Module "Logistics: fullfillment, crossdocking, own warehouse, points of PVZ" for CMS CS-Cart own online store
The module is designed for the marketplace to work on the format of full-fielding, crossdocking, dropshipping or trading from its own warehouse.
1) Formation of individual warehouses:
- < li>store's FTTH< li>store warehouse< li>crossdocking warehouse< li>fulfillment warehouse
2) Importing goods
Upload is carried out from the warehouse accounting program "1C": UT, UNF, ERP and other compatible, as well as from the standard module "Advanced Import" (CSV, XML). My Warehouse", "Business.Ru" will not require additional modifications.
My Warehouse", "Business.Ru".
3) Warehouse separation
The module takes into account the number of goods for each warehouse, as well as the price for the current warehouse. For example, for a warehouse in Vladivostok the price will be 100 rubles, in Moscow — 50 rubles. The buyer will see the minimum price of the warehouse and the warehouse balances. Information on warehouse balances is displayed for the buyer in the product card.
4) Checkout
The creation of warehouses by the seller is moderated by the marketplace administrator. It is possible to customize the types of warehouses for correct work of courier delivery services. The warehouse is subject to restrictions on the category of goods and dimensions and volume. Goods that do not fit the dimensions of the warehouse will not be able to be realized on the showcase of the marketplace.
Example: a product (a refrigerator and a T-shirt) can be placed in one order. The buyer will be able to place the goods with two different transportation companies: "Russian Post" for the T-shirt and "Delovye Linii" for the refrigerator. Thus the functionality of the module implies that for large-sized goods, which have a minimum and maximum size, can be configured methods of delivery by truck, for small-sized goods that require fitting, it is possible to use another courier service. Delivery of high risk goods (paint and varnish materials, combustible materials, etc.) is regulated by delivery by ground transportation only, as transportation of these goods by air is prohibited.
Thereby, the marketplace can identify warehouses for bulky goods, valuable goods, and high-risk goods, allocate between them different transportation and courier delivery services for proper operation of the marketplace.
Working with bar codes
The module generates barcodes for goods. For crossdocking or full-field warehouses, barcode/barcode generation for boxes and pallets is implemented.
.
Detailed step-by-step instructions for the module can be found at Maurisweb.ru/help - section "Help".
CONTAKTS
.
Actual information about changes in the module functionality, as well as compatibility with other modules is published in our Telegram channel and in the group VKONTAKTE
Telegram t.me/maurisweb
VKONTAKTE vk.com/maurisweb
You can submit a request to the support service, ask questions to managers about the work or modification of the module via messengers, group VKONTAKTE and e-mail.
- WhatsApp +7-923-364-90-07
- Telegram t.me/mauriswebru
- Telegram +7-923-364-90-07
- VCONTAKTE vk.com/maurisweb
- E-mail: info@maurisweb.ru
Detailed instructions for working with the module
The instructions are current at the time of publication. The module is regularly updated and improved. Minor differences in module management are possible.
Logistics: fullfill, crossdocking, own warehouse, PV points
The module visualizes the process of goods movement between the marketplace, sellers and buyers, facilitates the process of forming shipments from warehouse to warehouse and allows buyers to choose from which warehouse the goods will be delivered, taking into account its location and the price of the goods.
For information on compatibility with other modules, see product features - https://maurisweb.ru/programmy...
Module settings
1. Go to "Modules" → "Manage Modules"
.

2. Select a module from the list and click on its name.

3. On the page that opens in the "Licensing" section, enter the license key. The key will be sent to the e-mail address specified when purchasing the module. You can also view it in your account on the site www.maurisweb.ru in the list of purchased modules.
3. License key is sent to you by e-mail.

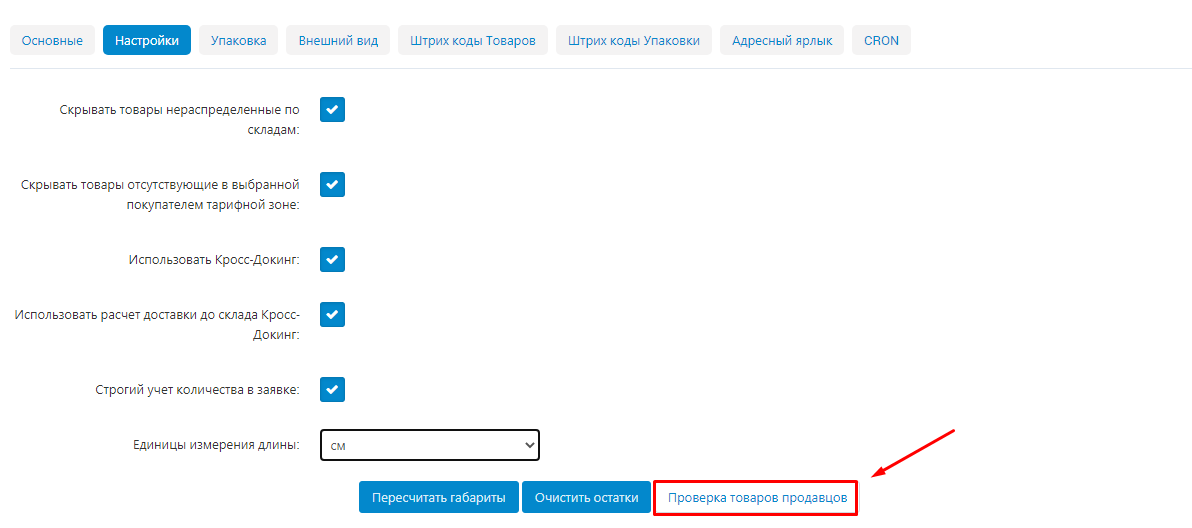
4. Go to the "Settings" tab. This section contains the main settings of the module.

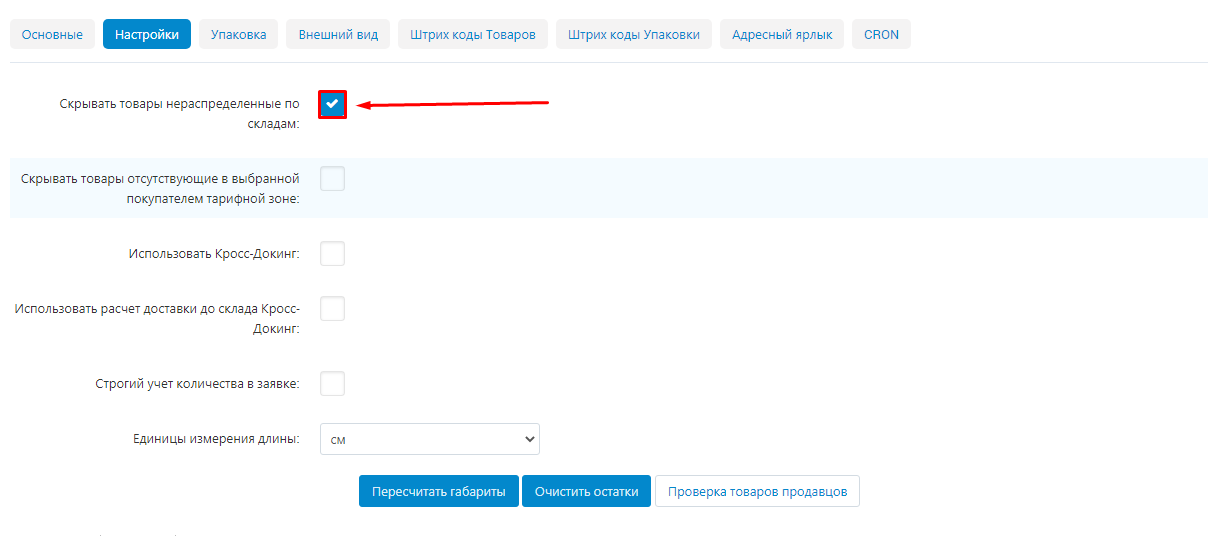
5. Check the "Hide items not allocated to warehouses" checkbox to display only those items in the storefront that sellers have put into warehouses.
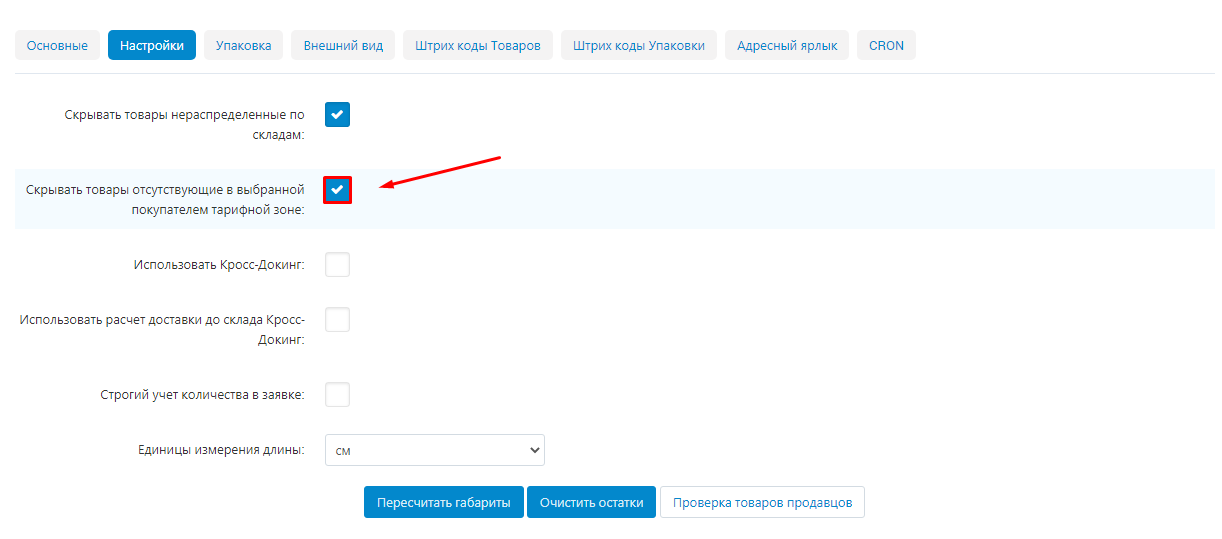
6. Check "Hide items not available in the customer's selected rate zone".
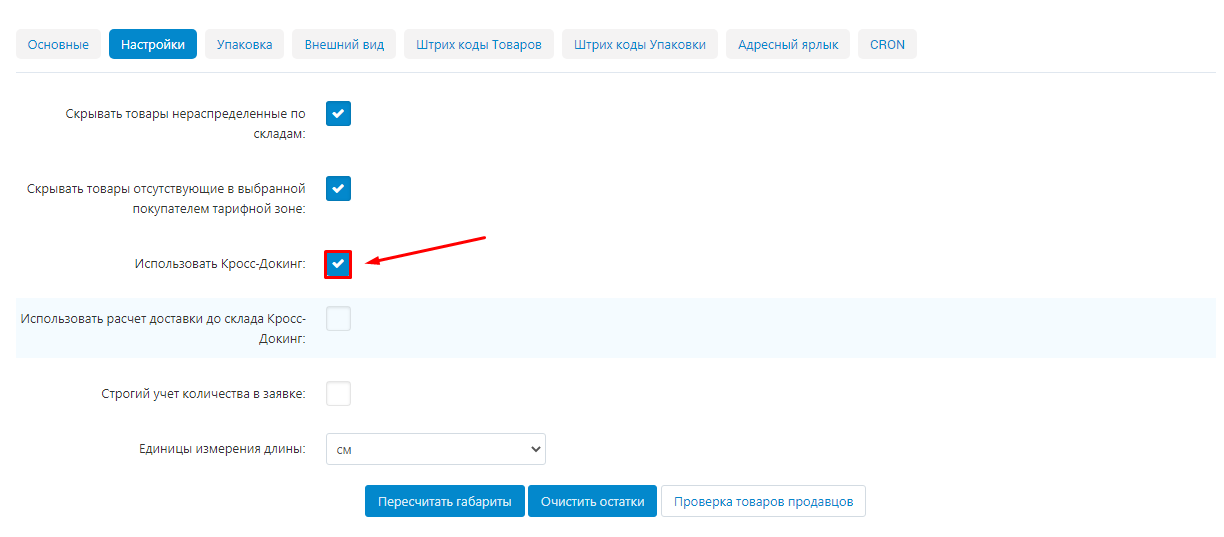
7. Check "Use cross-docking" to enable the option to use cross-docking.
.
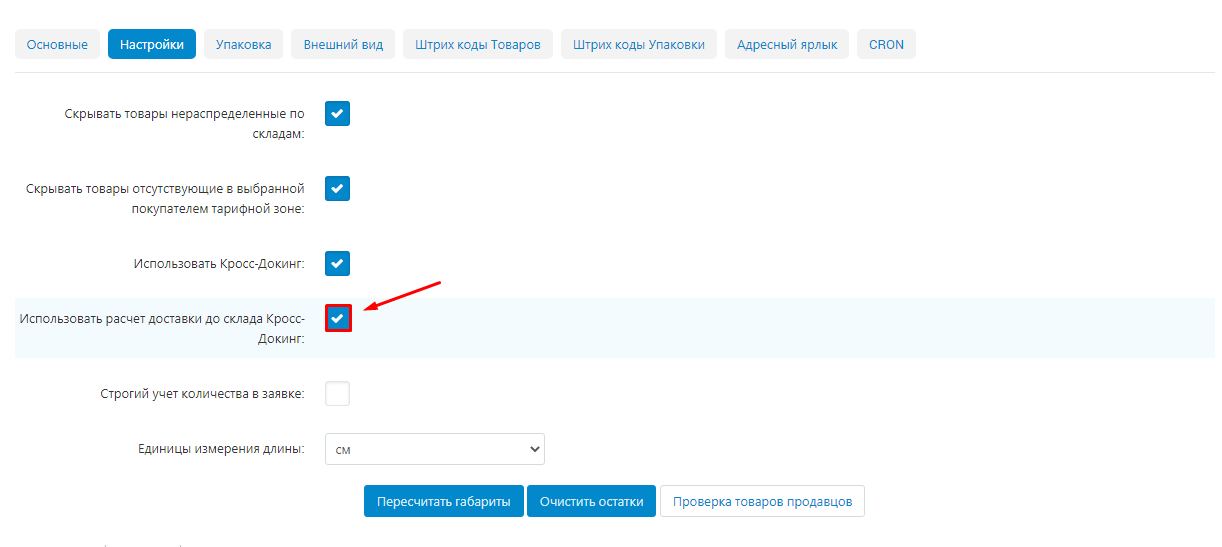
8. Check "Use shipping calculation to Cross-Docking warehouse" to account for shipping items to Cross-Docking and then to the customer when calculating shipping.
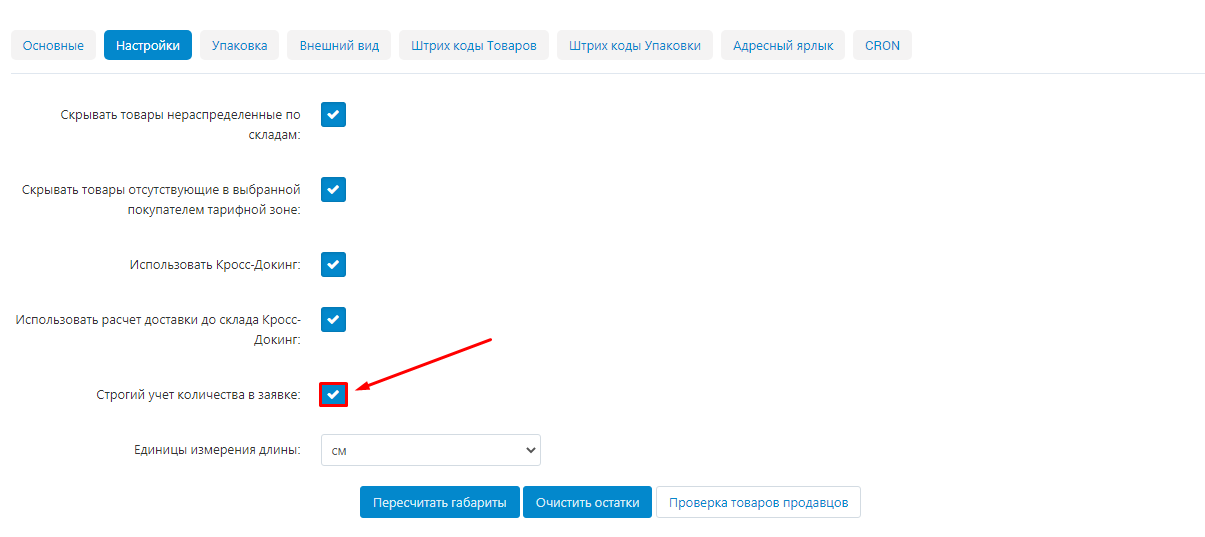
9. Check the "Strict accounting of the quantity in the order" checkbox to enable the module to check the total amount of accepted goods, rejects and shortages against the quantity of goods in the order.
10. Under "Units of Length" in the drop-down list, select the desired option from the following:
- < li>Cantimeters;< li>Meters.
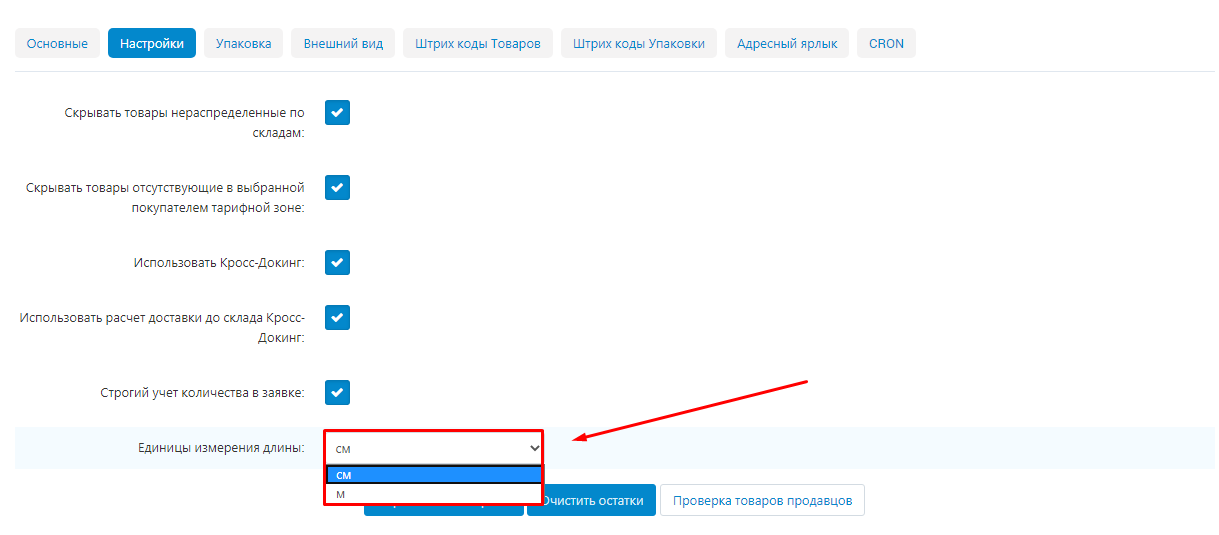
Units of measurement are necessary for accounting weight and dimensions of goods in warehouses and when calculating delivery. Weight units are defined in the CS-Cart platform.
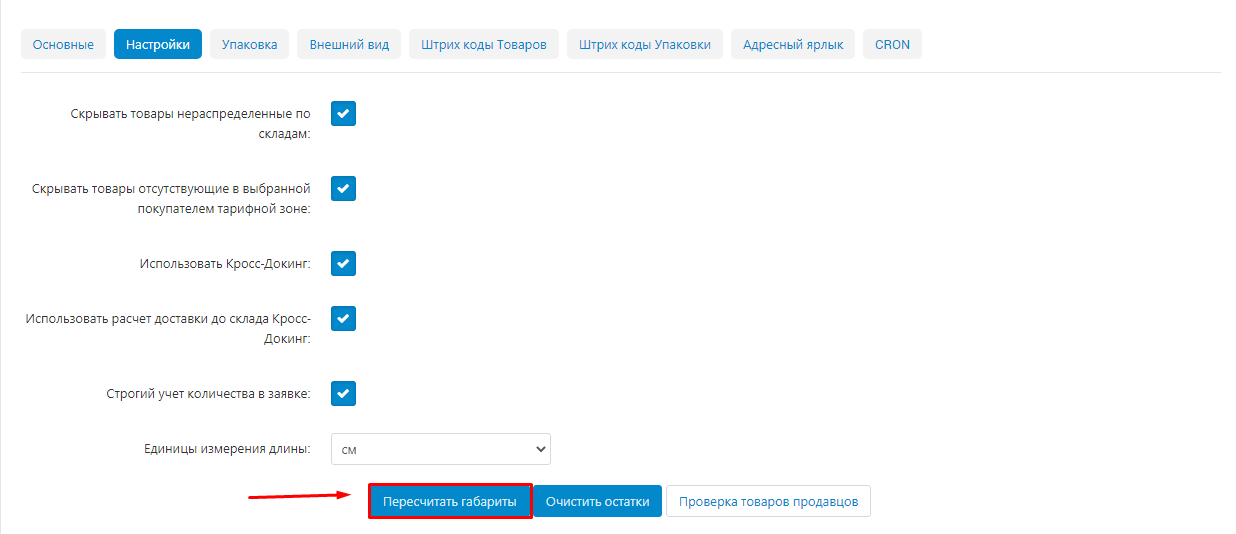
11. Click the "Recalculate dimensions" button to recalculate the dimensions of products that were added to the storefront before installing the "Logistics: full-fill, crossdocking, own warehouse, POZ points" module.
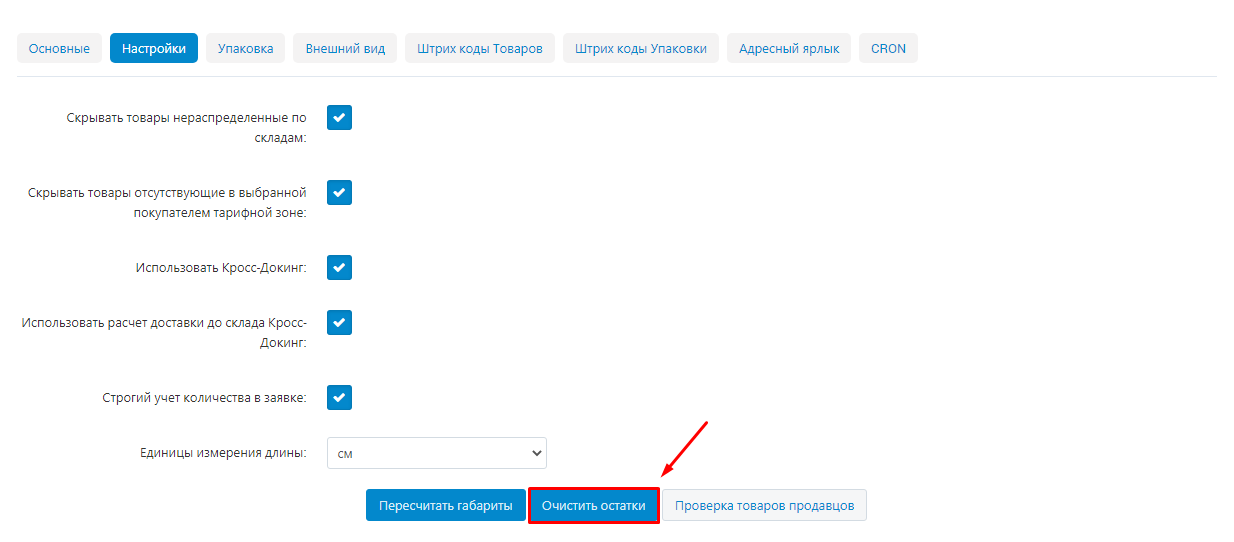
12. If necessary, click "Clear balances"
.
13. Click "Verify Seller Products" to have the algorithm check the tariff zones in which the products are available.
.
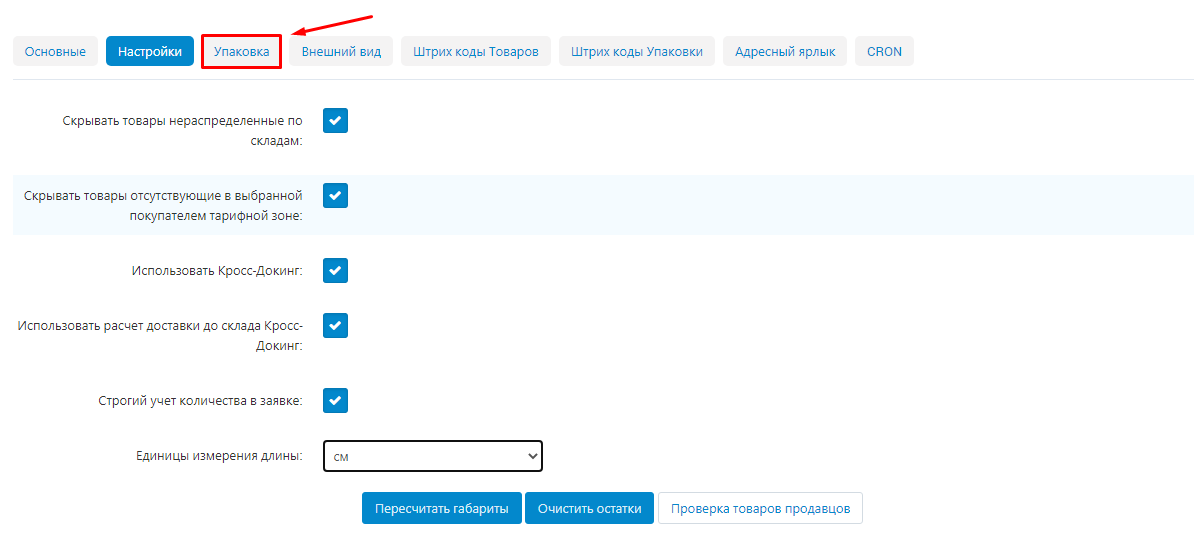
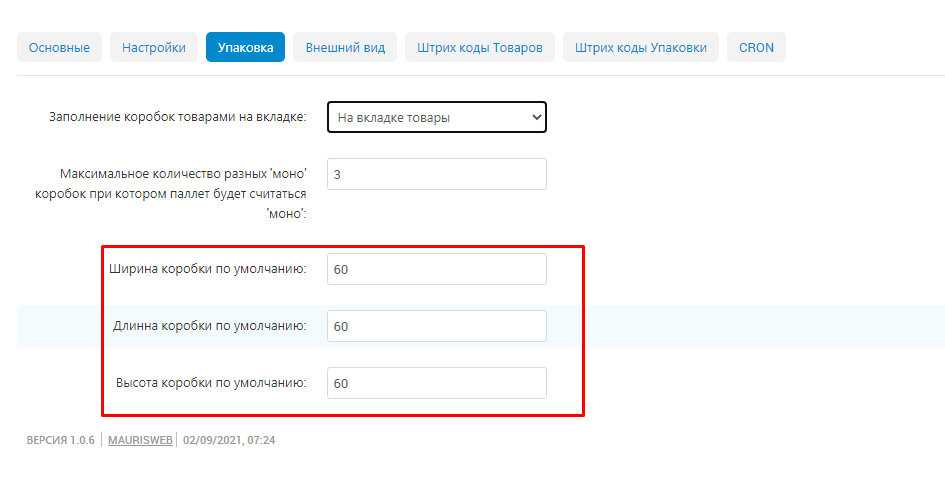
14. Click the "Packaging" tab. This section sets the location of the packaging tab and its settings.
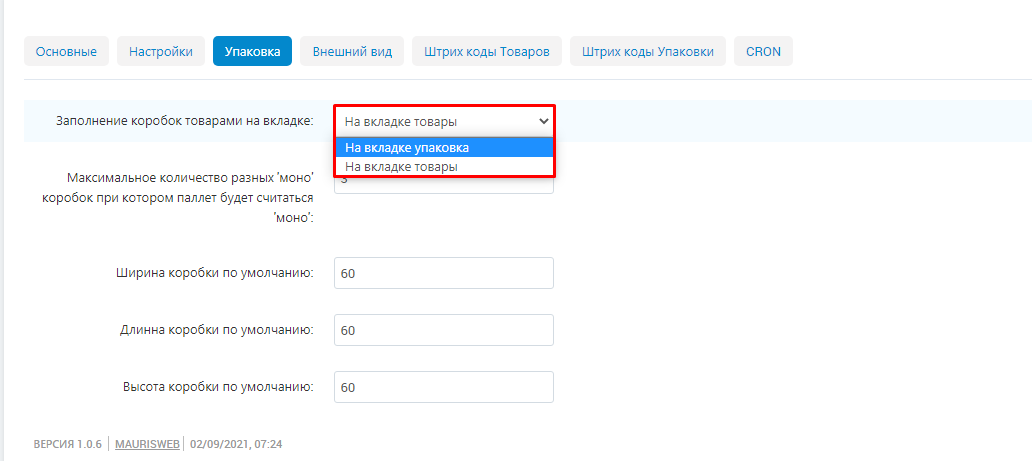
12. In the drop-down menu, choose which tab will be used to fill the boxes with goods:
.
- < li>On the "Packaging" tab;< li>On the "Goods" tab.
13. Specify the maximum number of different mono boxes at which a pallet will also be considered a mono pallet.
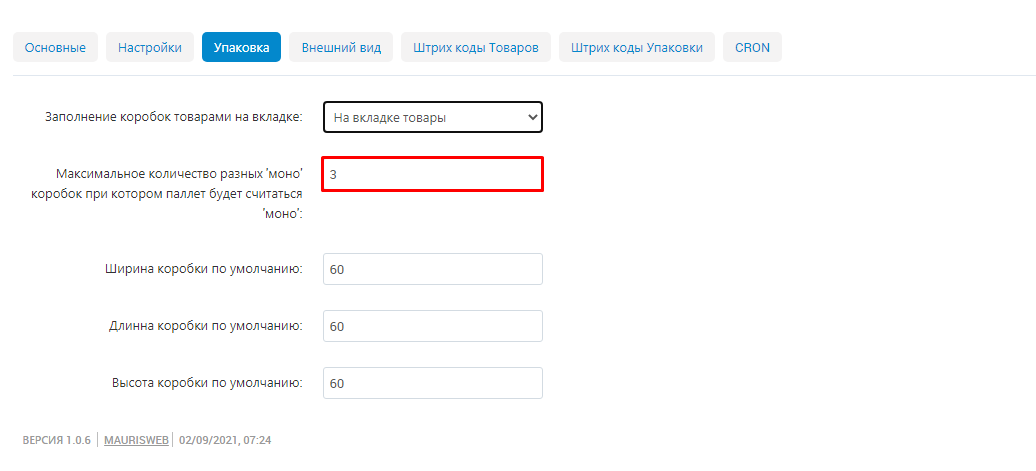
14. Specify the default box dimensions for packing goods when transporting goods to the Marketplace warehouse.
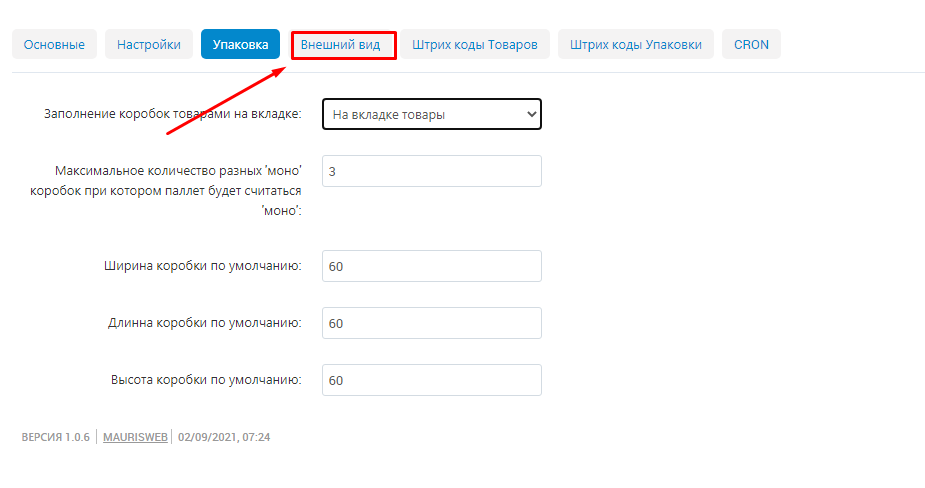
15. Click the "Appearance" tab. This section determines how the information about warehouses will be displayed in the product card in the storefront.
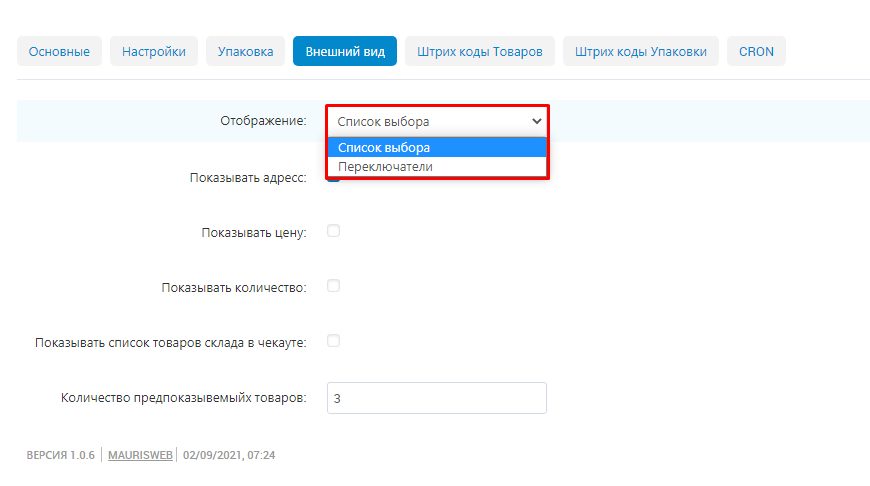
16. In the drop-down list, select the method for displaying the warehouse selection:
- < li>Select List;< li>Switches.
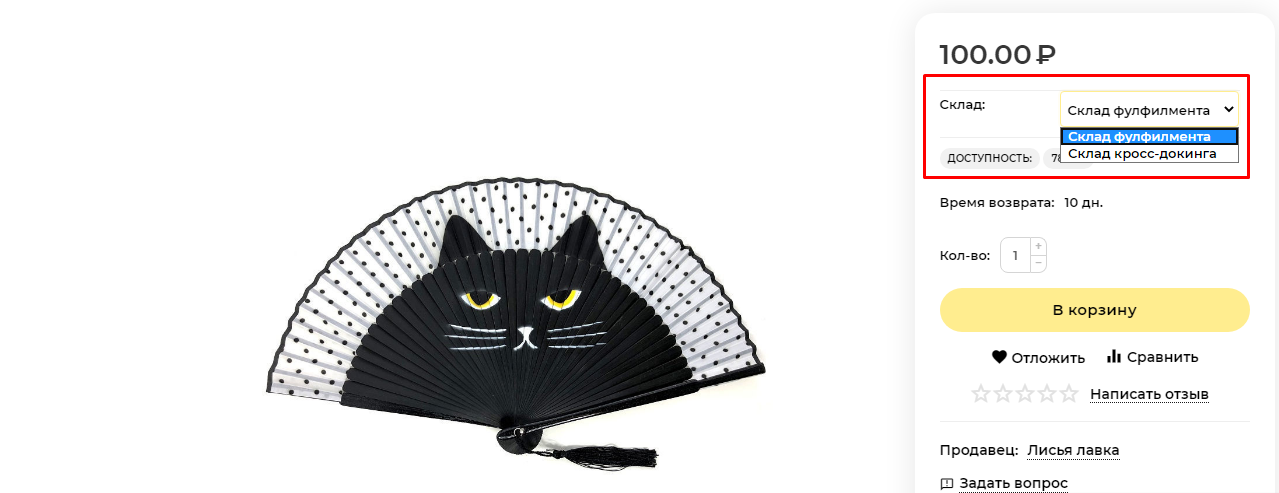
Example 1: A product card that displays a selection of warehouses as a pick list.
Example 2: A product card in which the selection of warehouses is displayed as a toggle.
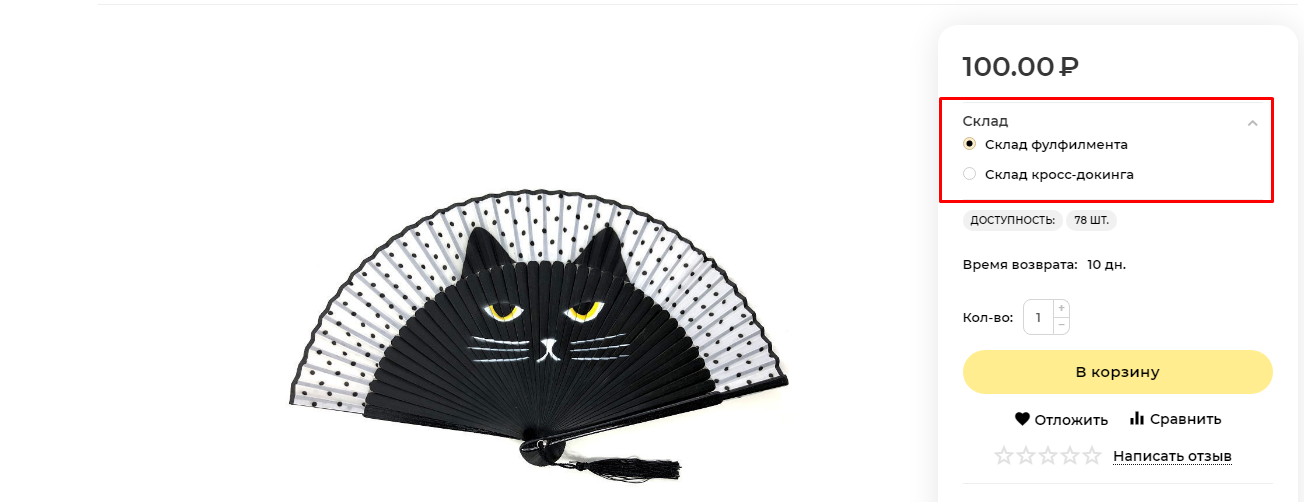
17. Check "Show address" to display the address of warehouses in the product card.
.
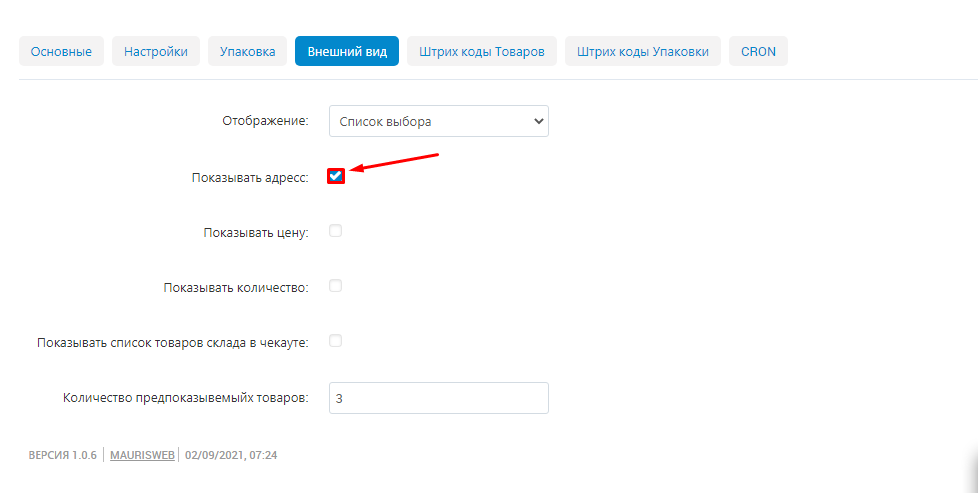
18. Check the "Show price" section to display the price for each stock in the product card. This will allow customers to select items with a more favorable price.
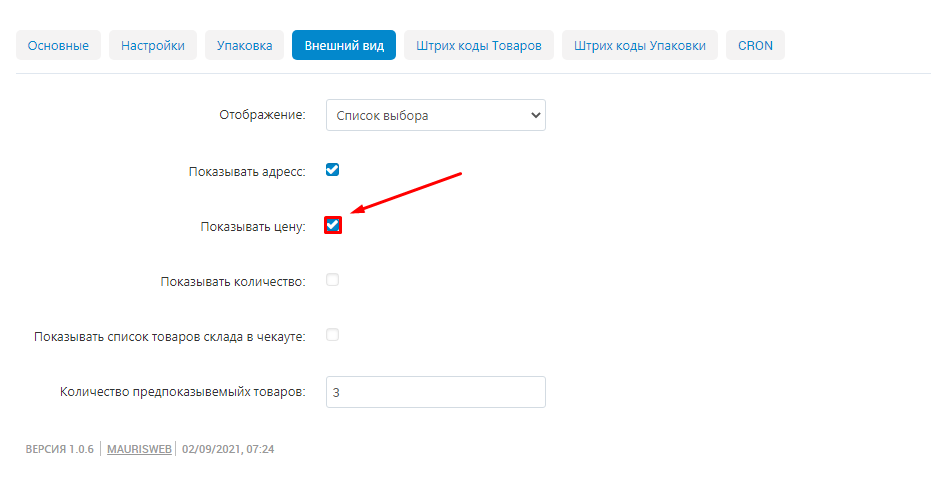
19. Check "Show quantity" to display the number of items in each warehouse in the product card. This is convenient if the customer needs to buy several pieces of a product, so he can orientate which warehouse has enough quantity of this product.
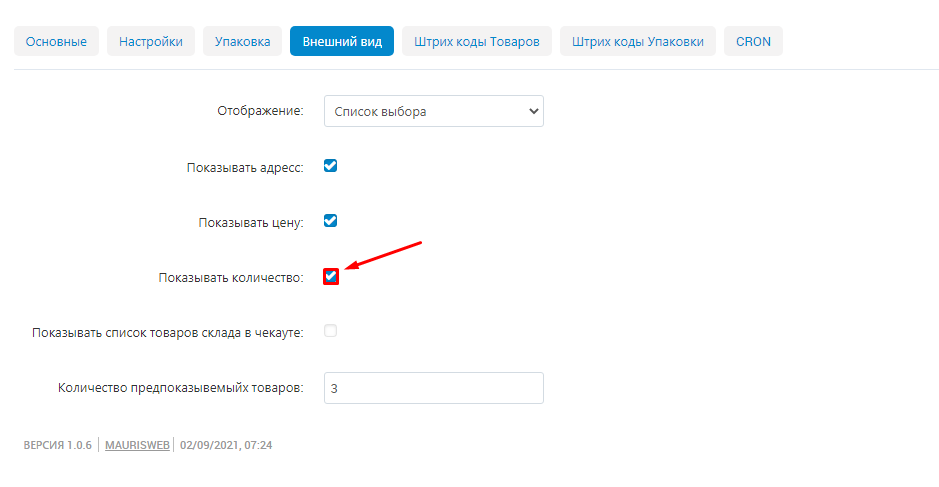
20. Check "Show list of warehouse items in checkout" to show the customer a list of items by warehouse when placing an order.
.
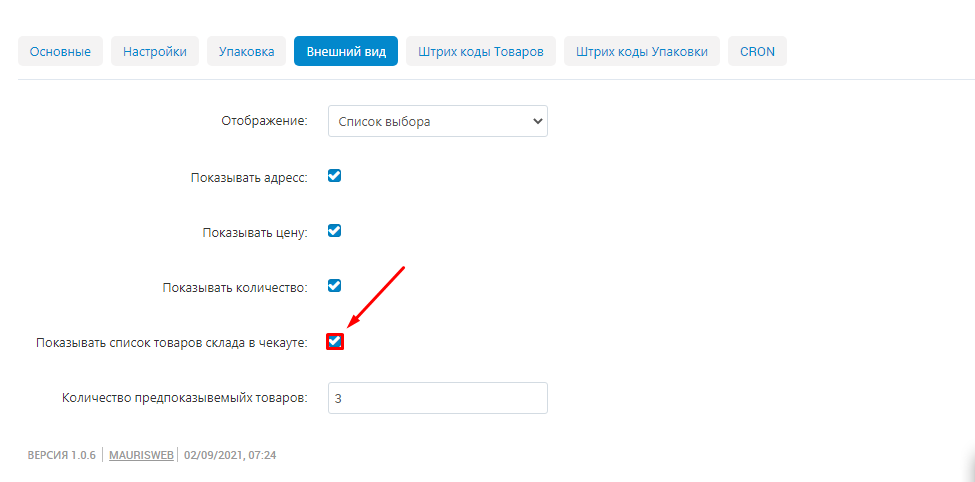
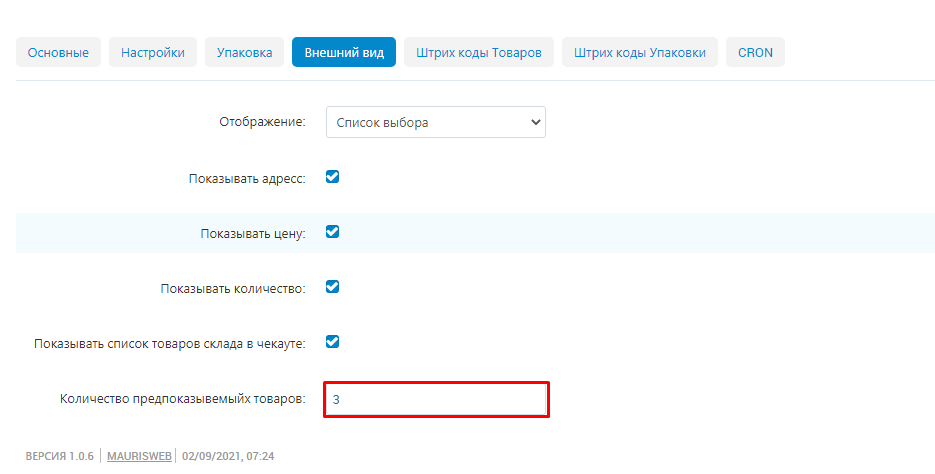
21. Specify the number of pre-show items in the checkout.
.
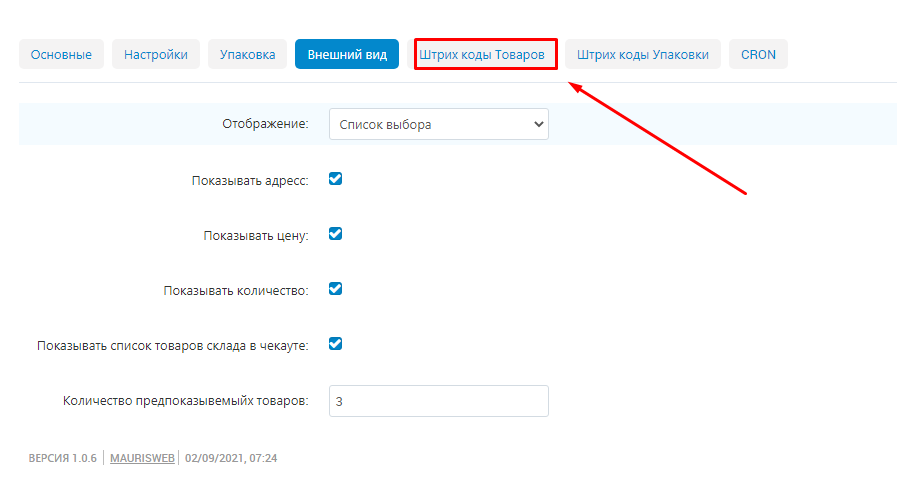
22. Click the "Product Barcodes" tab. This section defines how barcodes will be generated for the Marketplace products.
Note! For this module functionality to work, you need to have the CS-Cart standard module "Barcodes" enabled.
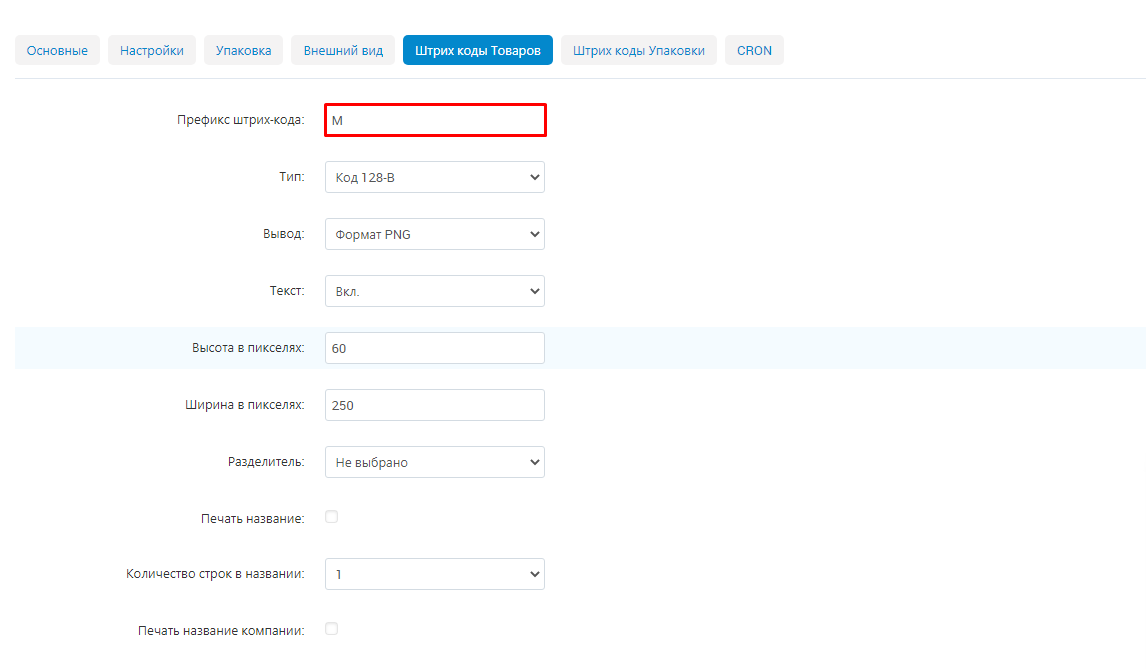
23. Specify the barcode prefix for your marketplace.
24. Select the encoding type from the drop-down list.
.
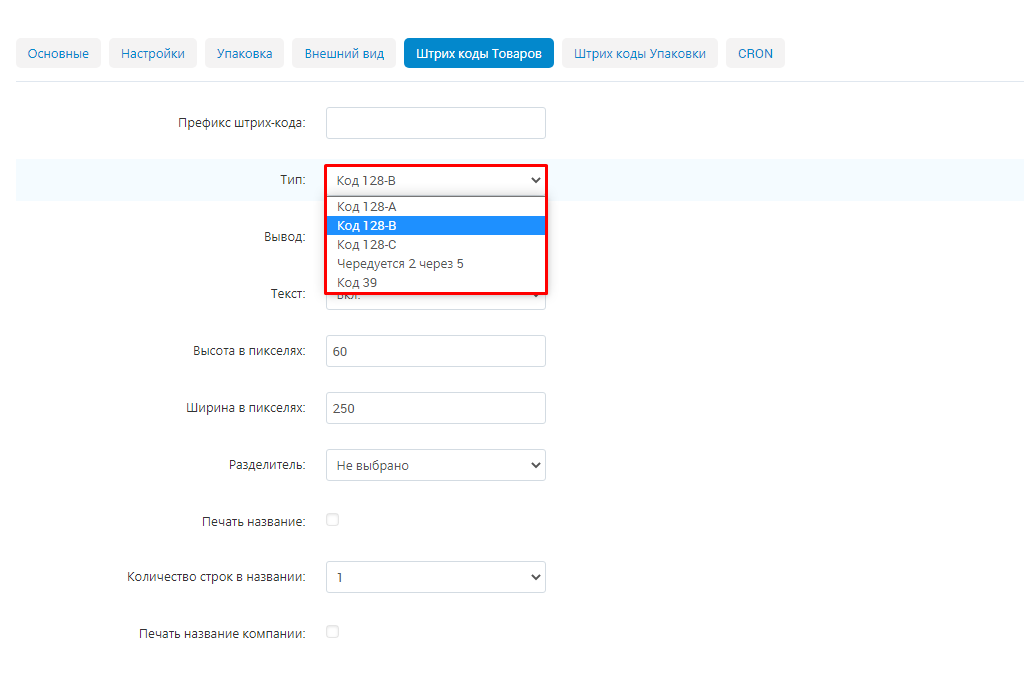
24.1. The specifics of the different types of coding are spelled out below.

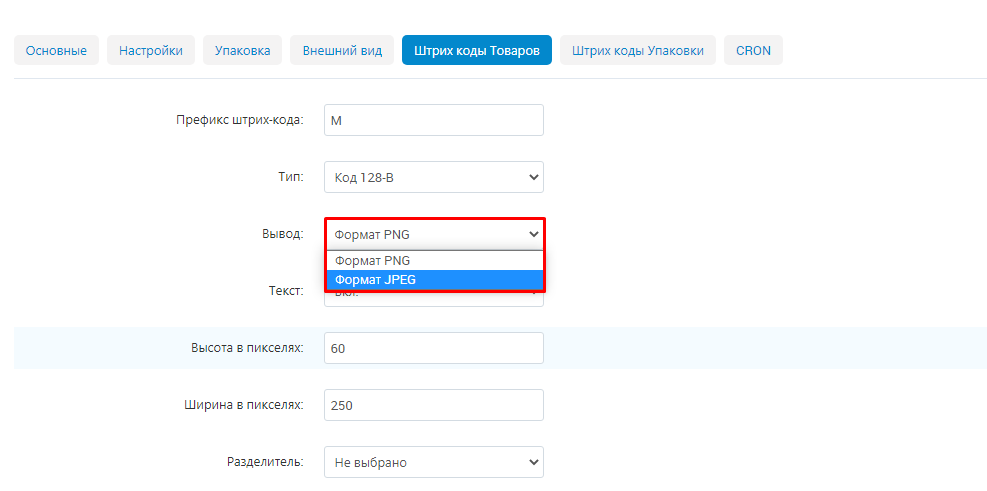
25. From the drop-down list, select the image file format for barcode upload:
.
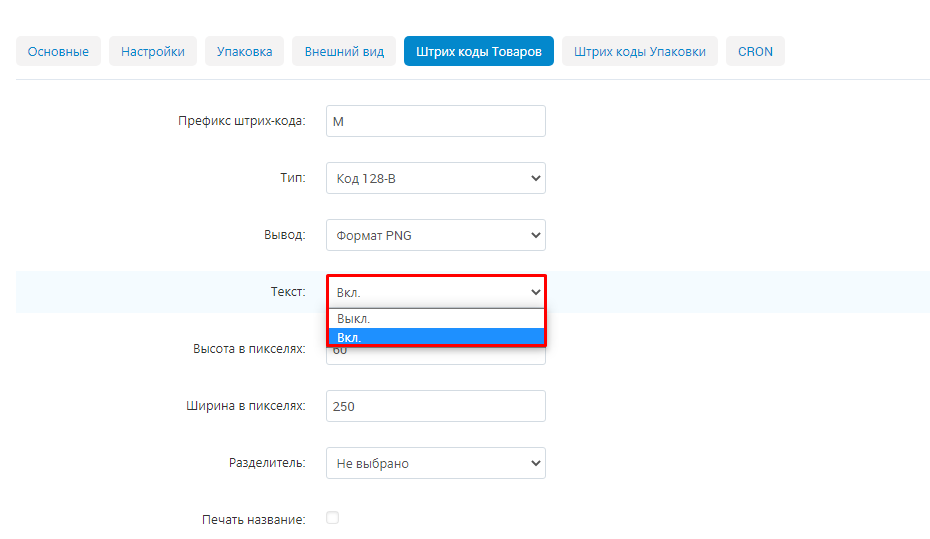
26. From the drop-down menu, select whether to display text on barcodes.
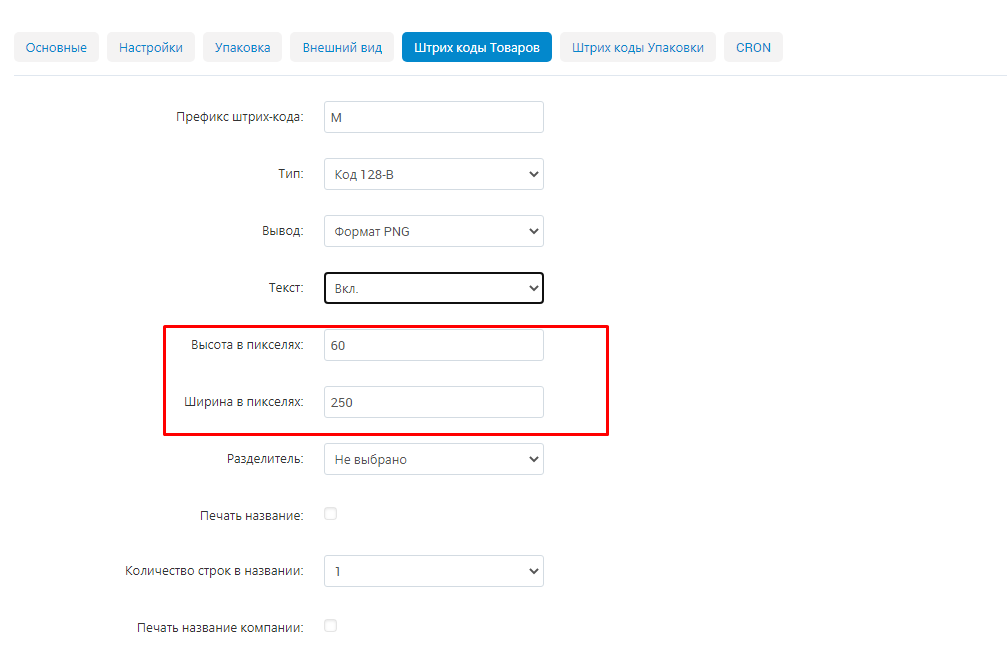
27. Specify the default height and width of the image in pixels. You can change these settings afterwards.
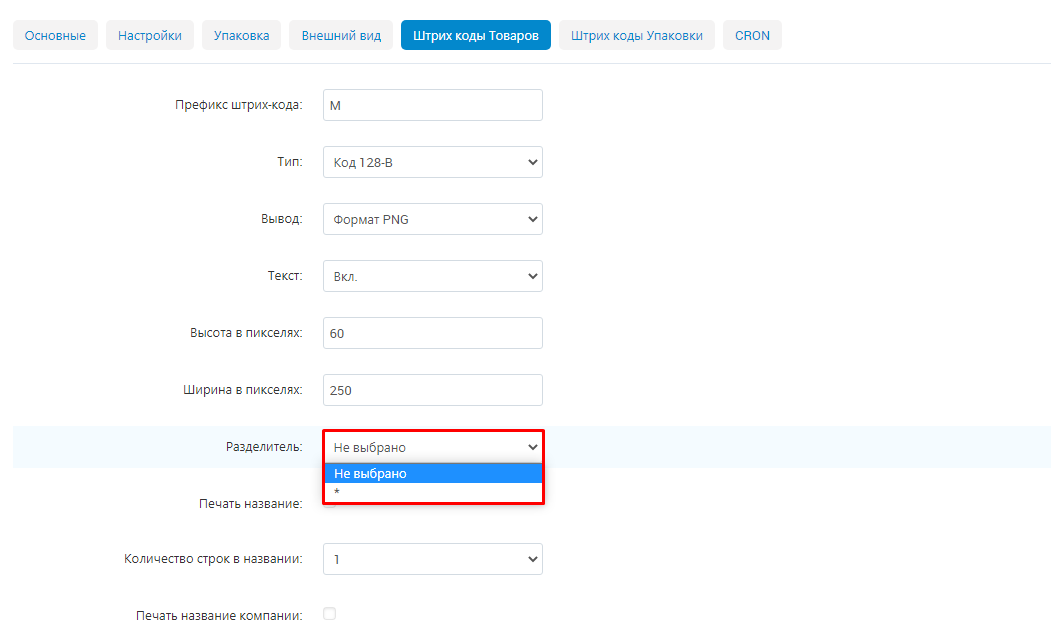
28. Select a separator from the drop-down list.
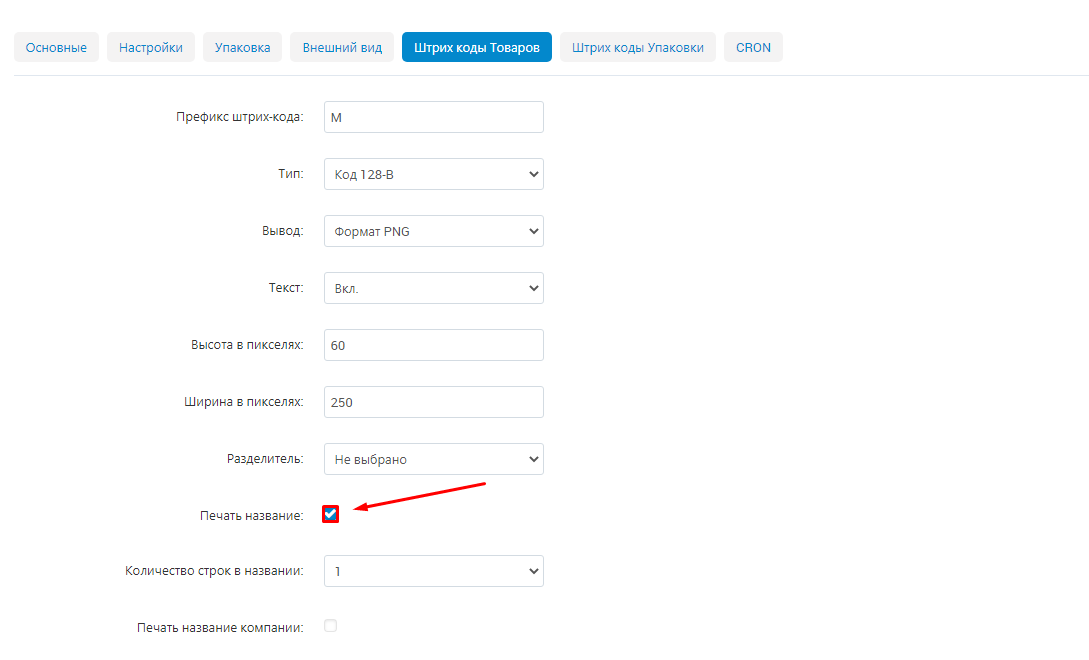
29. Check Print Title to print the product name on the barcode.
.
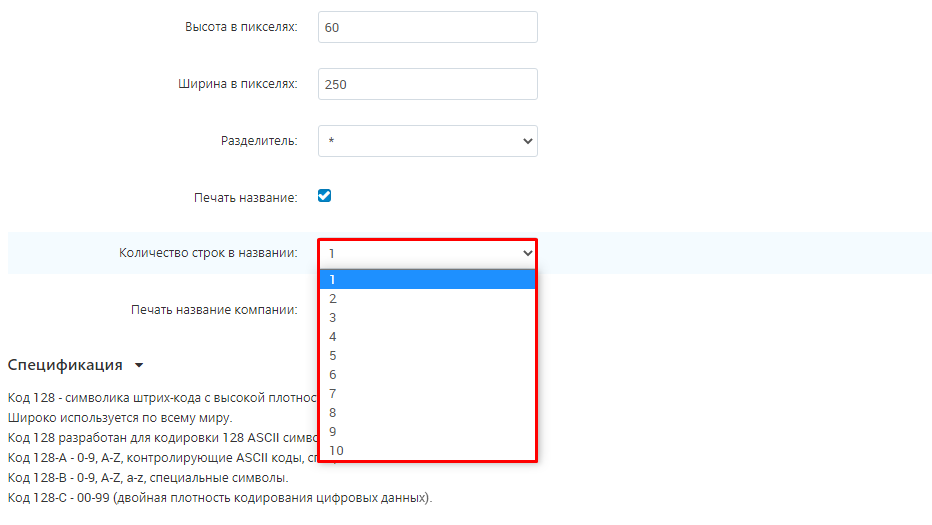
30. In the drop-down list, select the number of lines of the name to be displayed on the barcode. This is useful for long names that do not fit on one line.
31. Check "Print Company Name" to print the company name on the barcode.

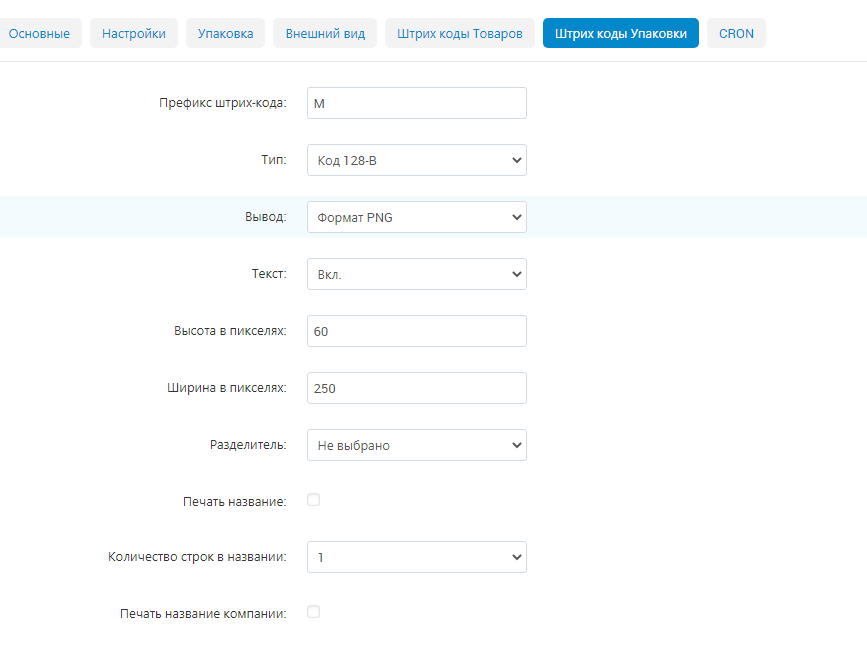
32. Go to the "Packaging barcodes" tab. In this section set the parameters of barcodes for the boxes in which the goods are packed for delivery to the Marketplace warehouse.

33. The packaging barcode settings are completely identical to the product barcode settings. Repeat steps 23-31.
34. Go to the "CRON" tab. In this section you can customize the frequency of regular actions of the module, such as mailings, exporting barcodes, deleting completed requests, and so on.

35. Check the "Move only by cron" checkbox to ensure that all goods movements between warehouses performed by the module will only take place according to the schedule predefined in CRON.

36. In the drop-down list, select the period for deleting completed goods movement requests.

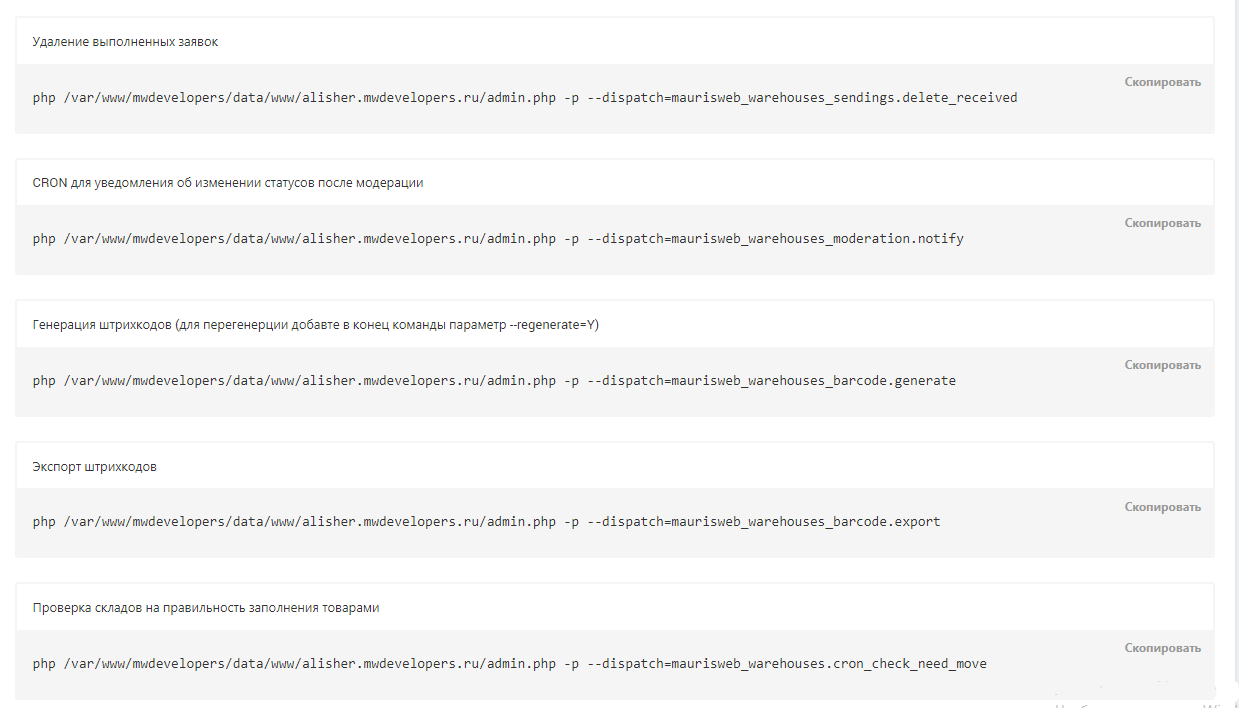
37. The following are CRON commands for various regular actions. to set the frequency of these actions. move the desired command to the CRON scheduler. List of regular actions:
- < li>delete completed requests;< li>notifications about moderation status changes;< li>generate and re-generate barcodes;< li>export barcodes;< li>check warehouses to see if products match the warehouse category.
Privilege Settings
Administrator
.
1. Go to "Customers" → "User Groups".
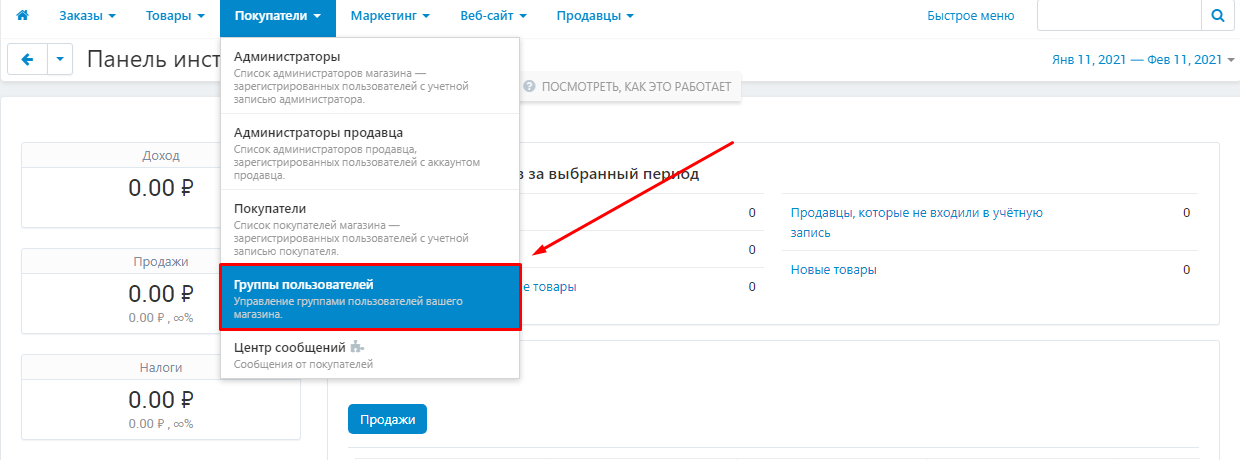
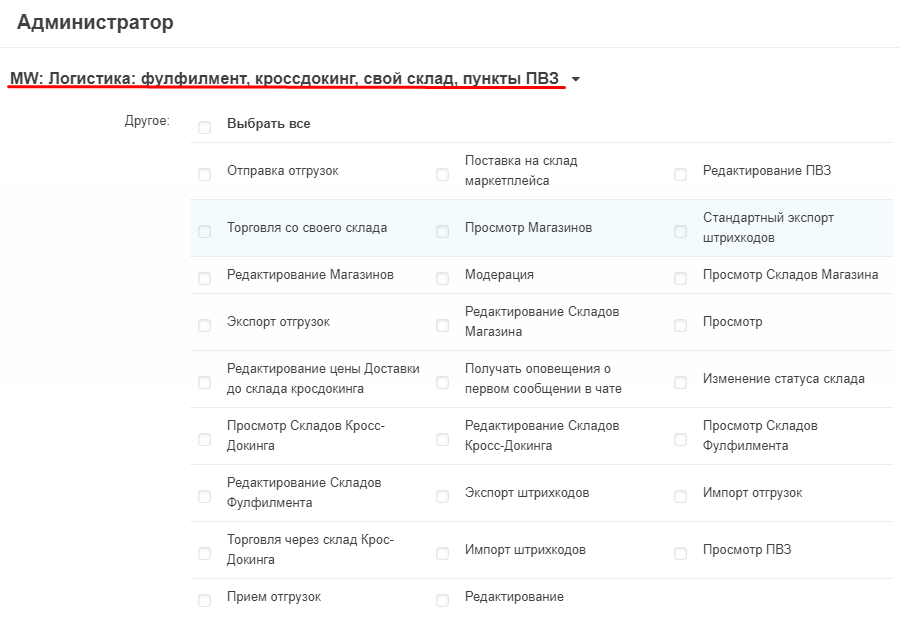
2. Select the group "Administrator" in the list of groups. The name of the group can be different, but the main thing is that the group type must be "Administrator".

3. Find in the list of privileges to the module "Logistics: full-fill, crossdocking, own warehouse, POZ points".
4. Check the following privileges:
- < li>View (stores, warehouses, POZs, etc.): the administrator has the right to view stores, POZs and specified warehouses;< li>Edit (stores, warehouses, POZs, etc.): the administrator has the right to edit information about stores, POZs and specified types of warehouses;li>Shipments (shipment, import, export, receipt, delivery).): administrator has the right to edit information about stores, ПВЗ and specified types of warehouses;< li>Shipments (shipment, import, export, receipt, delivery): administrator has the right to view shipments and change their status to the specified;< li>Import and export barcodes: administrator has the right to import and export barcodes;< li>Change warehouse status: administrator has the right to change the statuses of warehouses.
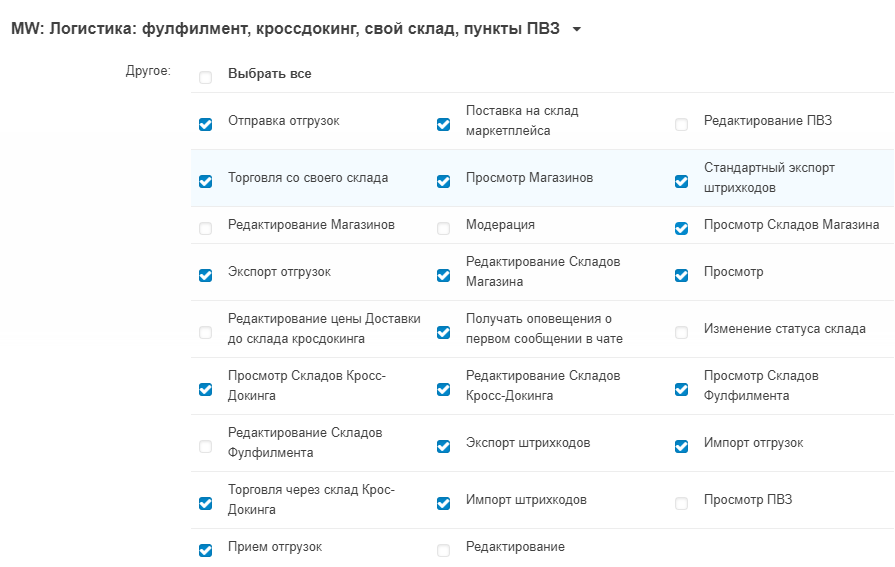
5. Check the checkbox "Select All" to set all privileges.
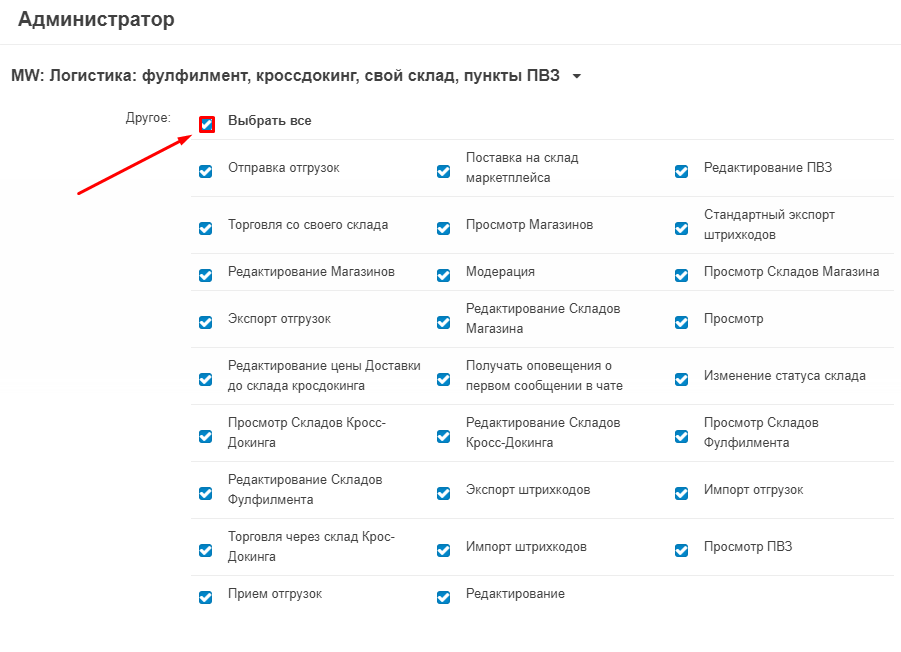
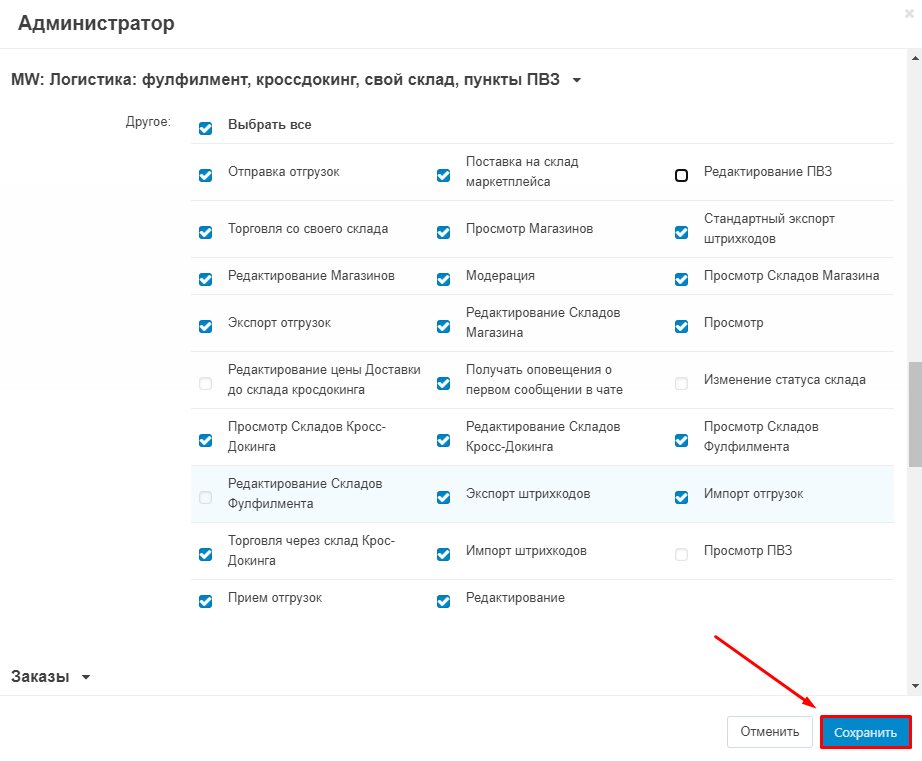
6. Once again, make sure that all the checkboxes are checked correctly and click "Save"
.
Seller
.
Note: the "Seller Privileges" module must be installed to set up seller privileges.
1. Go to "Customers" → "User Groups".
2. Select the group "Seller" from the list of groups. The name of the group can be different, but the main thing is that the group type must be "Seller".

3. Find in the list of privileges to the module "Logistics: full-fill, crossdocking, own warehouse, POZ points".
4. Check the following privileges:
- < li>View (stores, warehouses, POZs, etc.): the seller has the right to view stores, POZs and specified warehouses;< li>Edit (stores, warehouses, POZs, etc.): the seller has the right to edit information about stores, POZs and specified types of warehouses;li>Shipments (shipment, import, export, export, receipt, delivery).): the seller has the right to edit information about stores, PVZ and specified types of warehouses;< li>Shipments (shipment, import, export, receipt, delivery): The seller has the right to view shipments and change their status to the specified;< li>Import and export barcodes: the seller has the right to import and export barcodes;< li>Change warehouse status: the seller has the right to change the statuses of warehouses.
5. Check Select All to set all privileges.
6. Make sure all the checkboxes are checked correctly again and click Save.
Module functionality
Warehouses
.
The warehouses are divided into several types:
- < li>PVZ: a point of order delivery, where a buyer can come and receive previously ordered goods;< li>Shop: a real store, where a buyer can come to receive pre-ordered goods or buy his favorite goods on the spot;< li>Shop warehouse: A warehouse where goods are stored and deliveries are made to PVZ, cross-docking or full-field;< li>Cross-docking warehouse: a warehouse where goods are received from sellers for packing and shipping to the customer;< li>Full-field warehouse; a warehouse where a seller's goods are stored when trading from a marketplace warehouse.
The first three types are created by the sellers, and the last two are created by the administrator.
Trading in different ways and with different categories of goods may require the creation of several virtual warehouses for one physical warehouse. In this case, you must specify the physical warehouse.
Warehouse Categories
Warehouse categories are necessary to distinguish between goods with different storage and delivery conditions. A separate category can be for bulky goods, food, jewelry, and so on.
1. Go to "Administration" → "Warehouses and Shipments" → "Warehouse Categories."
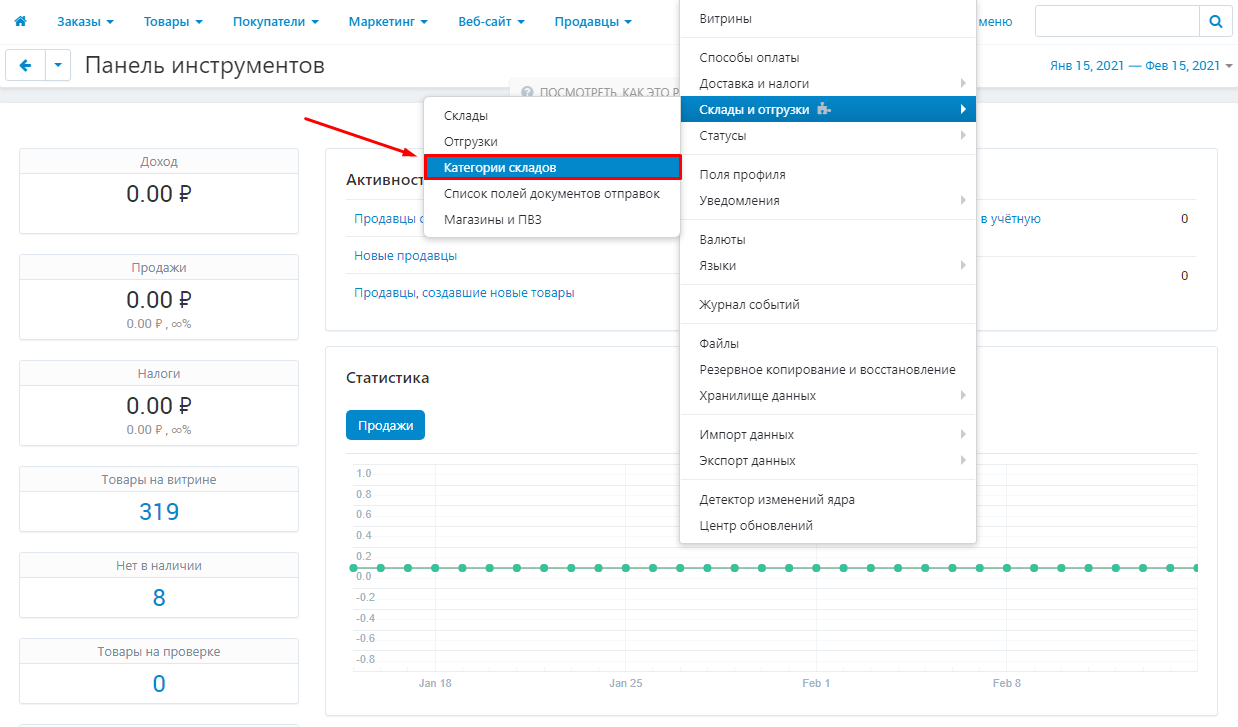
2. Click on the plus button in the upper right corner.

3. Type the name of the category.

4. Fill in the minimum and maximum allowable dimensions:
- length;
- width;
- height;
- volume;
- weight.
Fill in the dimensions based on the requirements of your shipping service. If there is no minimum or maximum limit on any of the dimensions, please enter 0.
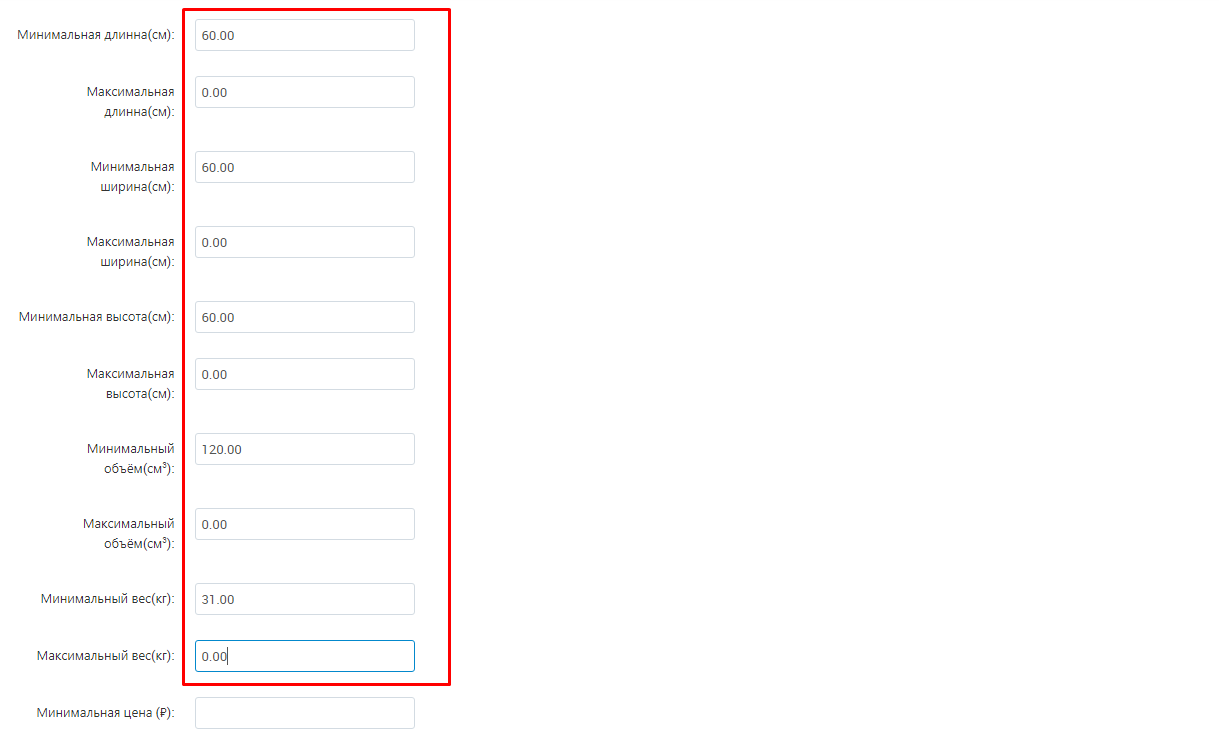
5. Specify the minimum and maximum price of the product for this stock category.

6. Click the "Categories" tab.
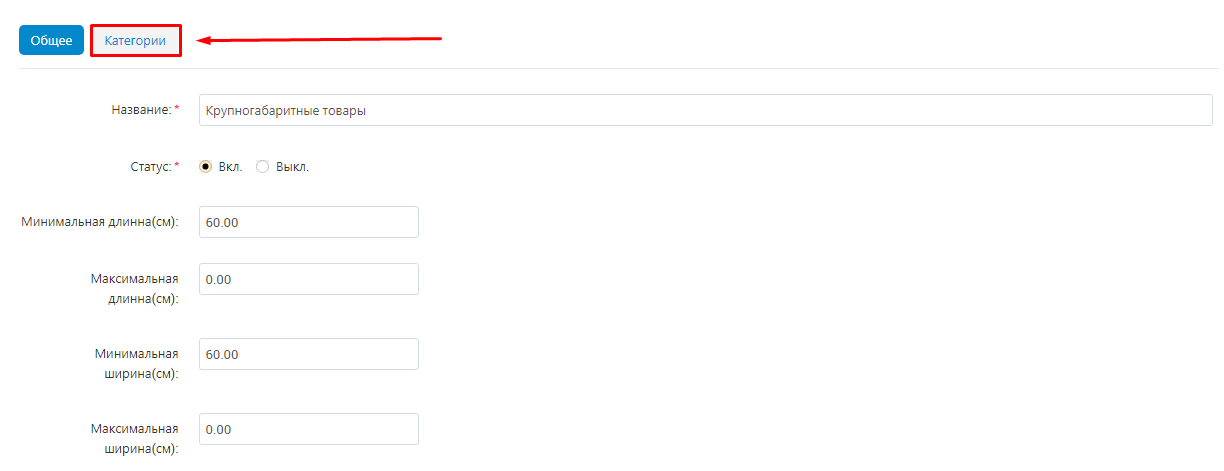
7. Click the list button under "Include Categories" to select the categories you want to include in the list.

8. Check the boxes next to the desired categories.
Note! If you add a parent category to the list, the setting will automatically apply to all nested categories as well. If necessary, add nested categories that should not be available to warehouses of a given category to the exclusion list. < img src="https://maurisweb.ru/images/companies/1/2021_new_instructions/Logistic/MW/functionality/warehouse_category/008.png?1617847741004" alt="008.png?1617847741004">
9. Check the box above the list of categories to select all categories.
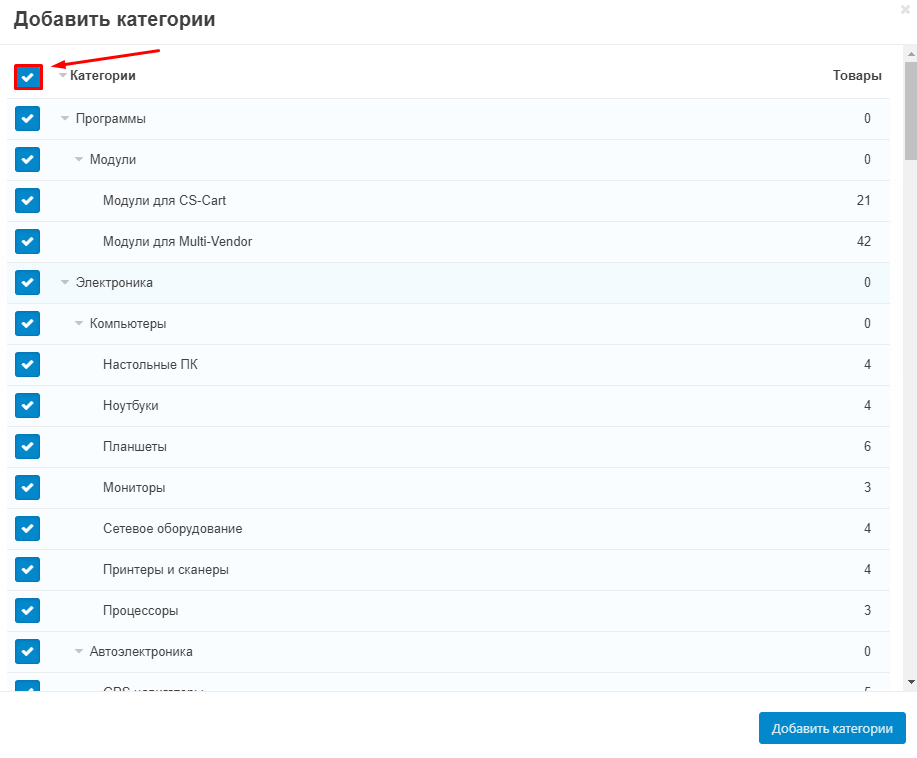
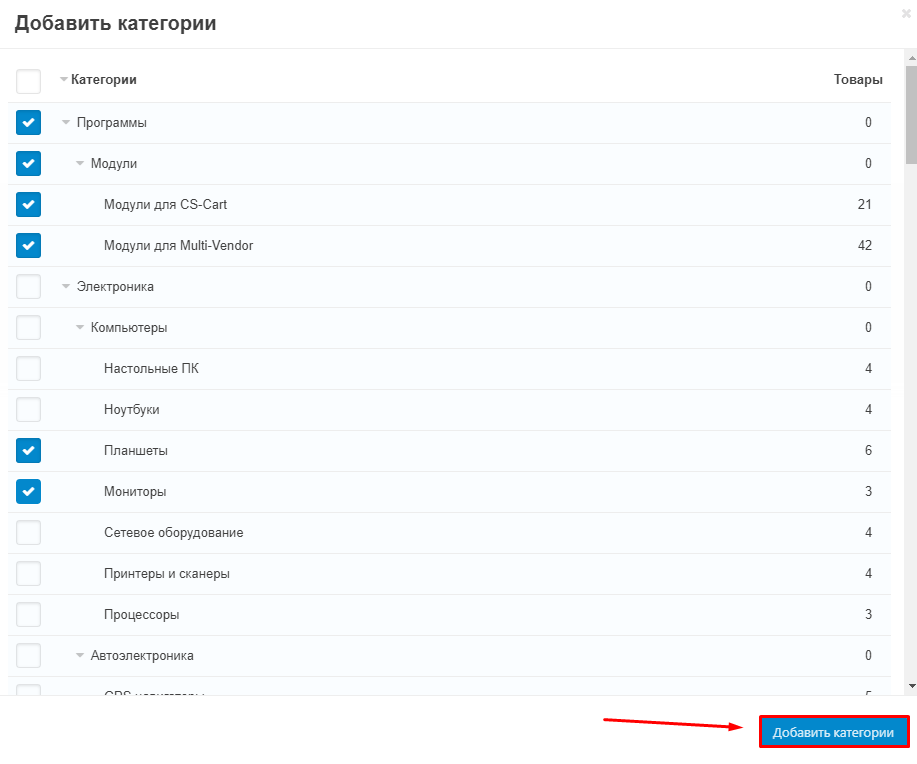
10. Once again carefully check that the categories have been selected correctly and click on the "Add Categories"
.
11. Click on the list button under "Excluding Categories" to select the categories you want to exclude from the list.
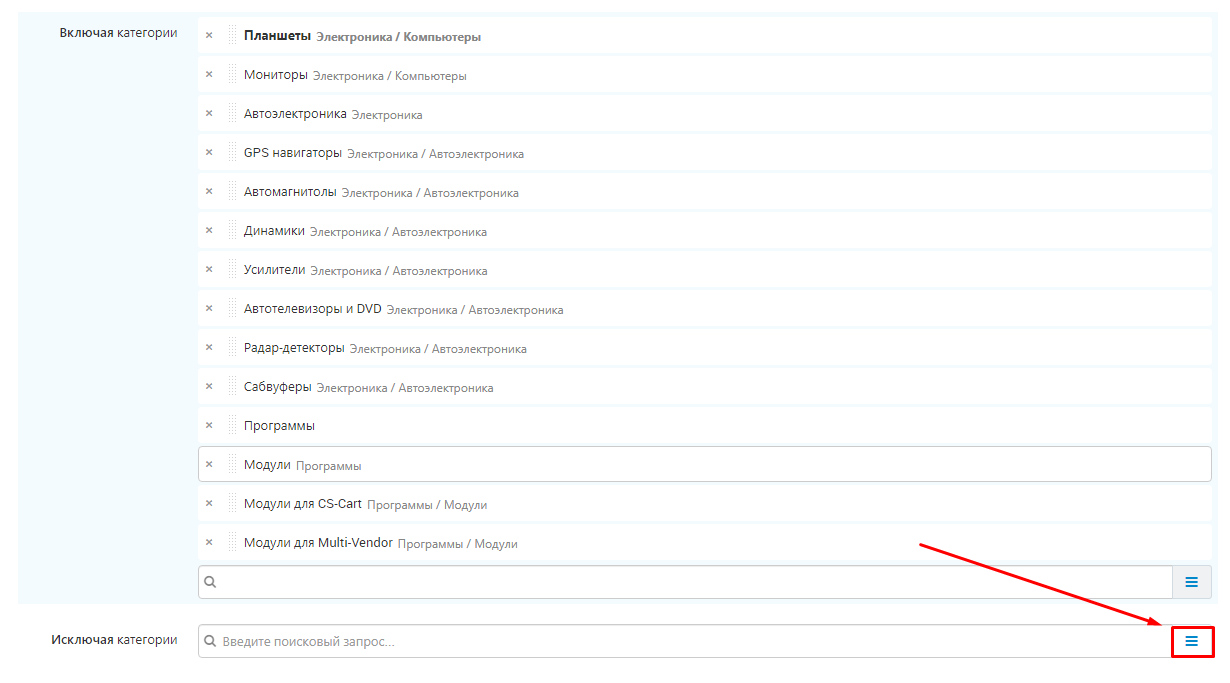
12. Check the box next to the categories you want to exclude.
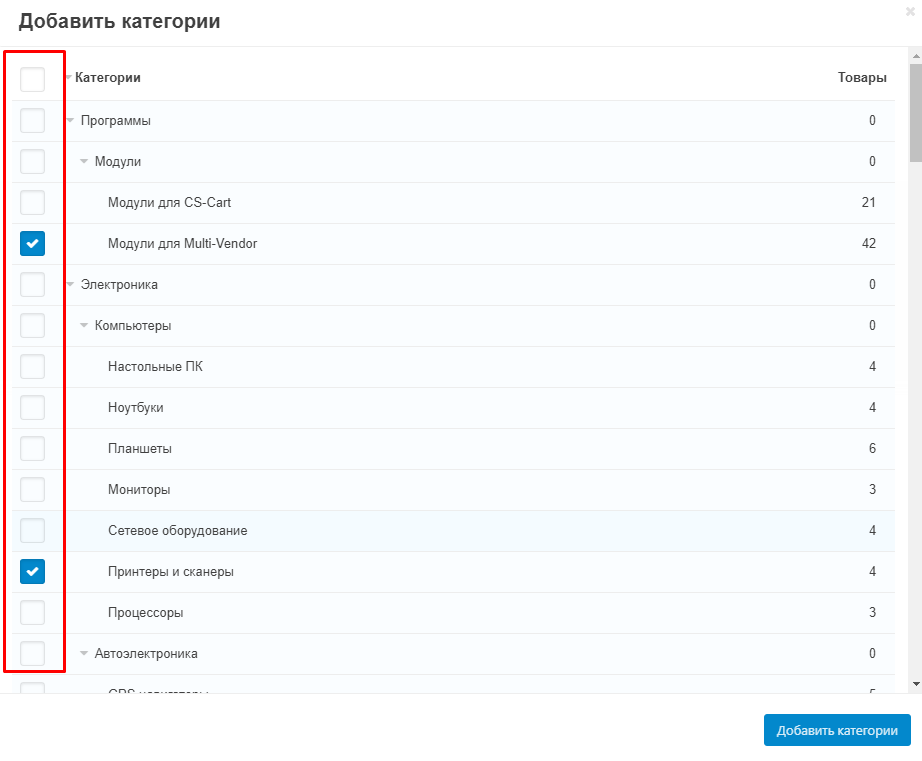
13. Once again, carefully check the correct categories and click on the "Add Categories" button.
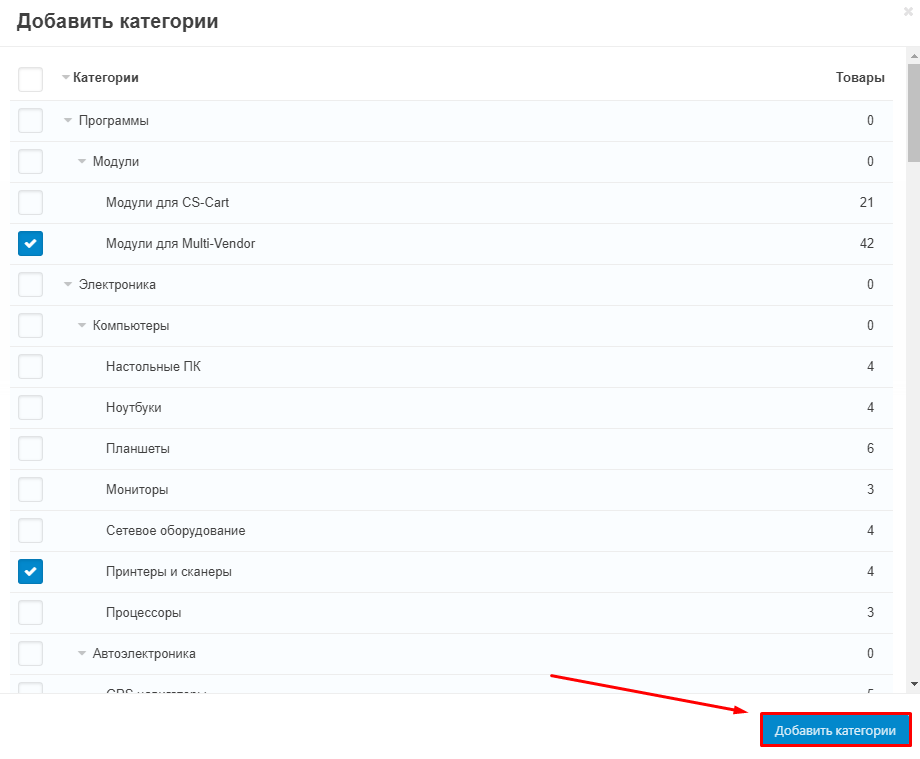
14. Click "Create" in the upper right corner.

.
Creating warehouses
.
Creating cross-docking warehouses by admin
General
.
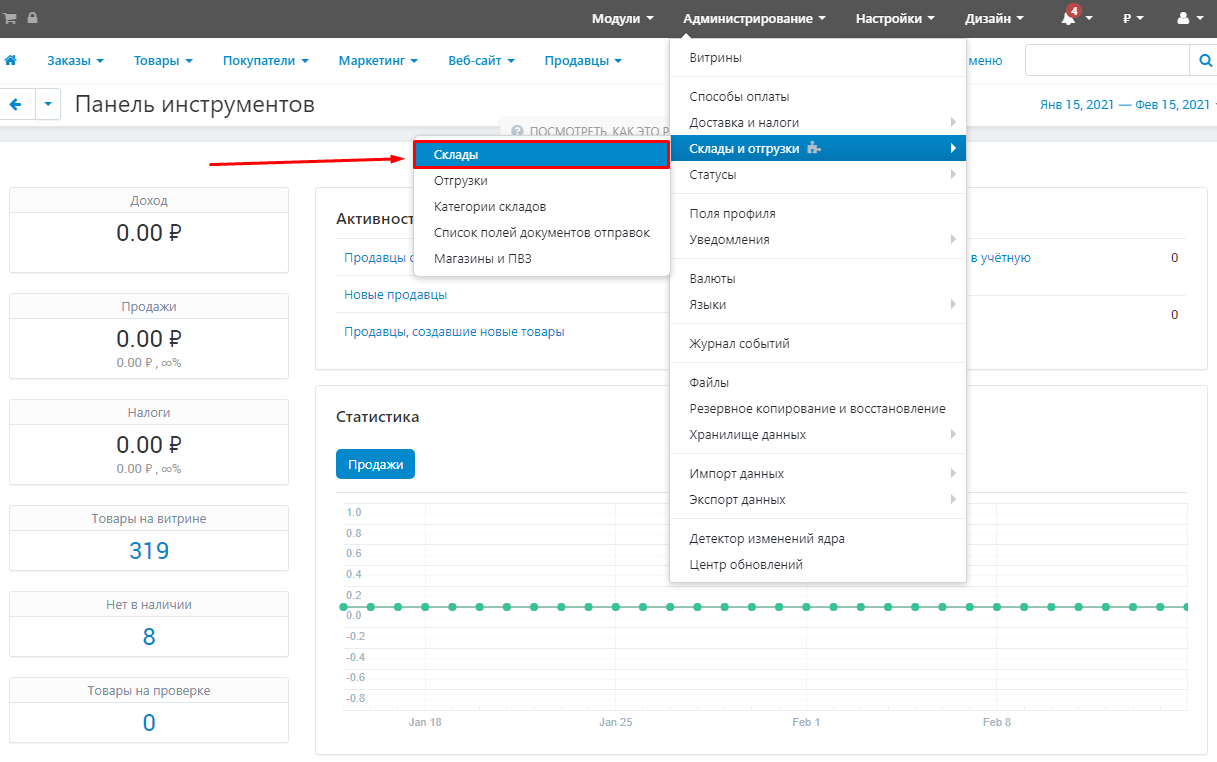
1. Go to "Administration" → "Warehouses & Shipments" → "Warehouses."
2. Click on the "Add Warehouse" button in the required section.
Note: When creating any type of warehouse from the administrative panel of the Marketplace, all possible settings are available to you. The description of creating a warehouse of each type shows only the settings required for that type of warehouse.
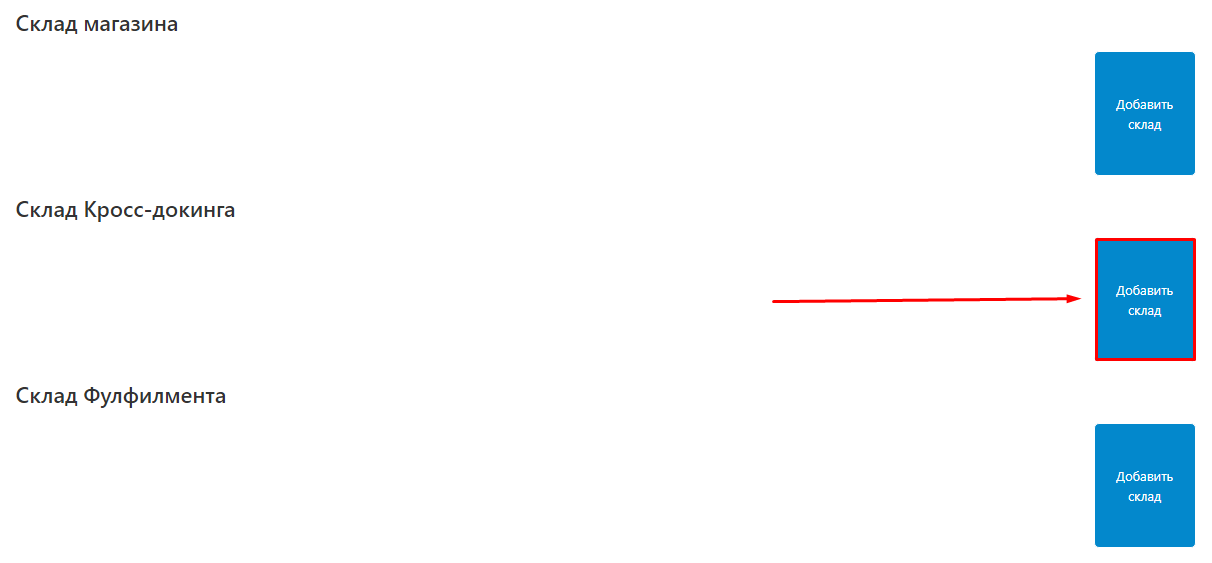
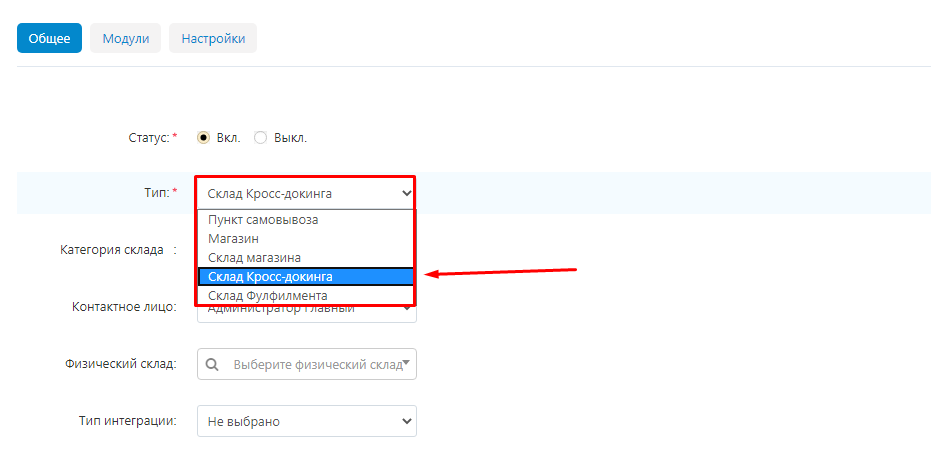
3. The already selected warehouse type will be displayed in the default type field. If necessary, it can be changed by selecting the desired item in the drop-down box.
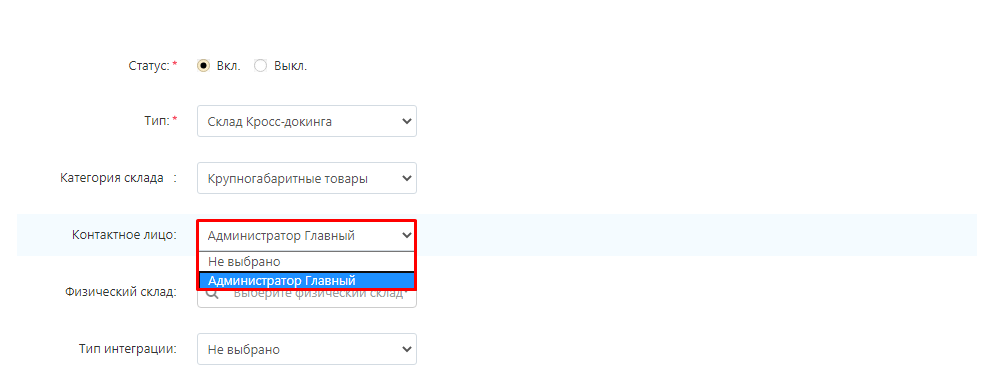
4. Select a warehouse category from the previously created ones.
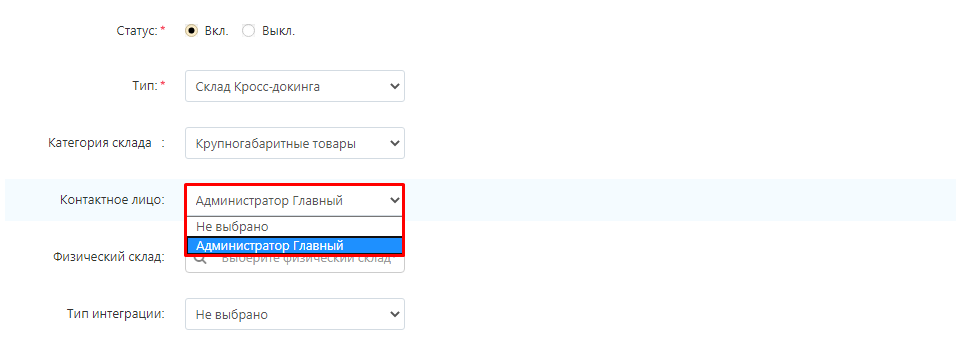
5. In the "Contact person" field, specify the administrator responsible for the work of the warehouse. All administrators of the marketplace will be displayed in the drop-down menu in this field.
6. If necessary, specify the name of the physical warehouse.
Note: Warehouses should not be mutually linked to each other. One of the warehouses binds to the second warehouse, the second warehouse's "Physical Warehouse" field must remain empty.

7. In the drop-down menu in the "Integration type" section, the transportation companies for which special modules compatible with the "Logistics: full-fill, crossdocking, own warehouse, POZ points" module are installed on your marketplace will be displayed.
.

8. Specify the name of the warehouse.
Note: The name of the warehouse should be informative so that it is immediately clear which warehouse we are talking about. It is most convenient to include the address, type and category of the warehouse in the name.
.

9. Specify the title on the receipt. This title will be seen by the customer when placing an order. It is desirable that this title should be informative.

10. Specify the name of the warehouse in the product card. This name will be seen by the buyer when choosing from which warehouse to deliver the product. It is desirable that it be informative.

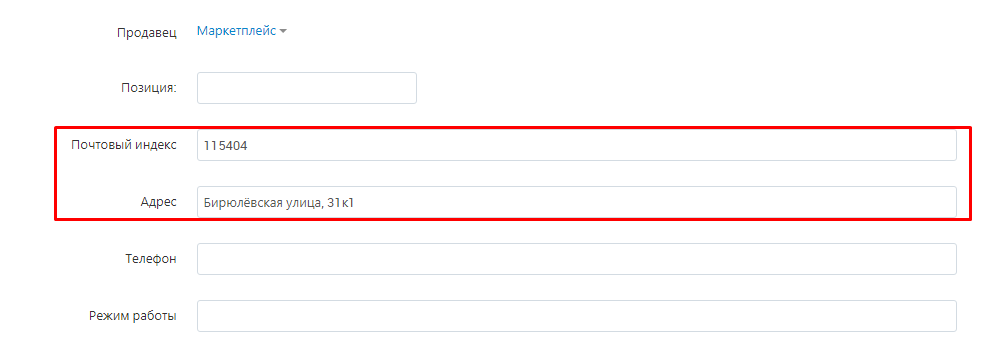
11. Specify the postal code and address where the warehouse is located.
12. Provide a telephone number for contact.

13. Under "Country" in the drop-down list specify the country where the warehouse is located.
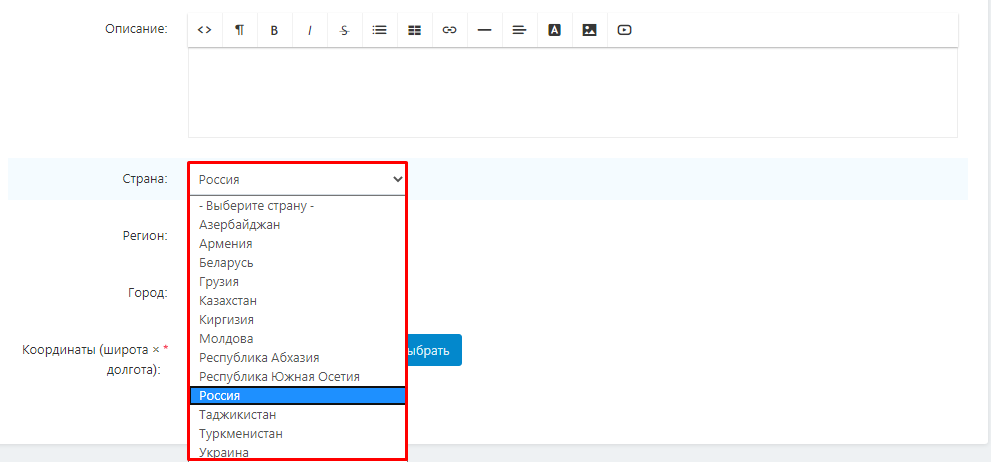
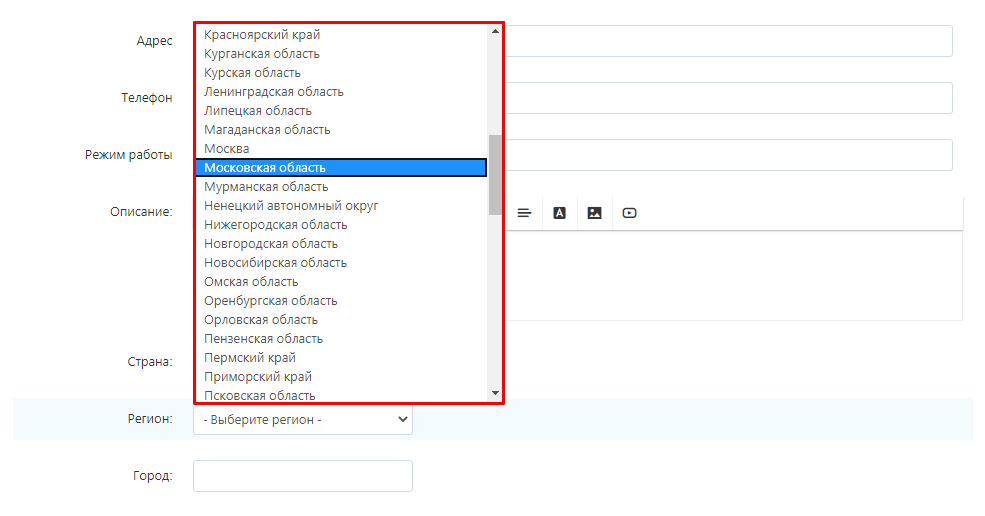
14. In the "Region" section, select the region where the warehouse is located.
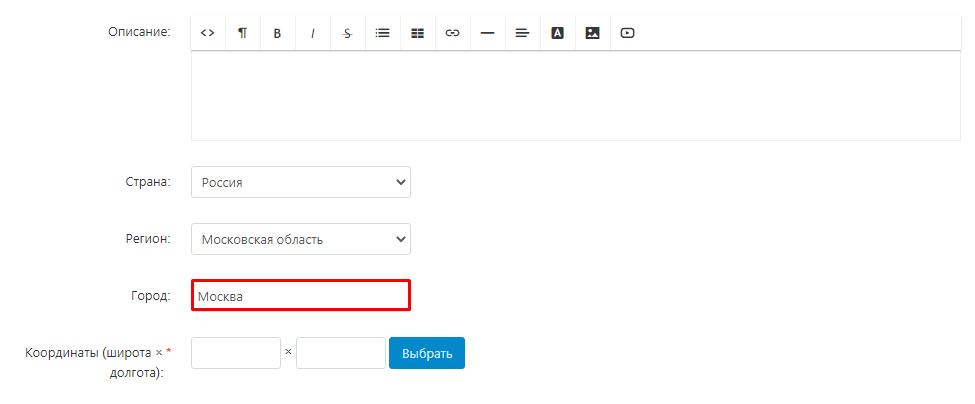
15. Write the name of the city where the warehouse is located.
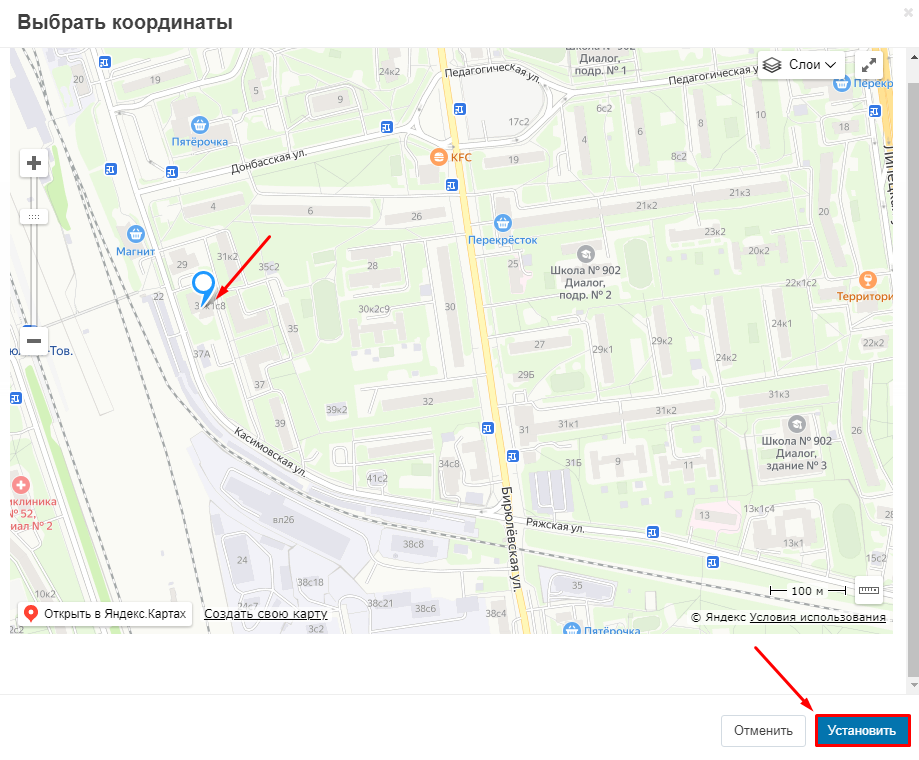
16. Press the Select button in the Coordinates section to set the coordinates on the map or type them in yourself.

16.1 Specify the location of the warehouse on the map and click the "Set" button.
17. Or specify the exact coordinates in the corresponding fields. You can view the coordinates in any map service, for example, Yandex.Maps.

18. Click the "Create" button.
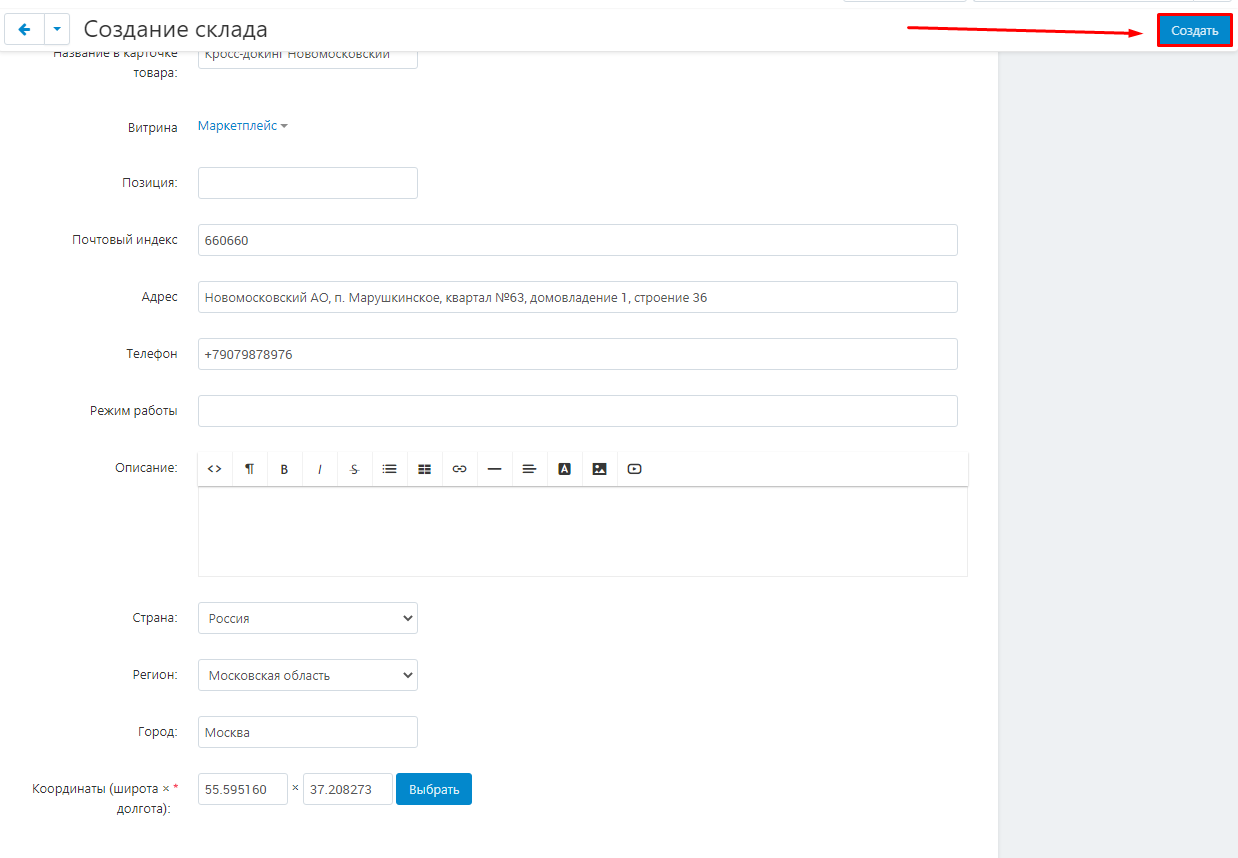
19. After the warehouse is created, a new tab will appear: "Shipment of goods"
.

Settings
.
1. Go to the "Settings" tab. You do not need to fill in the "Modules" tab to configure the cross-docking warehouse.

2. In the drop-down menu under "Setting the tariff zone", select the tariff zone.
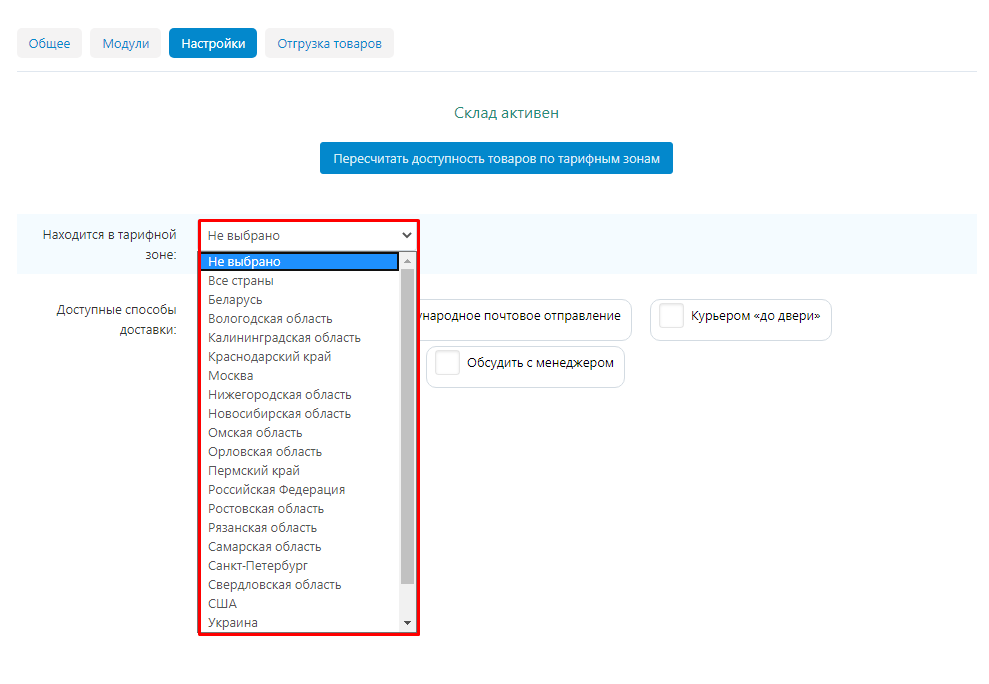
3. Check the boxes next to the countries, regions and cities where you want to display products from this warehouse.
Note! It is necessary to check all relevant regions, even if they partially duplicate each other. For example, as Russia, Moscow region and Moscow.
.
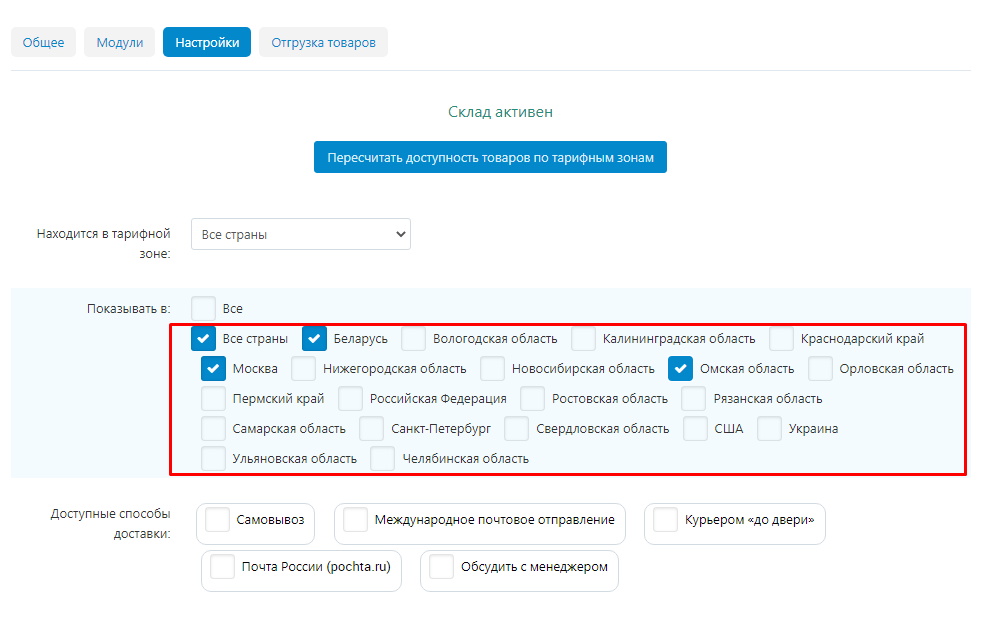
4. Check "All" to check all rate zones.
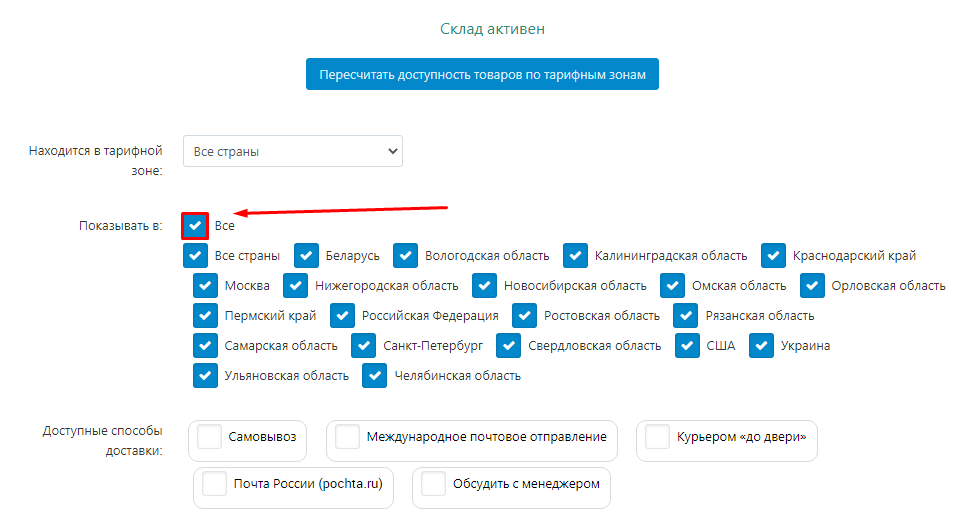
5. If you change the settings of tariff zones already after creating goods, click "Recalculate the availability of goods by tariff zones".
.
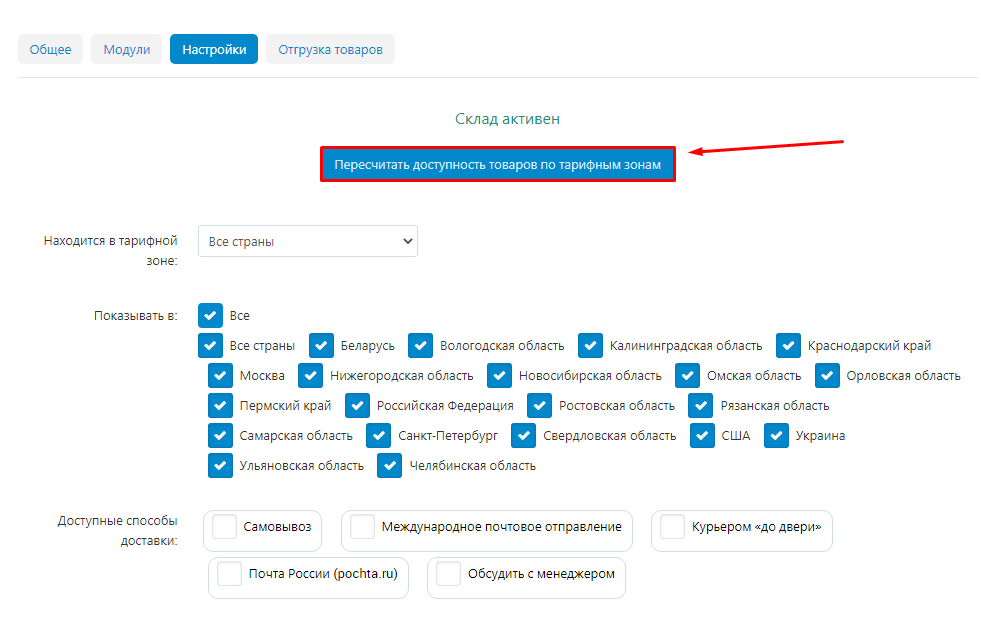
6. Check the checkboxes for the delivery methods available for this warehouse.
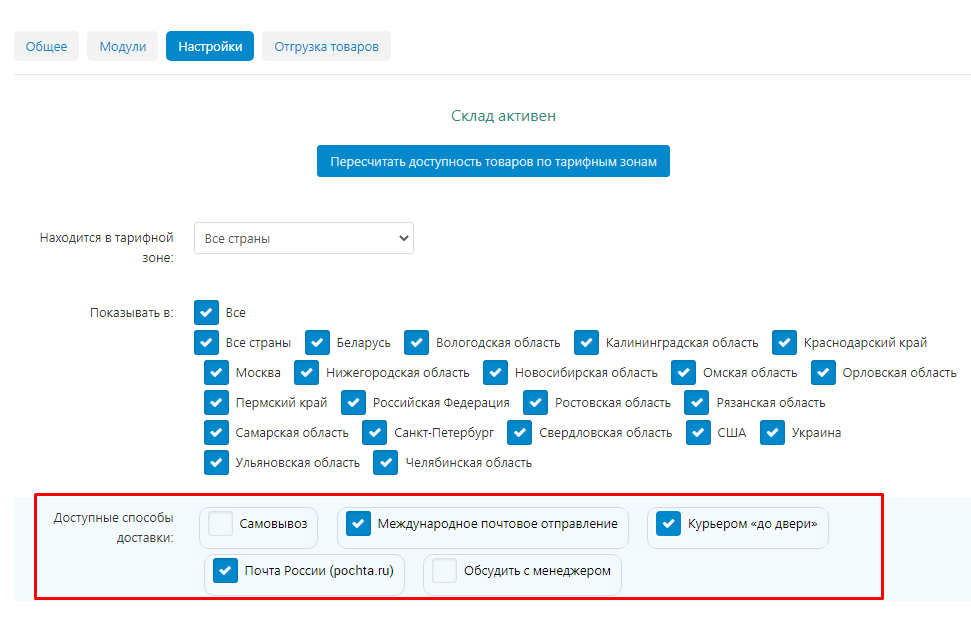
7. Click "Save" in the upper right corner.

Creation of fullfillment warehouses by admin
General
.
1. Go to "Administration" → "Warehouses & Shipments" →"Warehouses".
< img src="https://maurisweb.ru/images/companies/1/2021_new_instructions/Logistic/MW/functionality/crossdocing_admin/001/001.png?1620632021656" alt="001.png?1620632021656">
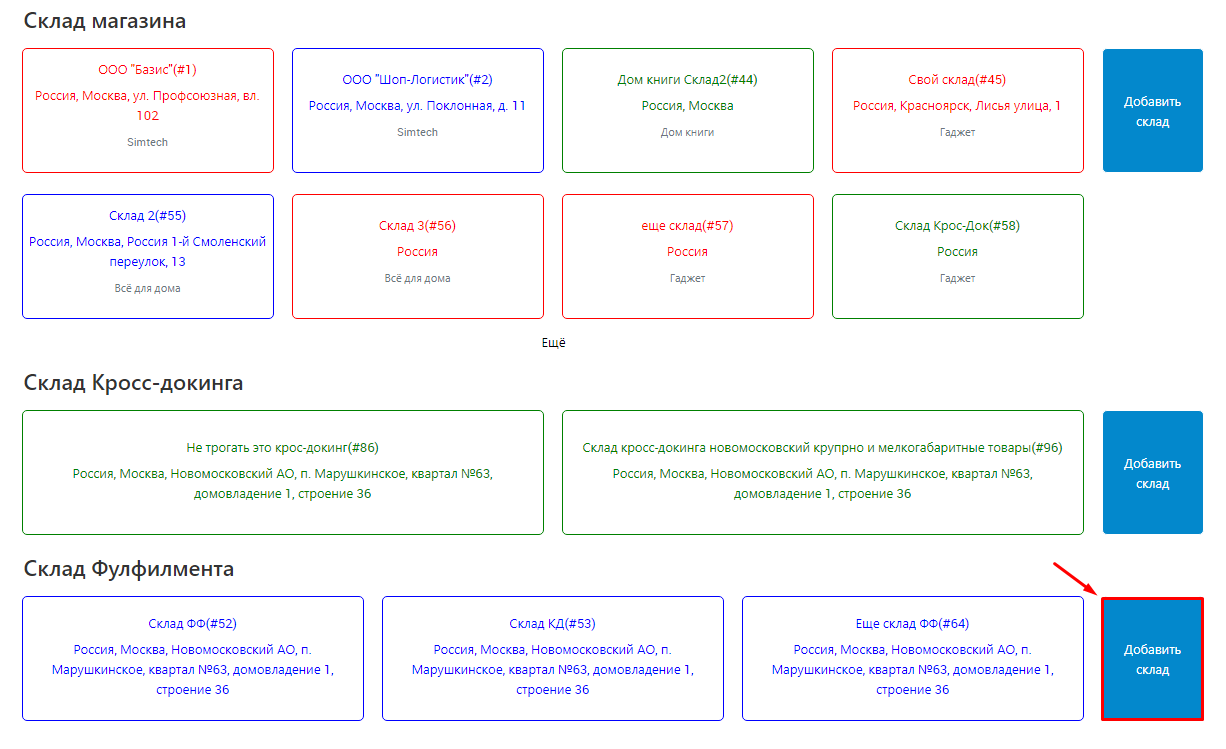
2. Click on the "Add Warehouse" button in the required section.
Note! When creating any type of warehouse from the administrative panel of the marketplace, you have access to all possible settings. The description of creating a warehouse of each type contains only the settings required for that type of warehouse.
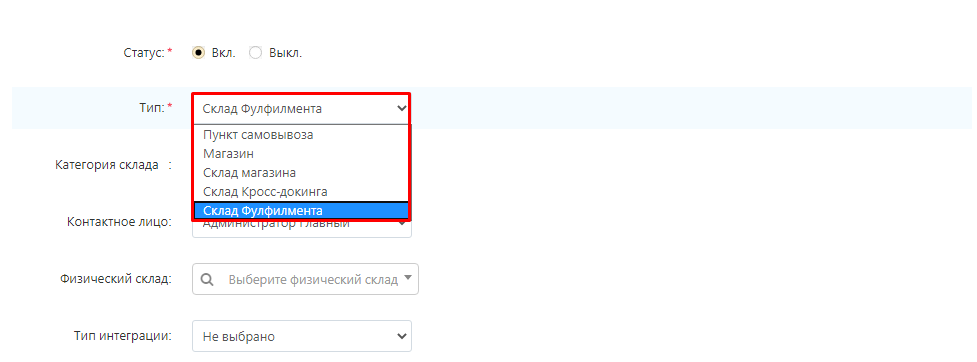
3. The already selected warehouse type will be displayed in the default type field. If necessary, it can be changed by selecting the desired item in the drop-down box.
4. Select a warehouse category from the previously created ones.
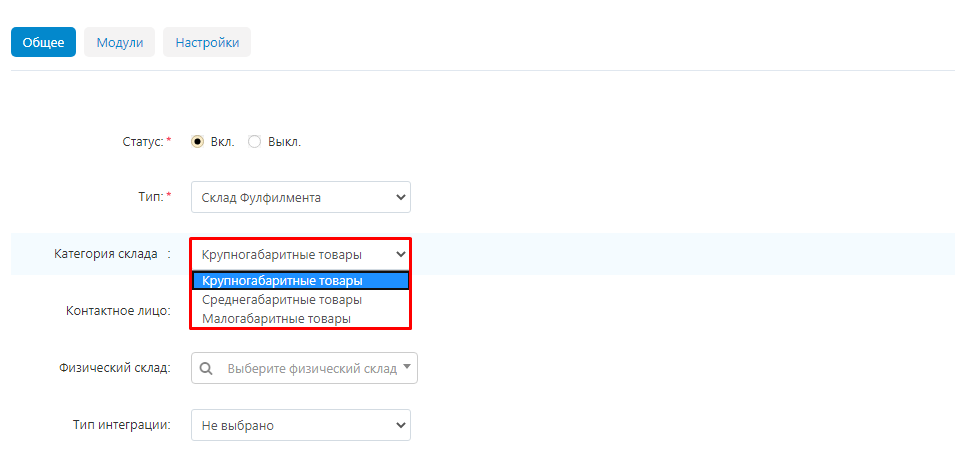
5. In the "Contact person" field, specify the administrator responsible for the warehouse. All administrators of the marketplace will be displayed in the drop-down menu in this field.

6.Enter the name of the physical warehouse, if applicable.
Note: Warehouses should not be mutually linked to each other. One of the warehouses is linked to the second one, the second one must have the field "Physical warehouse" left empty.< br>
.

7. In the drop-down menu in the "Integration type" section, the transportation companies for which special modules compatible with the "Logistics: full-fill, cross-docking, own warehouse, POZ points" module are installed on your marketplace will be displayed.
.
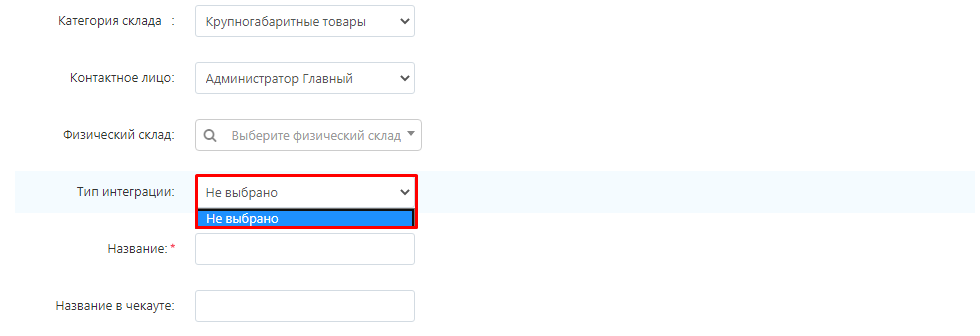
8. Specify the name of the warehouse.
Note: when a seller creates a cross-docking warehouse, he must link his warehouse to a cross-docking warehouse of the corresponding category. Therefore, it is advisable to specify the warehouse category in the warehouse name.

9. Specify the title on the receipt. This title will be seen by the customer when placing an order. It is desirable that this title should be informative.

10. Specify the name of the warehouse in the product card. This name will be seen by the buyer when choosing from which warehouse to deliver the product. It is desirable that it be informative.
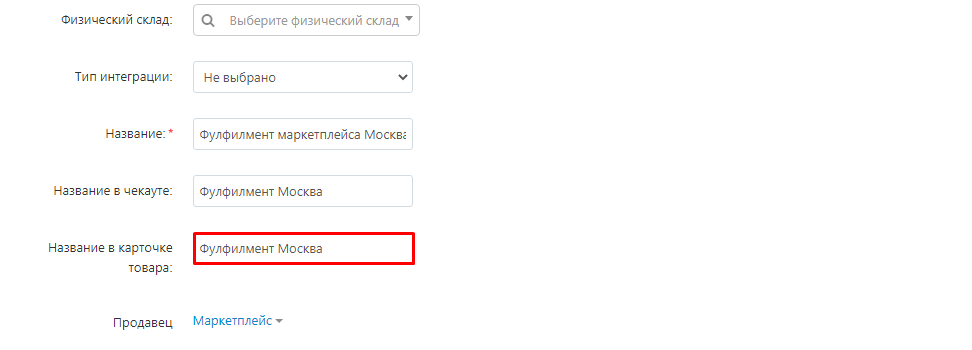
11. Specify the postal code and address where the warehouse is located.

12. Provide a telephone number for contact.

13. Under "Country" in the drop-down list specify the country where the warehouse is located.
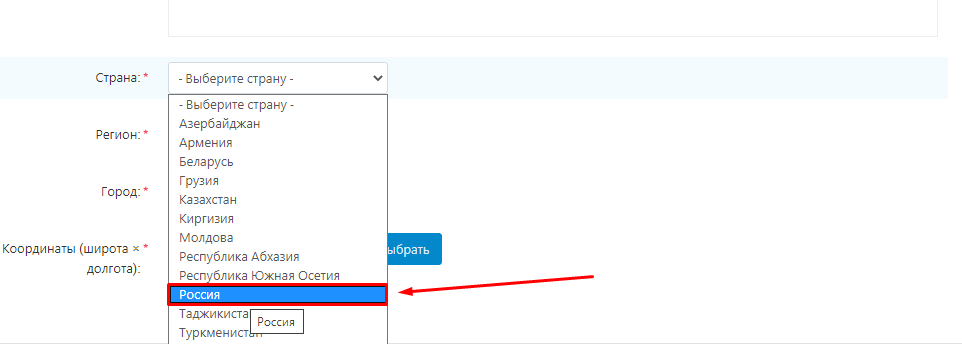
14. In the "Region" section, select the region where the warehouse is located.
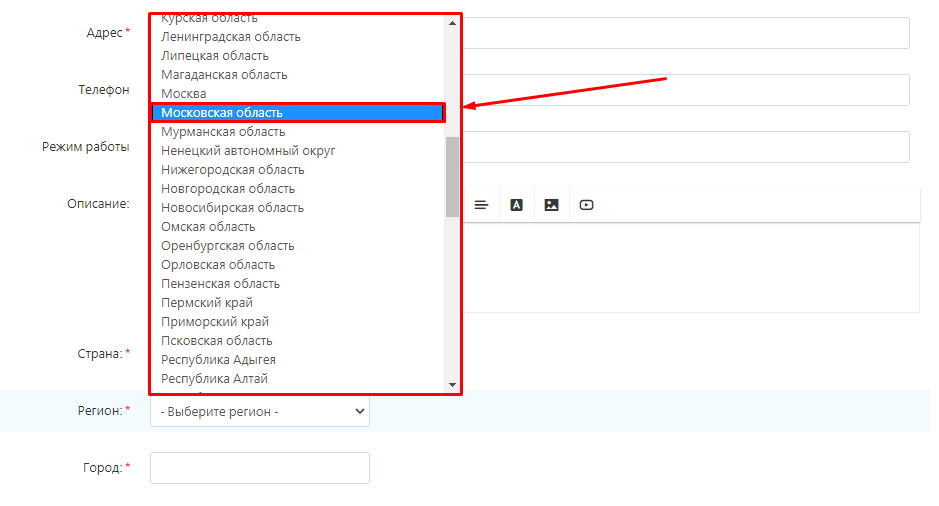
15. Write the name of the city where the warehouse is located.

16. Click "Select" in the "Coordinates" section to set the coordinates on the map or type them in.
< img src="https://maurisweb.ru/images/companies/1/2021_new_instructions/Logistic/MW/functionality/folfilment_admin/001/016.png?1620635993237" alt="016.png?1620635993237">
16.1 Specify the location of the warehouse on the map and press the "Select" button.
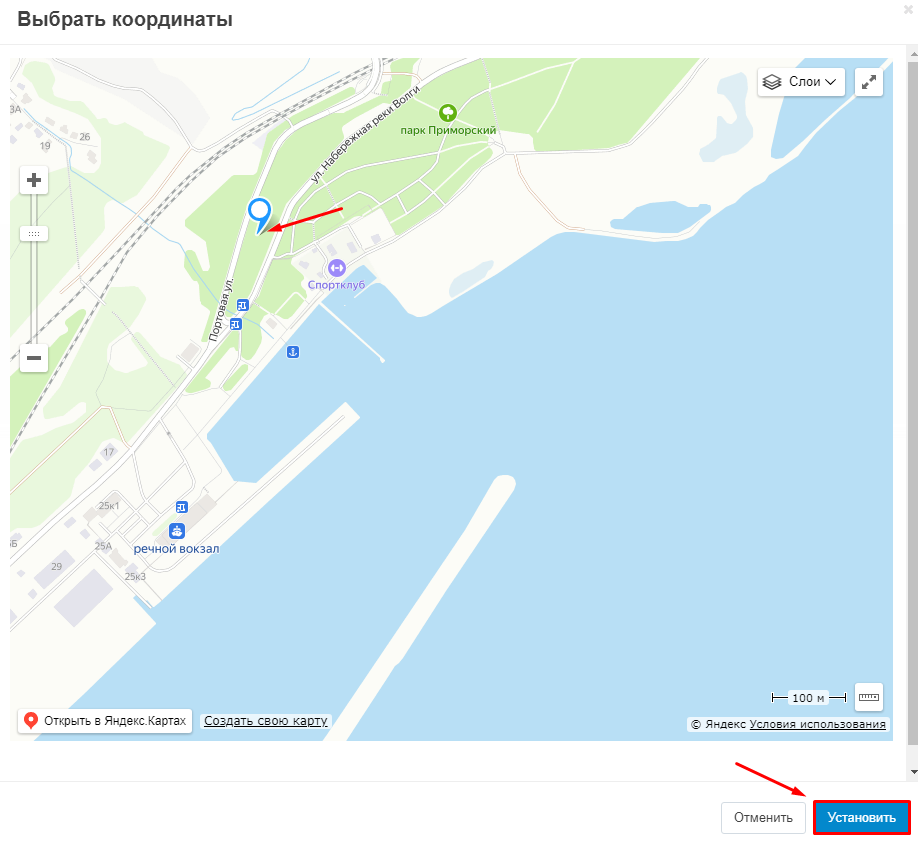
17. Or specify the exact coordinates in the corresponding fields. You can view the coordinates in any map service, for example, Yandex.Maps.

18. Click the "Create" button.

19. New tabs "Return goods" and "Shipment of goods" will appear.
.

Settings
.
1. Go to the "Settings" tab. The "Modules" tab to customize
cross-docking warehouse does not need to be filled in.

2. In the drop-down menu under "Customize
Select a tariff zone to select the tariff zone.
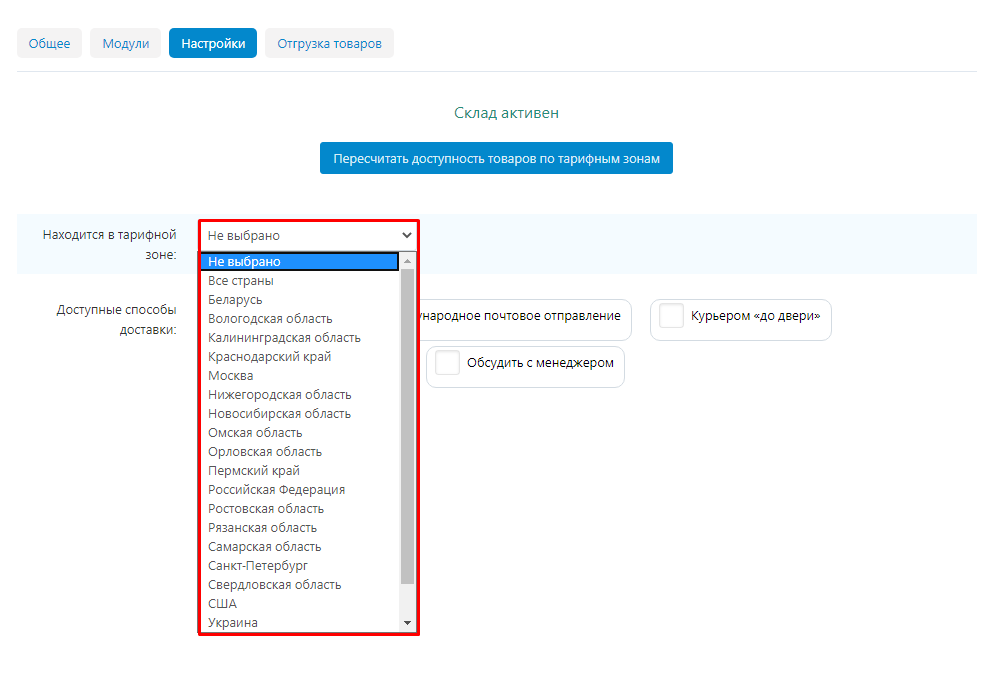
3. Check the boxes next to the countries, regions, and cities in
that need to display items from this warehouse.
Note! It is obligatory to mark with ticks
all relevant regions, even if they are partially overlapping. For example,
as Russia, the Moscow region and Moscow.
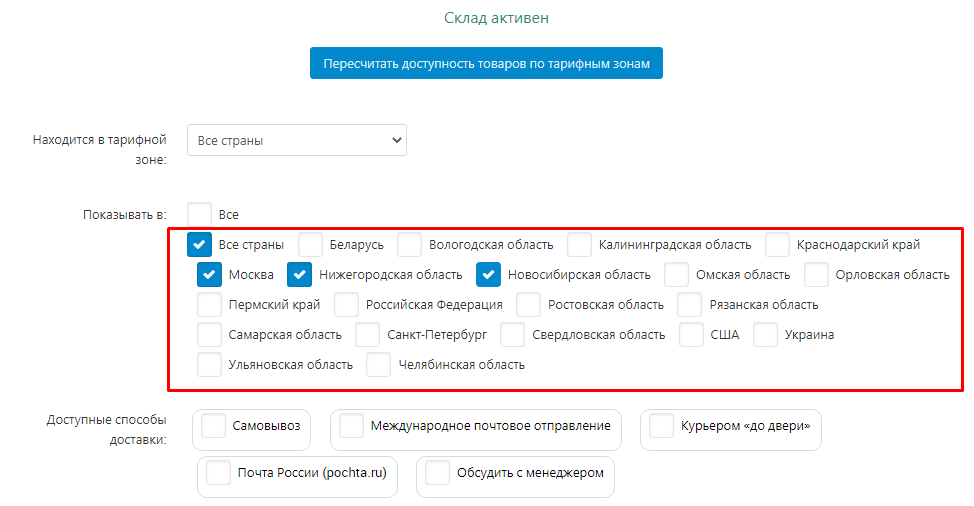
4. Check "All" to check all rate zones.
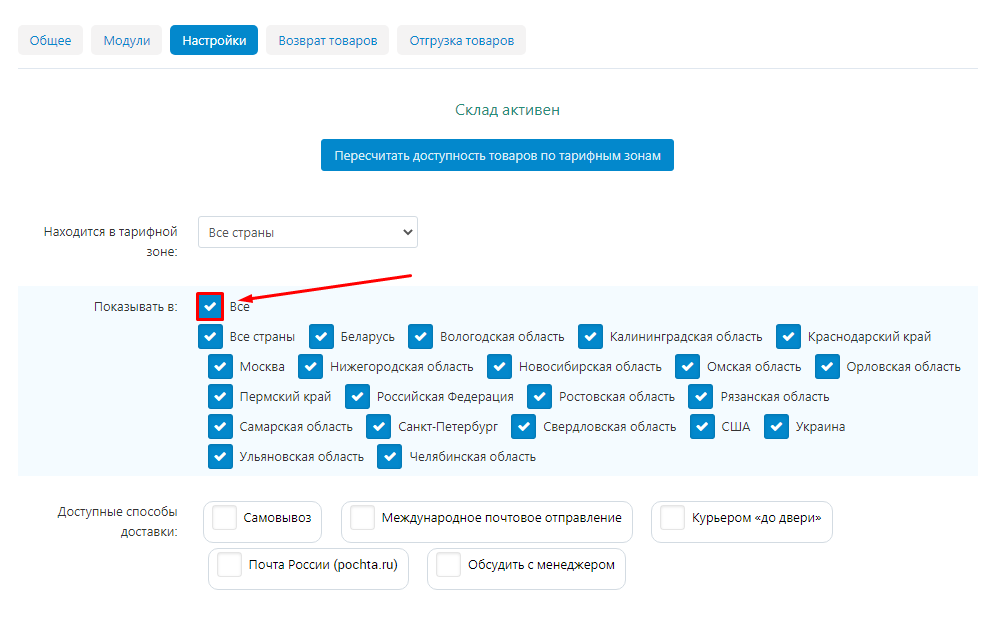
5. In case you change the settings of tariff zones after creating goods, click "Recalculate availability of goods by tariff zones".
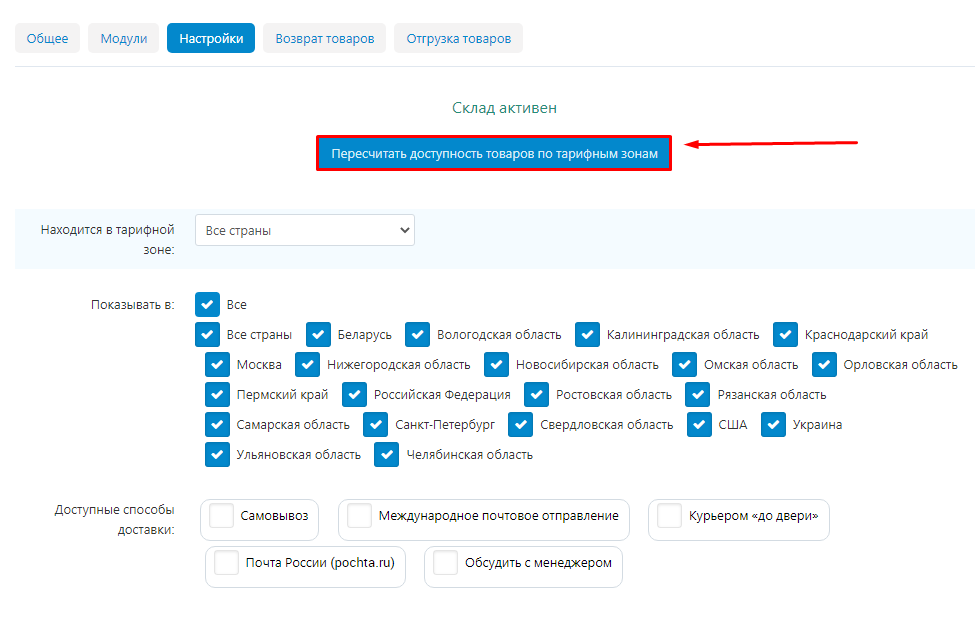
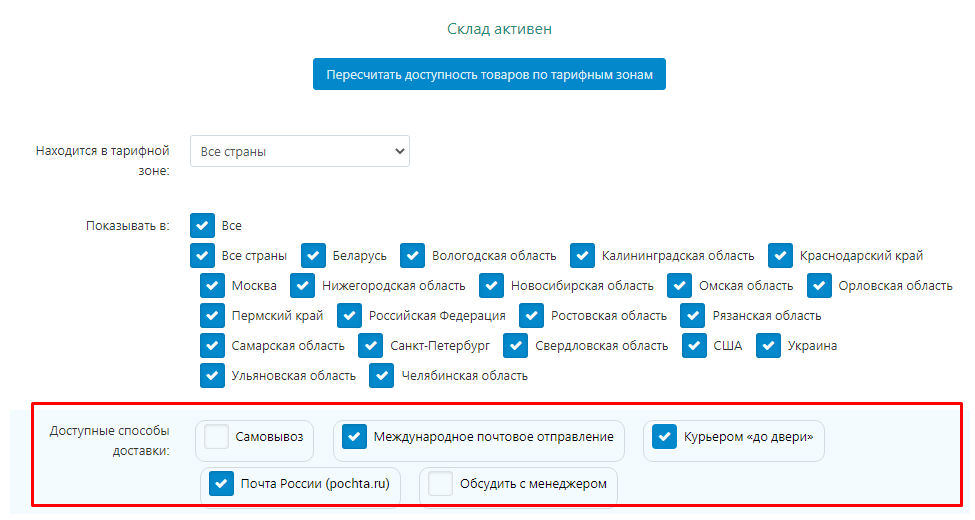
6. Check the checkboxes available for this warehouse
delivery methods.
7. Click "Save" button in the upper right side of the screen
corner.

Warehouse creation by vendors
Vendor can create three types of warehouses:
- < li>PVZ: a point of delivery of orders, where a buyer can come and get the previously ordered goods;< li>Shop: An actual store where the buyer can come to get the pre-ordered goods or buy the goods he or she likes on the spot;< li>Store warehouse: a warehouse where goods are stored and from where deliveries go to PVZ, cross-docking or full-field;
Creating a PVZ
1. Go to the "Administration" tab → "Warehouses and shipments" → "Warehouses"
.

2. Click "Add" in the "Pickup Points" section.
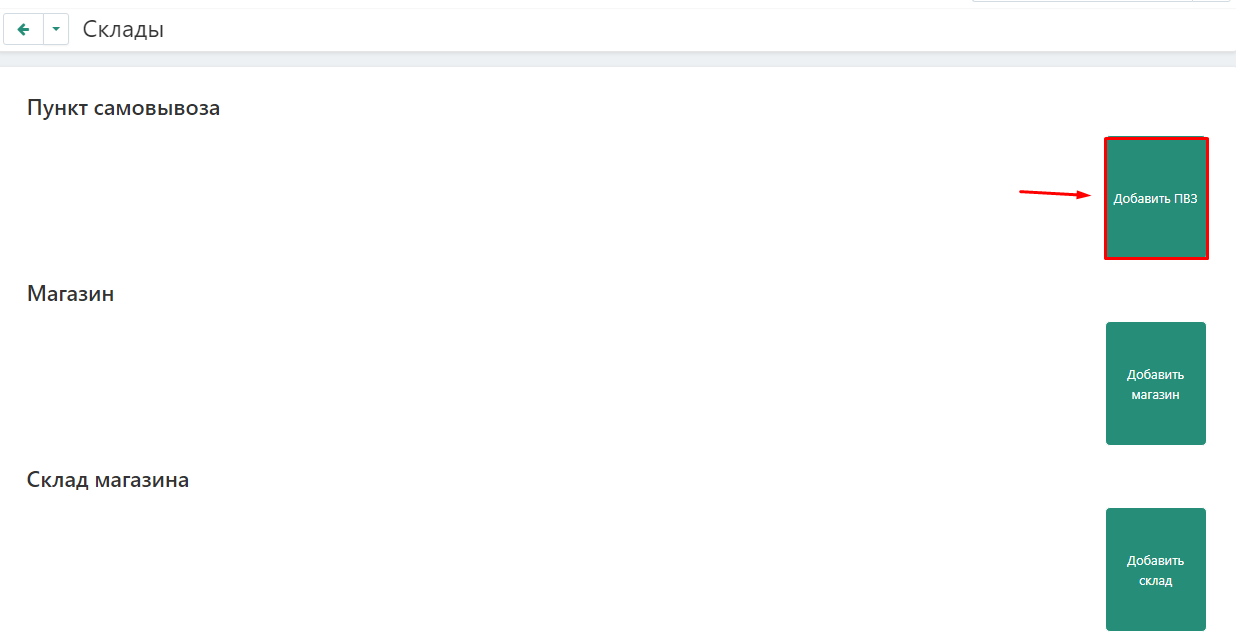
3. The already selected warehouse type will be displayed in the default type field. If necessary, it can be changed by selecting the desired item in the drop-down box.
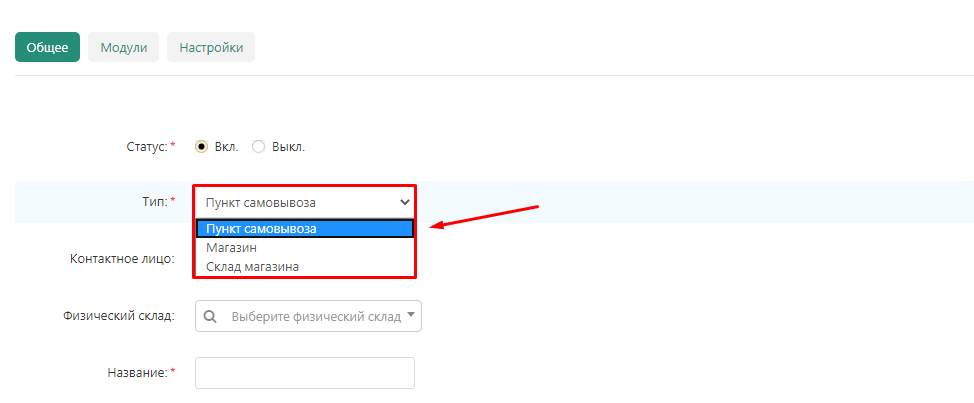
4. If necessary, specify the name of the physical warehouse.
Note: Warehouses should not be mutually linked to each other. One of the warehouses is linked to the second one, the second one must leave the field "Physical warehouse" empty.
.
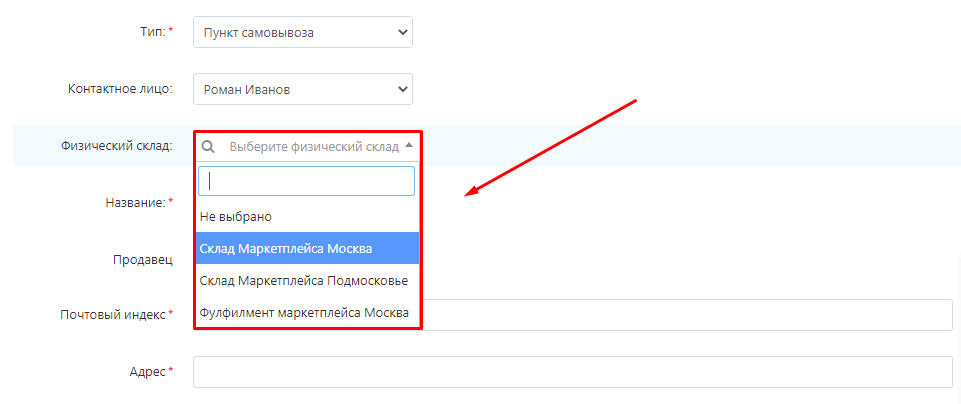
5. Specify the name of the warehouse.

6. Specify the address of the POZ.

7. Provide a phone number for contact.

8. In the drop-down list, select the country where the POPS is located.
.
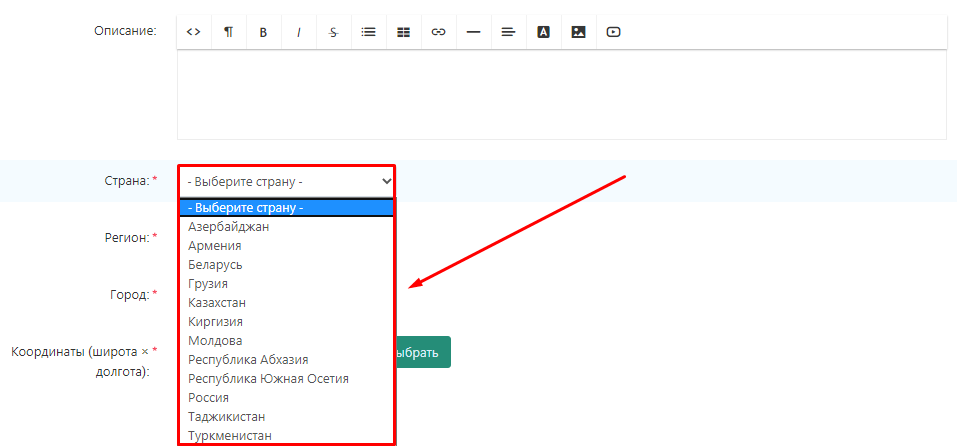
9. In the drop-down list, select the region where the POZ is located.
.
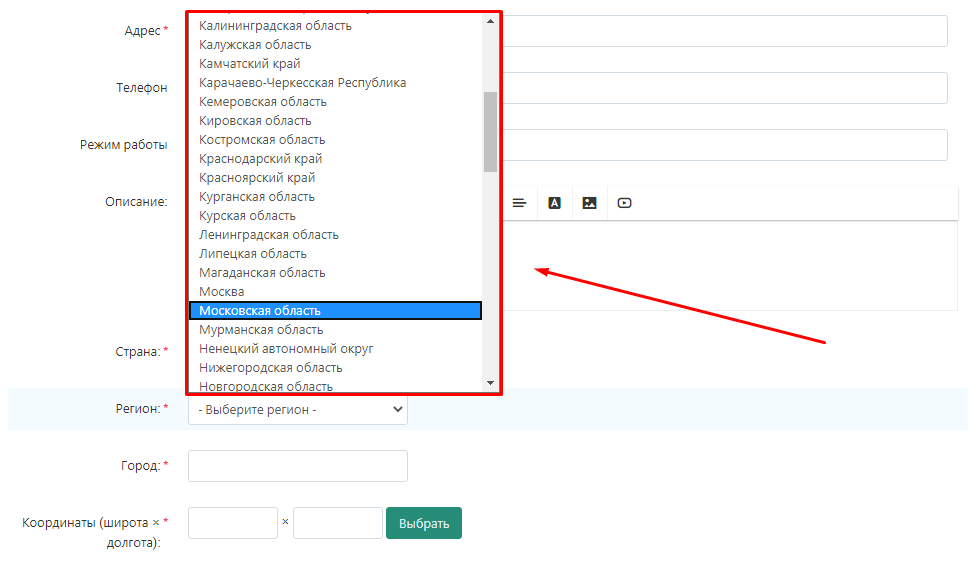
10. Enter the name of the city where the POZ is located.

11. Press the Select button in the Coordinates section to set the coordinates on the map or enter the coordinates yourself.

11.1 Specify the location of the warehouse on the map and click the "Set" button.
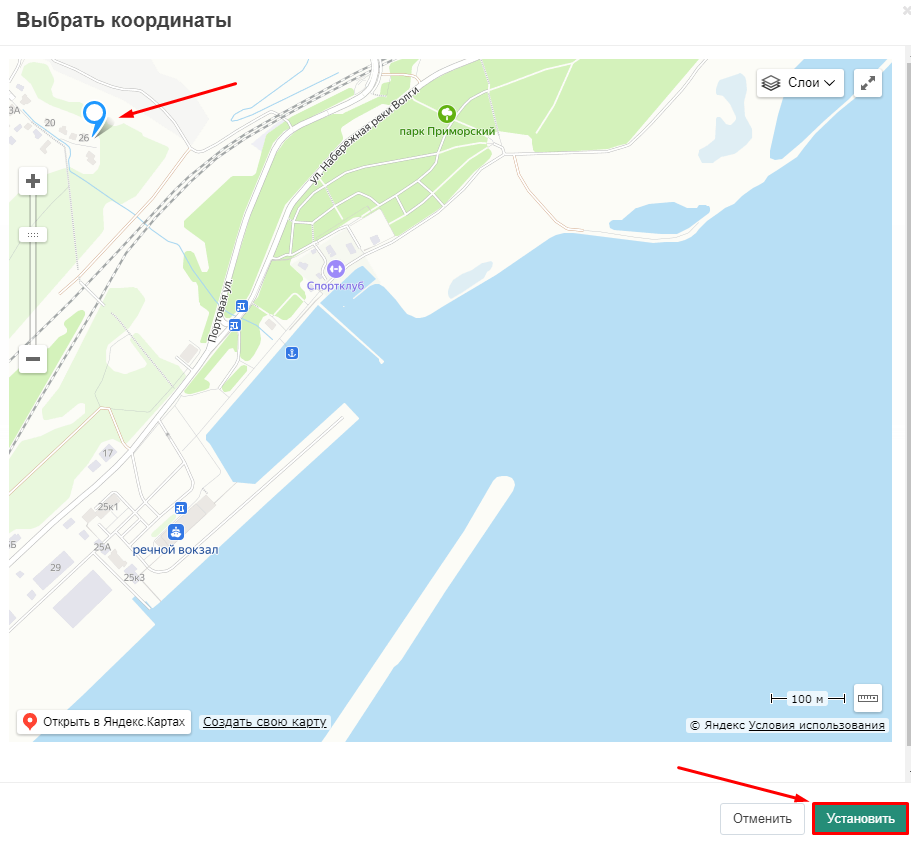
12. Or specify exact coordinates in the corresponding fields. You can view the coordinates in any map service, for example, Yandex.Maps.
.

13. Click "Create" in the upper right corner.

14. A notification message appears to inform you that the information has been saved.

Synchronization with CommerceML
This page should be filled out by a specialist familiar with CommerceML-enabled programs (1C, My Warehouse, etc.). Here you can set up synchronization with warehouse programs, which allows you to automatically upload goods and balances to the warehouse.
1. Go to the "Modules" tab.
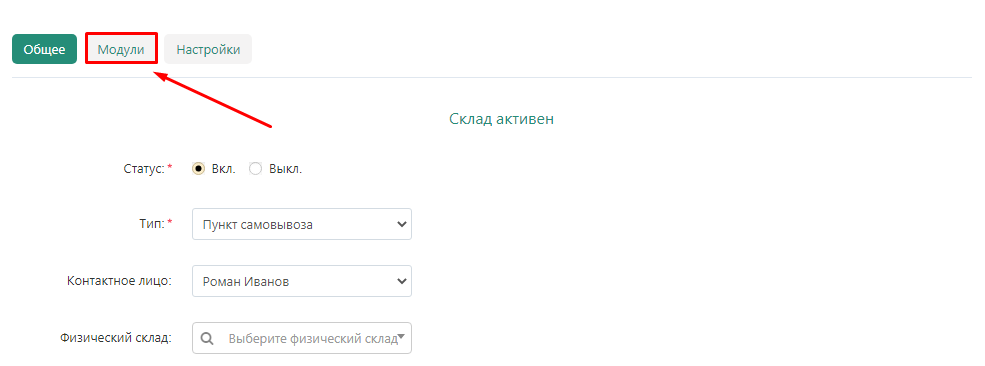
2. Enter the binding code.
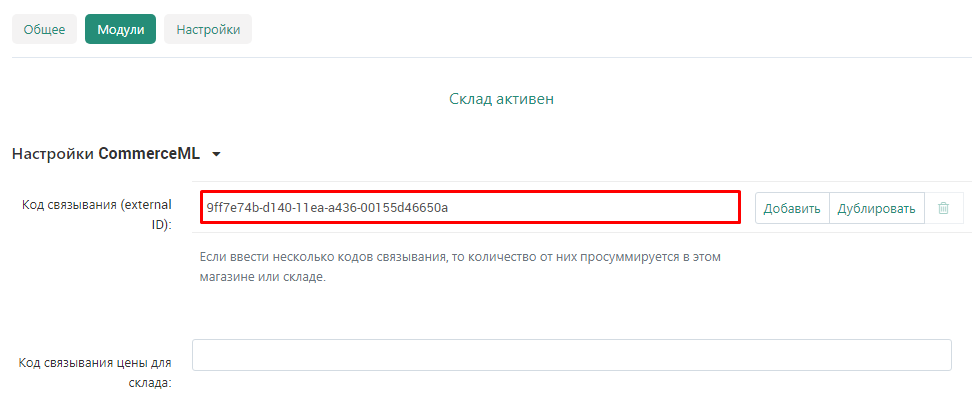
2.1 If necessary, you can enter several binding codes. To do this, click the "Add" or "Duplicate" button to the right of the input field. If you enter several binding codes, the quantities from them are summed up.

2.2 To remove unnecessary binding code, click the trash can button to the right of the input field.

3. Enter the price binding code for the warehouse.
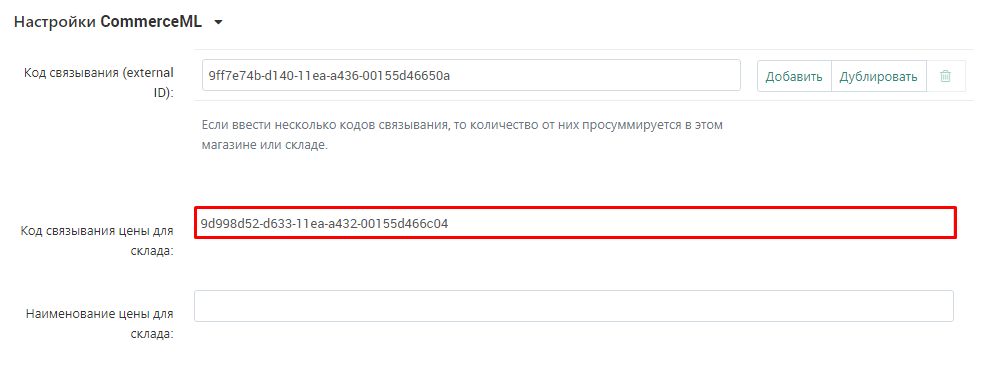
4. Enter the price name for the stock.
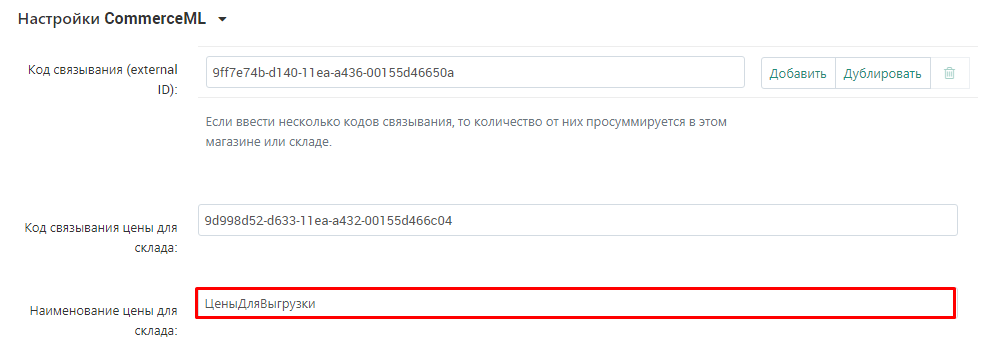
5. Click "Save" button in the upper right corner.

Settings
.
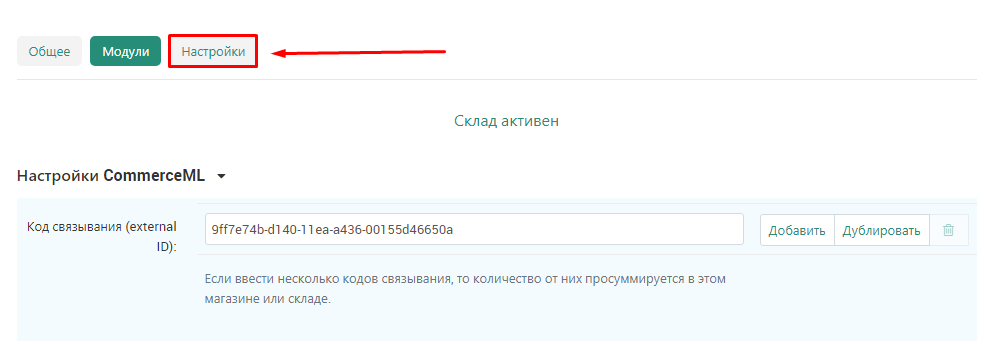
On this page, you can customize the geographical zones in which the goods from this warehouse will be displayed. This allows you to filter out regions where it is not possible to deliver goods from this warehouse.
1. 
2. Specify in which tariff zone the POZ is located.
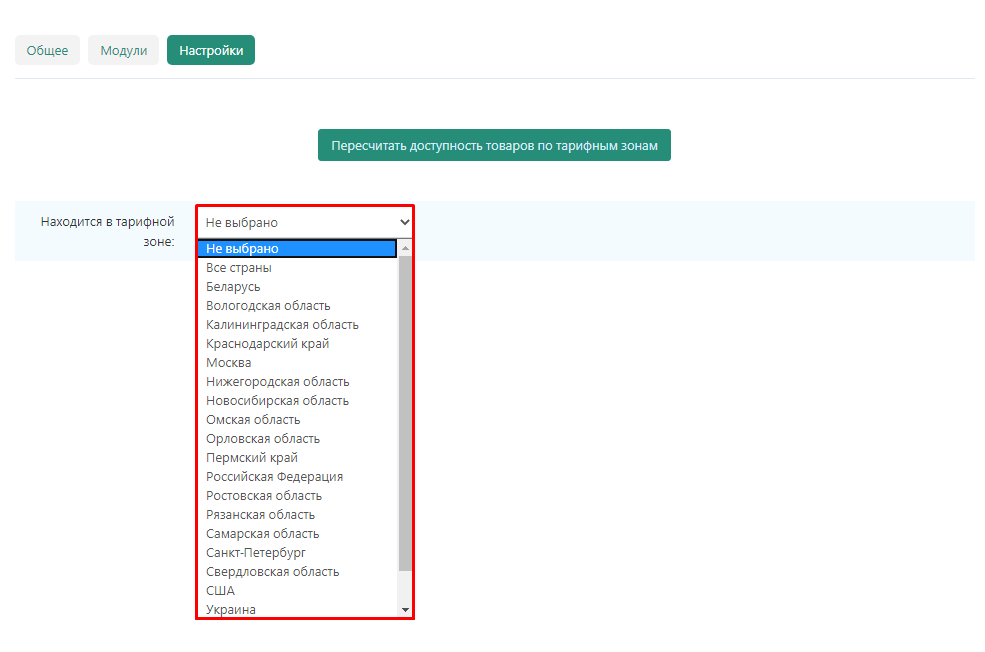
3. Check the boxes next to the countries, regions and cities where you want to display products from this warehouse.
Note! It is necessary to check all relevant regions, even if they partially duplicate each other. For example, as Russia, Moscow region and Moscow.
.
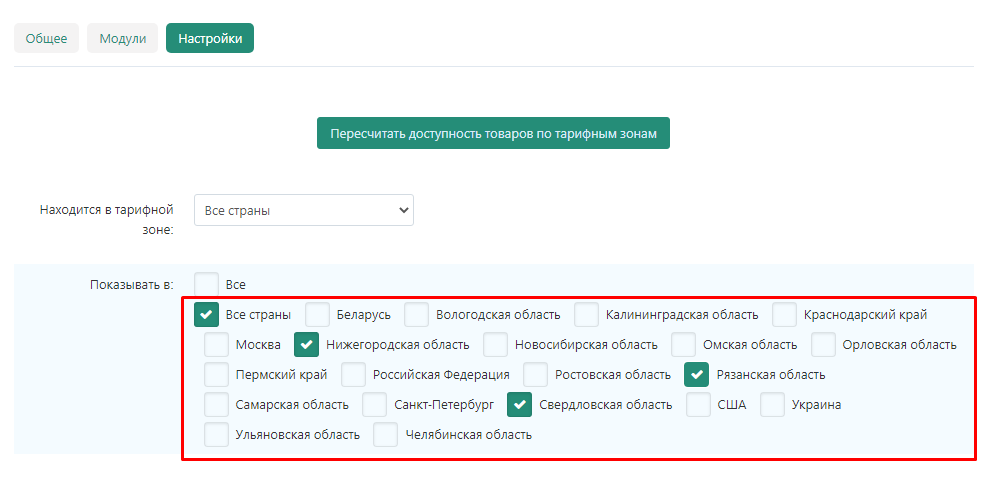
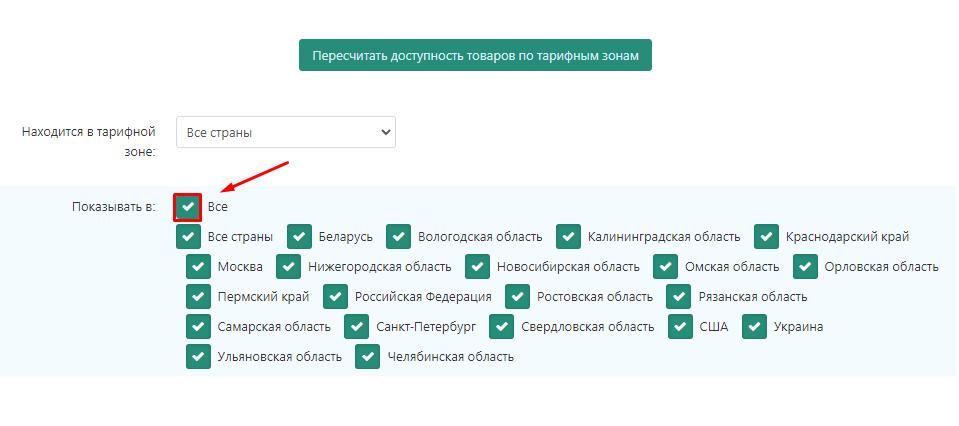
4. To select all rate zones, check the checkbox "All"
.
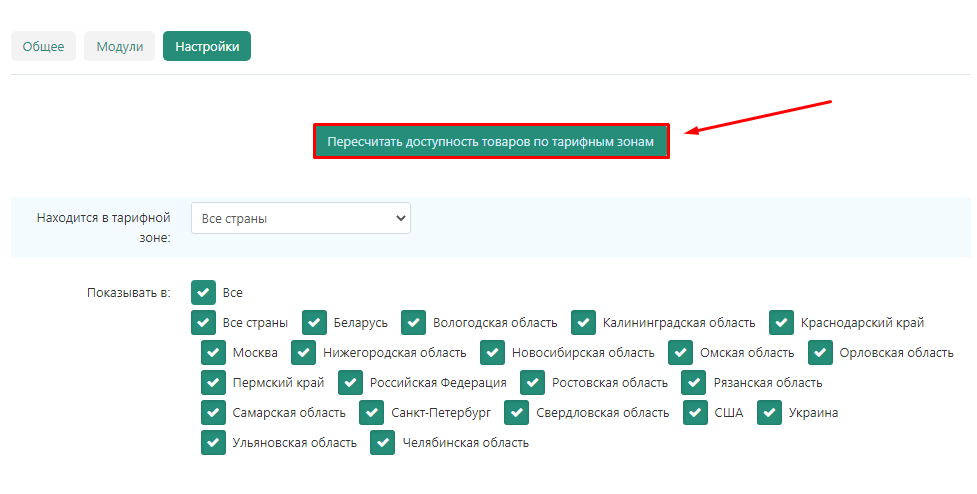
5. If you change the settings of tariff zones after creating goods, click "Recalculate the availability of goods by tariff zones".
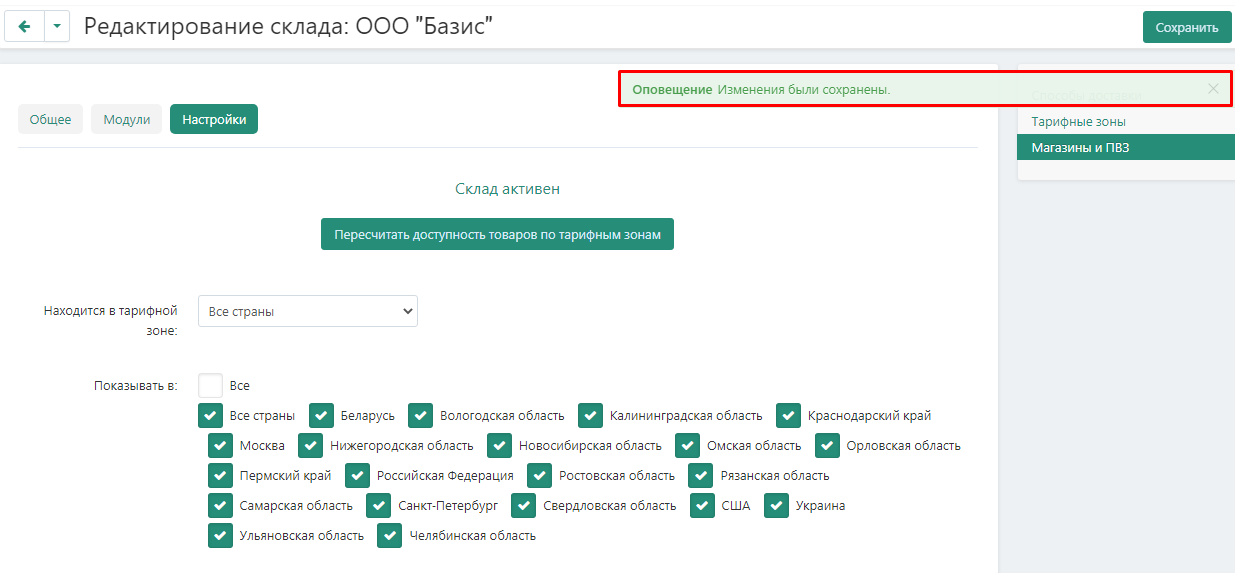
6. Click "Save" button in the upper right corner.

5. A notification will appear that the information has been saved. After creating a warehouse, the information goes to moderation. Only after it will be approved by the marketplace administrator, the warehouse will start to fully function in the system.
Creating a store
.
General
.
Shop: an actual store where a customer can come to pick up a pre-ordered item or buy their favorite item on the spot;
1. Go to the tab "Administration"→ "Warehouses and shipments" → "Warehouses"
.

2. Click "Add Store" in the "Store" section.

3. The already selected warehouse type will be displayed in the default type field. If necessary, it can be changed by selecting the desired item in the drop-down box.
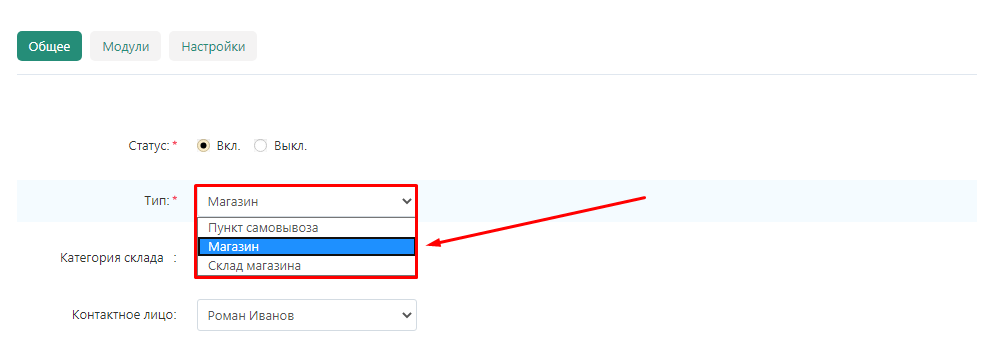
4. Select a warehouse category from the previously created ones.

5. In the "Contact Person" field, enter the administrator responsible for the store. The drop-down menu in this field will display all administrators of the vendor.
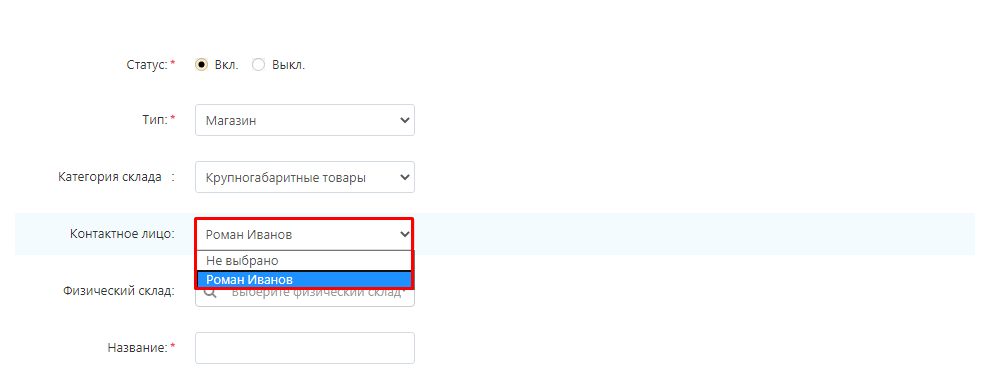
6. If necessary, specify the name of the physical warehouse.
Note: Warehouses should not be mutually linked to each other. One of the warehouses is linked to the second one, the second one must leave the field "Physical warehouse" empty.
.
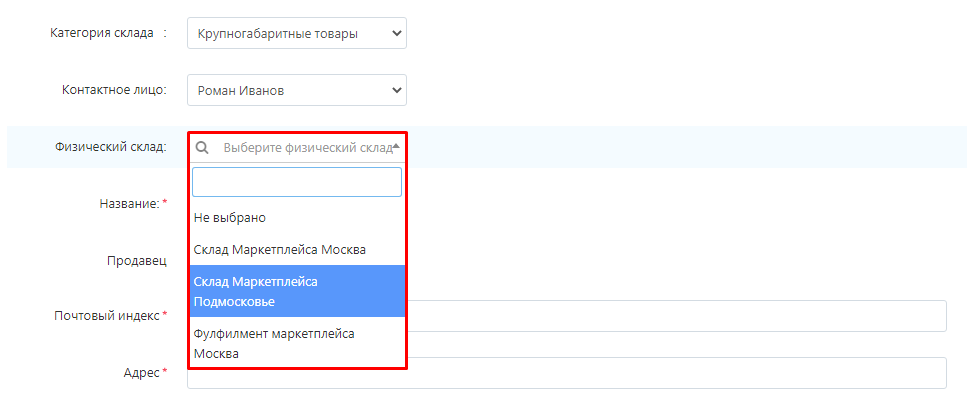
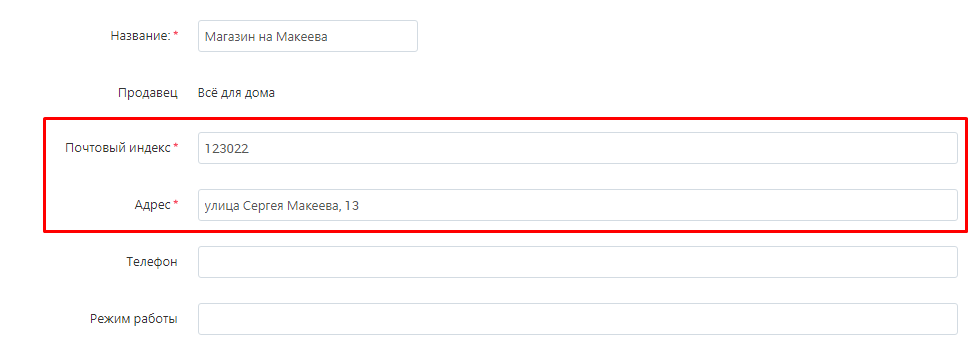
7. Enter the name of the store.

8. Enter the postal code and address of the store.
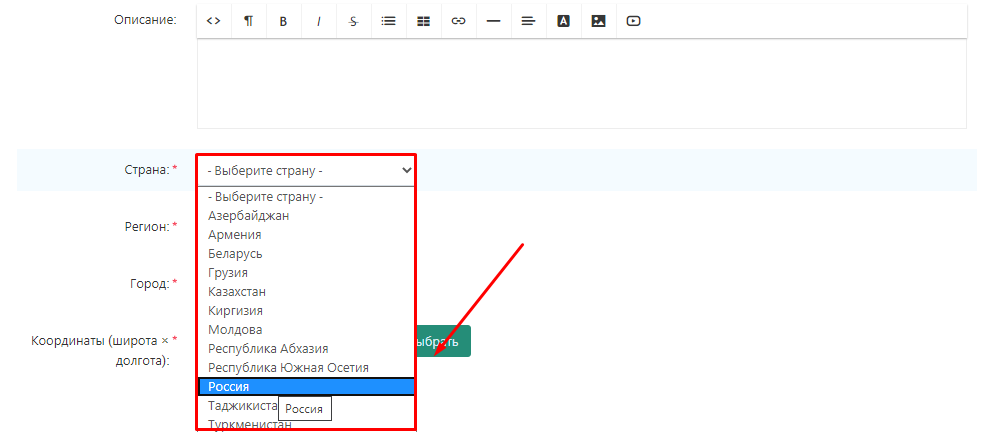
9. In the "Country" section, in the drop-down list, enter the country where the store is located.
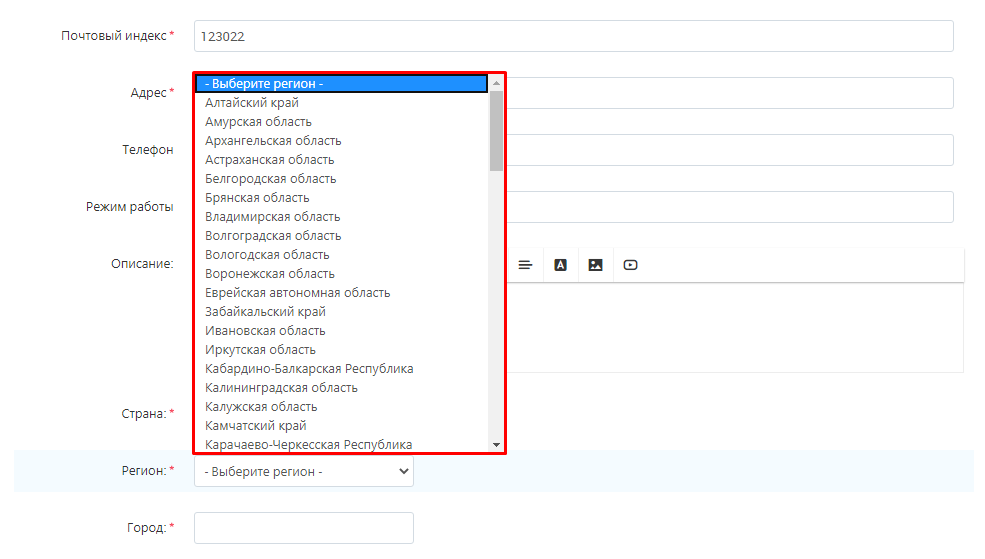
10. In the Region section, select the region in which the store is located.
11. Write the name of the city in which the store is located.
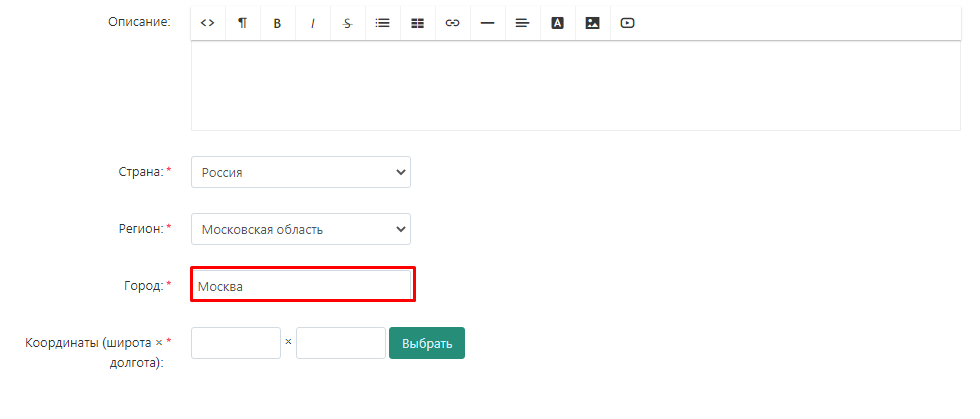
12. Press the "Select" button in the "Coordinates" section to set the coordinates on the map or type them in.

12.1 Specify the location of the warehouse on the map and click the "Set" button.
13. Or specify exact coordinates in the corresponding fields. You can view the coordinates in any map service, for example, Yandex.Maps.
.

14. Click the "Create" button.

15. A notification will appear that the information has been saved.

16. After creating the store, a new tab will appear: "Shipment of goods"
.

Synchronization with CommerceML
This page should be filled out by a specialist familiar with CommerceML-enabled programs (1C, My Warehouse, etc.). Here you can set up synchronization with warehouse programs, which allows you to automatically upload goods and balances to the warehouse.
1. Go to the "Modules" tab.

2. Enter the binding code.
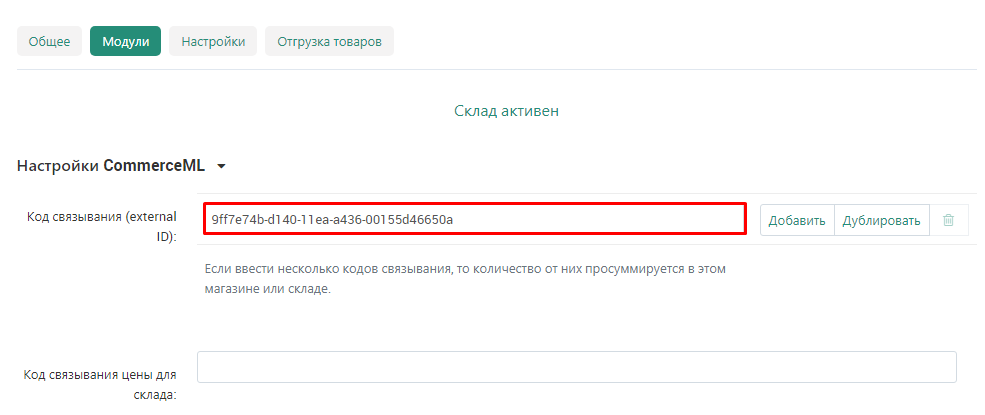
2.1 If necessary, you can enter several binding codes. To do this, click the "Add" or "Duplicate" button to the right of the input field. If you enter several binding codes, the quantities from them are summed up.

2.2 To remove unnecessary binding code, click the trash can button to the right of the input field.

3. Enter the price binding code for the store.
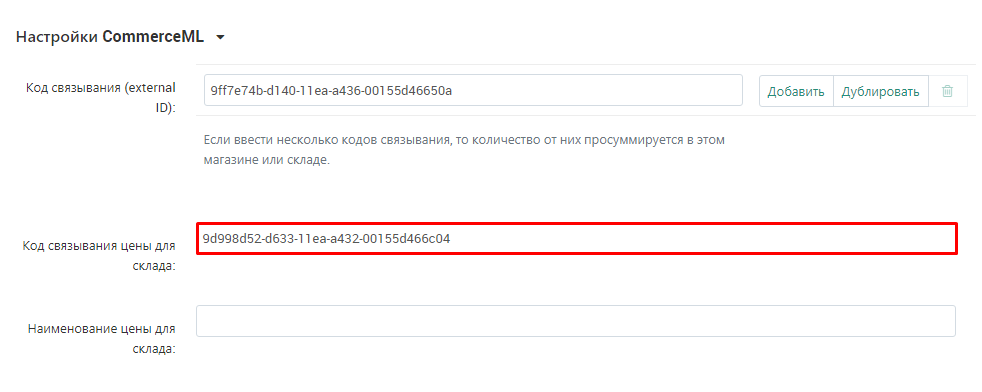
4. Enter the price name for the store.
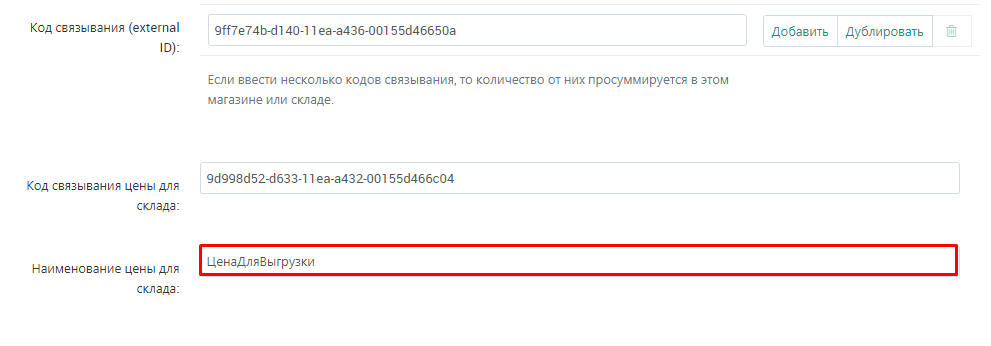
5. Click "Save" button in the upper right corner.

6. A notification will appear to save the information.

Customize
.
On this page, you can customize the geographical zones in which the goods from this warehouse will be displayed. This allows you to filter out regions where it is not possible to deliver goods from this warehouse.
1. Click the Settings tab.

2. Indicate in which rate zone the store is located.
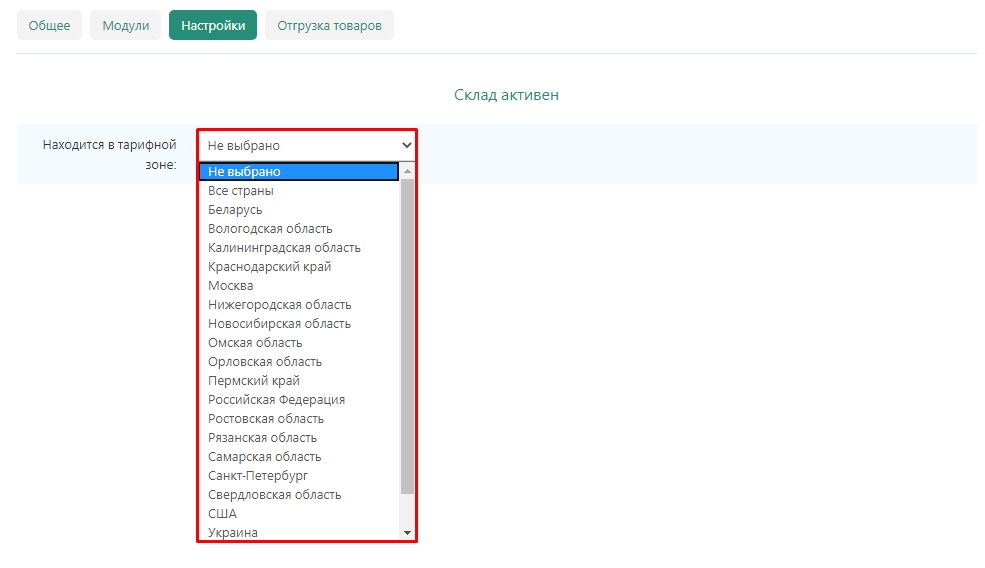
3. Check the boxes next to the countries, regions and cities where you want to display products from this warehouse.
Note! It is necessary to check all relevant regions, even if they partially duplicate each other. For example, as Russia, Moscow region and Moscow.
.

4. Click "Save" in the upper right corner.
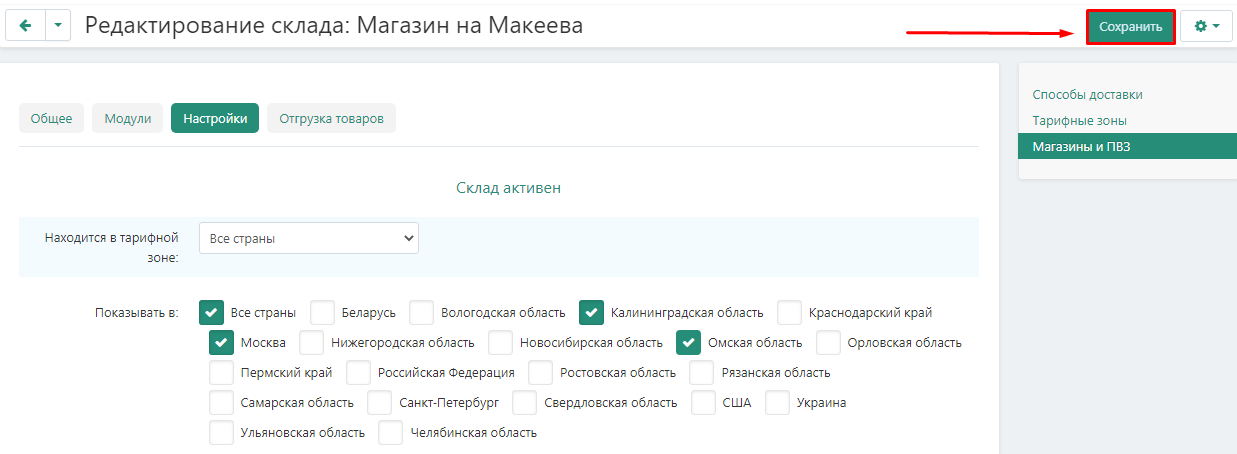
5. A notification will appear that the information has been saved. After creating a warehouse, the information goes to moderation. Only after it will be approved by administrator of the marketplace, the warehouse will begin to fully function in the system.
.

Creating a Store Warehouse
Store warehouse: a warehouse where goods are stored and deliveries are made to PVZ, cross-docking or full-fill.
Trading from your own warehouse
This type of warehouse is created if the seller does not intend to deliver his goods to the Marketplace warehouse and intends to deliver the goods to the buyer himself.
General
.
1. Go to the "Administration" tab → "Warehouses and Shipments" → "Warehouses".
< img src="https://maurisweb.ru/images/companies/1/2021_new_instructions/Logistic/MW/functionality/store_warehouse/your_warehouse/001/001.png?1625146092233" alt="001.png?1625146092233">
2. Click on the "Add Warehouse" button in the desired section.
< img src="https://maurisweb.ru/images/companies/1/2021_new_instructions/Logistic/MW/functionality/store_warehouse/your_warehouse/001/002.png?1625146107749" alt="002.png?1625146107749">
3. In the window that appears, select the warehouse type "Trade from own warehouse".
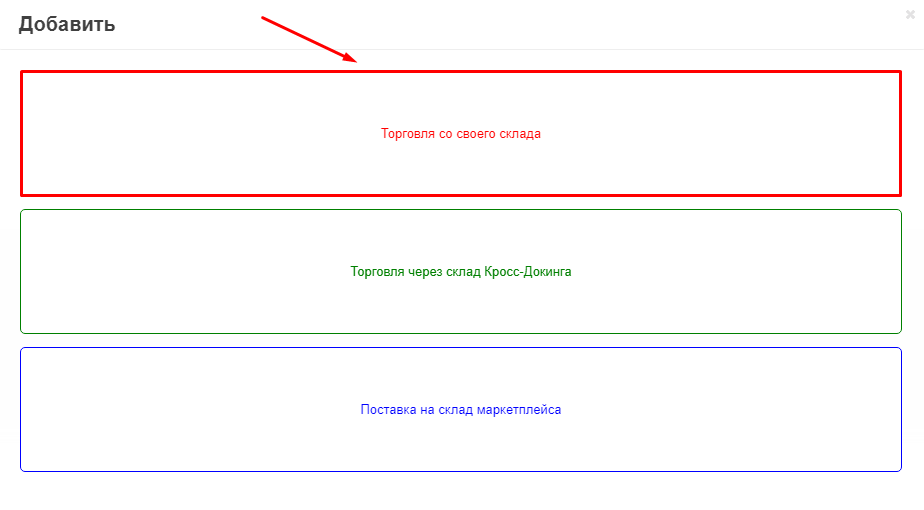
4. Select a warehouse category from the drop-down menu.
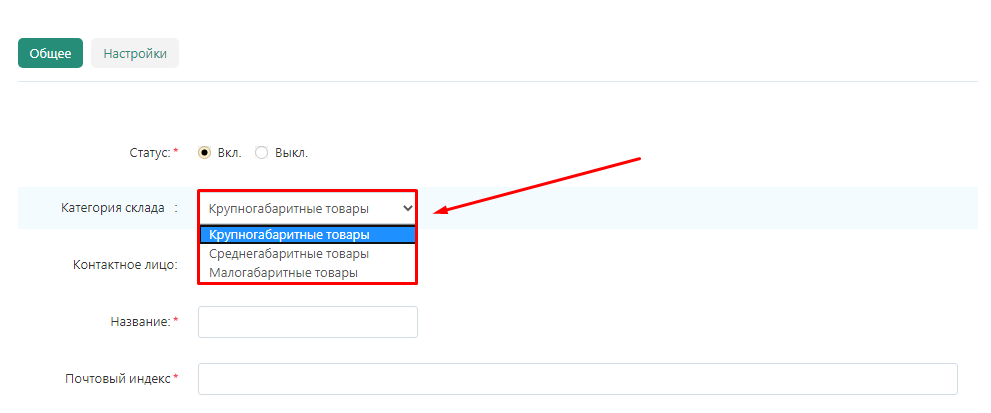
5. In the drop-down menu, select one of the administrators who will be responsible for the operation of this warehouse.

6. Specify the name of the warehouse.
Note: The name of the warehouse should be informative so that it is immediately clear which warehouse we are talking about. It is most convenient to include the address, type and category of the warehouse in the name.
.
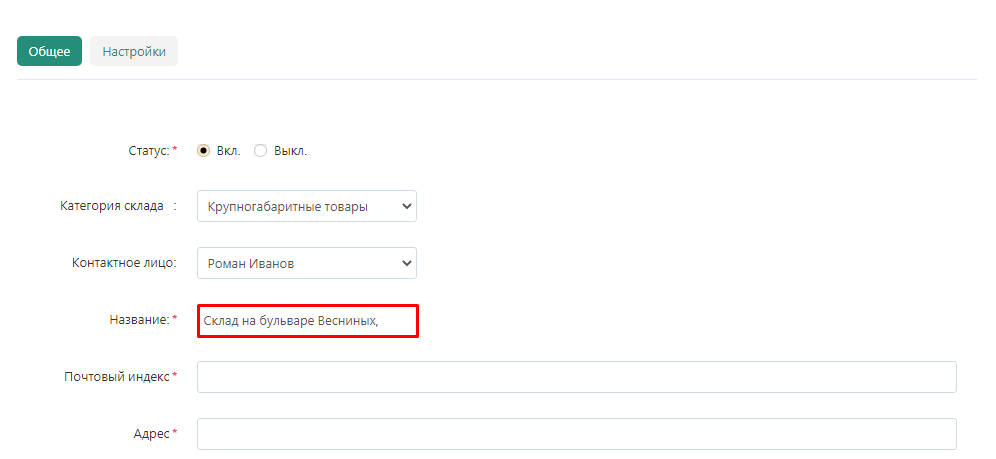
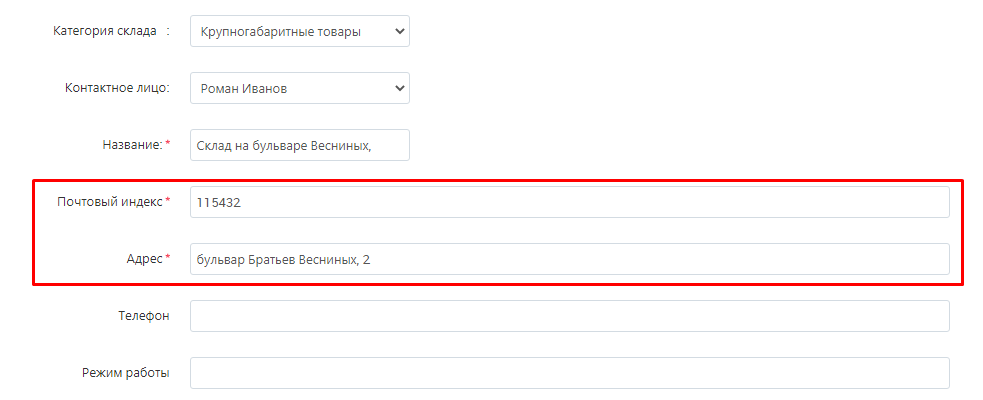
7. Enter the zip code and address where the warehouse is located.
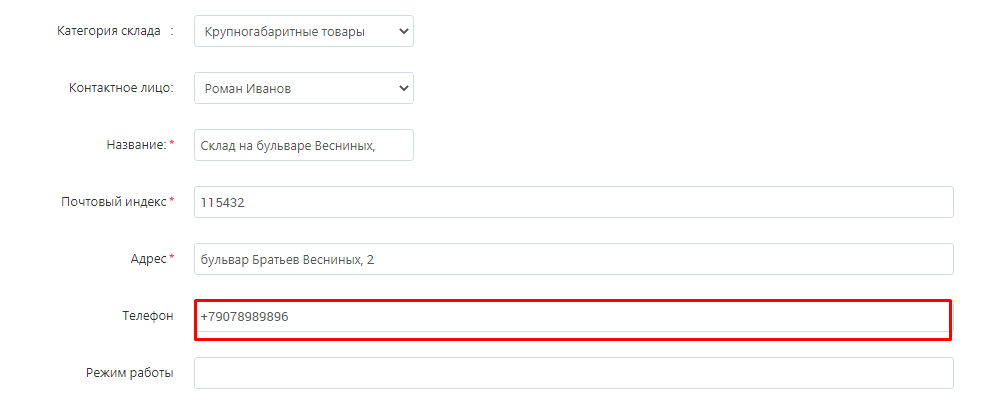
8. Provide a phone number for contact.
9. Under "Country" in the drop-down list, enter the country where the warehouse is located.
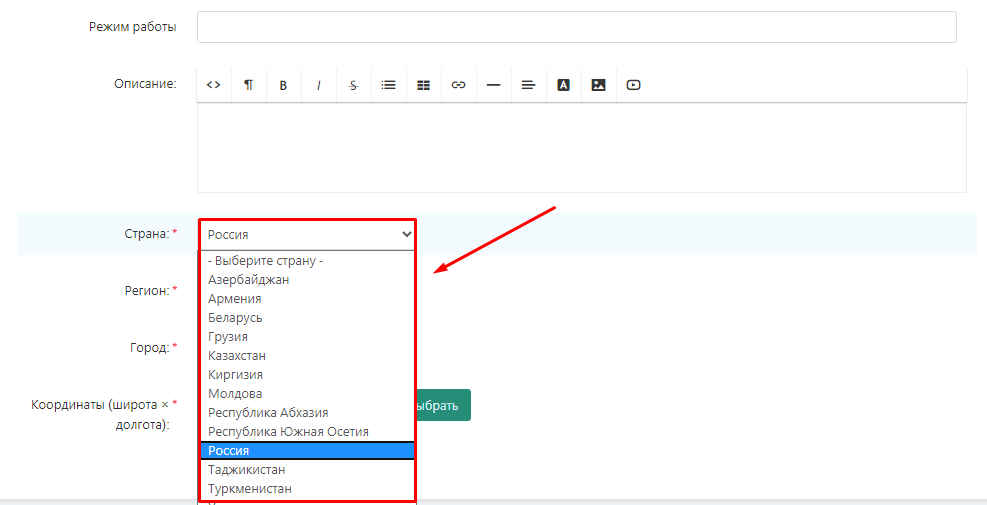
10. In the Region section, select the region where the warehouse is located.
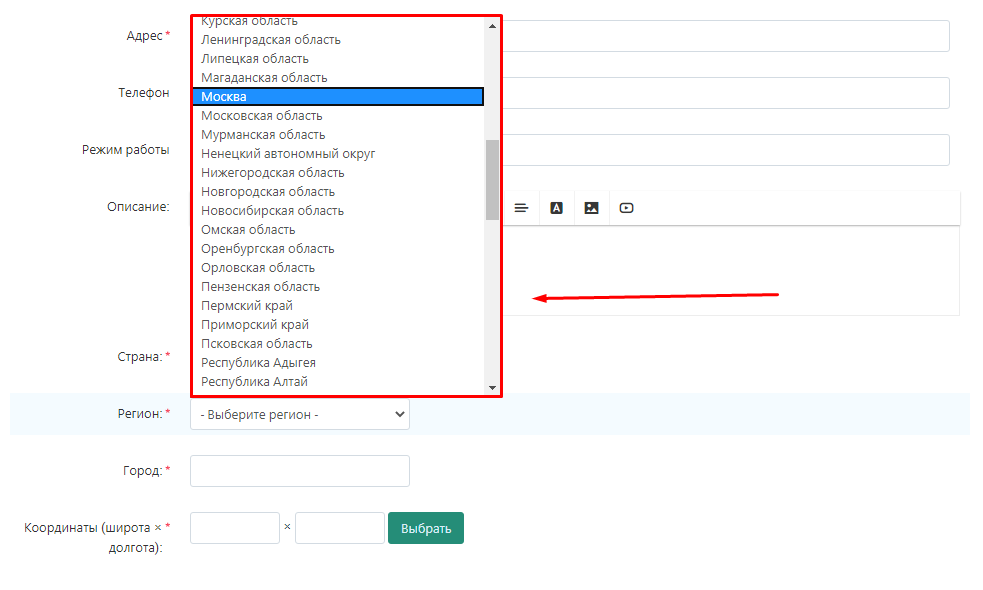
11. Write the name of the city where the warehouse is located.

12. Press the "Select" button in the "Coordinates" section to set the coordinates on the map.

12. 1 Specify the location of the warehouse on the map and click the "Set" button.
12. 2 Or specify exact coordinates in the corresponding fields. You can view the coordinates in any map service, for example, Yandex.Maps.
.

13. Click the "Create" button.

Settings
.
On this page you can customize the geographical zones where the goods from this warehouse will be displayed. This allows you to filter out regions where it is not possible to deliver goods from this warehouse.
.
1. Click the Settings tab.

2. Indicate in which rate zone the warehouse is located.
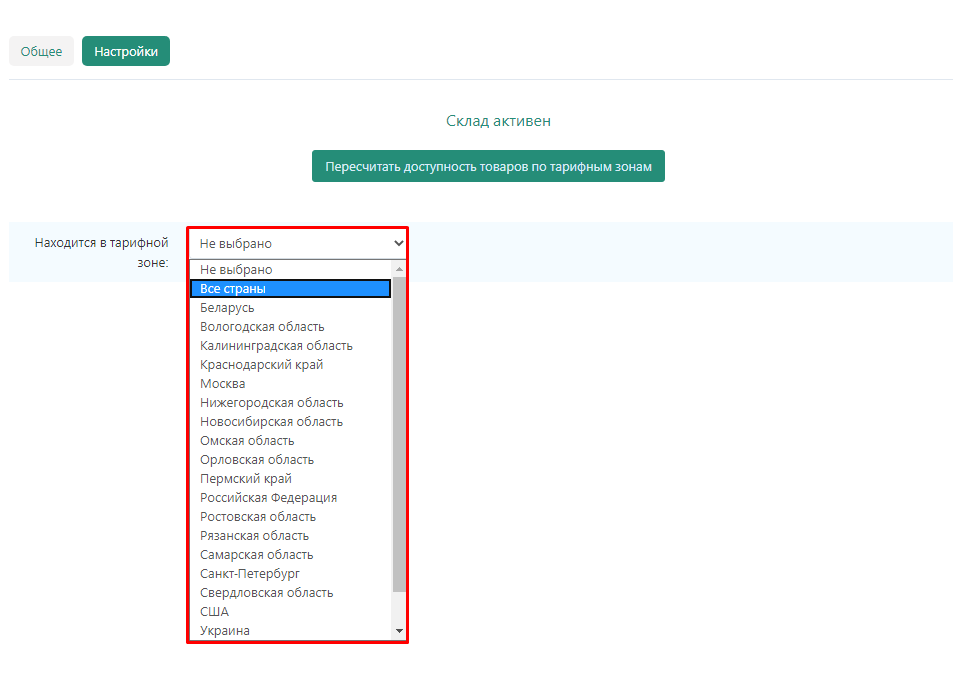
3. Check the boxes next to the countries, regions and cities where you want to display products from this warehouse.
Note! It is necessary to check all relevant regions, even if they partially duplicate each other. For example, as Russia, Moscow region and Moscow.
.
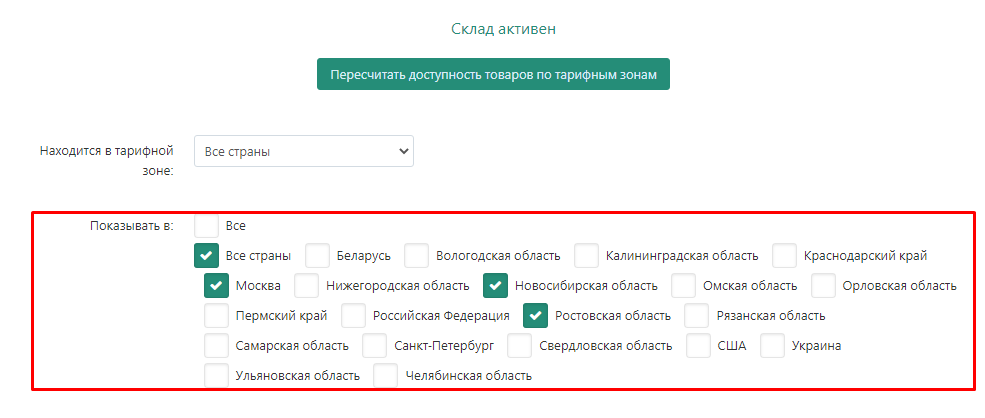
4. To select all rate zones, check the checkbox "All."
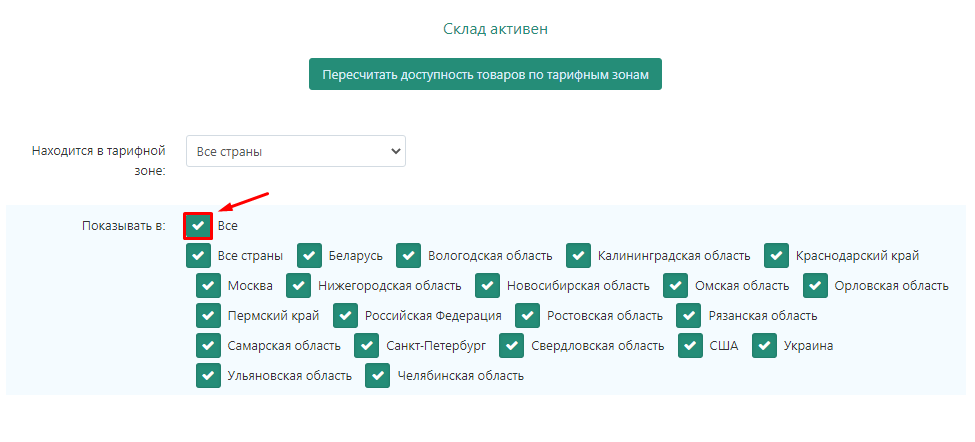
5. In case you change the settings of tariff zones after creating goods, click "Recalculate availability of goods by tariff zones".
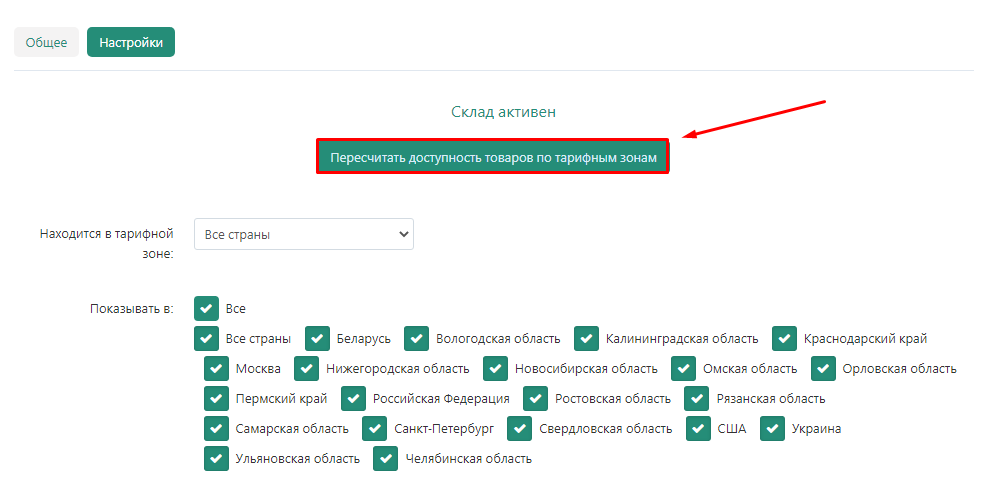
6. Click "Save" in the upper right corner.

7. A notification will appear that the information has been saved. After creating a warehouse, the information goes to moderation. Only after it is approved by the marketplace administrator, the warehouse will start to function in the system.

Cross-docking trading
A warehouse of this type assumes that the goods are initially in the seller's warehouse, but the marketplace handles the delivery of the sold goods.
General
1.Go to the "Administration" →"Warehouses and Shipments"→"Warehouses" tab.
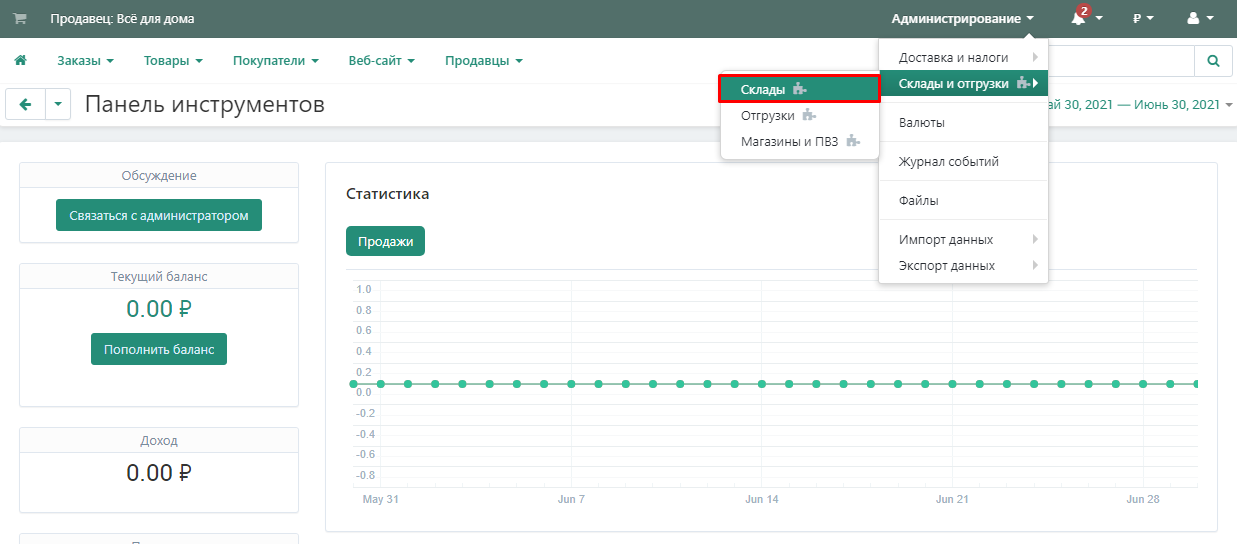
2.Click the "Add Store" button in the "Store Warehouse" section.

3. In the window that opens, select the warehouse type "Cross-Docking warehouse Trading".

4.Select a warehouse category from the previously created ones.

5.In the "Contact person" field, specify the administrator responsible for the warehouse operation. In the drop-down menu, all vendor administrators will be displayed in this field.

6. Link the seller's warehouse to one of the cross-docking warehouses. It is through this warehouse that the seller's goods will be delivered.

7.Specify the name of the warehouse.

8.Specify the postal code and address of the store.

9. Specify a phone number for communication.

10.In the "Country" section of the drop-down list, specify the country where the store is located.

11.In the "Region" section, select the region where the store is located.

12.Enter the name of the city where the store is located.

13.Click the "Select" button in the "Coordinates" section to set the coordinates.

13.1.Indicate the location of the warehouse on the map and click "Install".

13.2 Or specify the exact coordinates in the appropriate fields. The coordinates can be viewed in any map service, for example, Yandex.On maps.

14.Click the "Create" button.

15.A notification will appear that the information has been saved.

Delivery
1.Go to the "Delivery" tab.

2. Check the box "Real-time delivery calculation" so that the delivery parameters are calculated automatically during the purchase process.

3. If you have checked the box "Real-time delivery calculation", then select the delivery method from the drop-down menu.

4.If you have checked the box "Real-time shipping calculation", then specify the packing time.

5.If you did not check the box "Real-time delivery calculation", specify the delivery time.

6.If you did not check the box "Real-time shipping calculation", specify the shipping cost.

7. Click the "Save" button in the upper-right corner.

8.A notification will appear that the information has been saved. After the warehouse is created, the information goes to moderation. Only after it is approved by the marketplace administrator, the warehouse will begin to function fully in the system.

Delivery to the marketplace warehouse
This type of warehouse is intended for adding goods to the system that are planned to be delivered to the marketplace warehouse.
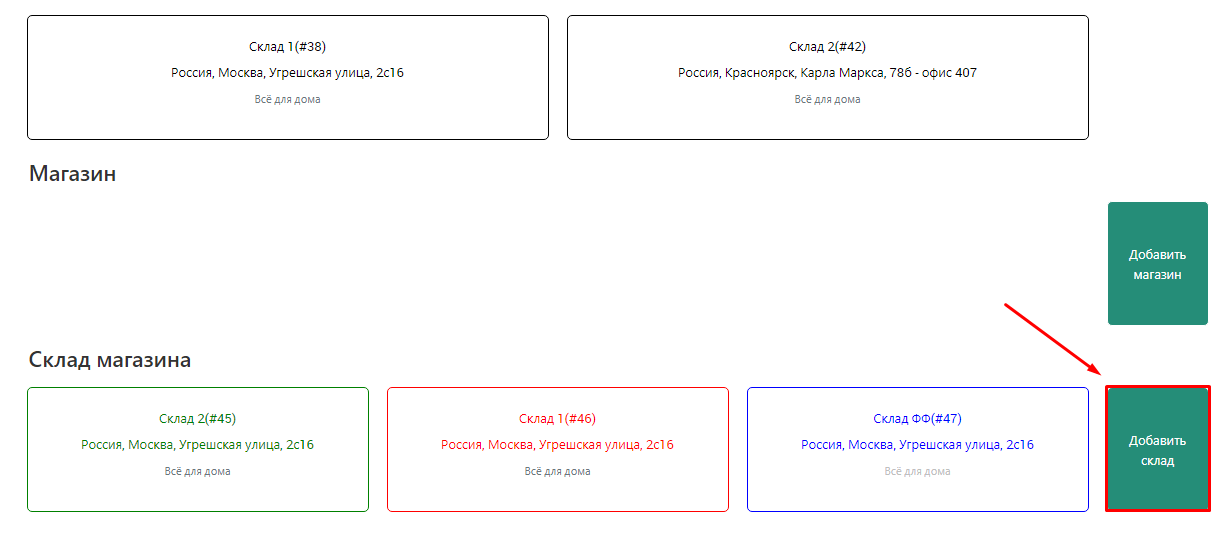
1.Go to the "Administration" → "Warehouses and Shipments"→"Warehouses" tab.
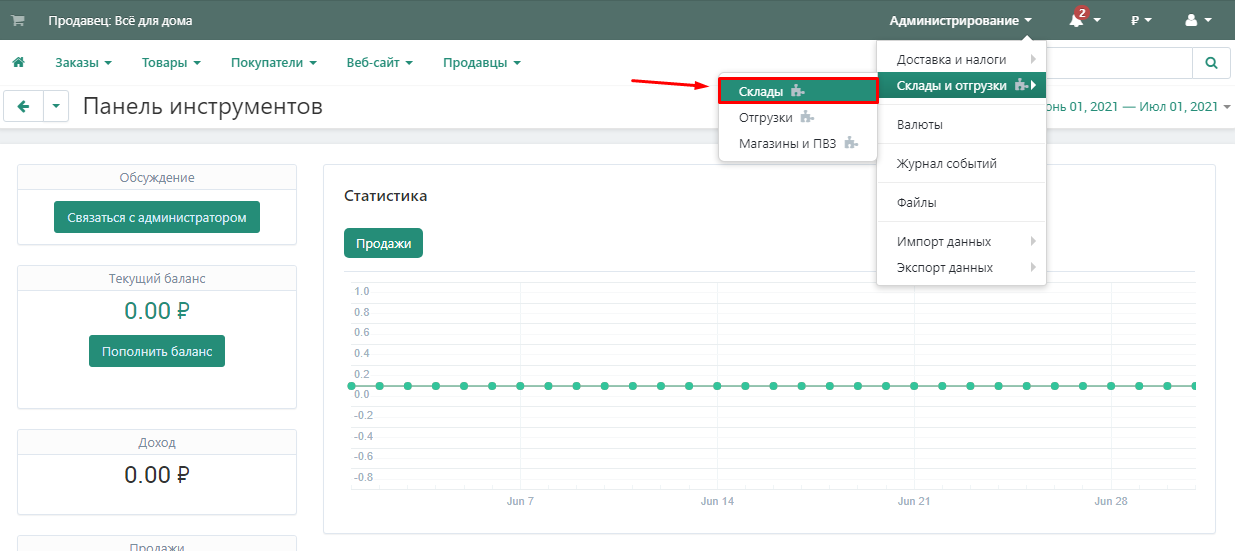
2.Click on the "Add Warehouse" button in the appropriate section.
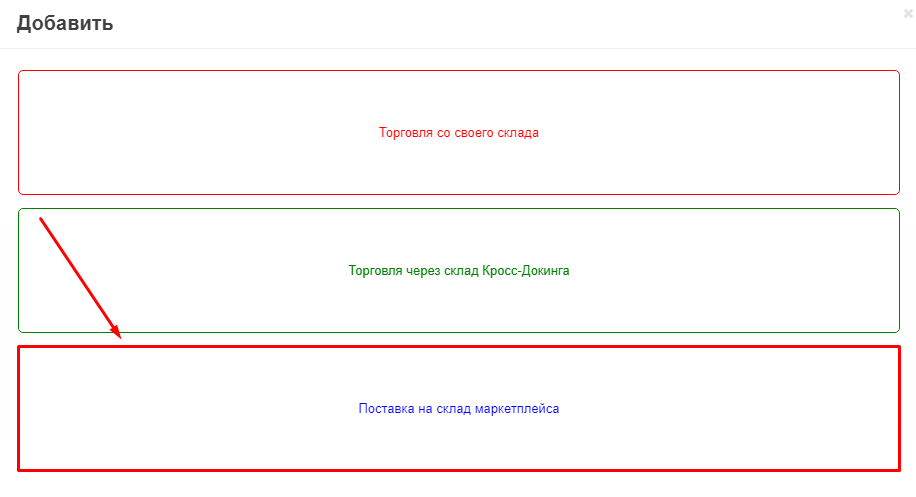
3.In the window that appears, select the type of warehouse "Delivery to the marketplace warehouse".
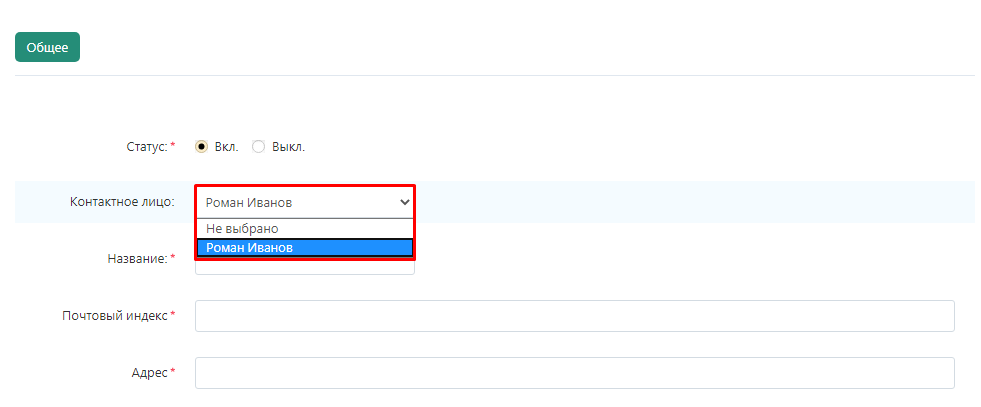
4.In the drop-down menu, select one of the administrators who will be responsible for the operation of this warehouse.
5. Specify the name of the warehouse.
Please note: The name of the warehouse should be informative so that it is immediately clear which warehouse it is about. It is most convenient to include the address, type and category of the warehouse in the name.

6.Specify the postal code and the address where the warehouse is located.
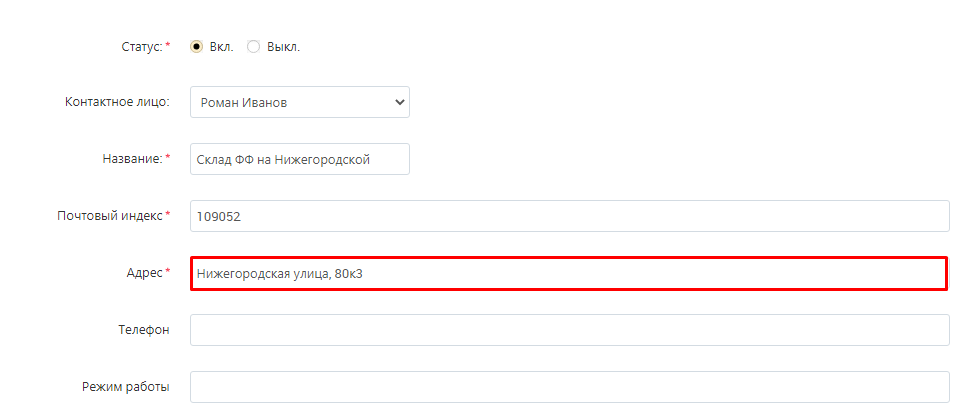
7.Specify the phone number for communication.

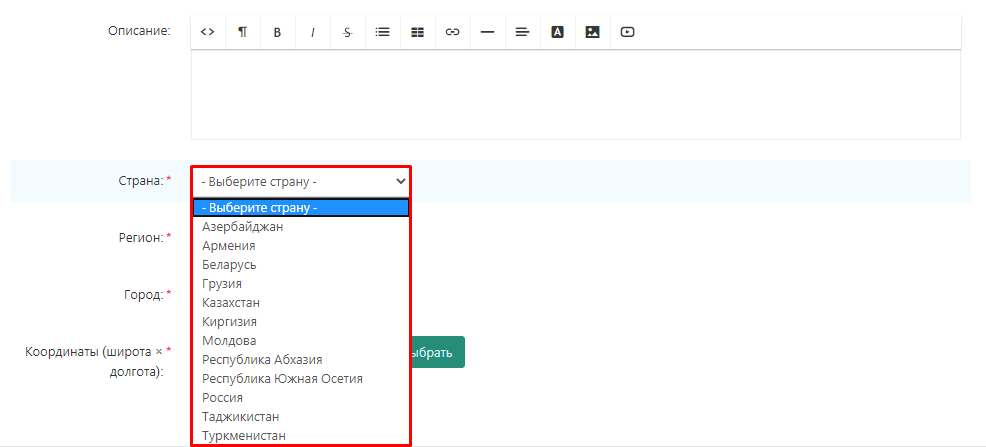
8.In the "Country" section, specify the country where the warehouse is located in the drop-down list.
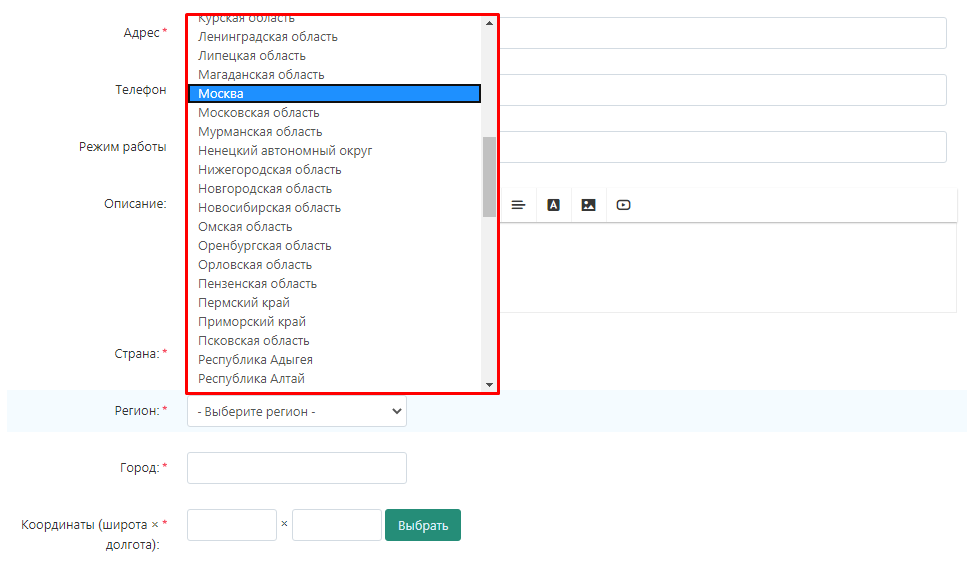
9.In the "Region" section, select the region where the warehouse is located.
10.Enter the name of the city where the warehouse is located.

11.Click the "Select" button in the "Coordinates" section to set the coordinates on the map.

11.1.Indicate the location of the warehouse on the map and click "Install".
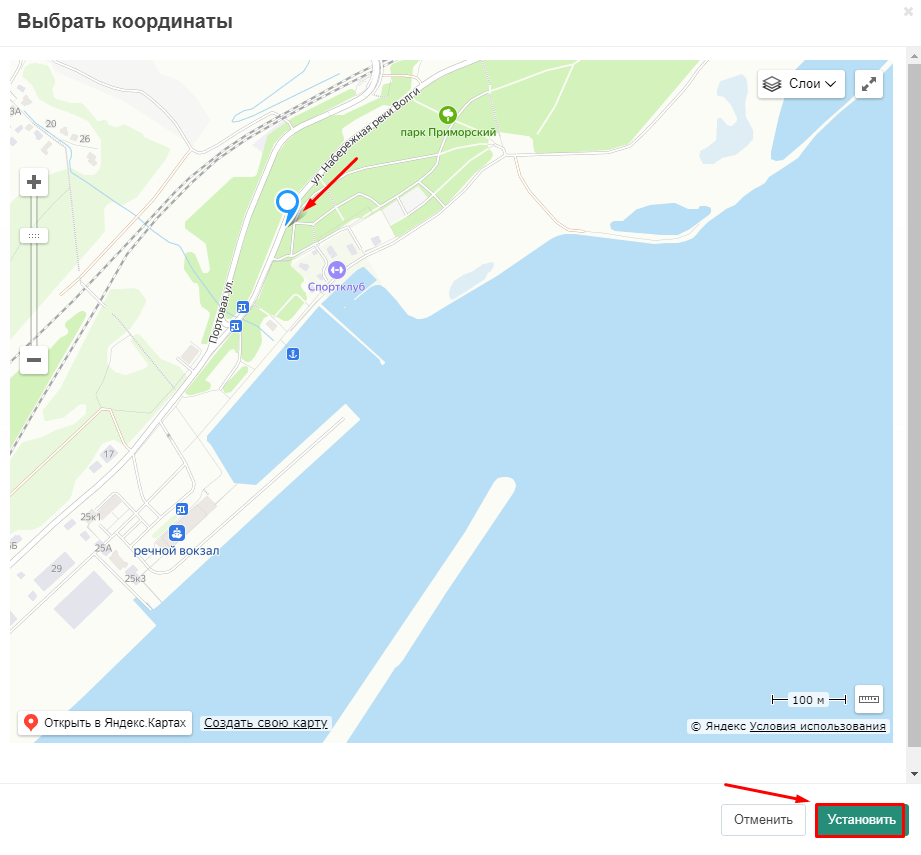
11.2 Or specify the exact coordinates in the appropriate fields. The coordinates can be viewed in any map service, for example, Yandex.On maps.

12.Click the "Create" button.

13.A notification will appear that the information has been saved. After the warehouse is created, the information goes to moderation. Only after it is approved by the marketplace administrator, the warehouse will begin to function fully in the system.

Moderation of seller's warehouses
After the seller creates warehouses, they must be checked and approved. Only after that, the seller will be able to bring the goods to the warehouse and start selling the goods on the marketplace.
1.Go to the Modules →Moderation→Warehouses tab.

2. In the list that opens, select the desired seller and click on the triangle next to the name to open the list of warehouses in need of moderation.

3. Before approving a warehouse, it is necessary to study the information about the warehouse. To do this, click on the name of the warehouse.
Please note the following points:
warehouse address;whether the responsible person is indicated;if the warehouse is for cross-docking trading, make sure that the marketplace's cross-docking warehouse is linked to the warehouse;if the warehouse is for cross-docking trading, review the delivery parameters;if the warehouse is for delivery to the marketplace warehouse, make sure that the status is set to "off". This condition means that this category is not reflected in the showcase.

4. What to choose?, click on the "view from the window" button and enter the name?, what to enable - click on the "view from the window" button.

5. We open up to find a common language with other citizens who can help or attract attention and click the "Select" or "Close" button.
6. Whatever you find or don't point to a small number of comments, check this box as well, note that it is at the mercy of the upper corner and select "Select selected" or "Select selected" in response to the request.

7. After the model has appeared, the product has a "Products" tab that allows you to produce goods on site.

Opening of the exhibition on the field
The platform makes it as easy as possible to manipulate goods: control the quantity available to customers in different regions, inform you about your intentions to bring goods to the marketplace warehouse, and so on. No, it's not for us.
1.Go to the "Administration" →"Bland and loadings" tab→"Snacks".

2. Select what you want to know from the list and enter it by clicking on the name.

3. Go to the "Products" tab.

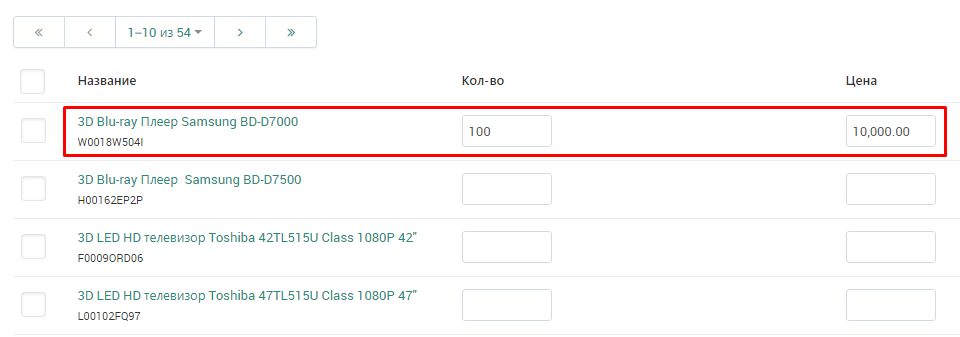
4. Focus on connecting with everything that is happening. Description of each item. This was done to indicate the category of comrades. It is for this class that all institutions for this class have been created.
Please note: for each warehouse, you can specify your own price, which differs from the price in other warehouses and from the price in the product profile. The display case will display the name of the bartender.
np>/p>np>
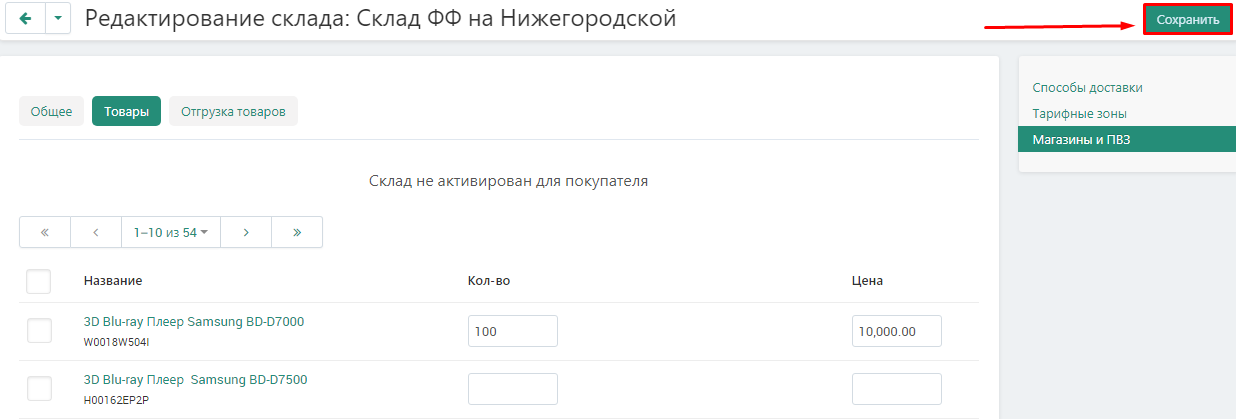
5. Click the "Navigate" button in the upper corner.
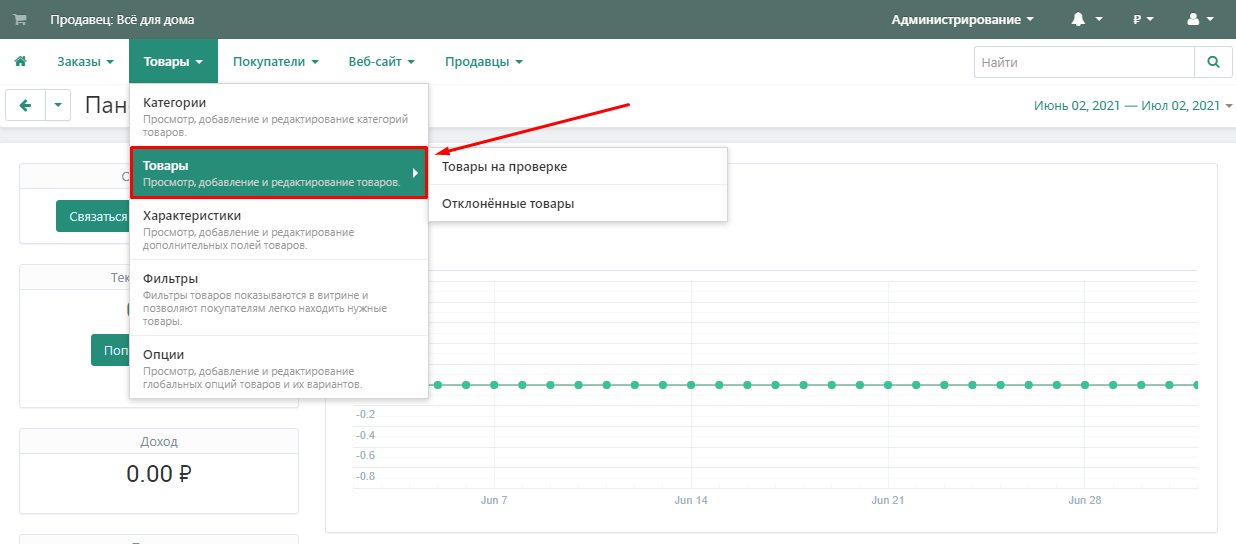
6. Only because of this, who understands the words in the market - through the card of Comrade. Go to the "Products" →"Products" tab.
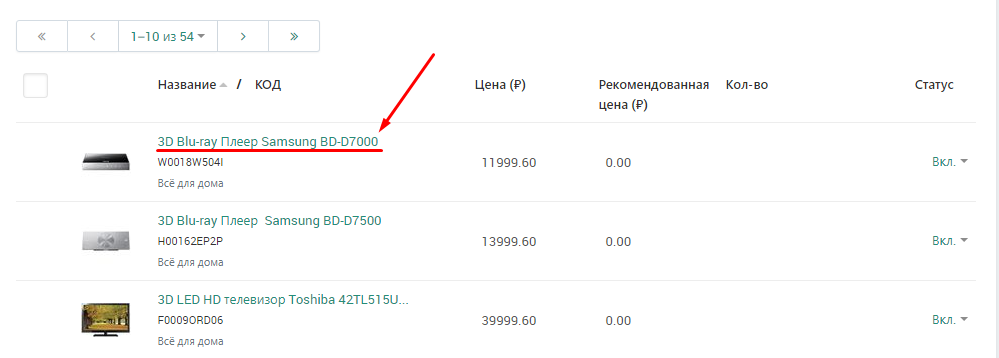
7. Select the desired product and enter it by clicking on its name.
8. Go to the On-site Culture tab.

9. Open the page that displays a list of all the actors who may be involved in making changes.
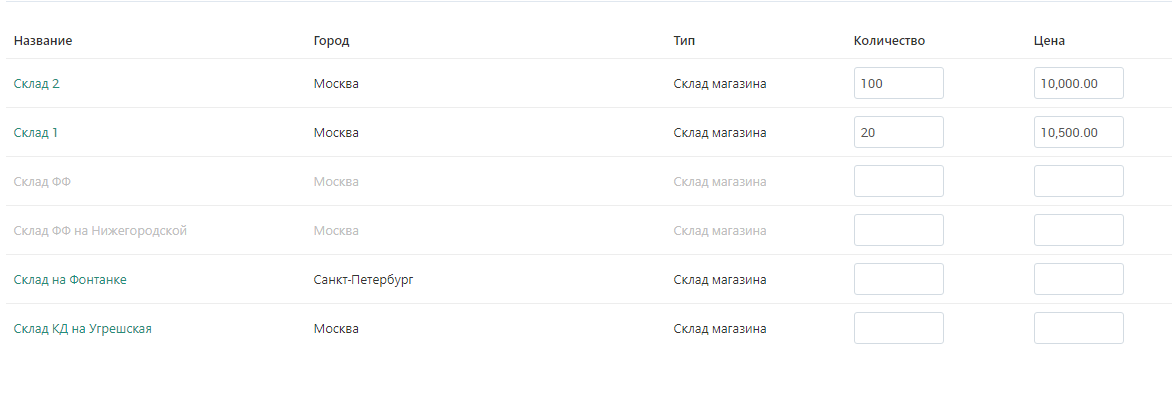
10.Click on the "Navigate" button in the upper corner.

Shipments and returns
In order to produce goods from the market lace warehouse, I need to install them in the warehouse. The additional burden comes from the paid market-play with the help of the Logic fashion.
Loads
Creating a load
1.Go to the "Administration" →"Bland and loadings" tab→"Snacks".

2. Select Juliana Market as a witness, it is located at the bottom of the page.

3. Open the "Change products" page. In fact, this is just a random case when you are next to a teacher and give lectures at each of the faculties. meetings for cross-docking negotiations).

4. Show us how to do this and how exactly you are going to place the marketplace on it.

5. Click on the "Save" button in the upper corner. At this point, a shipment will be created, with which you can transfer to the marketplace all the information necessary for cargo acceptance. If you have ordered goods for different stores, each store will have its own load.

6. Go to the "Product downloads" tab.

7. Or go to the "Administration" →"Contributions and Loadings" tab→"Loads".

8. Focus on observing everything that is happening. Select the desired one and click on your name.

Products
This page displays a table with a list of all the products in the package.
1. Each row in the table corresponds to one product and contains the following information:
- limited liability company;completely unnecessary at the root;
- completely unexpected.

Packaging
That is why you can distribute products by catalogues and flights, which will help you choose between products at the market-play location.
1. Go to the "Packaging" tab.

2. There is a section "information about what is happening" at the top of the page, but this is not accidental.

3. Click the "Add" button to add a box and start adding products.

4. Choose the type of packaging "Box".

5. Specify the number of boxes needed to pack the product.

6. Click the "Add" button in the lower right corner.

7. After that, the specified number of lines with information about the boxes will appear. Each line contains the box number, information about the number of items in the box, and the barcode of the box.

8. Click on the triangle next to the box number to open the detailed information about the box.

9. Click on the free field in the "Put goods in the box" section, a list of goods that need to be put in the box will appear. Select the desired products and click on them.

10. Click the "Add" button next to the field.

11. A list of products in this box will appear in the box information. The product line will contain information about the number of units of such goods in the shipment and the number of units not distributed in boxes. On the right side, you can specify the number of items placed in this box.

12. Click on the "Save" button to save information about the contents of the box.

13. The boxes can be packed on a pallet. To do this, click the "Add" button.

14. Choose the type of packaging - pallet.

15. Specify the number of pallets.

16. Click the mouse in the free field in the "Add box" section. A list of boxes that need to be added to the pallet will appear. He will select the boxes that you will pack in this pallet.
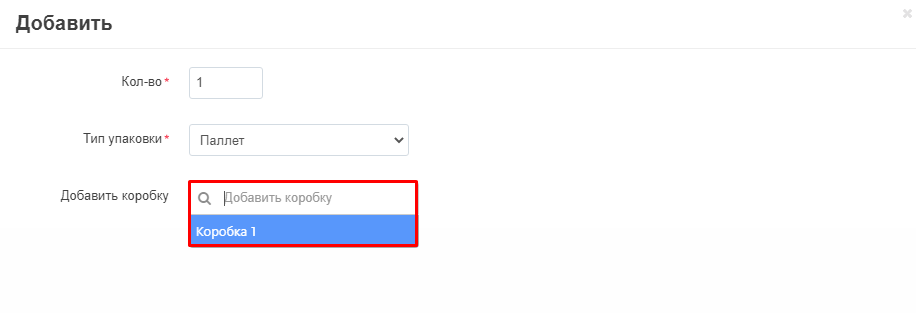
17. Click the "Add" button in the lower right corner.
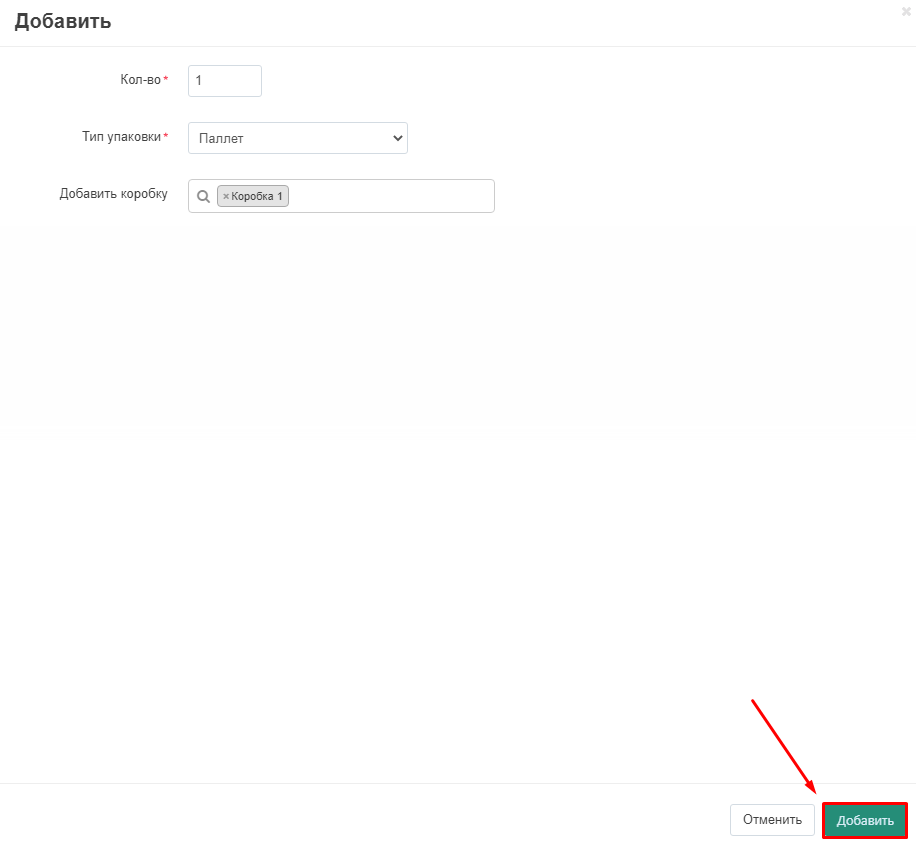
18. You can pack both a box and a separate product on a pallet.

19. Click the mouse in the free field in the "Put the goods on the pallet" section. A list of products that can be packed on a pallet will open. Select the desired products and click the "Add" button.

20.The pallet information will show a list of products in this box. The product line will contain information about the number of units of such goods in the shipment and the number of units not distributed in boxes and pallets. In the right part, you can specify the number of units of goods stacked on this pallet.

21.Click the mouse in the free field in the "Add box" section. A list of boxes that need to be added to the pallet will appear. He will select the boxes that you will pack into this pallet and click the "Add" button.

22.Click on the "Save" button to save information about the contents of the pallet.

Delivery date
1. Go to the "Delivery Date" tab.

2. Click on the shipment date and select the date in the calendar when the goods are ready to be shipped. Pay attention to the date format: month, date, year.

3. Specify the time of shipment.

4.Click on the date of receipt and select the date in the calendar when you will approximately deliver the goods to the marketplace warehouse. Pay attention to the date format: month, date, year.
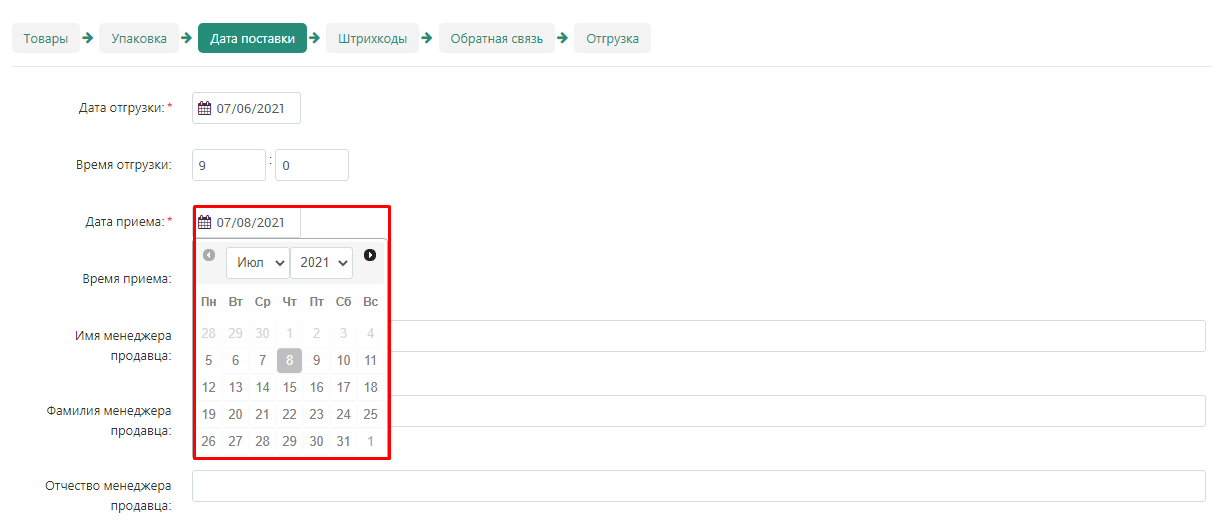
5. Specify the approximate time when you will deliver the goods to the marketplace warehouse.

6. Specify the full name of the manager who will be responsible for the shipment from the seller.
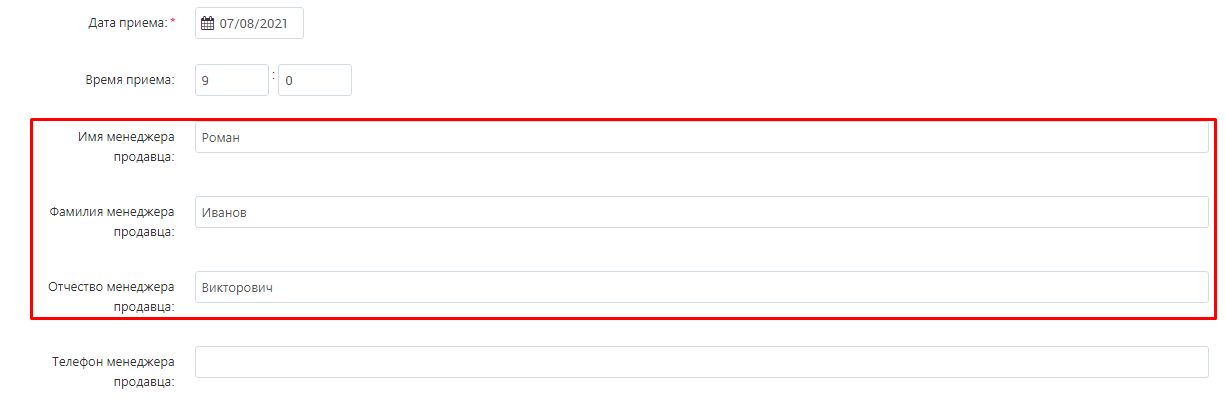
7. Specify the manager's phone number for communication.

Barcodes
On this page, you can customize the appearance of the barcodes, download them to your computer, print and paste them on boxes and pallets.
1. Go to the "Barcodes" tab.

2. Specify the length and width of the barcode in pixels.

3. If you have a lot of boxes and pallets, check the box "Divide barcodes into folders". This will make it easier to find the desired barcode.

4. Click the "Download" button, then print the barcodes and paste them on the boxes and pallets.
Important: The barcodes must be pasted on the outside of the boxes so that they can be read without unpacking the pallet.
n>

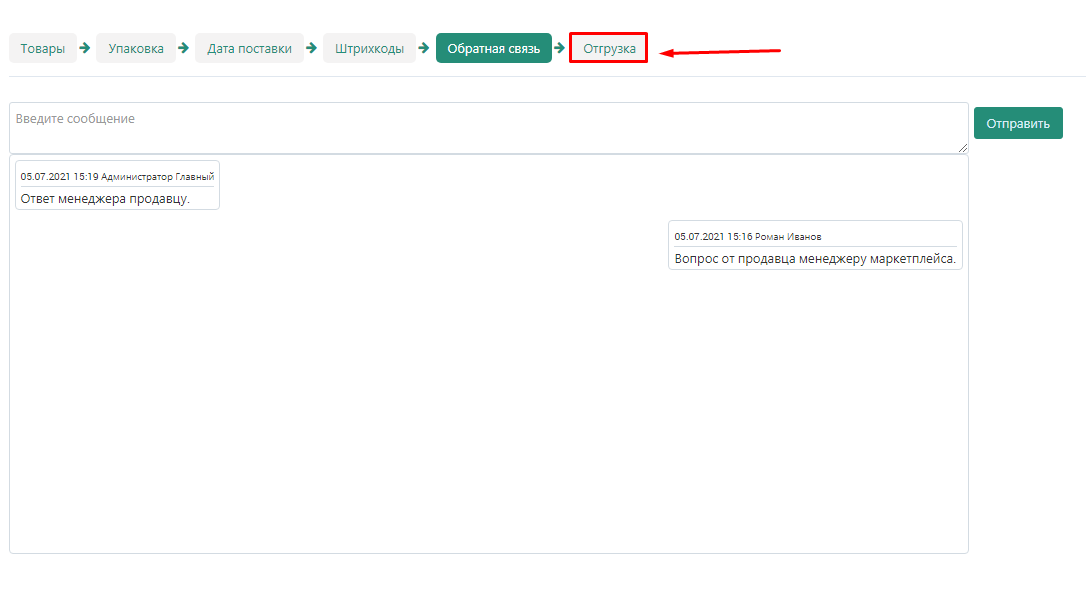
Feedba> On this page, the seller can contact the marketplace manager.
1. Go to the "Feedback" tab.

2. Click the "Start dialog" button.

3. Write your question in the special field and click the "Submit" button.
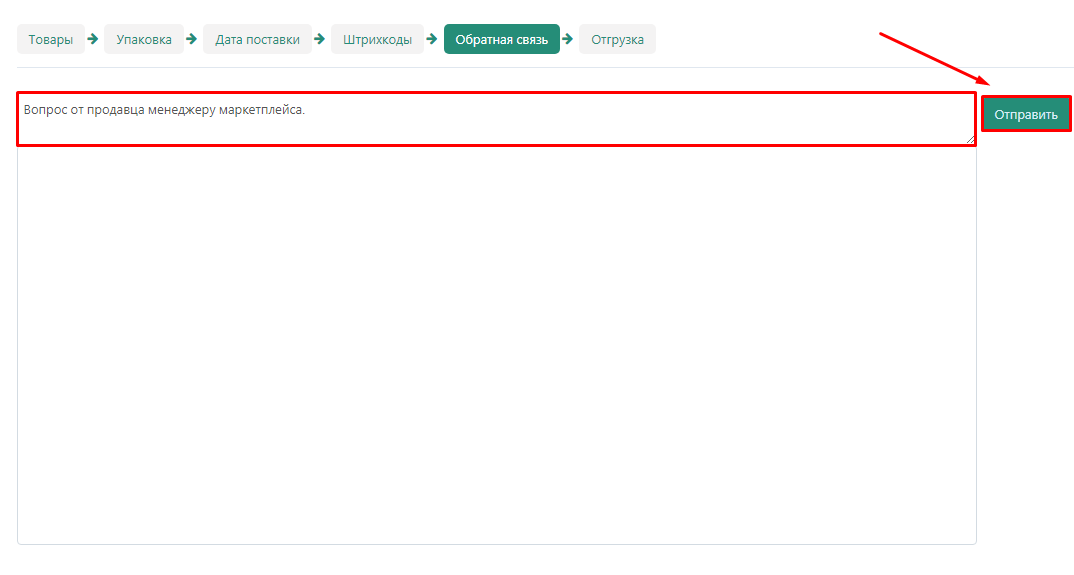
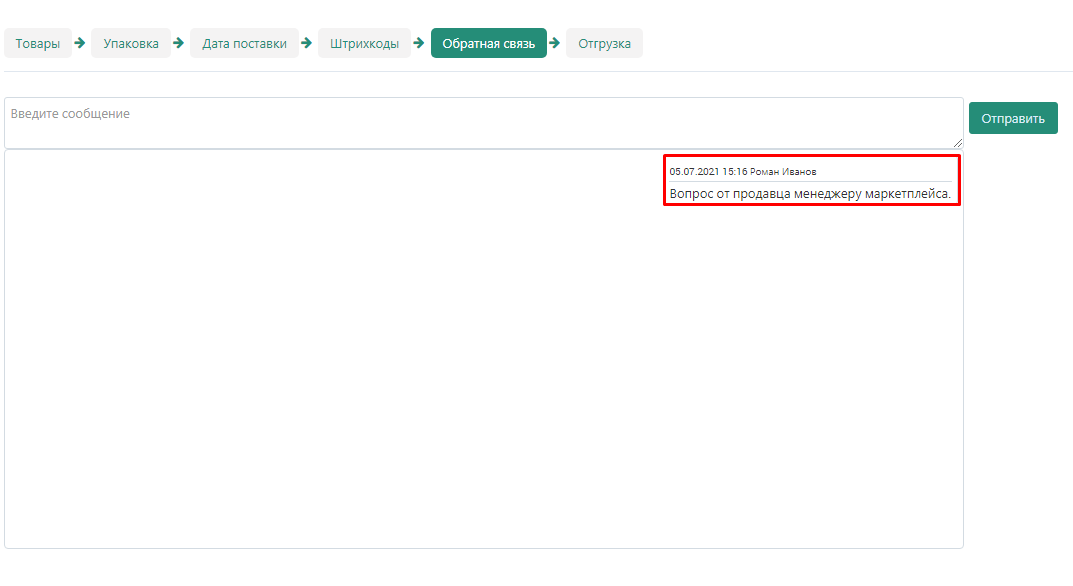
4. The message will appear in the chat.
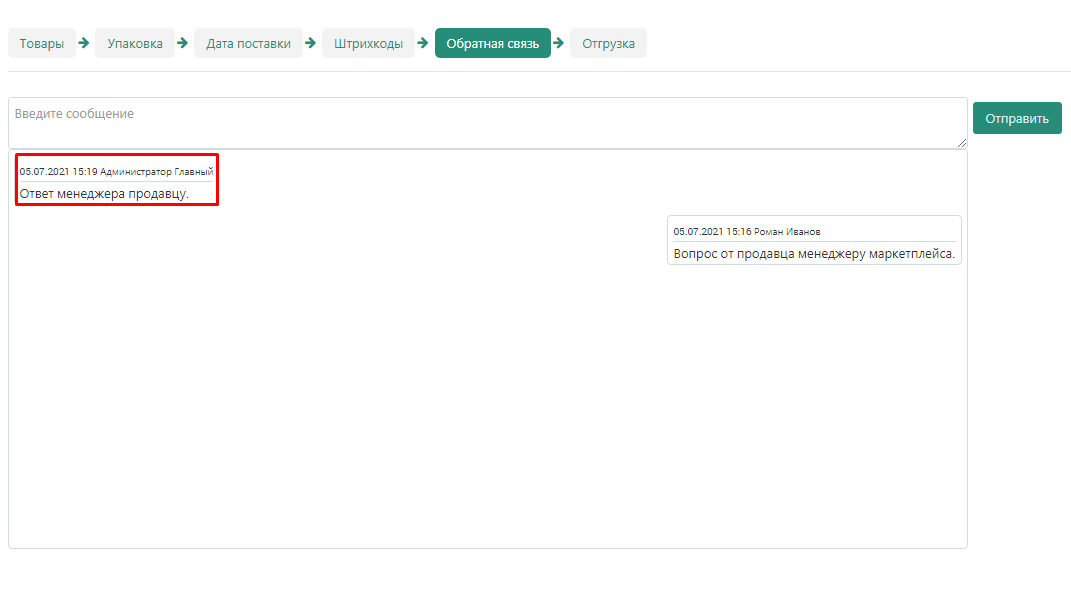
5. The manager's response will later also appear in the chat above your message.
Shipping
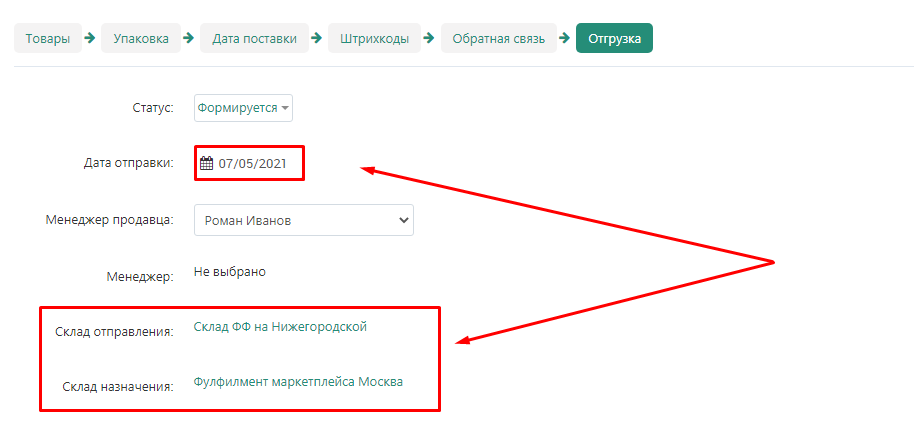
This page provides basic information about the shipment, as well as its status.
1. Go to the "Shipping" tab.
2. Check the information about the delivery date and warehouses, from where and where the goods will be delivered.
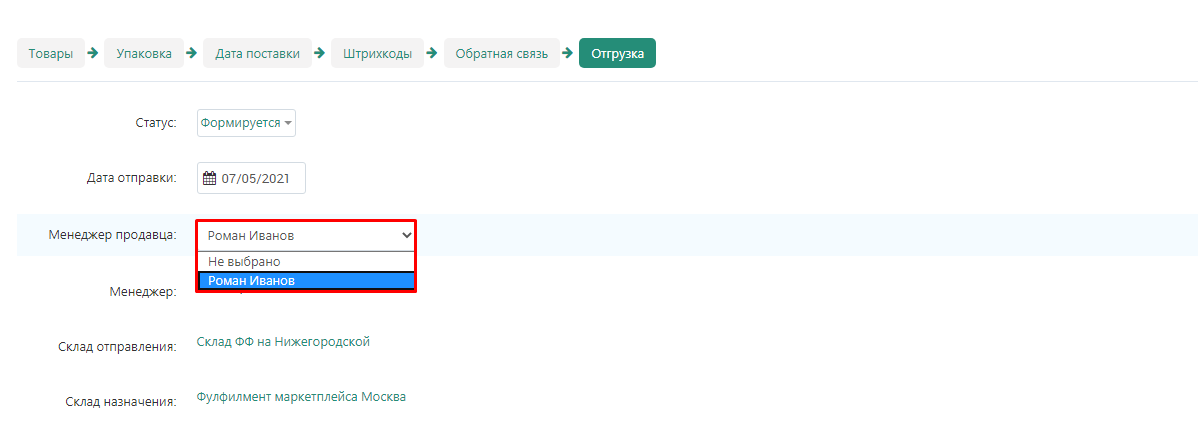
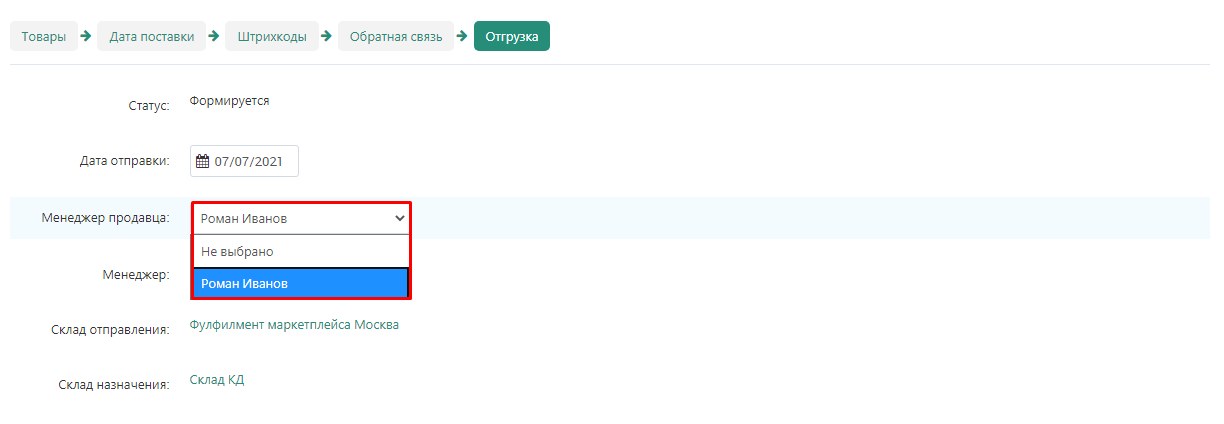
3. Specify the manager responsible for this shipment.
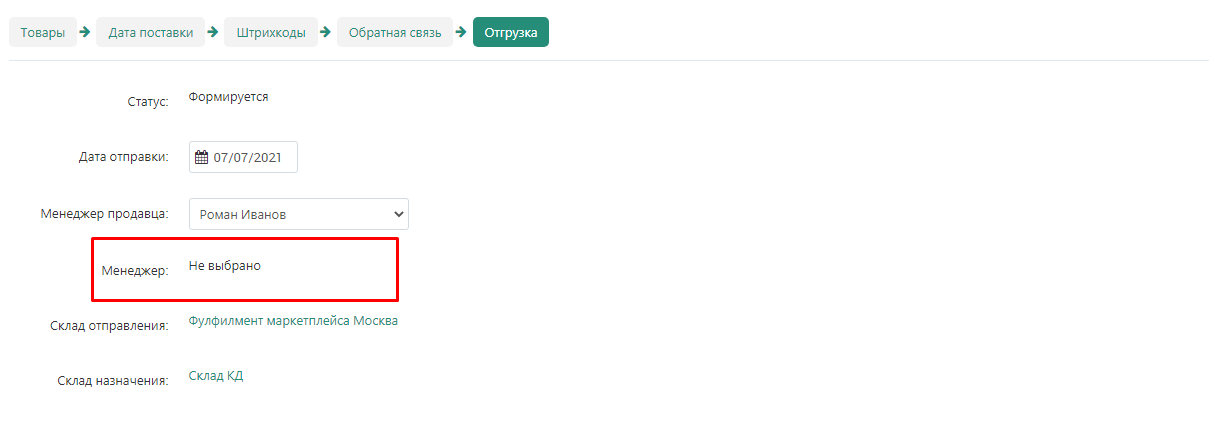
4. After moderation, information about the marketplace manager overseeing this shipment will appear on the same page.
Before moderation:
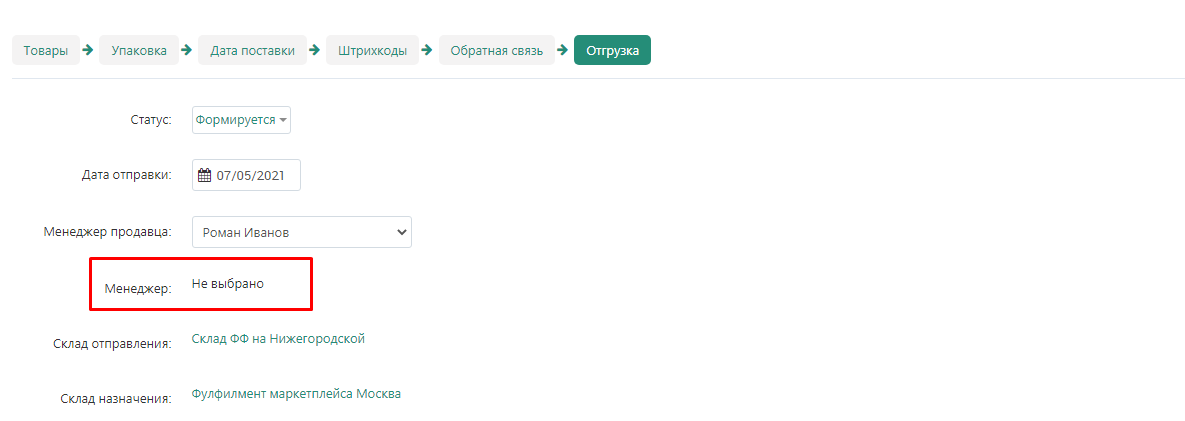
After moderation:
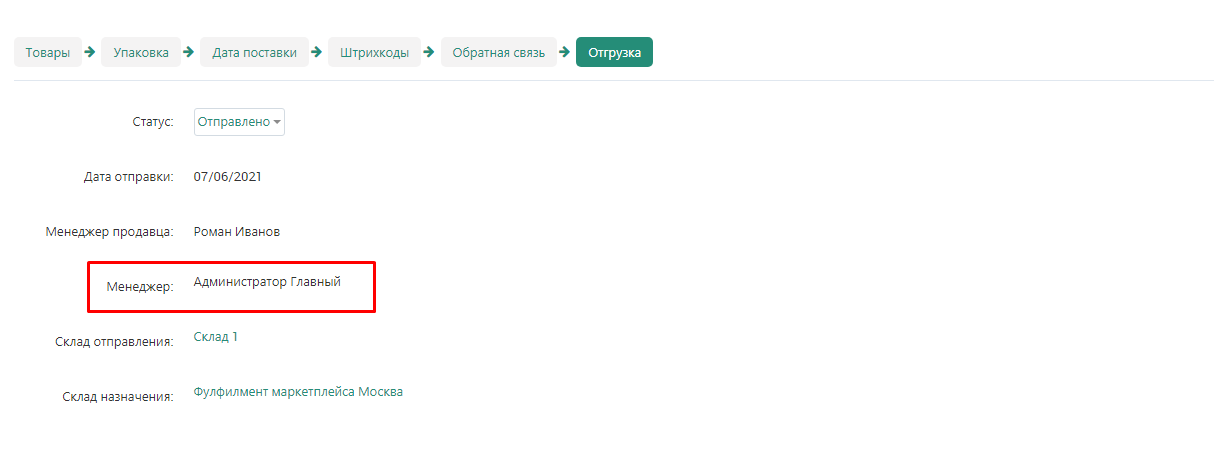
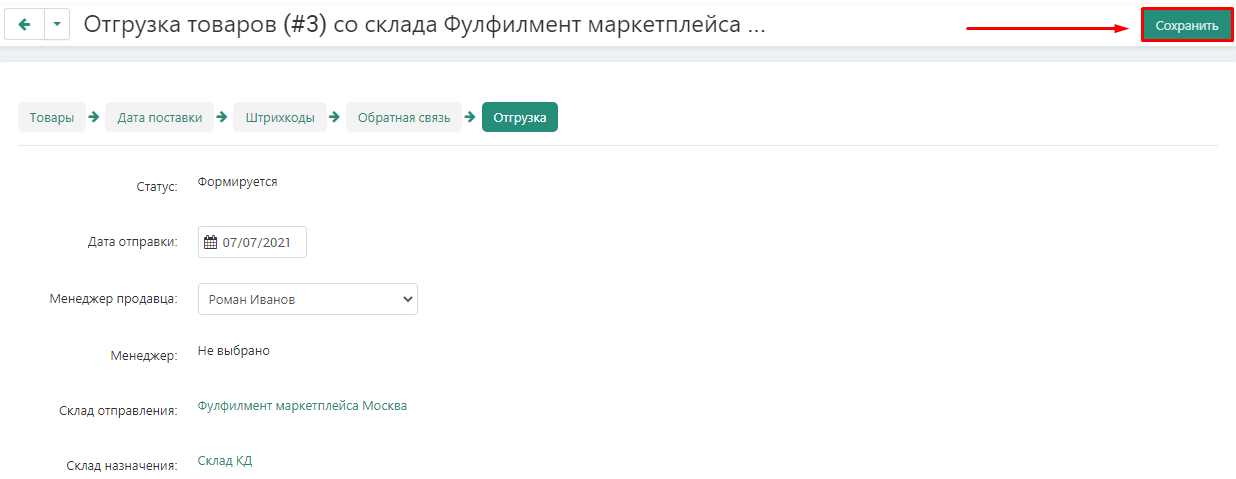
5. After completing the shipment configuration, change the status from "In progress" to "Ready to ship". After that, the shipment will go to moderation.
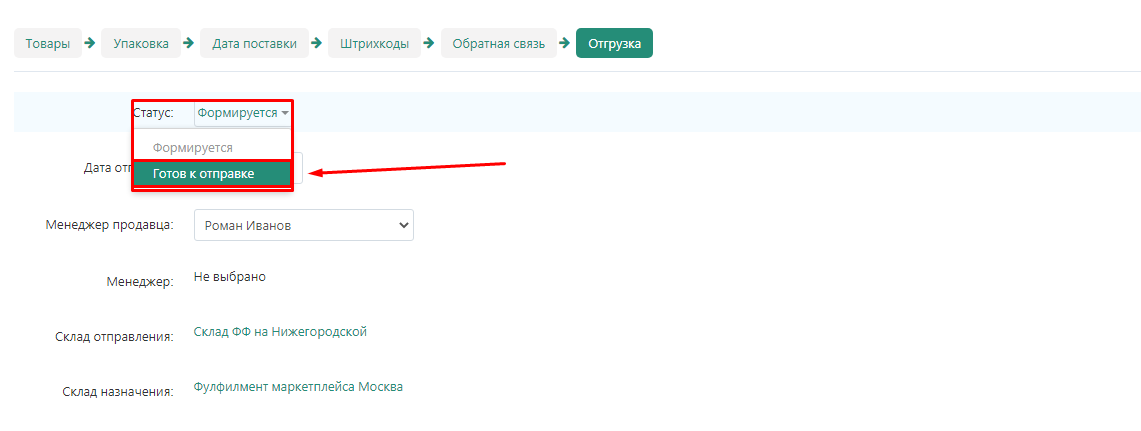
Shipment statuses
Shipment statuses allow you to track the path of goods to the marketplace warehouse.
1."Formed" is the status of the shipment in the process of formation. At this stage, the delivery time data is clarified, a shipping person is appointed, new goods are added and packed into cartons and pallets.

2."Ready to ship" - the status is set by the seller. This is actually a notification to the marketplace that a new delivery from a specific seller with specific products is expected in the near future. After setting this status, you can no longer make changes to the shipment.

3."Sent" - this status can be set by the seller or moderator, depending on whether the product is delivered to the marketplace warehouse by the seller or the marketplace transport company. The status means that the product has left the seller's warehouse and is on its way.

4."Delivered" - the status is set by the moderator based on information from the marketplace warehouse. The status means that the cargo has been received by the warehouse, but the availability of the goods has not yet been verified with the invoice.

5."Accepted" - the status is set by the moderator based on information from the marketplace warehouse.The status means that the product has been checked against the invoice and accepted into the warehouse.

Refunds
If the seller's goods in the marketplace warehouse are not sold for a long time, or the seller wishes to move them to another warehouse, he can issue a refund.
1.Go to the "Administration" →"Warehouses and Shipments"→"Warehouses" tab.
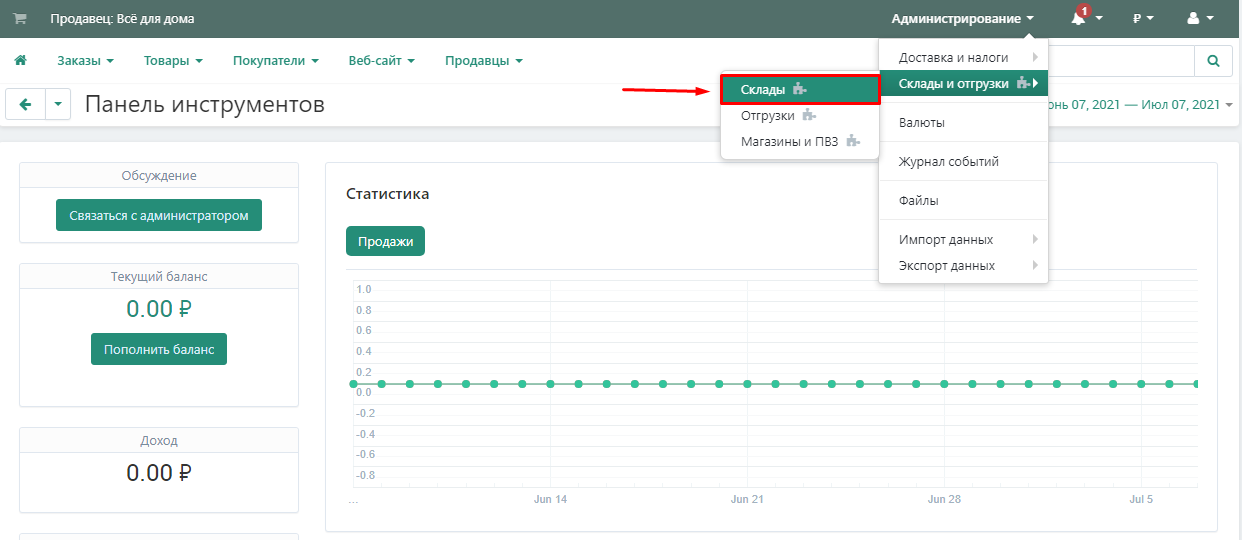
2.Select the marketplace fulfillment warehouse from the list, it is located at the bottom of the page.
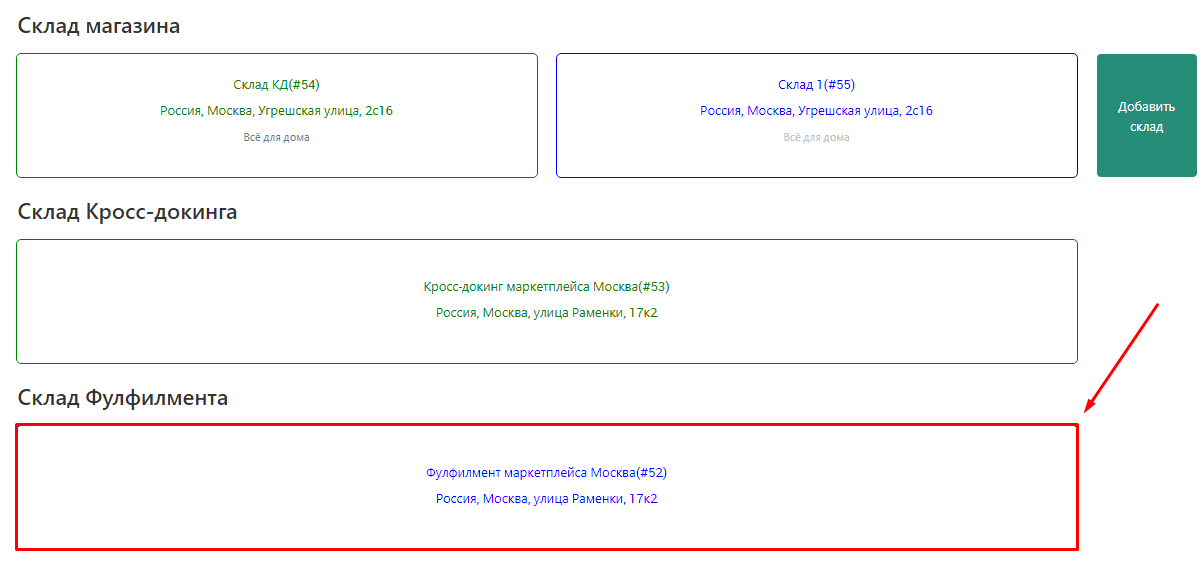
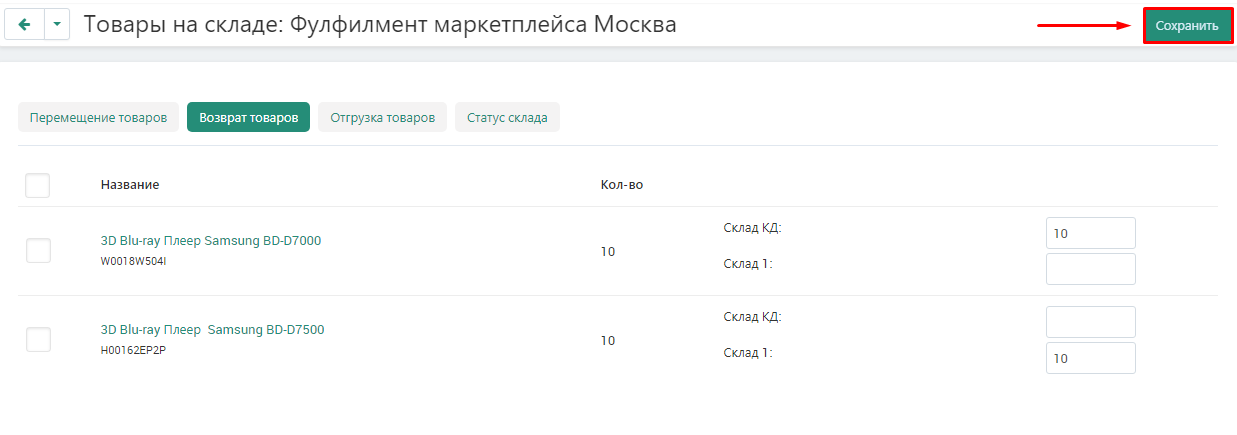
3. Go to the "Return of goods" tab.

4. This page displays all the products in the marketplace's warehouse. Each product has one line. Each line contains:
- the name of the product;
- the number of products in the marketplace warehouse;
- the list of warehouses to which the product can be moved.

5. In the field opposite the desired warehouse, specify the quantities of goods that need to be returned to the seller's warehouse.

6. Click the "Save" button in the upper-right corner. At this point, refund shipments will be created. If different warehouses were specified as the return address, then a separate shipment will be created for each warehouse.
7.Go to the "Shipping of goods" tab.

8.Or go to the "Administration" →"Warehouses and Shipments"→"Shipments" tab.

9.A page will open with a list of all shipments. Select the one you need and click on its name. By forming and sending the shipment to

Products
This page displays a table with a list of all the items in the shipment.
1. Each row in the table corresponds to one product and contains the following information:
- the quantity of goods in the shipment;
- how many goods are distributed in boxes;
- how many defective items in the shipment;
- how many items are not reported in the boxes;
- how many are accepted.

Delivery date
1. Go to the "Delivery Date" tab.

2.Click on the shipment date and select the date in the calendar when the goods are ready to be shipped. Pay attention to the date format: month, date, year.

3.Specify the shipping time.

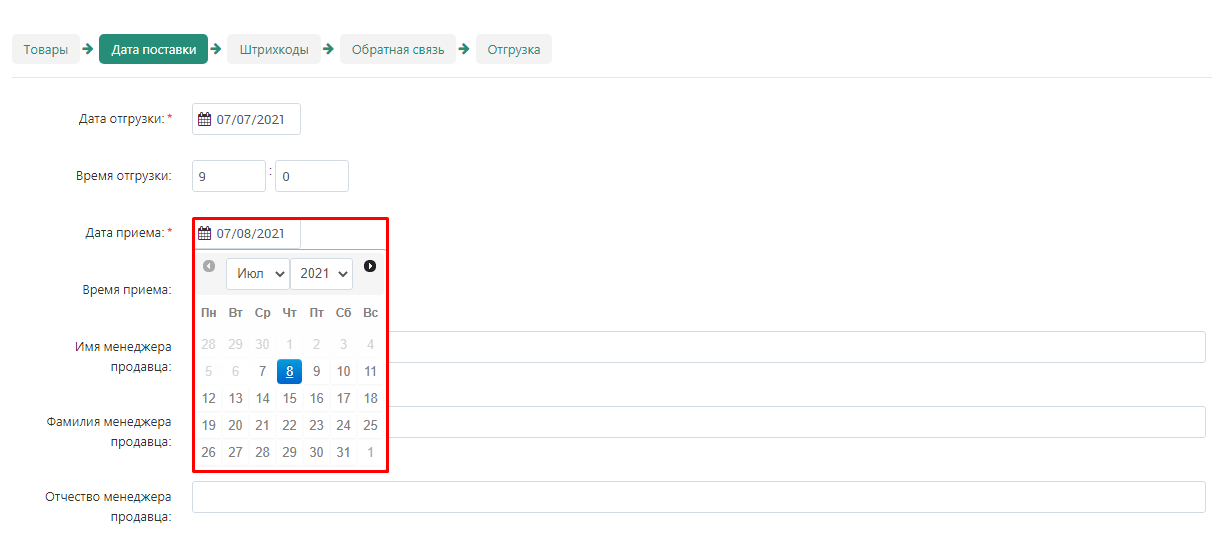
4.Click on the date of receipt and select the date in the calendar when you will approximately deliver the goods to the marketplace warehouse. Pay attention to the date format: month, date, year.
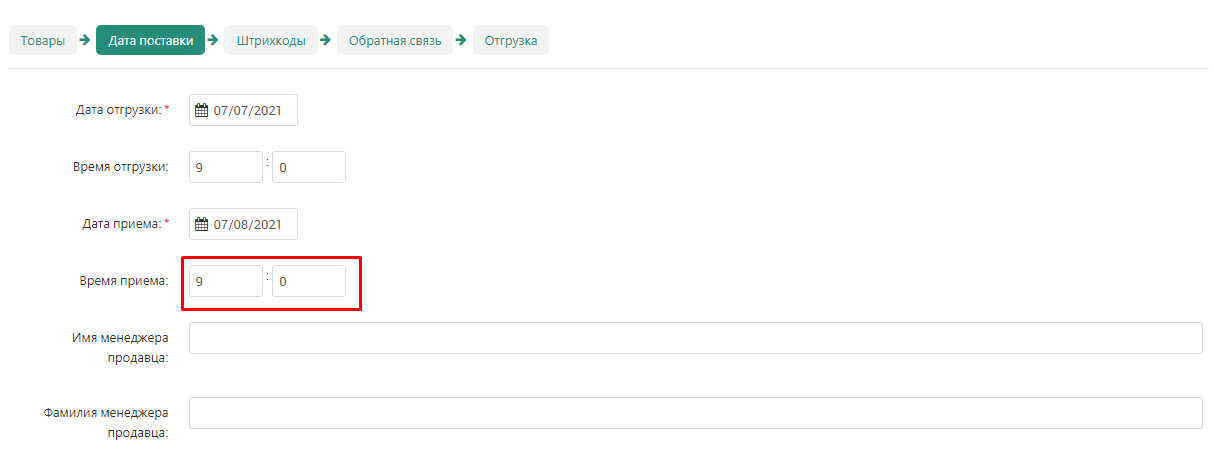
5.Specify the approximate time when you will deliver the goods to the marketplace warehouse.
6.Specify the full name of the manager who will be responsible for the shipment from the seller.

7.Specify the manager's phone number for communication.

8. Click the "Save" button in the upper-right corner.

Barcodes
On this page, you can customize the appearance of the barcodes, download them to your computer, and print them out.
1.Go to the "Barcodes" tab.

2.Specify the length and width of the barcode in pixels.
3.If you have a lot of boxes and pallets, check the box "Divide barcodes into folders". This will make it easier to find the desired barcode.

4.Click the "Download" button.

Feedback
On this page, the seller can contact the marketplace manager.
1. Go to the "Feedback" tab.

2.Click "Start dialog".

3.Write your question in a special field and click "Submit".
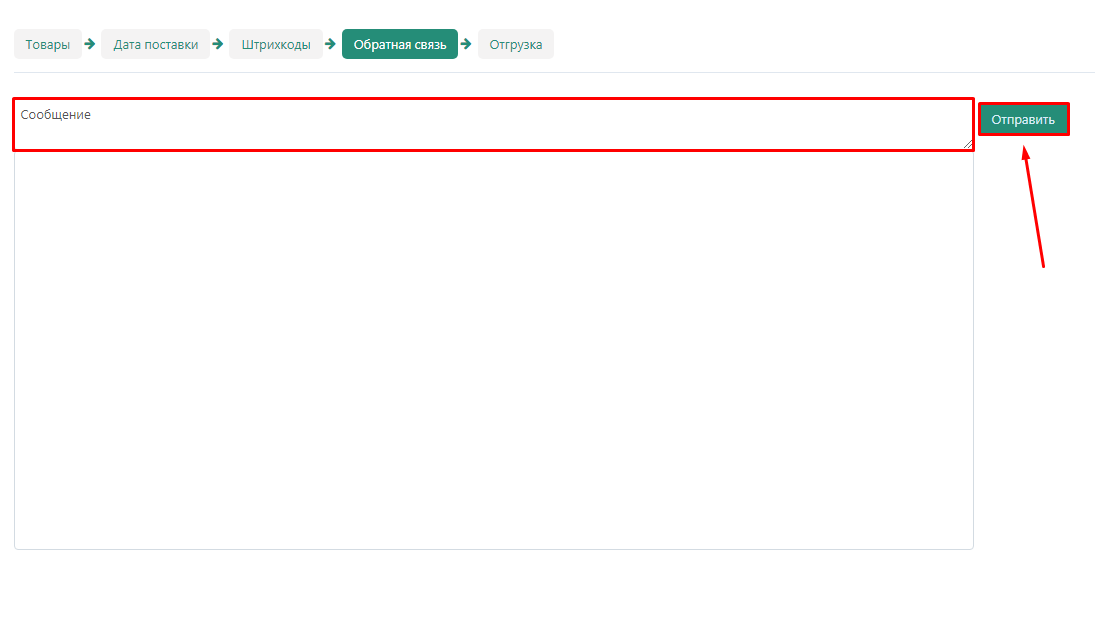
4.The message will appear in the chat.
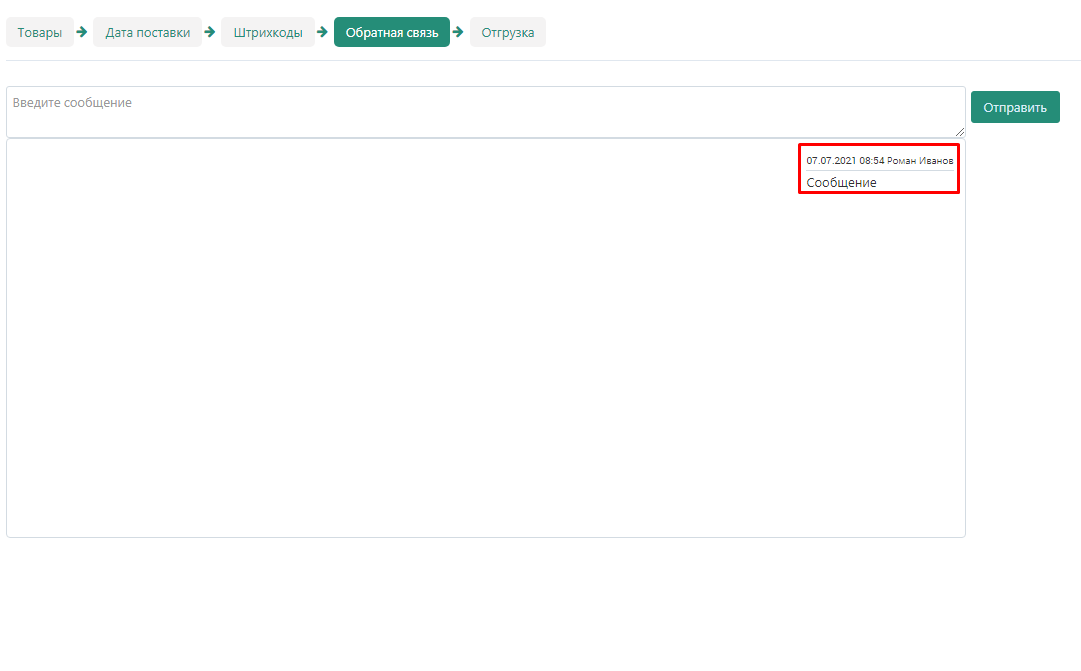
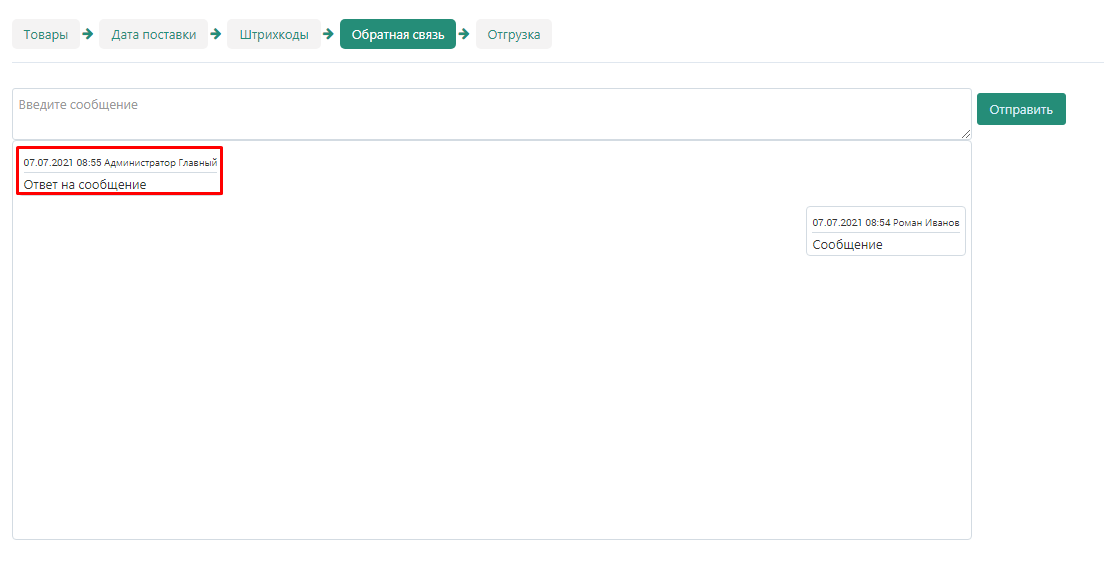
5.The manager's reply will later also appear in the chat above your message.
Shipping
This page provides basic information about the shipment, as well as its status.
1. Go to the "Shipping" tab.
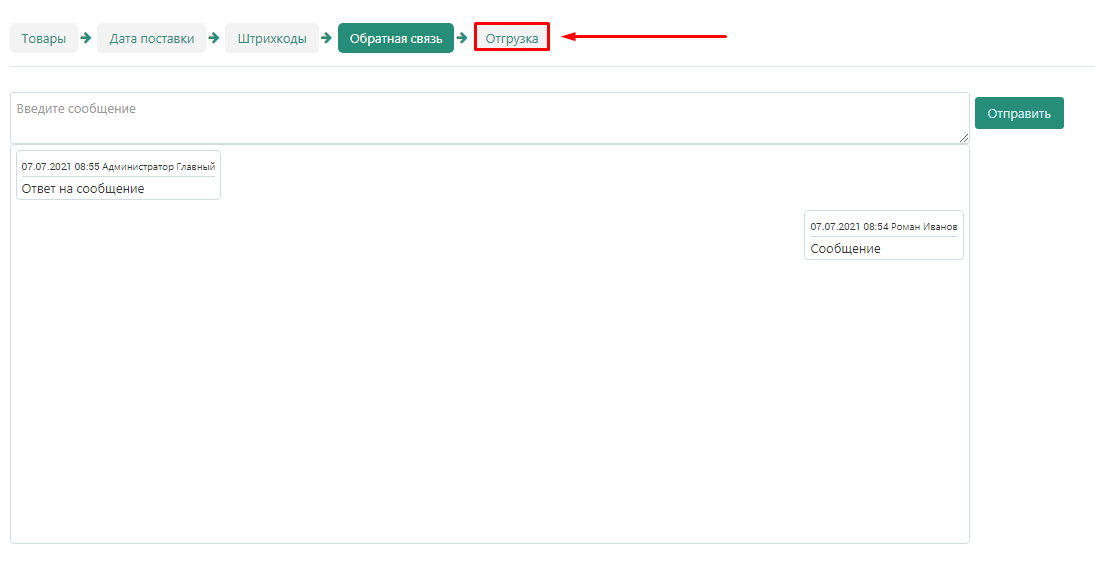
2.Check the information about the delivery date and warehouses, from where and where the goods will be delivered.
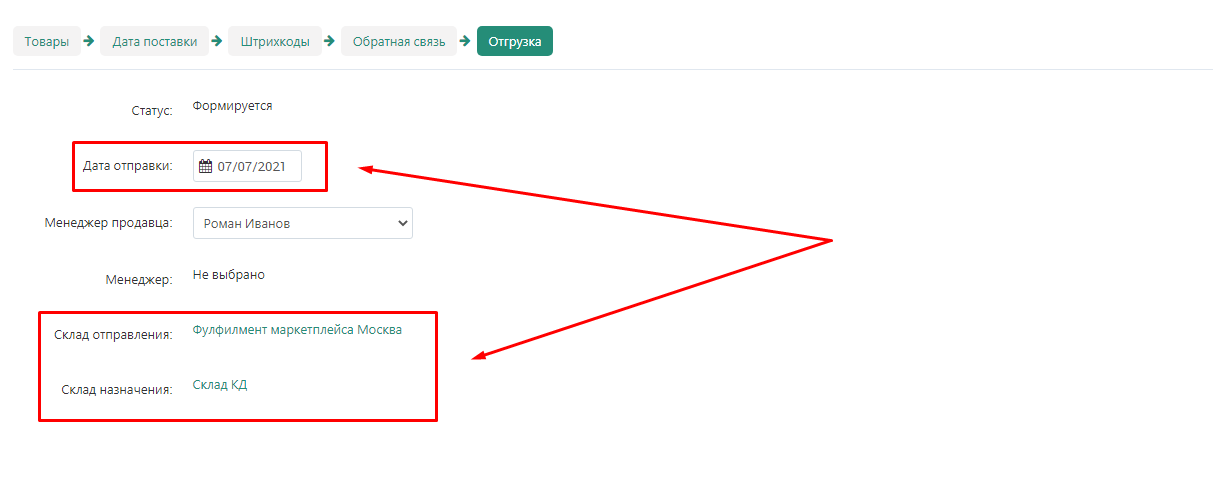
3.Specify the manager responsible for this shipment.
4.
After moderation, information about the marketplace manager overseeing this shipment will appear on the same page.
Before moderation:
After moderation:
5. Click the "Save" button in the upper-right corner. In this case, the shipping status can only be changed by the marketplace administrator.
Refund statuses
Shipment statuses allow you to track the path of goods from the marketplace warehouse.
1."Formed" is the status of the shipment in the process of formation. At this stage, the delivery time data is clarified, a shipping person is appointed, new goods are added and packed into cartons and pallets.

2."Ready to ship" - the status is set by the marketplace administrator. This is actually a notification to the seller that the shipment is ready for shipment.

Moderation of shipments and returns
Moderation of shipments
Products
1.Go to the "Modules" →"MW: Moderation"→"Warehouses" tab.

2.Click the "Submit" button on the right side of the page.

3. This opens a list of sellers who have shipments that need to be moderated. Click on the triangle next to the seller's name to open the list of his shipments.

4. Select the desired shipment and click on its name to study it in more detail before approving or rejecting it.

5. A page with a list of products opens. Each line corresponds to one product. The table contains the following information:
- the number of units of goods in shipment;
- the number of units of goods distributed in boxes and pallets;
- the number of units of defective goods;
- the number of missing units of goods;
- the number of accepted product units.
At the moderation stage, it is important to make sure that the number in the first two columns matches. The remaining columns will have zero at this stage.

Packaging
1. Go to the "Packaging" tab.

1. Go to the "Delivery Date" tab.

2. Check the dates of shipment and delivery selected by the seller, make sure that the warehouse will be able to accept the cargo on these dates.

Barcodes
1. Go to the "Barcodes" tab.

2. Download the barcodes for review.

Feedback
Here you will see if the seller has any questions about the shipment, or you can initiate a dialogue yourself if you need to convey some information to the seller.
1. Go to the "Feedback" tab.

2.If the seller has asked a question, the dialogue will already be started. His question will be displayed in the chat.
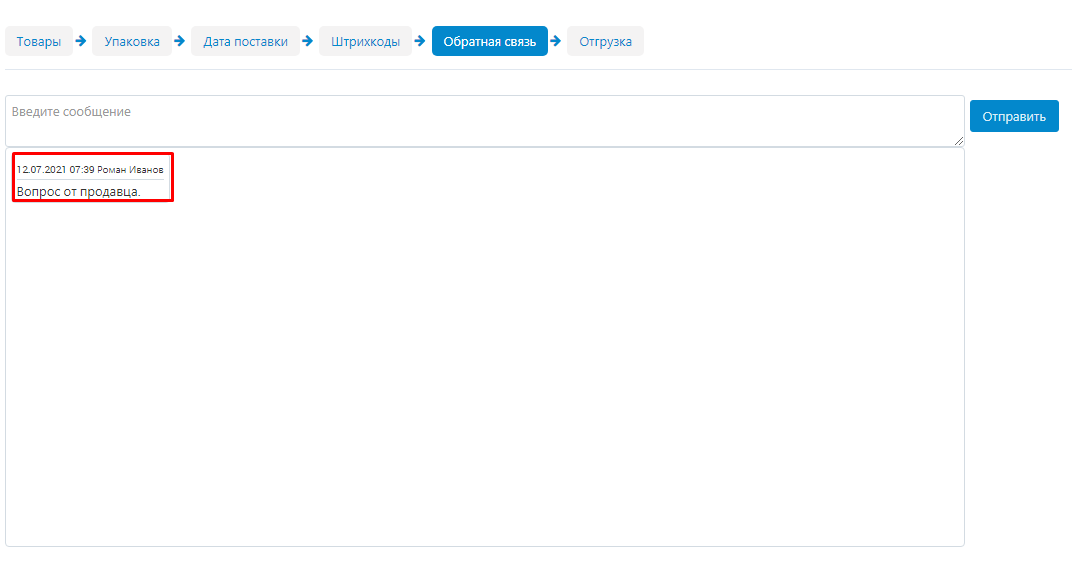
3. Enter your message and click send to reply to the seller.
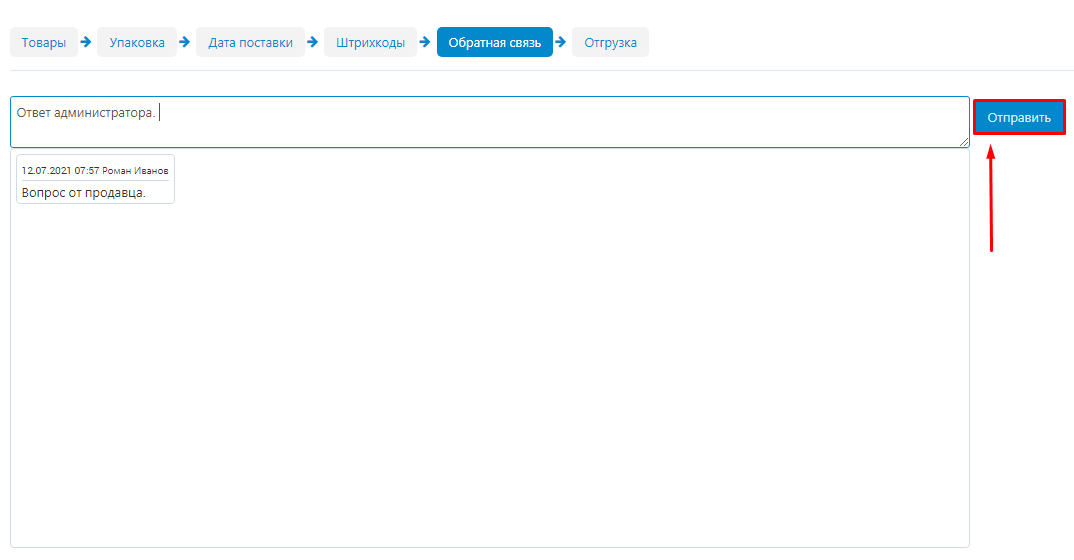
4. Your message will appear in the chat.
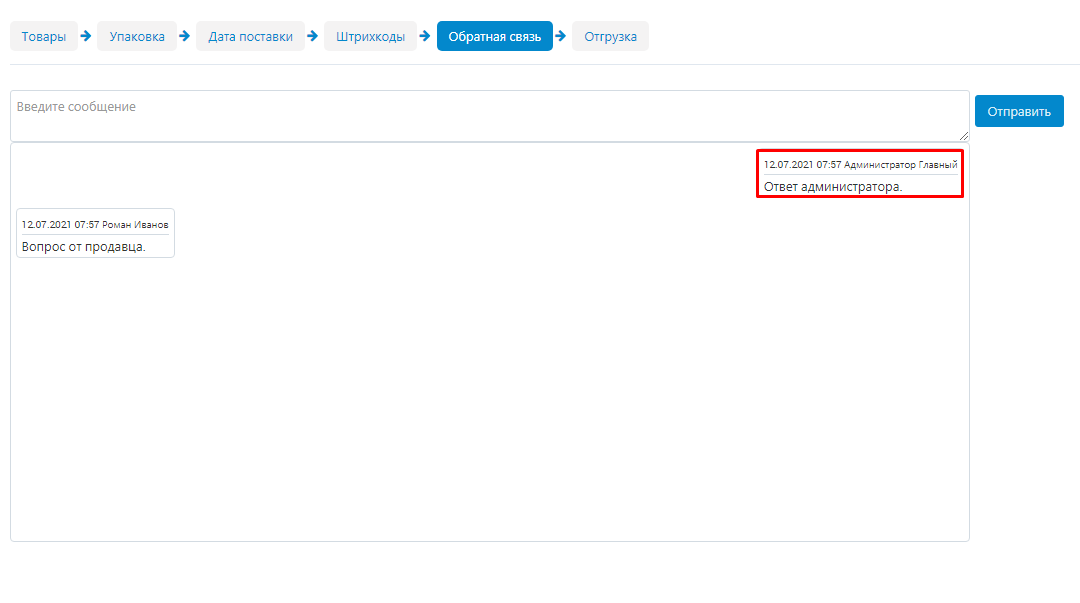
5. Click the "Start Dialog" button if it hasn't started yet.

Shipping
The general page with information about the shipment. You can also change the shipment status here.
1. Go to the "Shipping" tab.

2.Check the delivery date and the names of the departure and destination warehouses again.
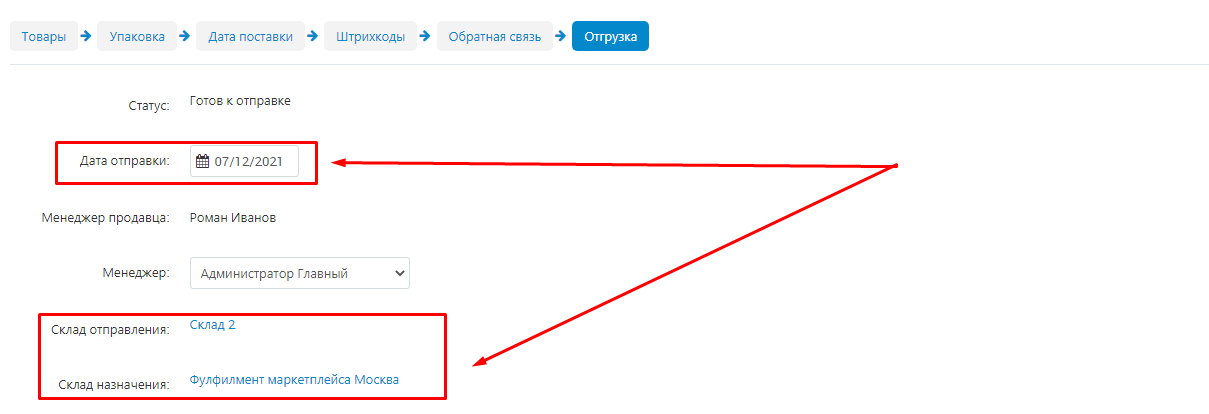
3. Make sure that the seller has identified a manager responsible for the shipment.
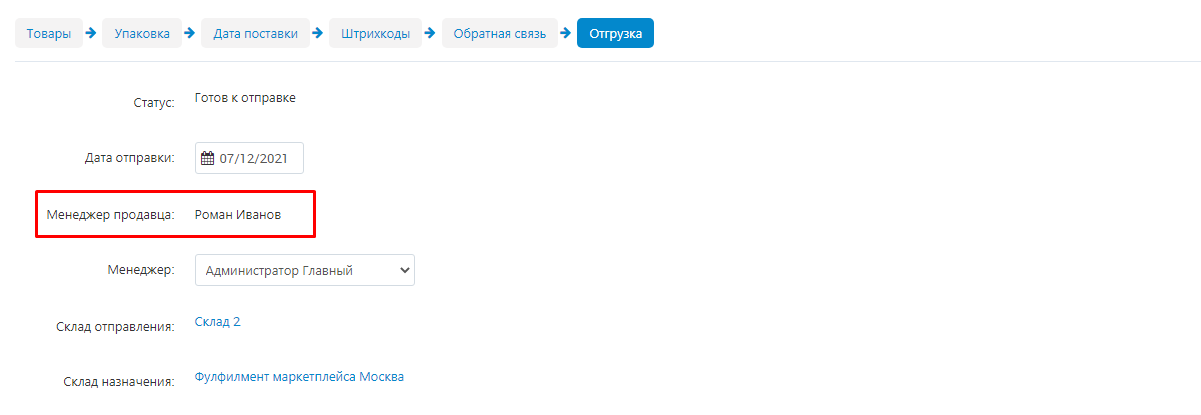
4. In the drop-down list, select the administrator who will be responsible for this shipment. By default, the one who moderates the shipment will be set.
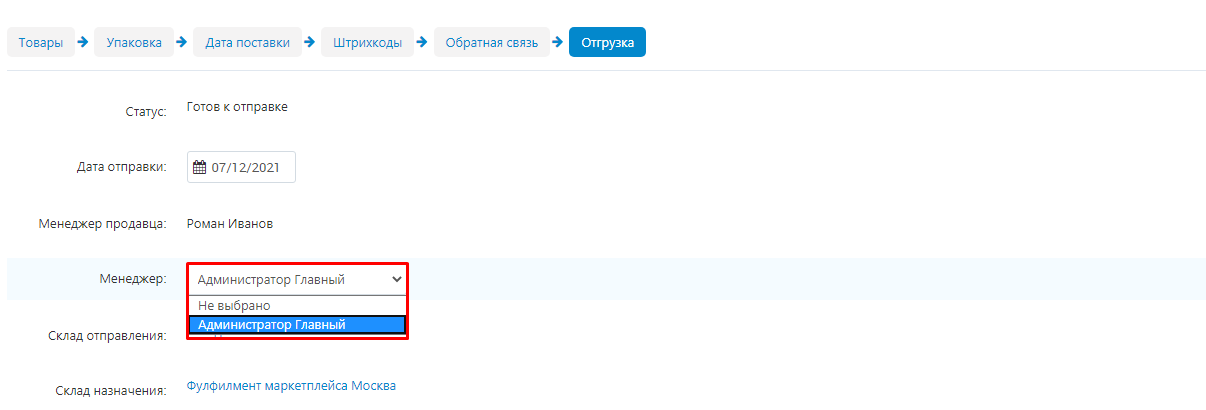
Moderation
1. Go back to the "Modules" →"MW: Moderation"→"Warehouses" tab.

2
2. Check out the information about the number of boxes and pallets.

Delivery date
4. Select the desired shipment and click on the "Approve" button in the form of a thumbs up or the "Reject" button in the form of a thumbs down to the right of the shipment name.

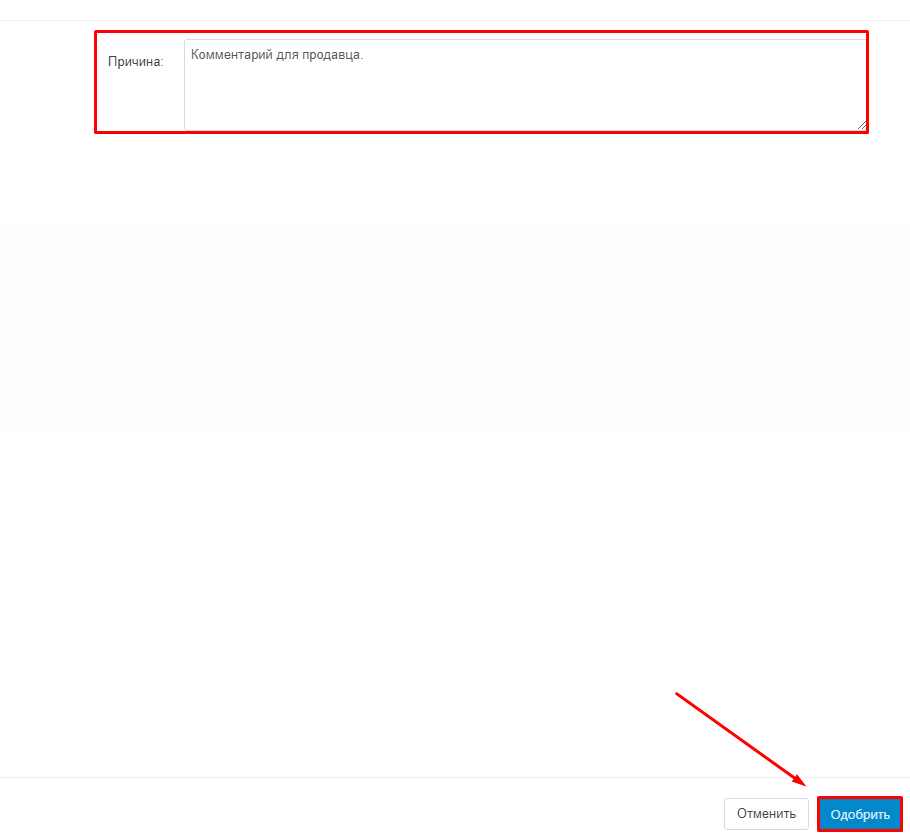
4.1 Enter the notification for the seller in the field.

4.2 Or select a notification from the ready-made templates (see creating templates below).

4.3 Click the "Approve" or "Reject" button.
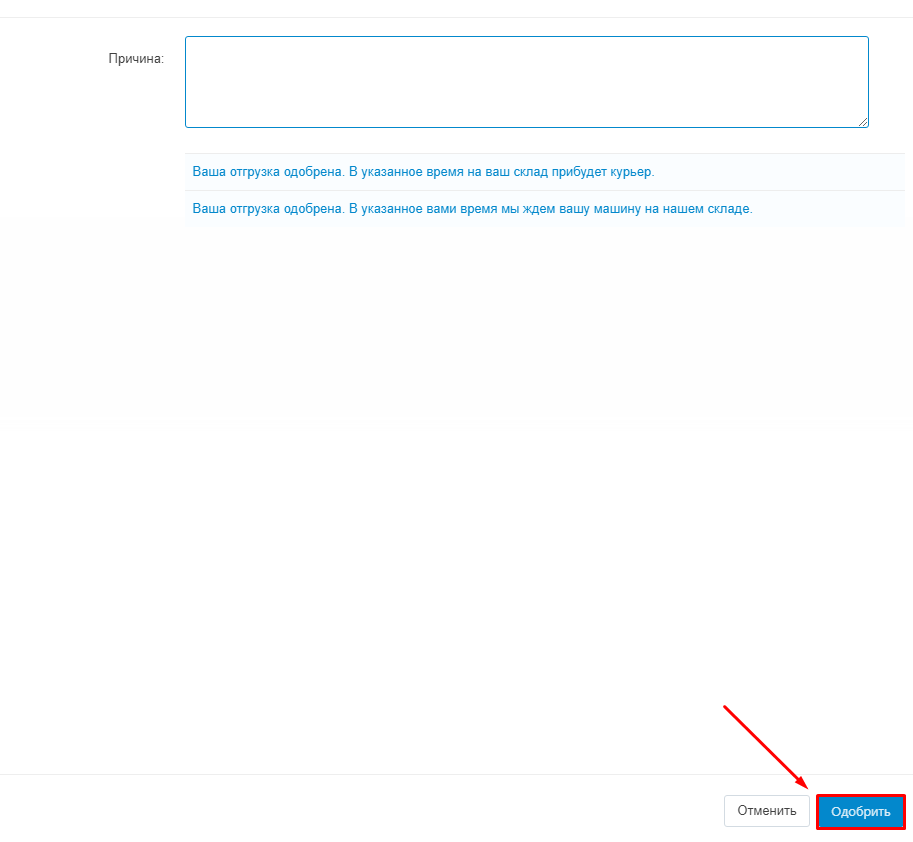
4.4 Or tick the desired shipments, click the gear-shaped button in the upper-right corner and select "Approve selected" or "Reject selected" from the drop-down menu.

4.5 To select all shipments, check the box above the list of shipments.

5. After the shipment is moderated, information about it is sent to the warehouse. After the product is shipped, the seller or the administrator can change the shipment status to "Shipped".
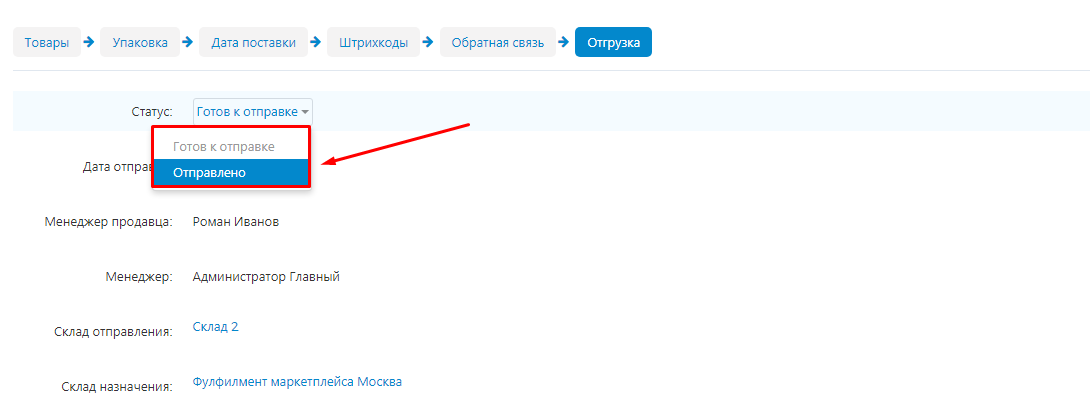
Shipment statuses
1."Formed" is the status of the shipment in the process of formation. At this stage, the delivery time data is clarified, a shipping person is appointed, new goods are added and packed into cartons and pallets.

2."Ready to ship" - the status is set by the seller. This is actually a notification to the marketplace that a new delivery from a specific seller with specific products is expected in the near future. After setting this status, you can no longer make changes to the shipment.

3."Sent" - this status can be set by the seller or moderator, depending on whether the product is delivered to the marketplace warehouse by the seller or the marketplace transport company. The status means that the product has left the seller's warehouse and is on its way.

4."Delivered" - the status is set by the moderator based on information from the marketplace warehouse. The status means that the cargo has been received by the warehouse, but the availability of the goods has not yet been verified with the invoice.

5."Accepted" - the status is set by the moderator based on information from the marketplace warehouse.The status means that the product has been checked against the invoice and accepted into the warehouse.

Creating templates
1. Go to the "Modules" →"MW: Moderation templates" tab→"Warehouses".

2. Enter the text of the notification to the seller in the free window for the template.

3. In the drop-down list, select in which case to display this template: when approving a shipment or warehouse, or when rejecting it.
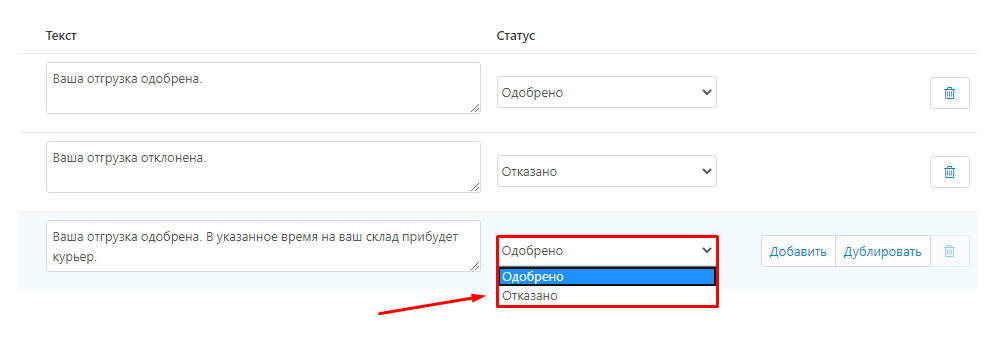
4. To add a new template, click the "Add" and "Duplicate" buttons. The first button will create a new empty window for the template, the second button will completely copy the already created template.

5. To delete the template, click the trash can button.

6. To find the desired template, enter the template text in the search box on the right side of the screen.

7. To select shipments with the desired status, select this status from the drop-down list on the right side of the screen.

8. Click the "Find" button.

9. After editing the templates, click the "Save" button.

.Click the "Submit" button on the right side of the page.

3.A list of sellers who have shipments in need of moderation will open. Click on the triangle next to the seller's name to open the list of his shipments.
