The module synchronizes the work of the online store with the delivery service aggregator SafeRoute.
SafeRoute is:
There are more than 10 delivery services in one service, and their number is constantly being updated. A simple and convenient personal account, the possibility of preliminary calculation of the delivery rate, provision of fulfillment services. Having concluded 1 contract, you get a personal manager, the possibility of free integration with the service and a unified system of mutual settlements.
Delivery in Russia, CIS and around the world - to the door, pick-up points and post offices. Shipment to delivery services takes place daily, due to which your customers will receive orders as quickly as possible. The service does not require prepayment or monthly payments. SafeRoute takes care of all interactions with delivery services.
Customers are given the opportunity to choose the most suitable options for the cost, timing or method of delivery, while saving up to 30% due to discounts from direct tariffs of delivery services.
The module supports a shopping cart widget. In the future, a card widget will also be developed
Important! To get the module for free, you must confirm your domain in your personal account.
Integration possibilities
The module is embedded on the shopping cart page, allowing the buyer to choose the most convenient and suitable delivery method in terms of time and cost.
Key features
- 14 delivery services in one widget;
- More than 20,000 points of issue on the map with convenient filters and available options, displaying the work schedule and photos of the PVZ;
- Display of pick-up points in the locality closest to the buyer;
- Automatic hiding of more expensive delivery options by type and delivery service with equal delivery times
- Selection of the Russian Post office on the map;
- Flexible adjustment of the rules for displaying the cost and delivery methods;
- Adding your own delivery methods;
- The recipient can choose the desired date and time interval for delivery to the door;
- Support for receiving and withdrawing prices in currencies (dollar, euro) with the possibility of flexible adjustment of rates;
- Interface in two languages (Russian, English);
- Customization of the widget's color design for your site's corporate identity;
- Automatic detection of the user's city and location from mobile devices;
- Order payment via widget;
- Work on FZ-54. No need to buy fiscal equipment
Getting started
- Install the module “MW: SafeRoute” for CS-Cart or CS-Cart Multi-Vendor.
- Register on https://saferoute.ru /
- Send signed scans of the contract.
- Create a Warehouse and Store in your personal account, get a Token and ID.
- In the SafeRoute module setup, enter the username and password
Detailed step-by-step instructions for the module can be found at Maurisweb.ru/help - section"Help".
CONTACTS
Up-to-date information about changes in the functionality of the module, as well as compatibility with other modules, is published in our Telegram channel and in the group VKONTAKTE
Telegram t.me/maurisweb
VKONTAKTEvk.com/maurisweb
You can submit a request to the support service, ask questions to the managers about the work or completion of the module via messengers, the groupVKONTAKTE and mail.
- WhatsApp +7-923-364-90-07
- Telegram t.me/mauriswebru
- Telegram +7-923-364-90-07
- VKONTAKTEvk.com/maurisweb
- E-mail: info@maurisweb.ru
Detailed instructions for working with the module
The instruction is current at the time of publication. The module is regularly updated and improved. There may be minor differences in the control of the module.
SafeRoute - aggregator of delivery services for online stores
The module stands for interaction with SafeRoute, an aggregator of services for online stores.The functionality sends information to your Personal Account immediately after creating an order.
SafeRoute is:
14 delivery services in one service, a simple and convenient personal account, the possibility of preliminary calculation of the delivery rate, provision of fulfillment services.
Door-to-door delivery to more than 65,000 localities, more than 140,000 pick-up points. Shipment to delivery services takes place daily, due to which you save on fulfillment. The service does not require prepayment or monthly payments. SafeRoute takes care of all interactions with delivery services.
Customers are given the opportunity to choose the most suitable options for the cost, timing or method of delivery, while saving up to 30% due to discounts from direct tariffs of delivery services.
The module supports a shopping cart widget. In the future, a card widget will also be developed.
For information about compatibility with other modules, see the product features:
For CS-Cart and Multi-Vendor -https://maurisweb.ru/programmy...
SCOPE OF APPLICATION
Suitable for marketplaces interacting with SafeRoute.
APPLICATION EXAMPLE
During the checkout, the buyer chooses the delivery method with the estimated SafeRoute tariff and then one of the most convenient options for him: delivery by courier, pickup, Russian post, etc.
TECHNICAL SPECIFICATIONS
- Synchronizes the work of the marketplace with SafeRoute;
- Adds the ability to create a delivery method by adding the calculation of the SafeRoute tariff;
- Adds the ability to configure SafeRoute for individual products;
- Adds the ability to track order tracking;
- Allows you to change the delivery option after placing an order.
COMMUNICATION WITH OTHER MODULES
For the module to work correctly, you need to install the "SEO" CS-Cart module.
Pay attention! For the module to work correctly, the product must have specified delivery parameters!
MODULE SETUP
1. After installing the module, go to the "Modules" tab, select "Module Management" and "MAURISWEB" from the drop-down menu.
< / p>
 < /p>
< /p>
2. In the list that opens, select the module you are interested in and click on its name, highlighted in blue or black.
 < /p>
< /p>
3. Go down below, select the "Basic Settings" section and tick the "Save data when deleting the module" option so as not to lose them when reinstalling the module.

4. Go to the "Getting Started" tab and proceed according to the instructions.
 < /p>
< /p>
5. Go to the "Settings" tab. Expand the additional menu in the item "Length units in your system" and select one of the suggested values: "mm", "cm", "m".

6. and If there is a payment method on the site and the online store wants to provide the buyer with the possibility of cash on delivery (by courier in cash or by card), then he needs to create additional payment methods and transfer this information to SafeRoute Personal Account! Otherwise, you do not need to configure items 6 and 7.
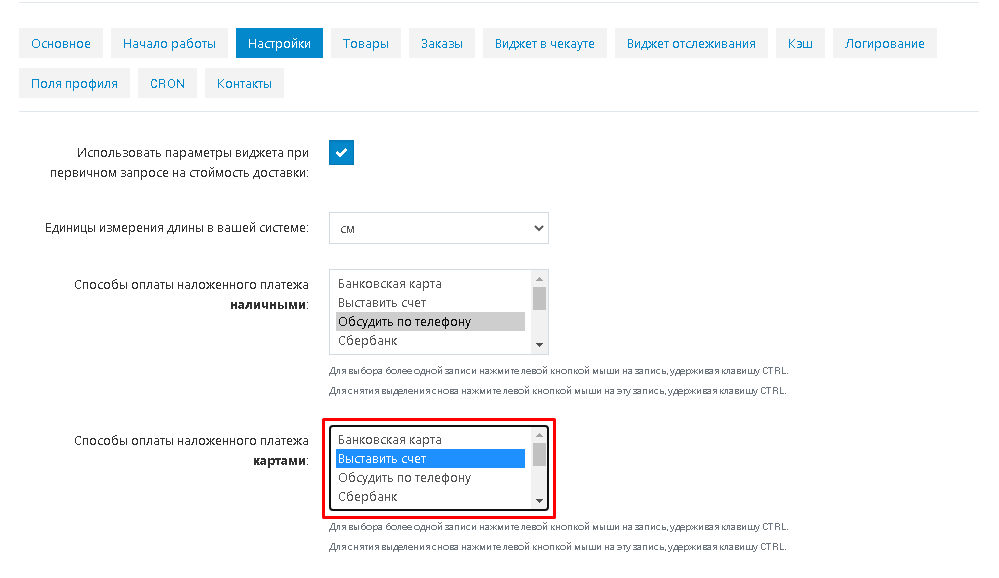
Specify the payment method to the courierin cashby default. To do this, in the item "Cash on delivery payment methodsin cash", select one of the suggested methods. For example: "Bank card", "Invoice", "Discuss by phone", etc. (depending on the payment methods you already have).To select more than one entry, left-click on the entry while holding down the Ctrl key. To remove the selection, left-click on this entry again while holding down the CTRL key.
Please note that different transport companies may have different payment requirements. In the settings, only the data that will be specified by default is displayed!

7. Specify the payment method to the courierby cardsby default. To do this, in the item "Cash on delivery payment methods by cards", select one of the suggested methods.
 < /p>
< /p>
Later, this information is synchronized with the Personal Account.
 < / p>
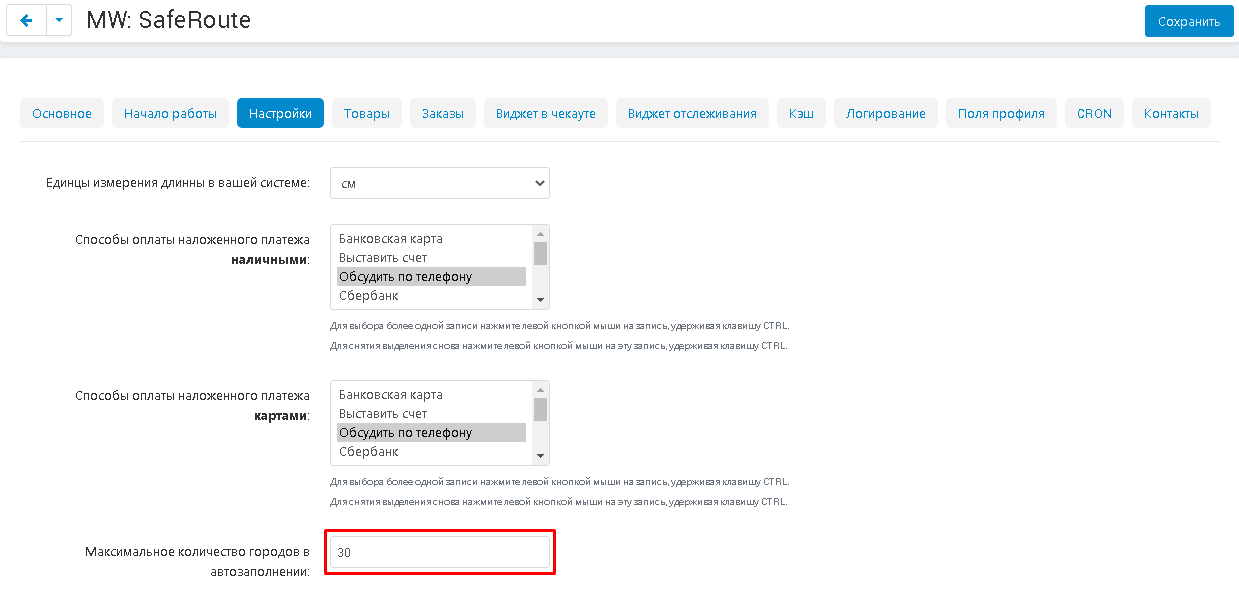
8. In the "Maximum number of autofill cities" item, enter the number of cities to choose from when placing an order on the showcase.
 < / p>
9. Go to the "Products" tab. In case the goods are stored in a Safe Route warehouse, you can allow them to be shipped. To do this, leave a check mark in the corresponding item or remove it to prohibit sending. Available only for CS-Cart platform.
 < /p>
< /p>
10. To send goods on behalf of the marketplace, check the appropriate box.
 < /p>
< /p>
11. Check the box "Send previously unsent goods during the calculation of the shipping cost" to be able to add goods to the order while the cost is being calculated.
 < /p>
< /p>
12. Go to the "Orders" tab. It contains synchronization data with orders from the Safe Route Personal Account.
 < /p>
< /p>
Enter the prefix to the order number. When using multiple storefronts, the prefix will help to navigate which store the order belongs to.
 < /p>
< /p>
13. Enter the order number separator.

14. In the item "Statuses at which orders will be sent" and mark one or more statuses. When the order status changes to one of the specified ones, the system will automatically send the order to SafeRoute.

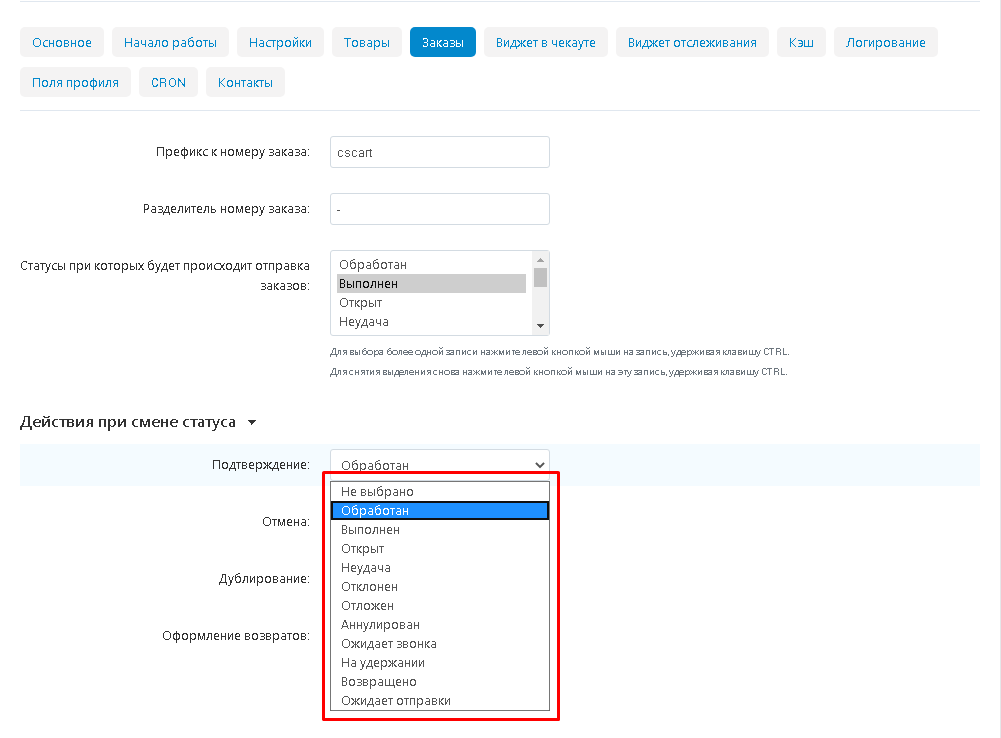
15. Go to the section "Actions when changing the status". In the "Confirmation" item, expand the additional menu and compare the statuses.
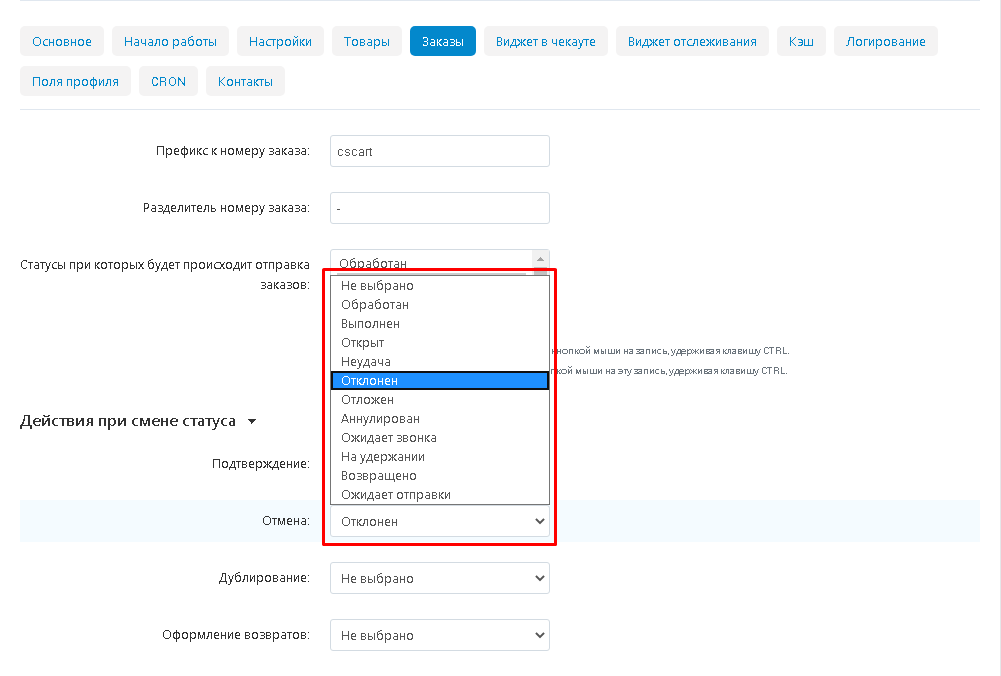
16.In the "Cancel" item, expand the additional menu and compare the statuses.
17.In the "Duplication" item, expand the additional menu and compare the statuses. This item means that the order will be re-created in SafeRoute.
For example, an order was canceled due to the lack of goods in stock, but after a while the seller and the buyer resume it. The status of the order changes and it is created anew (duplicated) in SafeRoute.
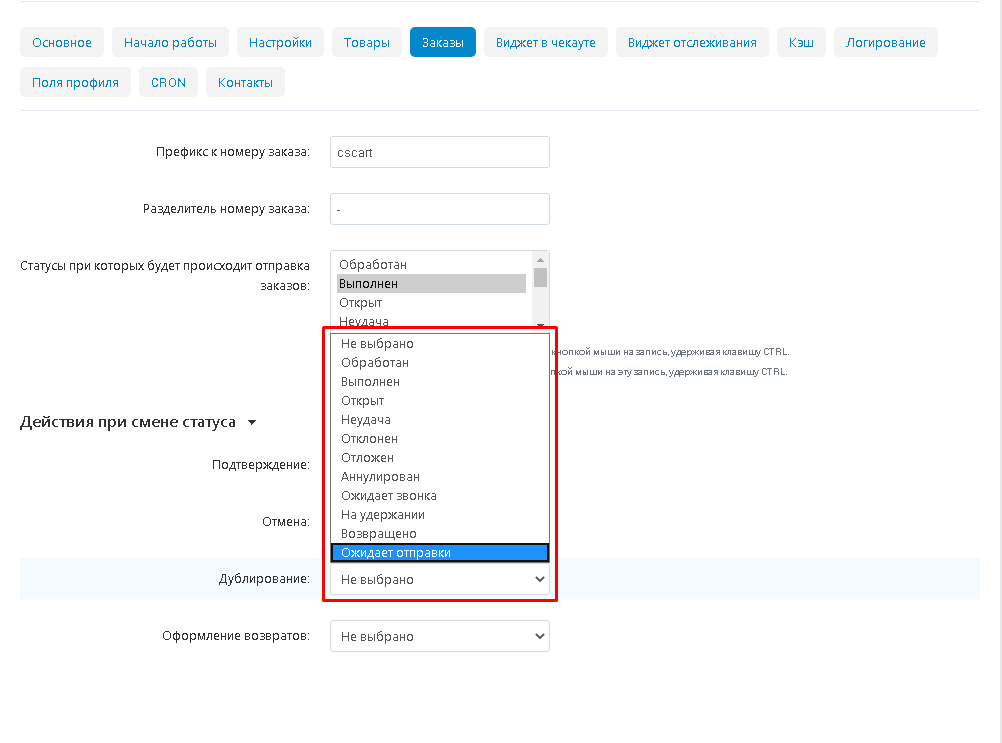
18.In the "Making refunds" section, expand the additional menu and compare the statuses.
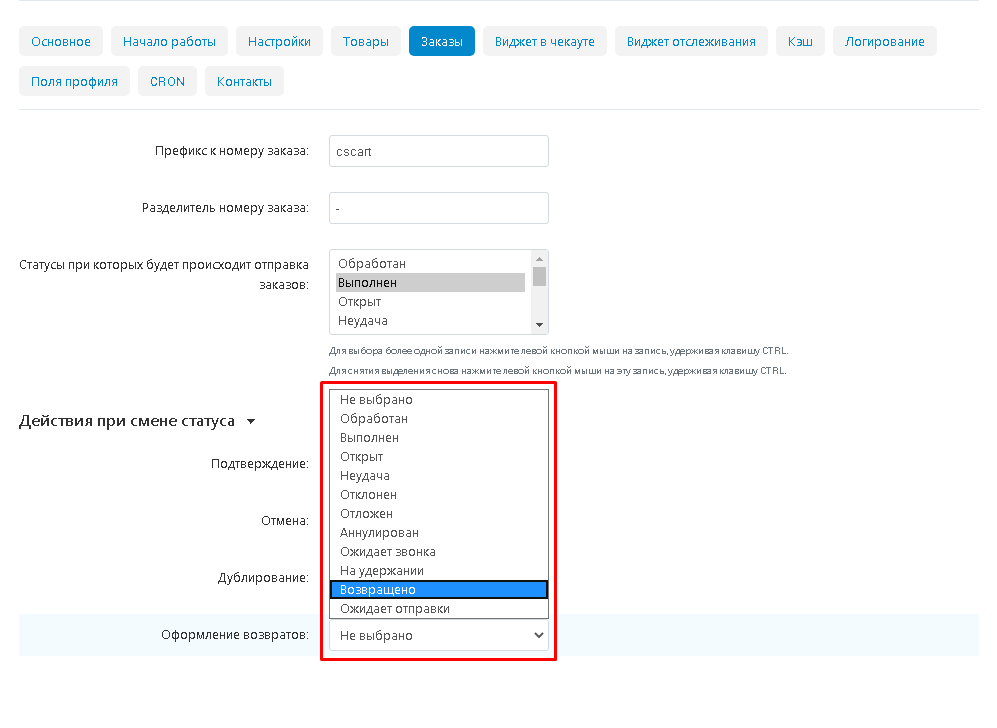
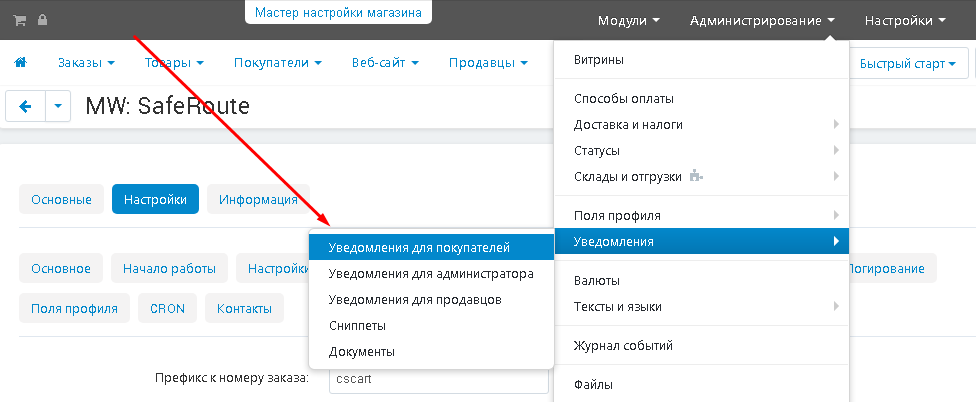
If necessary, you can configure additional statuses. To do this, go to the "Administration" tab, select "Statuses" and "Order Statuses".

In order to configure notifications for the created statuses, go to the "Administration" tab, select the "Notifications" and "Notifications for buyers" section.
19. Go to the "Widget in Checkout" tab. In this tab, you can configure the display of the SafeRoute widget during checkout. If your showcase works in the "Catalog" format and you want to place a customer's order directly to your SafeRoute Personal Account, bypassing the creation of an order on the CS-Cart platform, then uncheck the boxes. Delivery will take place directly through your Personal Account with payment via the widget, the payment method is CloudPayments.
A check mark in the "Hide payment step" item disables payment in the SafeRoute widget.

20. To make the widget work according to the CMS Cs-Cart platform scenario, check the box "Delivery calculation only".

21. Go to the "Tracking Widget" tab. To immediately display the order number input field, check the appropriate box.

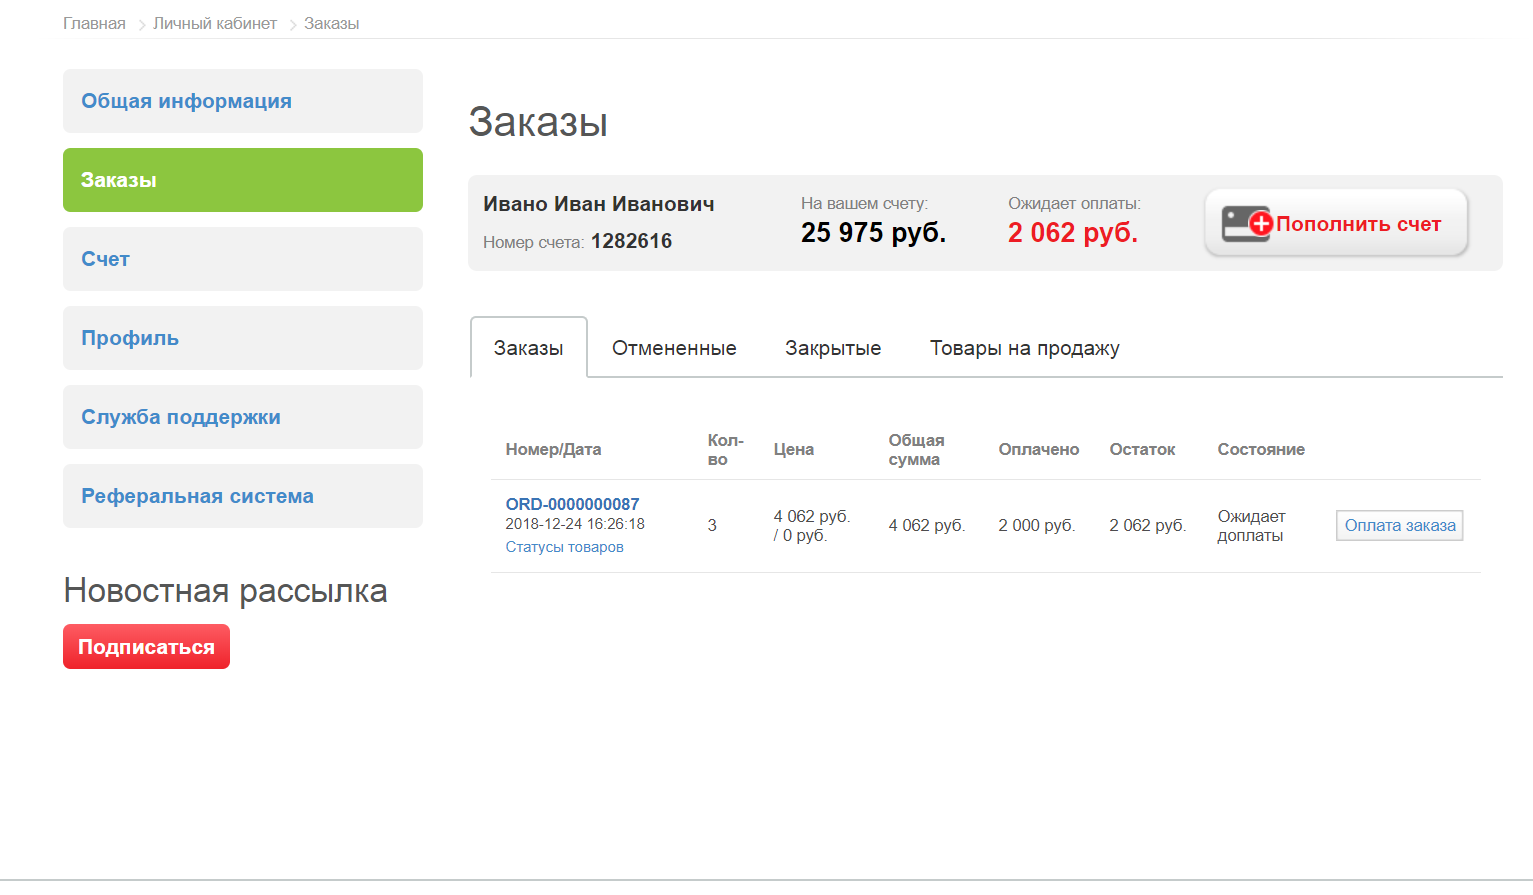
22. In the item "What will be used for immediate tracking", expand the additional menu and select how to track tracking: "Not selected", "SafeRoute order ID", "Store order ID", "Track number in the delivery service".

The SafeRoute order ID can be viewed in your Personal Account.

The order ID in the store is displayed in the admin.The panel is in the "All orders" tab, and is also sent in a letter to the buyer.

The track number in the delivery service depends on the specific transport company, their Personal Account, ordering, etc.
23. Go to the "Cache" tab. To clear the autofill data of cities, check the appropriate box.

Autofill of the city is responsible for saving address data and fills them in automatically. Clearing the cache will delete this information.
24. To clear the cost calculation, check the appropriate box. Data on the calculations of previous shipments will be deleted.

25. If you have changed the settings of the SafeRoute personal account or the settings of the module itself and they do not work correctly, click on the white "Clear Cache" button to clear the cache.

26. Go to the "Logging" tab and select the type of logging: "Not selected", "File system", "Database".

27. Go to the "Profile Fields" tab. In the "Buyer" section, select from which profile fields the information about the buyer will be indicated. If necessary, you can create your own profile fields (see the subsection "Profile Fields").
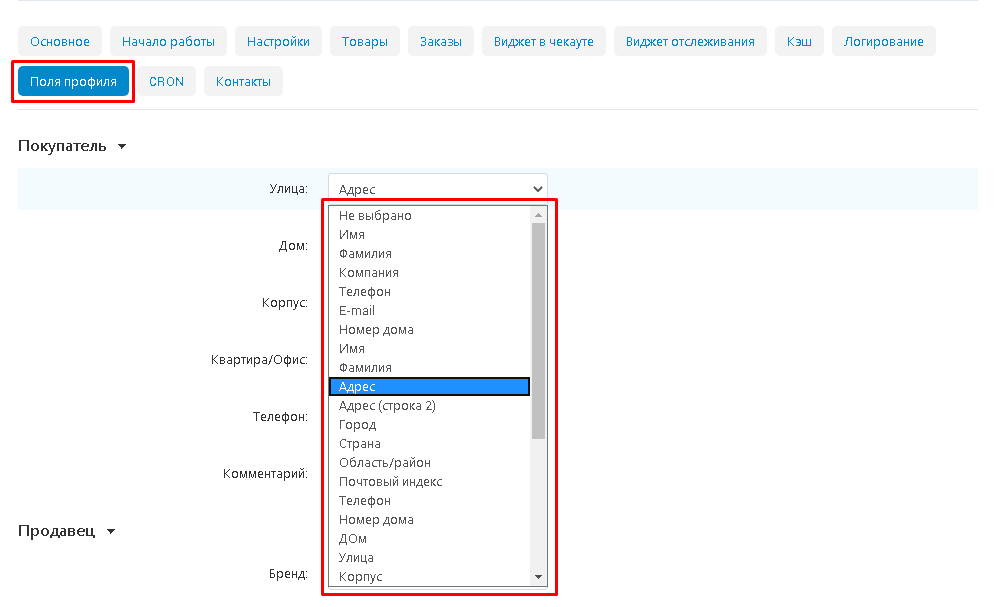
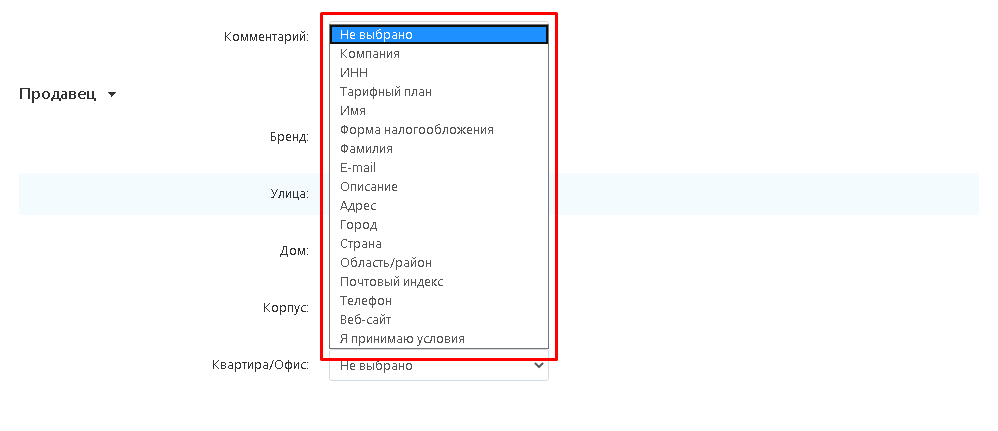
28. In the "Seller" section, specify the profile fields for the seller.
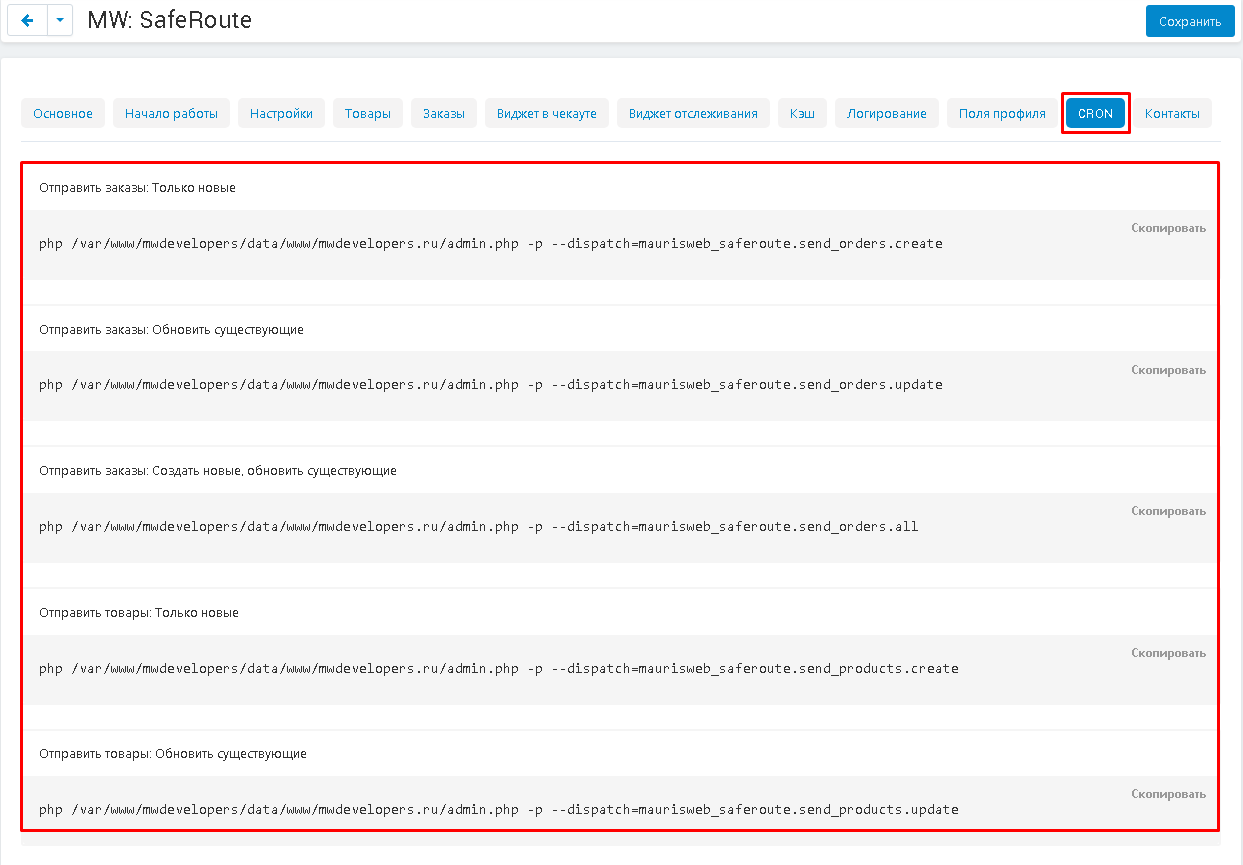
29. Go to the "CRON" tab and enter the necessary CRON commands into the scheduler.
30. Go to the "Contacts" tab. It contains information about contacts and technical support of SafeRoute and MAURISWEB.

31. Save the module settings by clicking on the blue "Save" button in the upper right part of the screen.

PROFILE FIELDS
1. To create new profile fields, go to the "Administration" tab, select the "Profile Fields" section and then "Buyers and Administrators".

2. Click on the plus button in the upper right corner of the panel.

3. Fill in the required fields (marked with a red asterisk) and specify access to the profile in the "Profile (Show/Required).
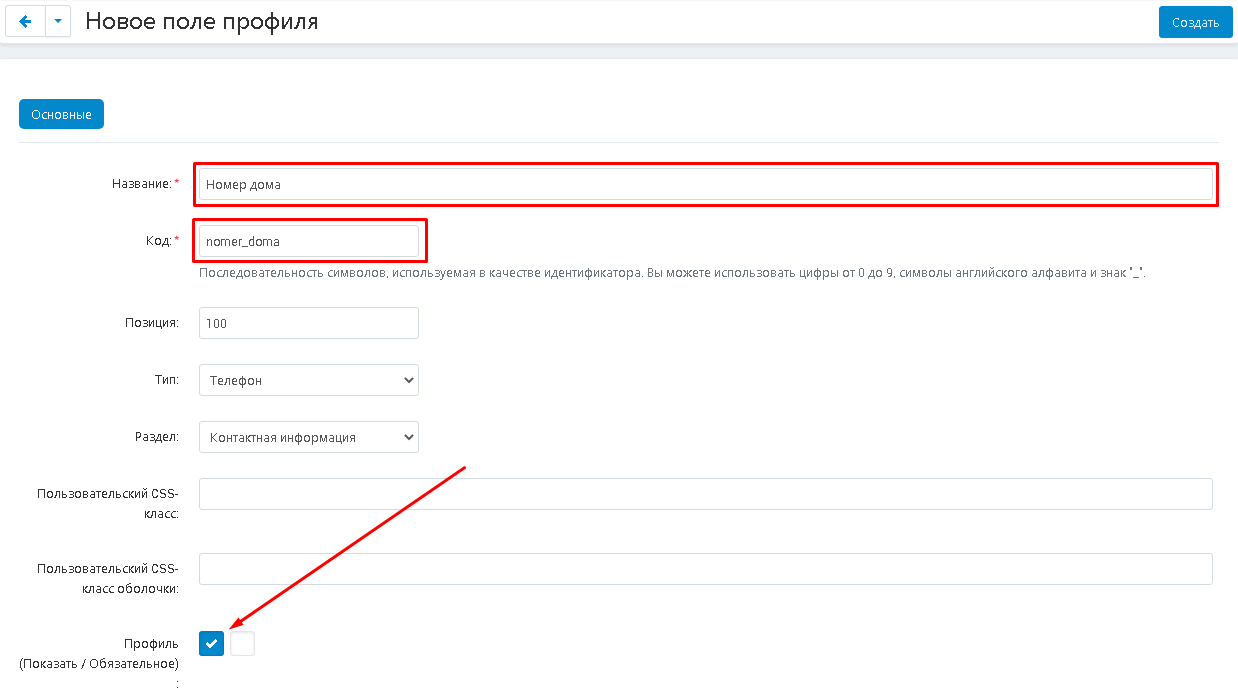
4. When all the fields are filled in, click on the "Create" button in the upper right corner of the panel.

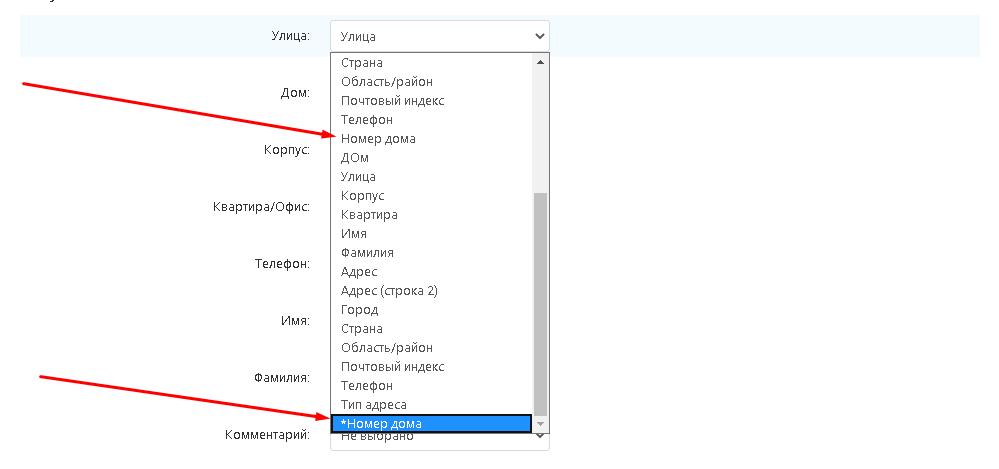
5. If the profile fields are displayed in different sections with the same names (for example, in the "Address" and "Contact information" sections), it is recommended to add a distinction mark to one of them (*, !, @, etc.)
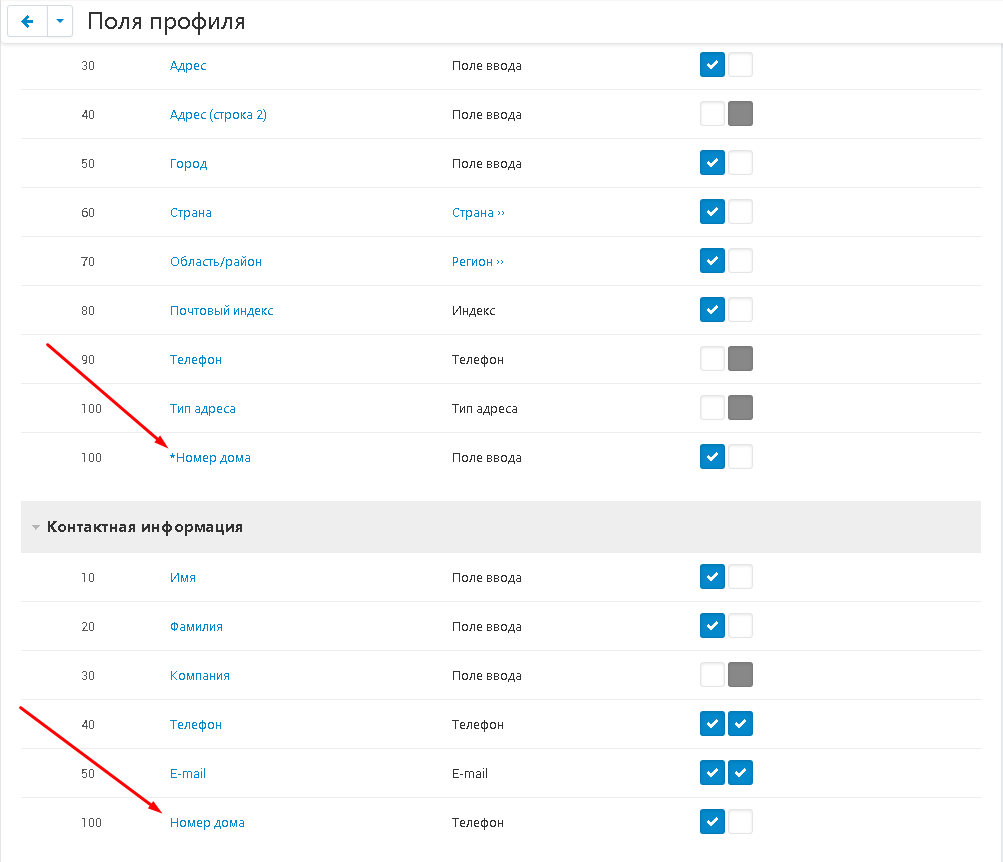
6. In this case, you will not make a mistake during the selection.
7. To make the profile fields appear on the checkout page, go to the Design tab, select the Layouts and Layouts section.

8. Go to the "Checkout" tab.

9. Go to the parameters of a ready-made block or create your own.
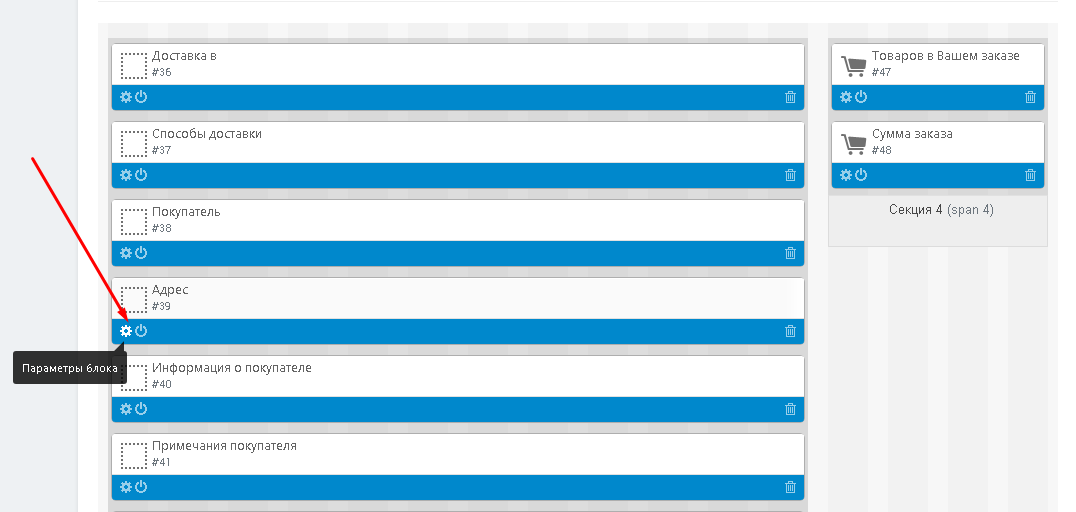
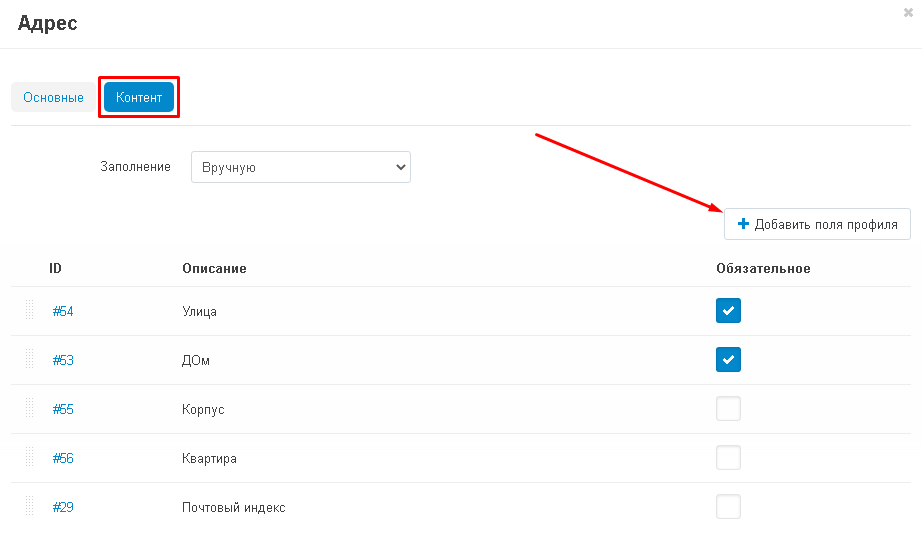
10. Go to the "Content" tab and click on the "Add profile fields" button.
11. In the window that opens, tick the required profile fields. Click on the "Add profile fields" button to continue the selection or "Add profile fields and close" to complete the selection.
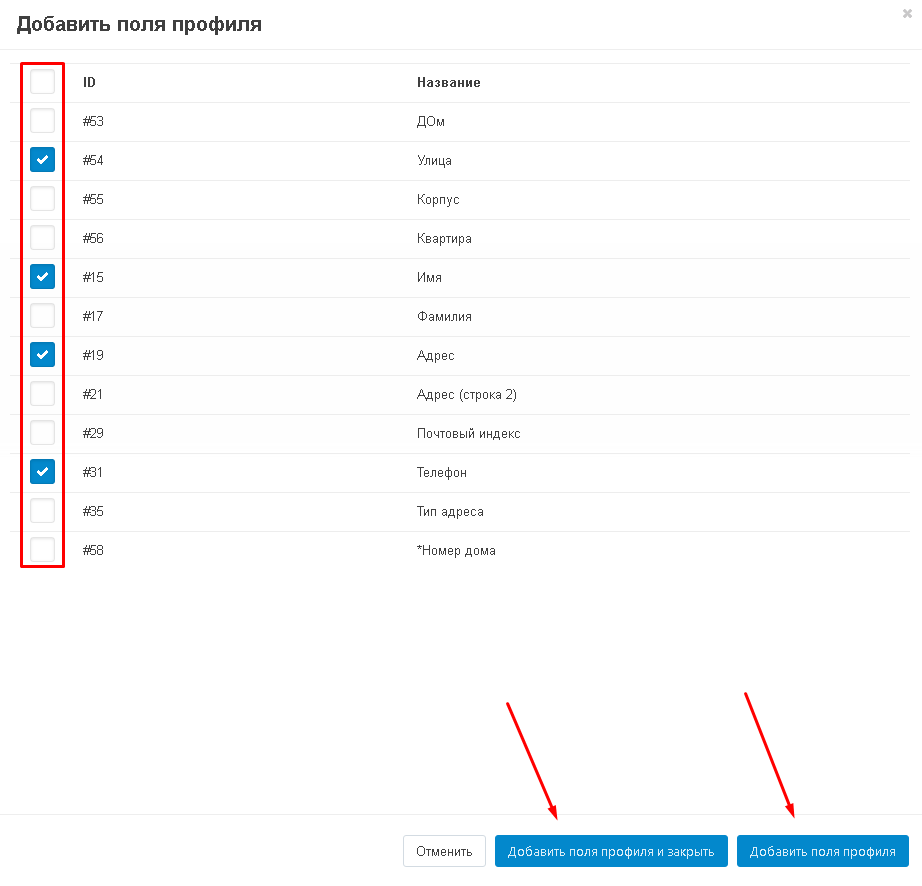
12. Save the changes by clicking on the button in the lower right corner.

ACCESS RIGHTS SETTINGS
1) If you configure the module under a super user, then adding privileges is not required.
2) If another user is doing the settings, then it is necessary to configure access privileges for him.
1. To configure privileges, go to the "Buyers" tab and select the "User Groups" section.

2. Select the desired group and click on its name highlighted in blue.

3. Go to the section "MW: SafeRoute" and select the access rights: "Full access", "View only", "No access".

4. Save the changes. by clicking on the blue "Save" button in the lower right corner of the panel.

SAFEROUTE SETTINGS
1. For the initial setup of CMS SafeRoute, you need to enable the showcase( in case you are working in test mode and the showcase is initially turned off!). To do this, go to the "Administration" tab and select "Storefronts".

2. Switch the switch in the "Status" column.
Please note that after setting up, the showcase must be turned off!

3. To configure SafeRoute, go to the "Modules" tab, select the "SafeRoute" and "Settings" section.

4. Go to the "General" tab. Fill in the "Login" and "Password" items, click the "Log in" button. Full synchronization with SafeRoute will occur.

5. Go to the "Order Synchronization" tab. Copy the link highlighted in gray and go to the SafeRoute personal account by clicking on the blue-highlighted link "SafeRoute personal account settings", according to the hint.

6. The SafeRoute Personal Account will open. Go to the "Basket Widget" tab and select the "Basic Settings" section.

7. Go to the "API" tab and paste the copied link into the "CMS API Path" field and click on the gray "save changes" button in the lower right corner of the window.
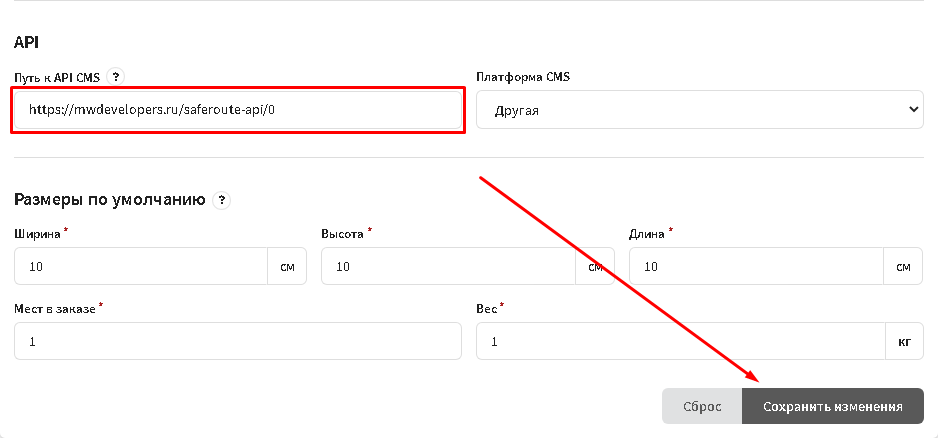
8. Go to the "Basket Widget" tab and "CMS Settings". Do not forget to turn on the showcase (p.1-2 of this section)!

9. Go to the "Matching statuses" section and match the statuses.
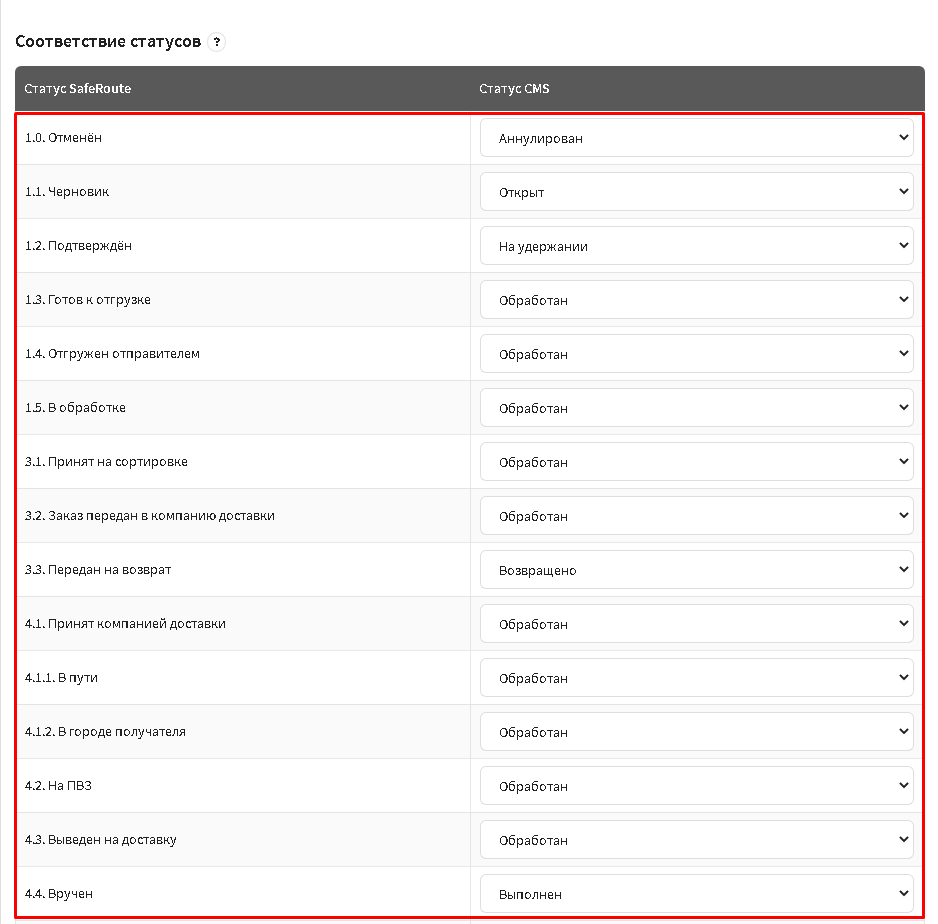
10. After all the statuses are matched, click on the gray "Save changes" button in the lower right corner of the window.
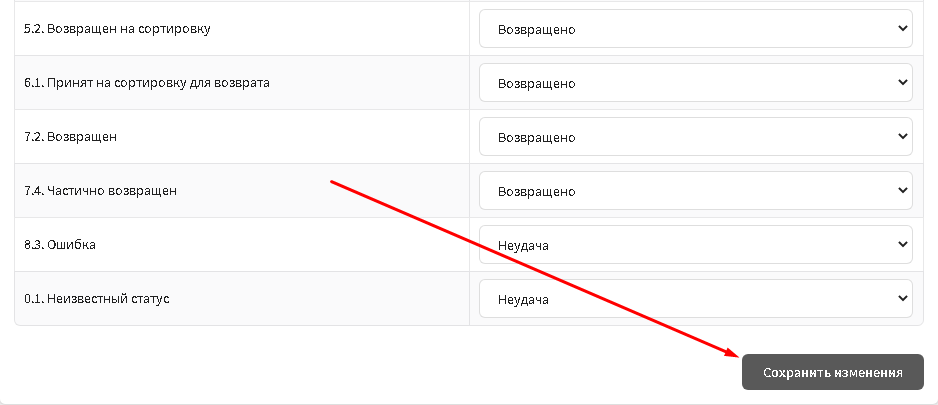
11. Go back to the admin panel and click on the blue "Save" button in the upper right corner of the panel to save the changes.

12. Don't forget to turn off the showcase (if you are working in test mode and the showcase is initially turned off)!

DELIVERY METHOD
1. To apply SafeRoute delivery, you need to create the appropriate delivery method. To do this, go through "Administration", select the section "Shipping and taxes" and "Shipping methods".

2. Click on the blue button with a plus sign in the upper right corner of the panel.

3. Enter the name of the new delivery method and expand the additional menu in the "Tariff calculation" item and select "SafeRoute".
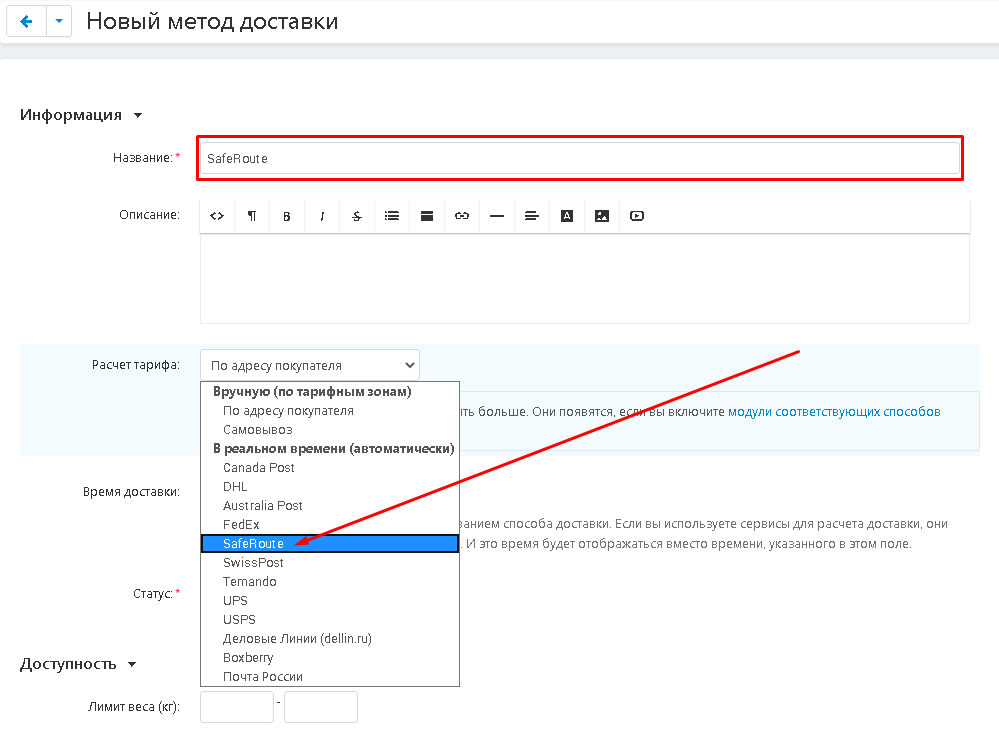
4. To save the changes, click on the blue "Create" button in the upper right corner of the panel.

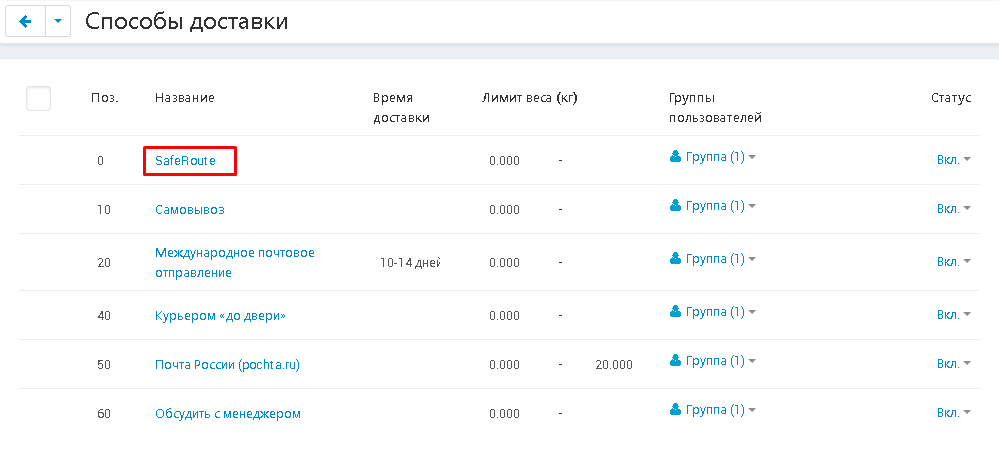
5. The new delivery method will be reflected in the general list. Here it can be edited, deleted, turned on and off. To edit the delivery method, click on its name highlighted in blue.
6. Go to the "Advanced Settings" tab. In addition to the standard functionality, here you can also turn on and off the buyer's address as mandatory.
If you tick the box "The buyer must specify his address",
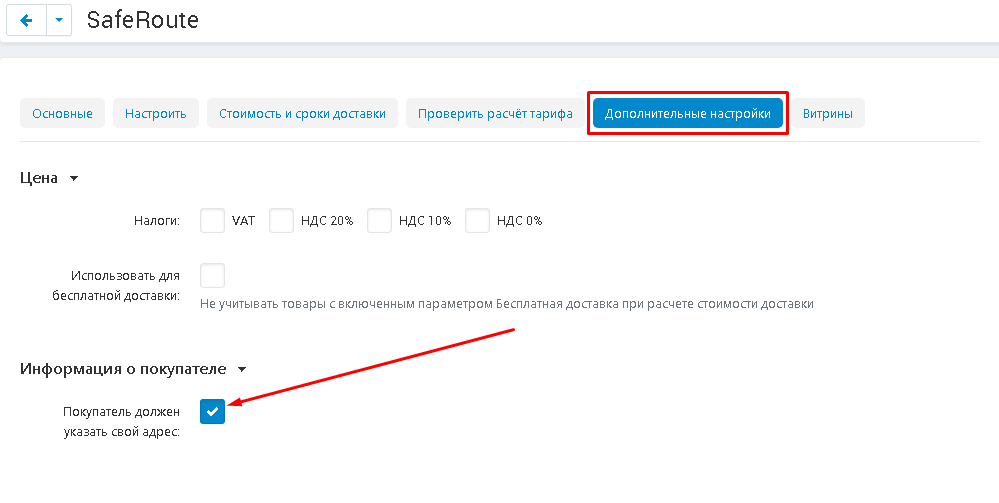
then the buyer's address will be displayed when placing an order and will be mandatory.
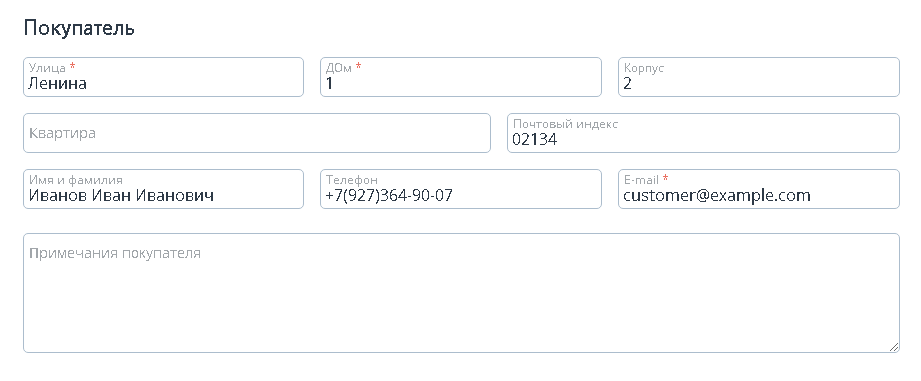
7. If there is no check mark,
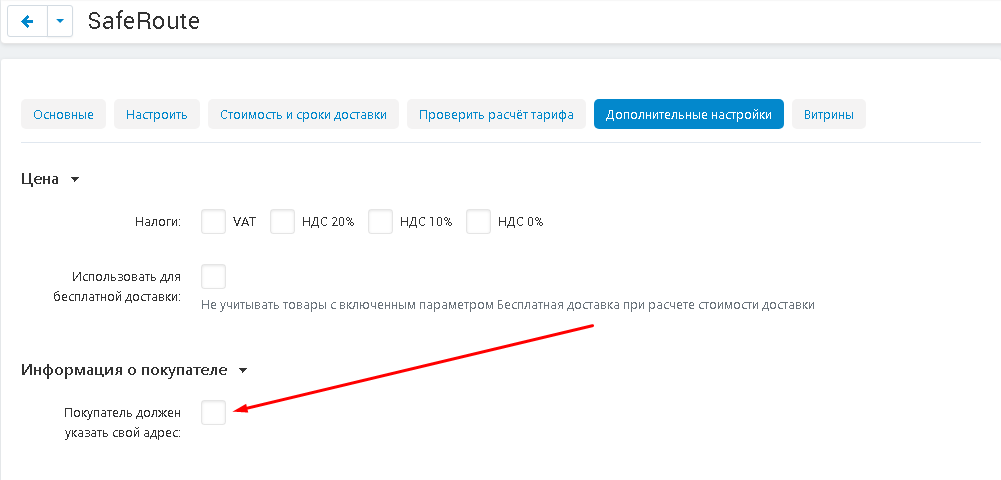
then during the checkout, the address fields for the buyer will not appear.

8. If the delivery method needs to be added to all sellers, click on the button in the form of a blue gear, select "Allow delivery for all sellers". The delivery method will be added for all sellers of the store.

9. Go to the "Configure" tab. Here, specify additional delivery services and additional packaging services by ticking them. After making the changes, click on the blue "Save" button in the upper right corner of the panel.
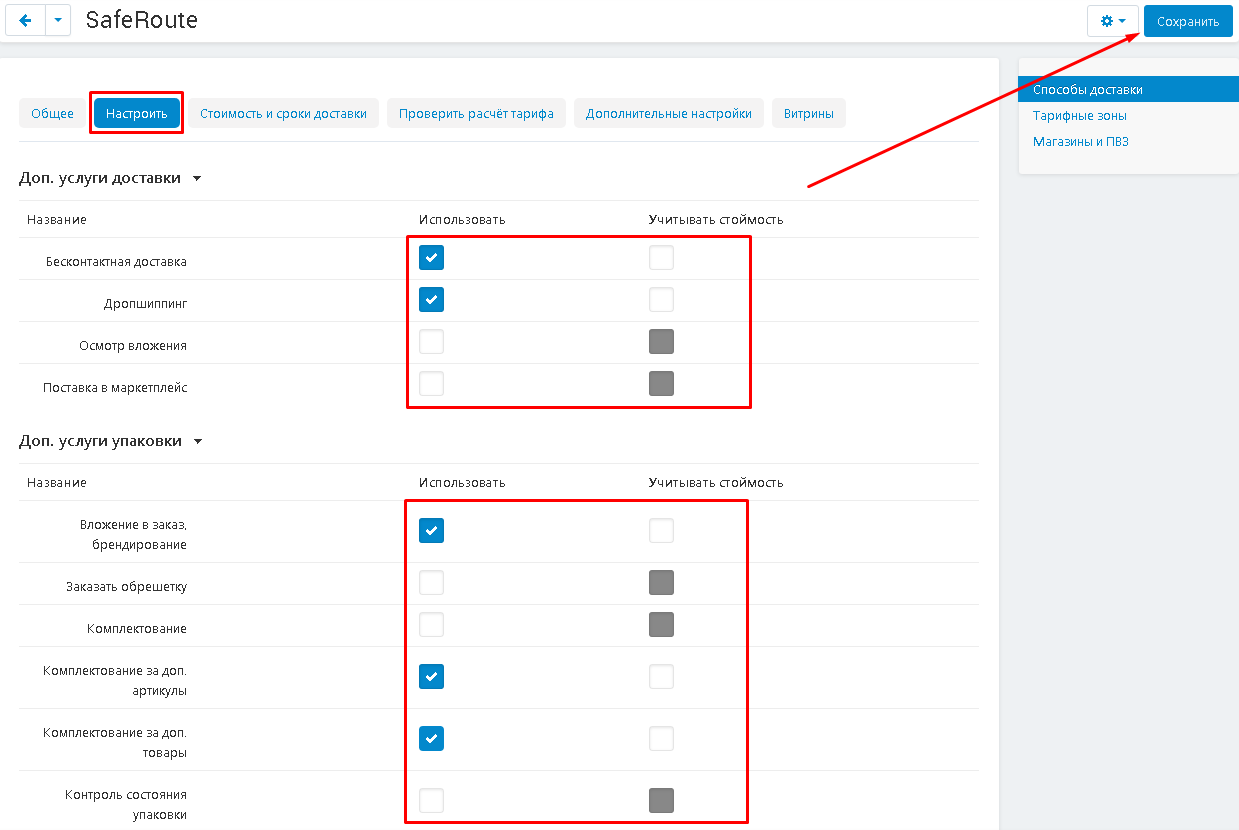
10. If this delivery method is applicable to all sellers, then use the group addition. To do this, click on the gear-shaped button in the upper right corner of the panel and select the "Allow delivery for all sellers" function.

TARIFF PLANS
In some cases, as a result of a failure or error, the delivery method may lose tariff zones. Or, they are not added for the platform. Without specifying the tariff zone, the delivery method will not be displayed on the checkout page. Therefore, it is recommended to check the data in advance.
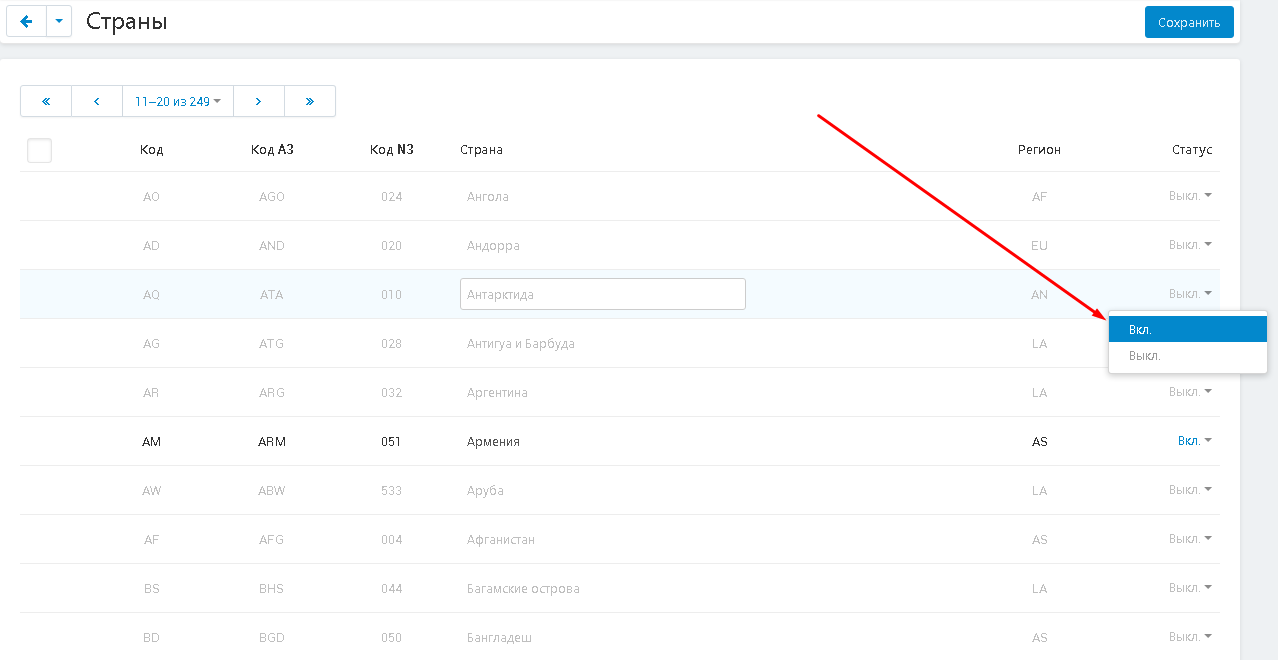
1. First of all, check if all countries are included. To do this, go to the "Administration" tab, select the "Shipping and Taxes" and "Countries" section.This is especially important when you work in different countries.
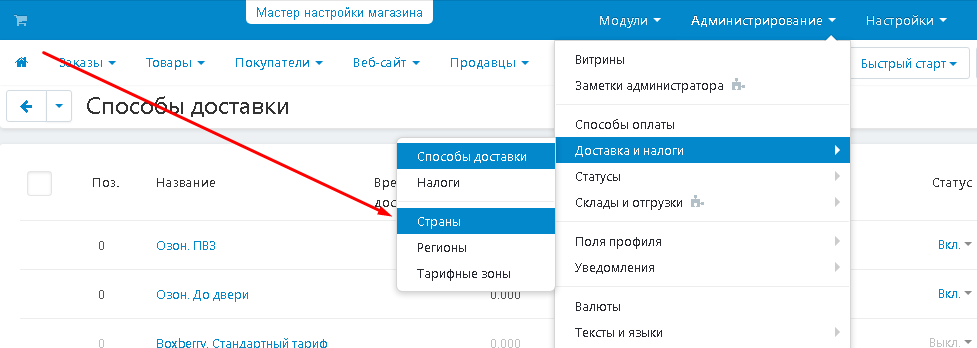
2. In the list that appears, select the desired country. Make sure that the status is set to "On" (enabled)
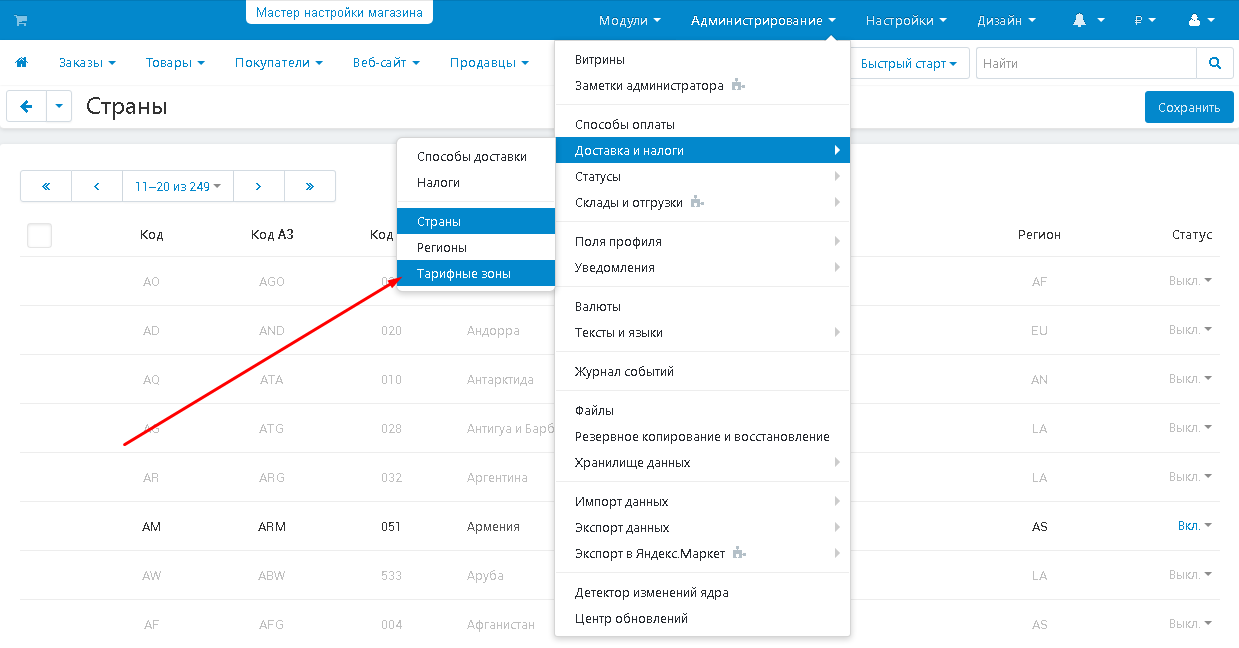
3. Now check the tariff zones. To do this, go to the "Administration" tab, select the "Shipping and Taxes" and "Tariff zones" section.
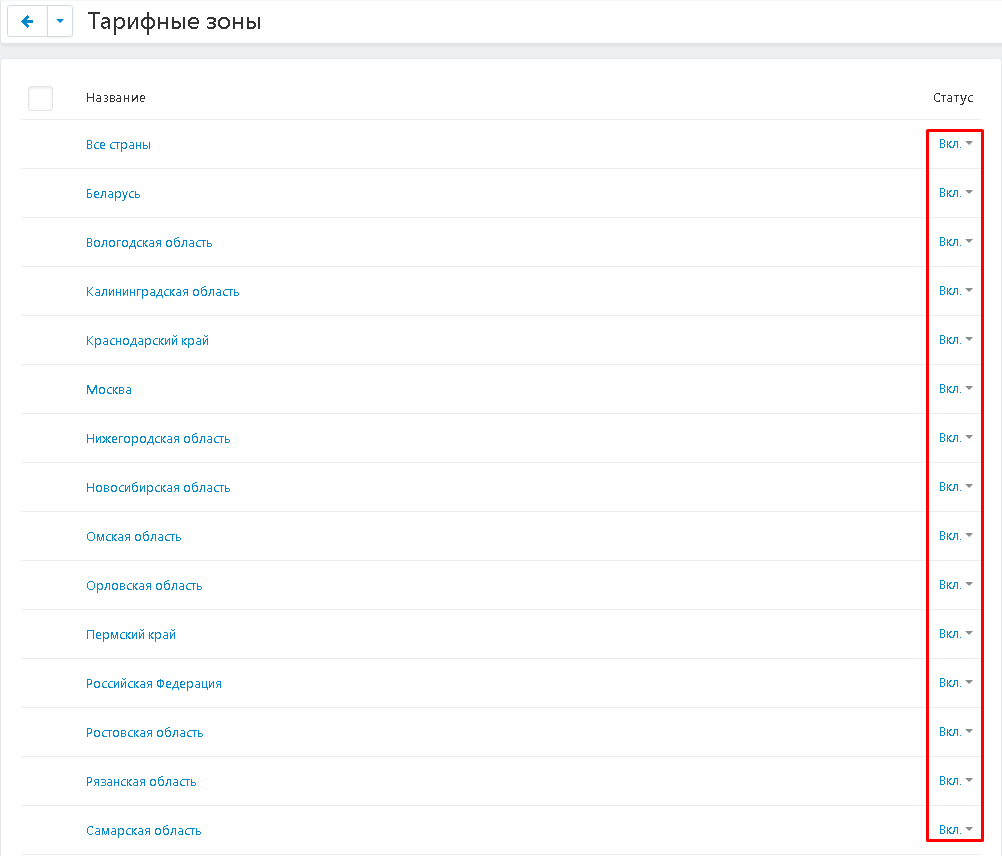
4. Make sure that all the necessary tariff zones are enabled.
5. If necessary, add a new tariff zone by clicking on the plus button in the upper right corner of the panel.

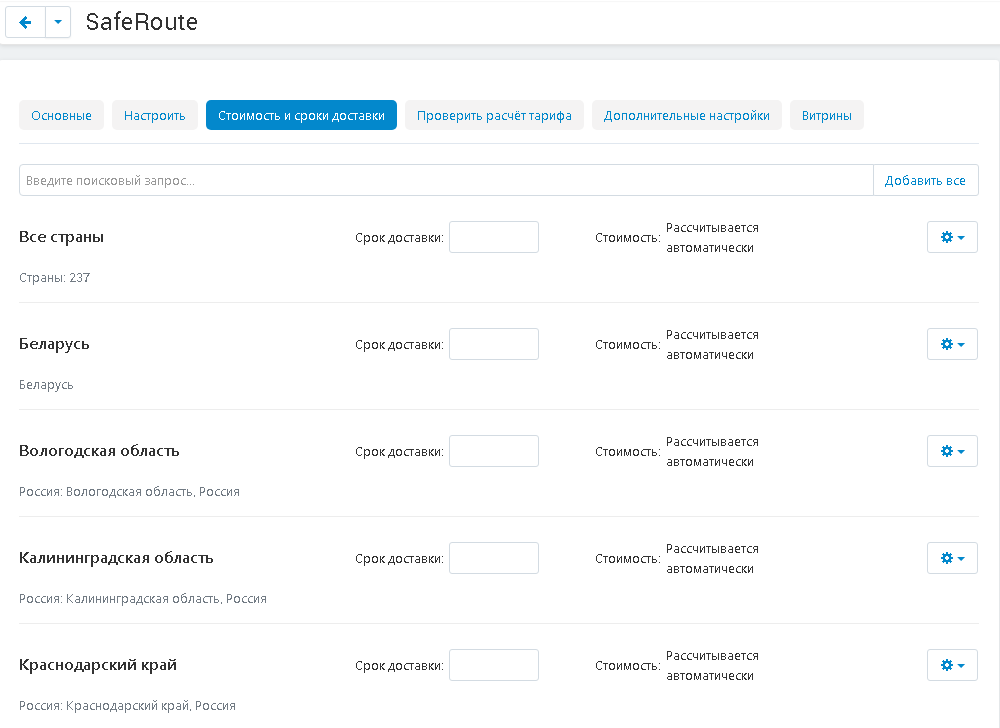
6. Information about tariff zones is contained in the "Cost and delivery time" tab in any of the delivery methods.

7. If the contents of the tab are completely missing, then a failure has occurred. To enable all available tariff zones at once, click on the "Add all" button.
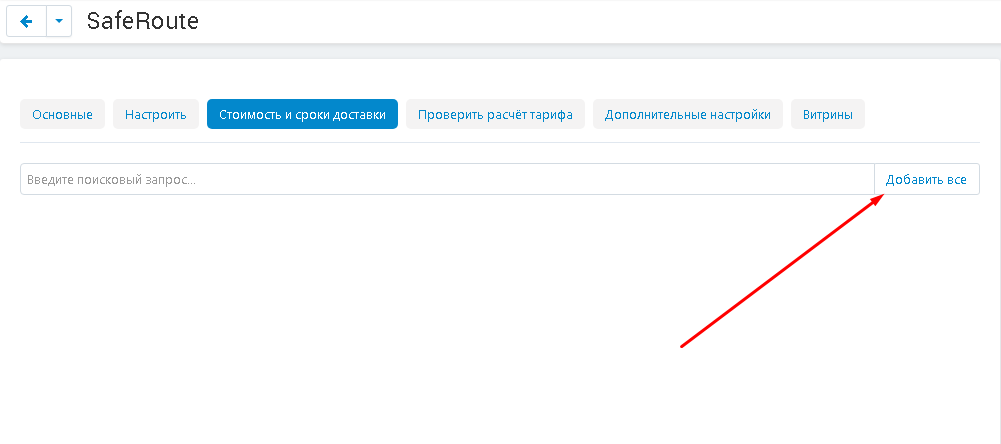
8. Or use the search.
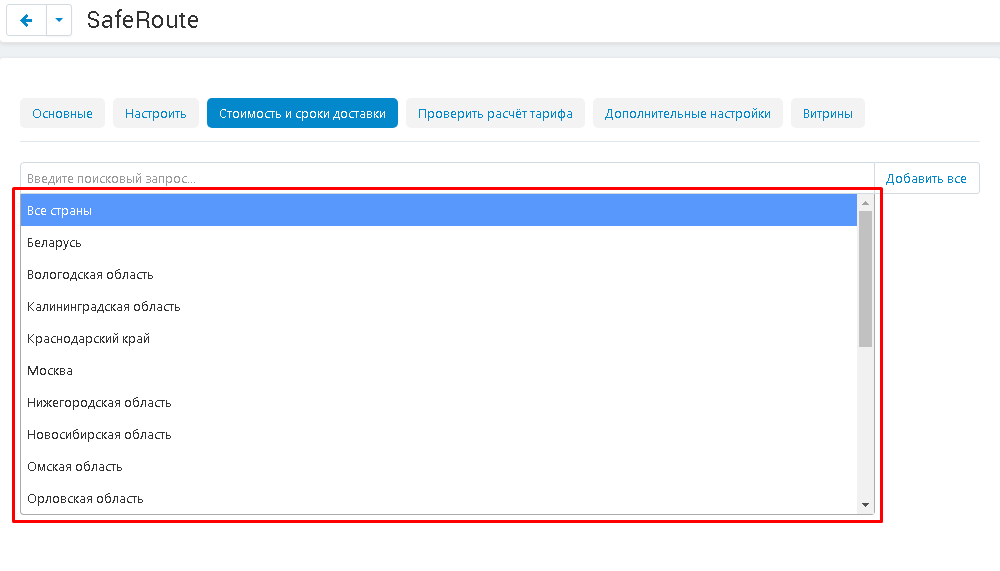
9. The contents of the tab will be filled in.
PRODUCTS
It is used if the goods are stored in a Safe route warehouse (fulfillment services are provided).
1. The safe route can be configured for individual products. To do this, go to the "Products" tab and select "Products".
2. Select the product and click on the "Actions" button. Select the function "Send selected products to SafeRoute" and one of the options: "New only", "Update existing" or "update existing Create new".
3. To apply SafeRoute features to several products, mark them and click on the gear-shaped button in the upper right corner and select the "Send products to SafeRoute" function and its options or "Send found products to SafeRoute" and its options (if a search was carried out).
ORDERING
1. Click on the button in the form of a grocery basket in the upper left corner to go to the showcase.
< / p>
 < /p>
< /p>
2. Add the product to the cart and click on the "Place an order" button.
Pay attention! For the module to work correctly, the product must have specified delivery parameters!
 < /p>
< /p>
3. "Safe route".
 < / p>
4. The address from the "Delivery to" item will be automatically copied to the Safe Route widget.
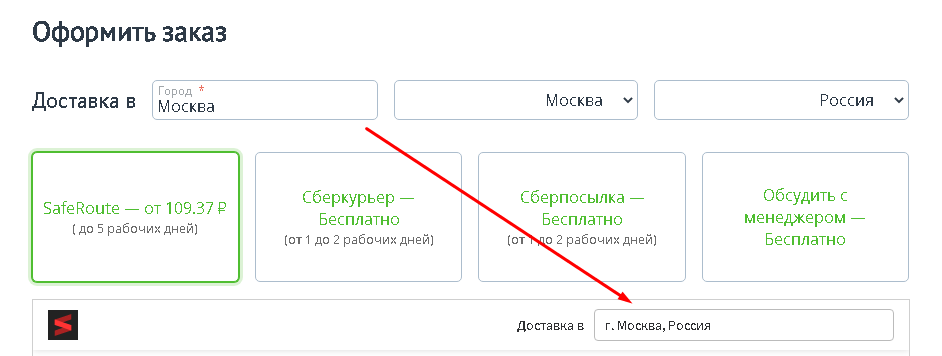 < / p>
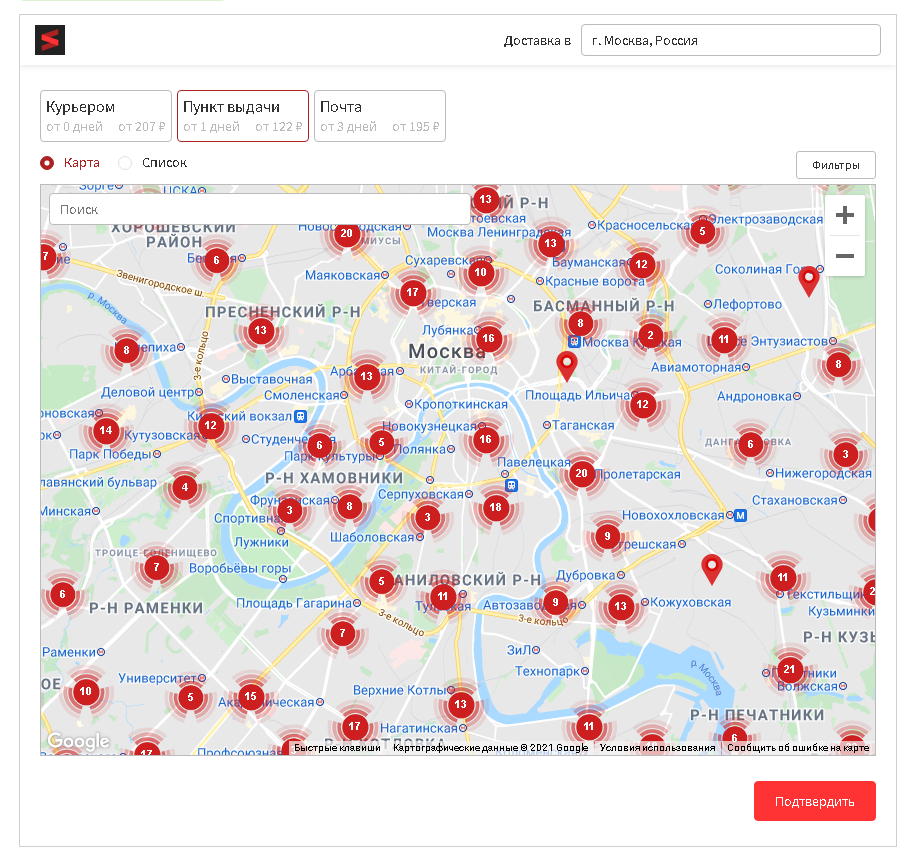
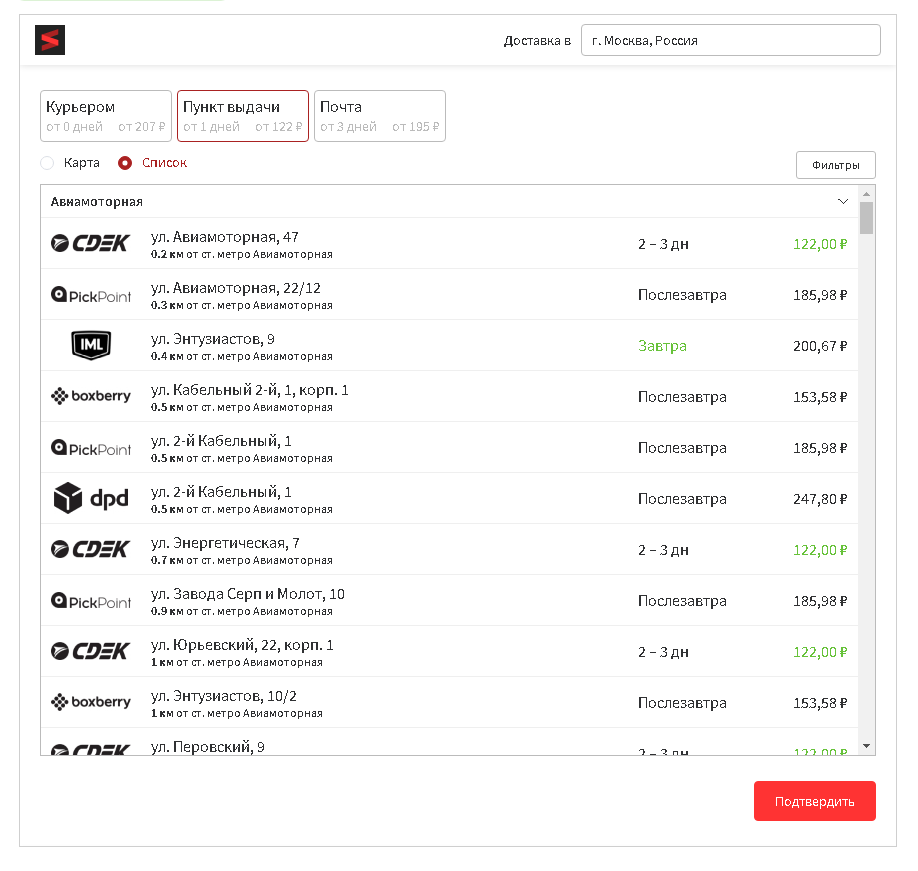
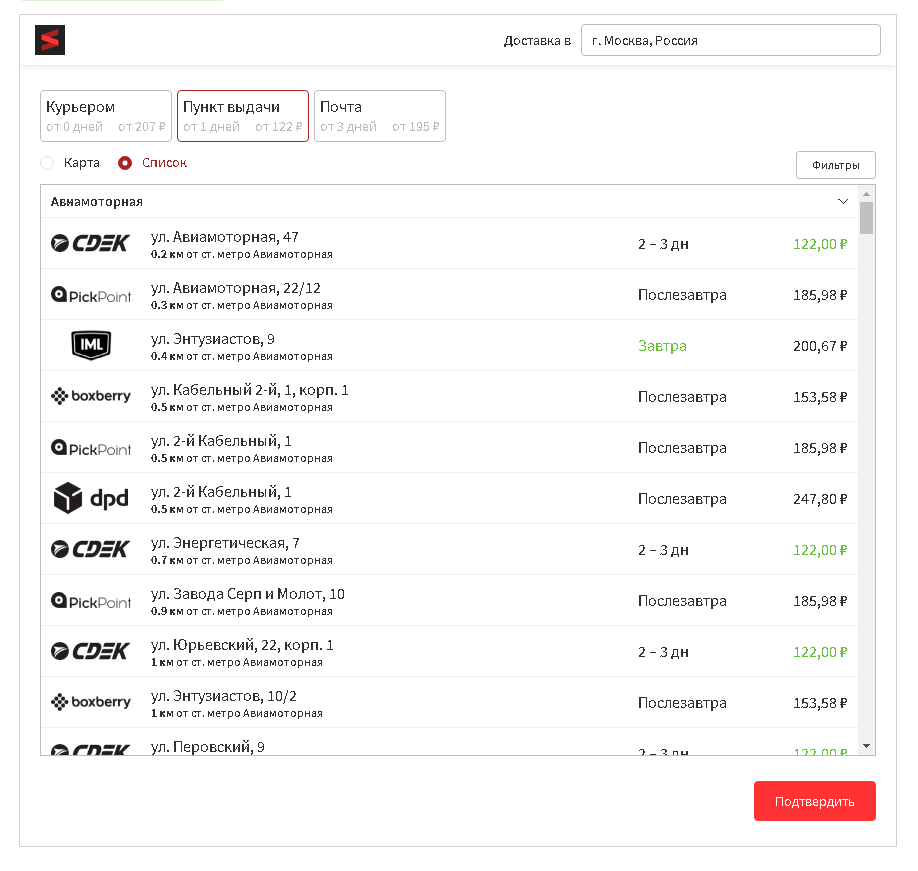
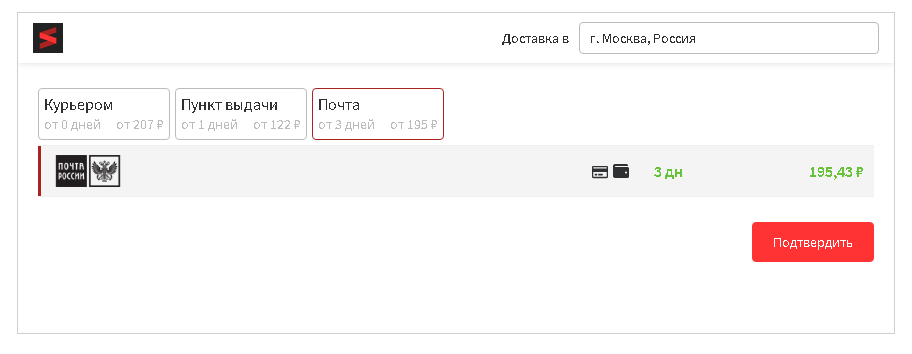
5. The widget has three tabs: "Courier", "Pick-up point" and "Mail".
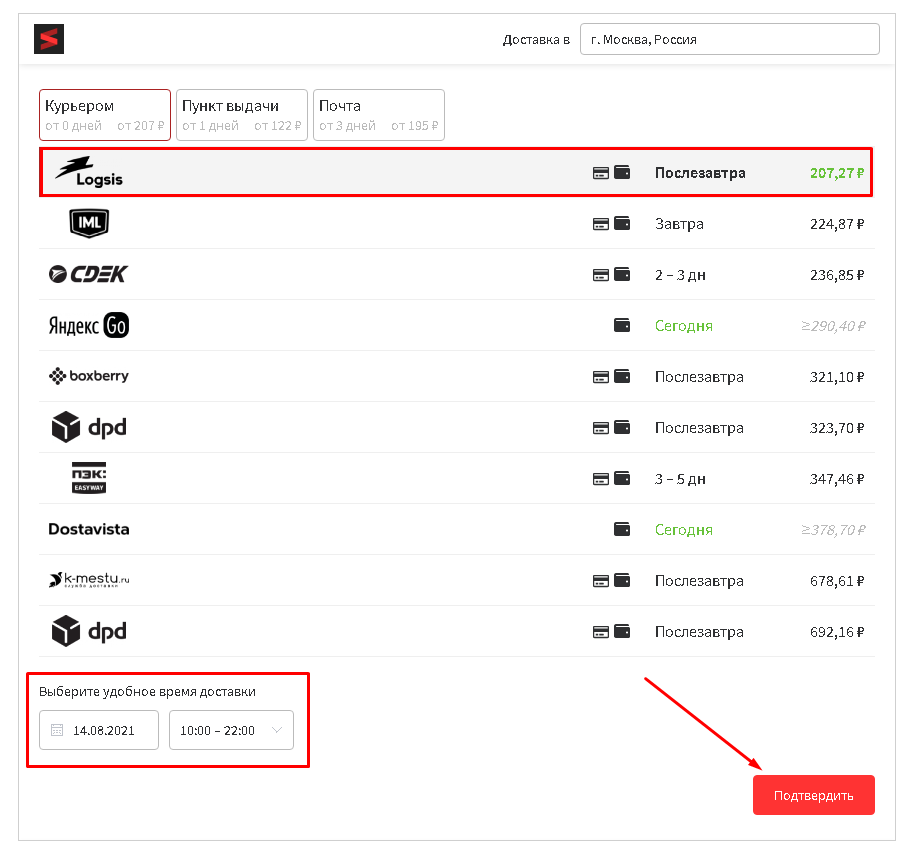
In the "Courier" tab, you can select a specific delivery service. The calculation of the cost will be indicated taking into account the delivery by courier.
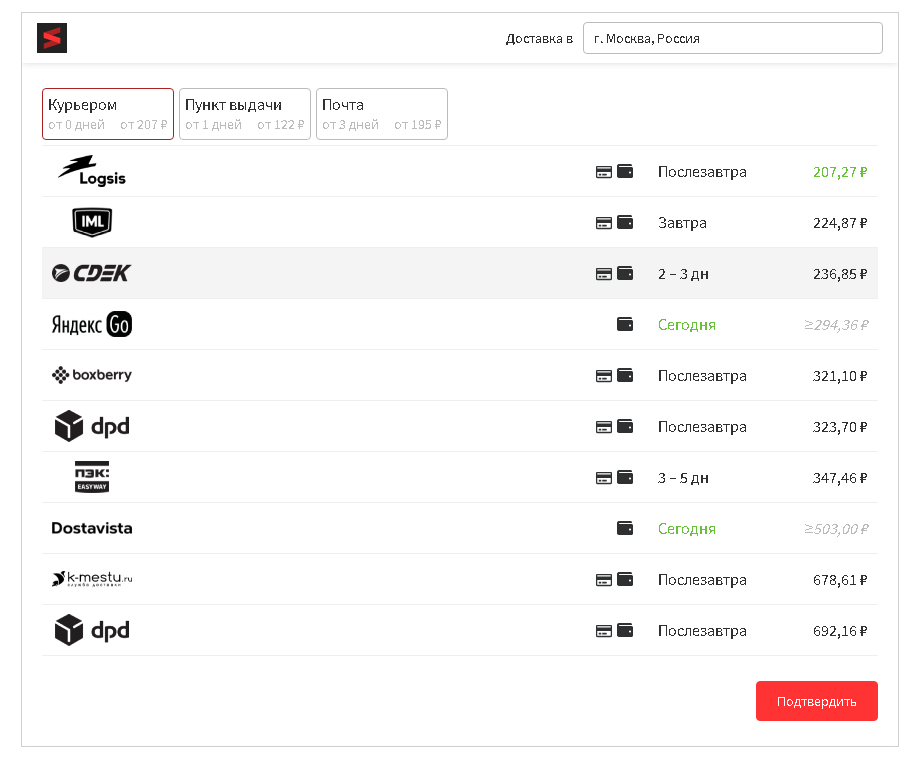 < /p>
< /p>
6. In the "Pick-up point" tab, you can select a specific pick-up point on the map
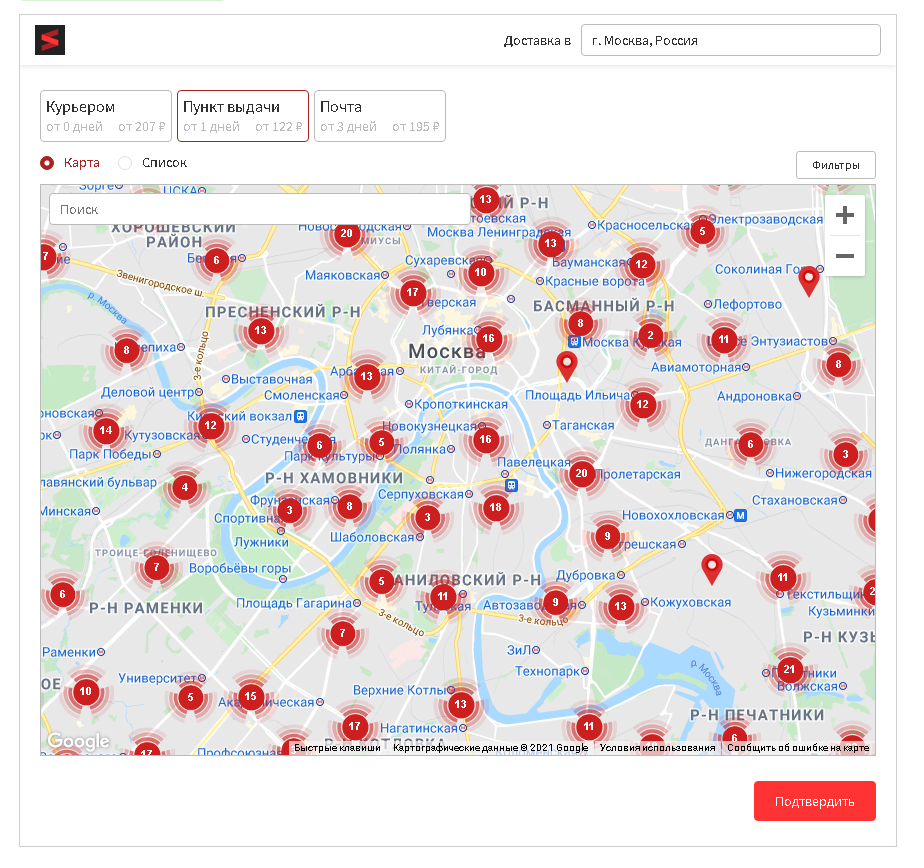 < /p>
< /p>
or through a list that specifies the address, delivery service, delivery time and cost.
 < / p>
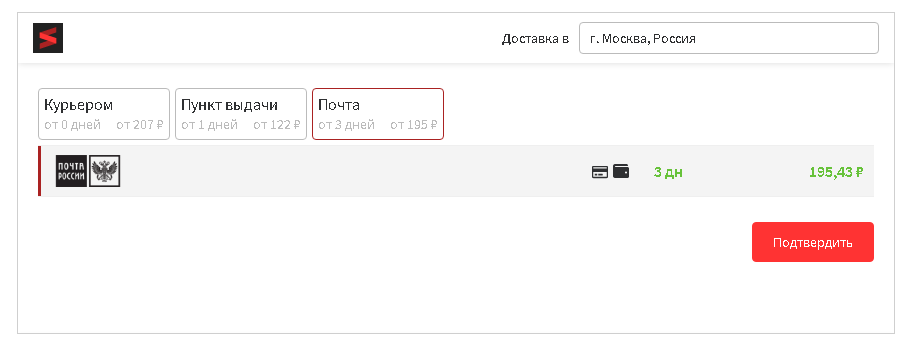
7. In the "Mail" tab, information about sending by mail will be displayed.
 < /p>
< /p>
IF THE PAYMENT WIDGET IS DISABLED
1. Select the service and delivery terms, then click on the "Confirm" button.
< / p>
 < /p>
< /p>
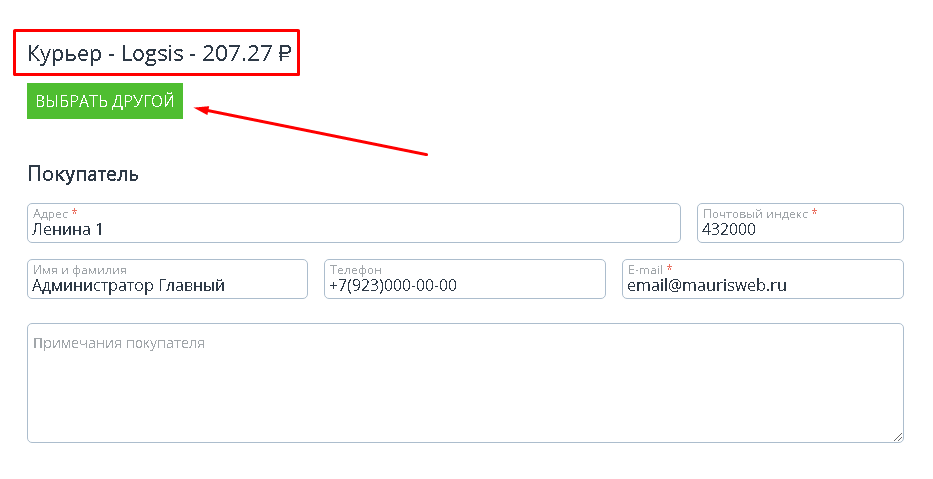
2. The page will display information about the delivery service, method and cost. The rest of the data is filled in as standard.
 < /p>
< /p>
IF THE PAYMENT WIDGET IS ENABLED
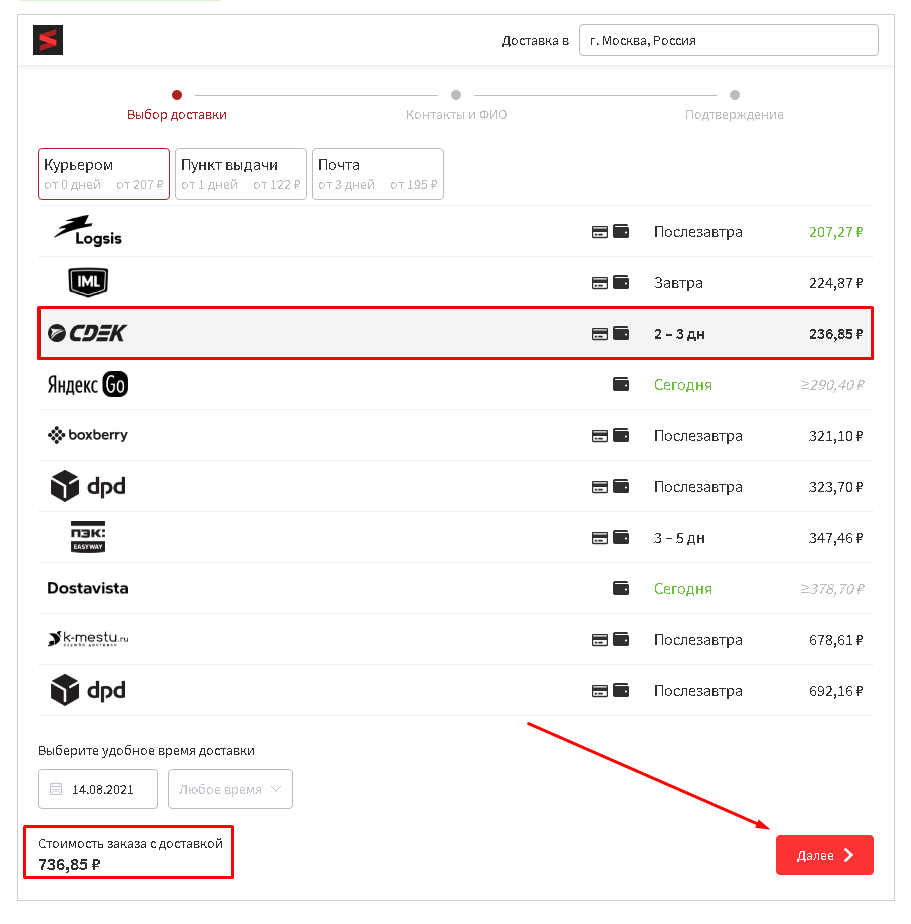
1. After selecting the service and delivery method, the widget will display the total cost including delivery. For further registration, click on the "Next" button.
< / p>
 < /p>
< /p>
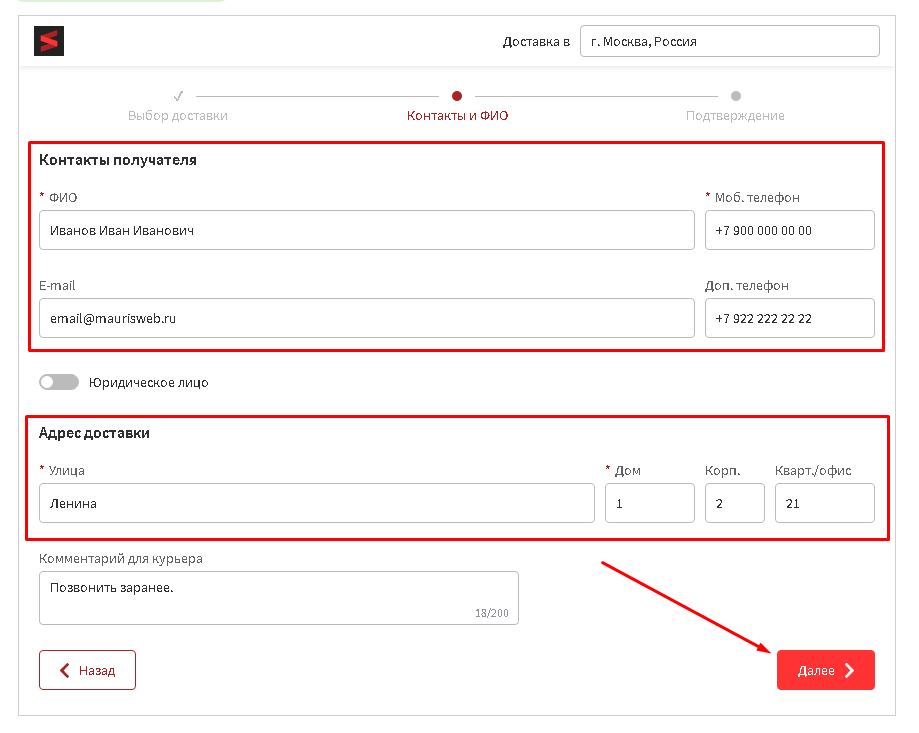
2. Fill in the required fields for delivery and click on the "Next" button.
 < /p>
< /p>
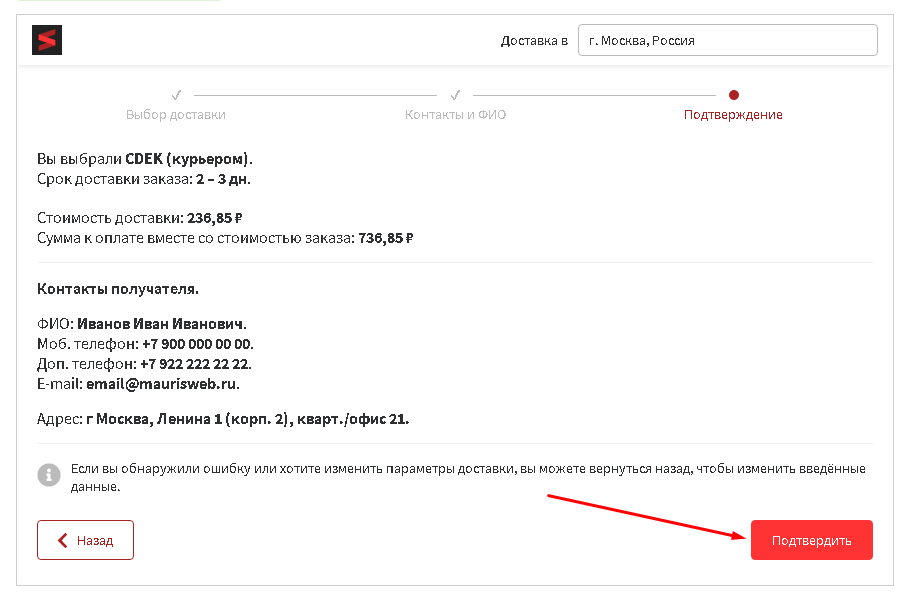
3. If all the data is correct, then click on the "Confirm" button.
 < /p>
< /p>
ORDER TRACKING
Order ID, read in the section "MODULE SETTINGS" p.20-21
1. To go to the order tracking service, click on the green "Order Details" button.
< / p>
 < / p>
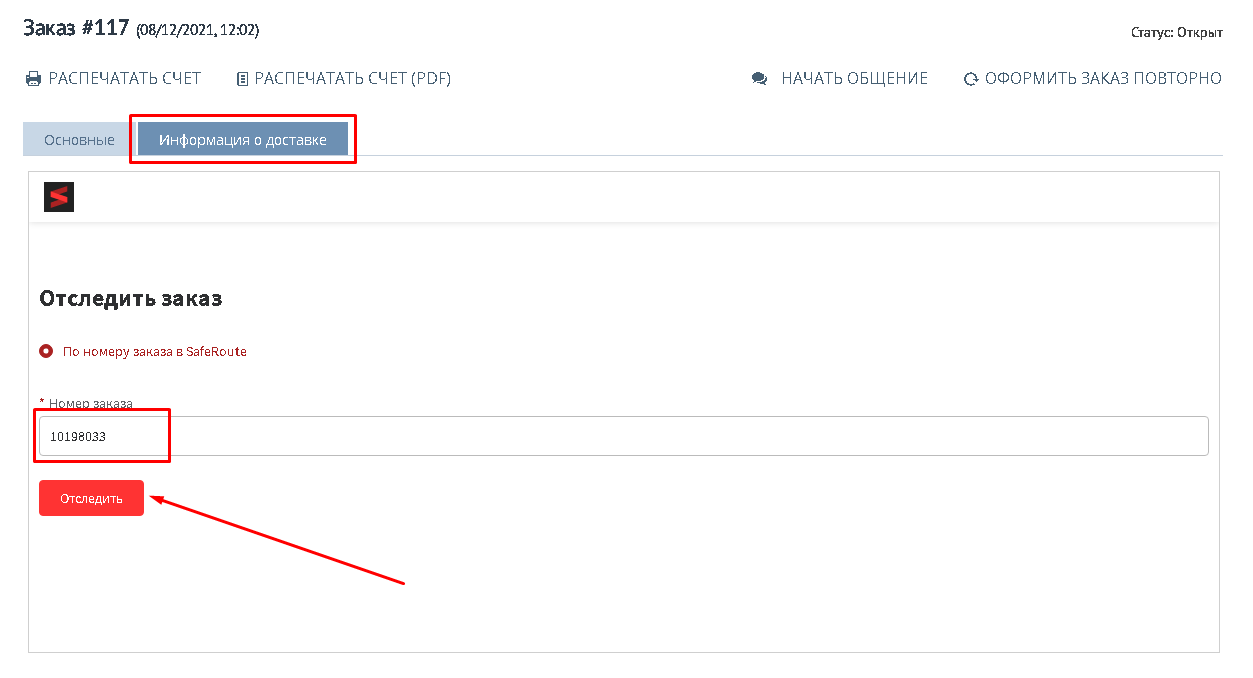
2. Go to the "Delivery Information" tab. In the "Order Number" field, enter the order number and click on the "Track" button.
 < /p>
< /p>
3. The widget will display information about the order. There will also be a link to the tracking site and the ability to track another order.
 < /p>
< /p>
CHANGING THE ORDER AFTER REGISTRATION
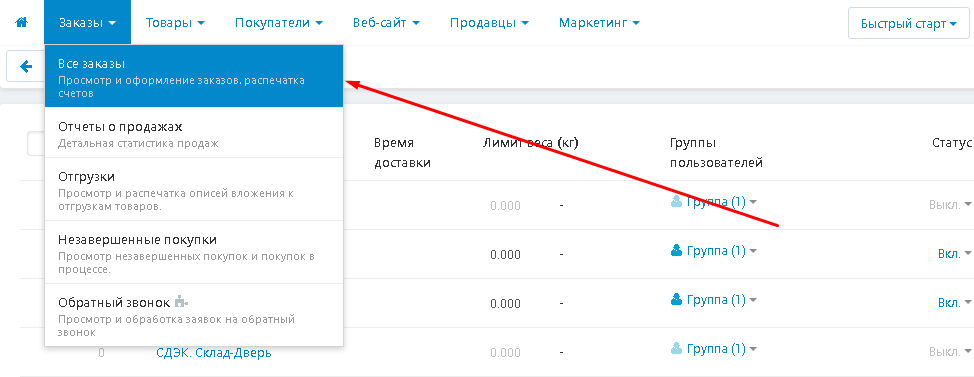
1. After placing an order, its details can be changed. Go to the "Orders" tab and select the "All orders" section.
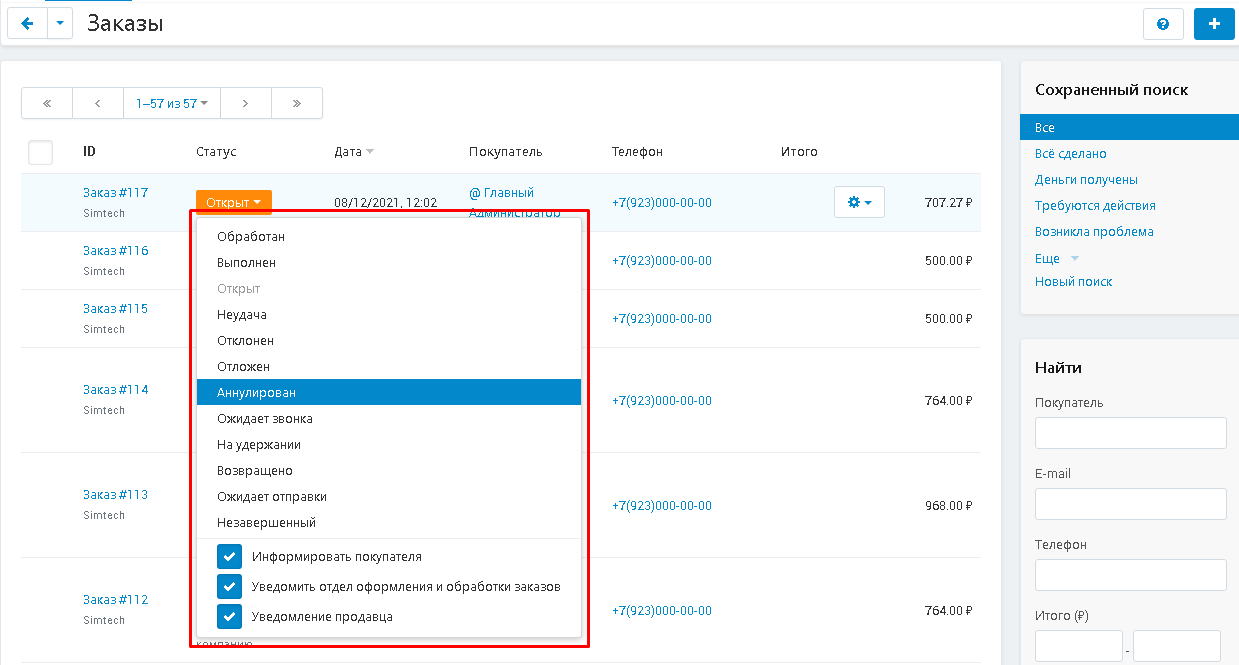
2. The order status can be changed by clicking on it and selecting the desired status.
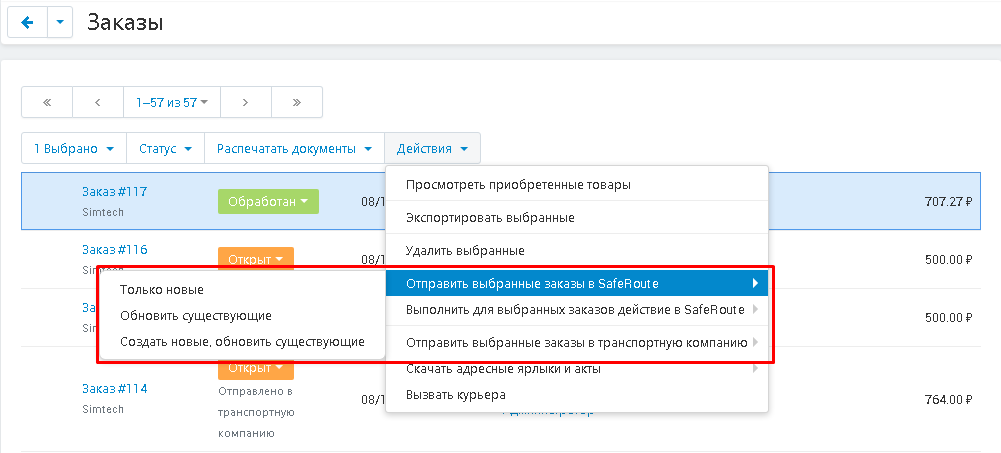
3. You can also change the shipping methods for multiple orders. To do this, select them, click on the "Action" button and select the "Send selected orders to SafeRoute" function and one of its options.
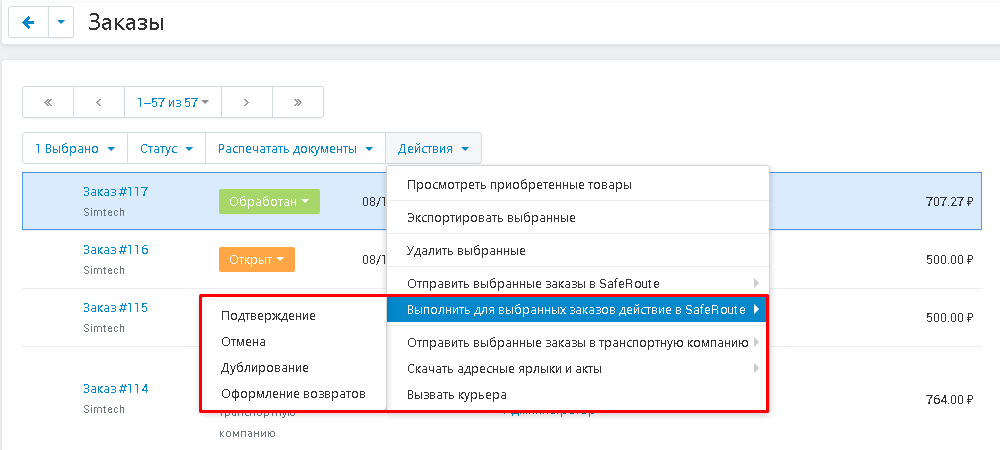
4. You can also perform a group status change by selecting the function "Perform an action in SafeRoute for selected orders" and one of the options.
5. Inside the order, "SafeRoute" will be specified as the payment method and the carrier.
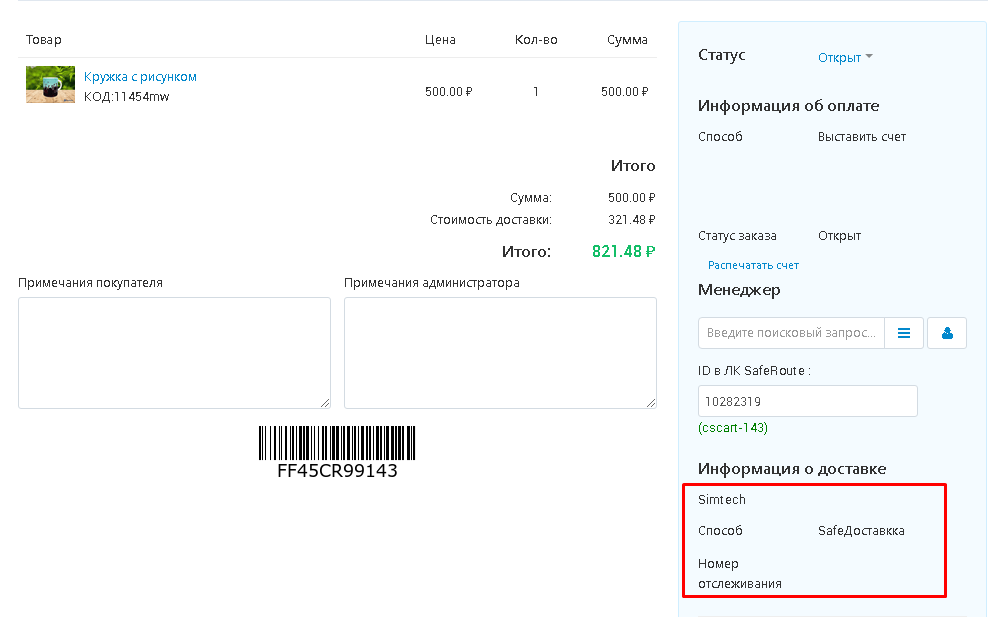
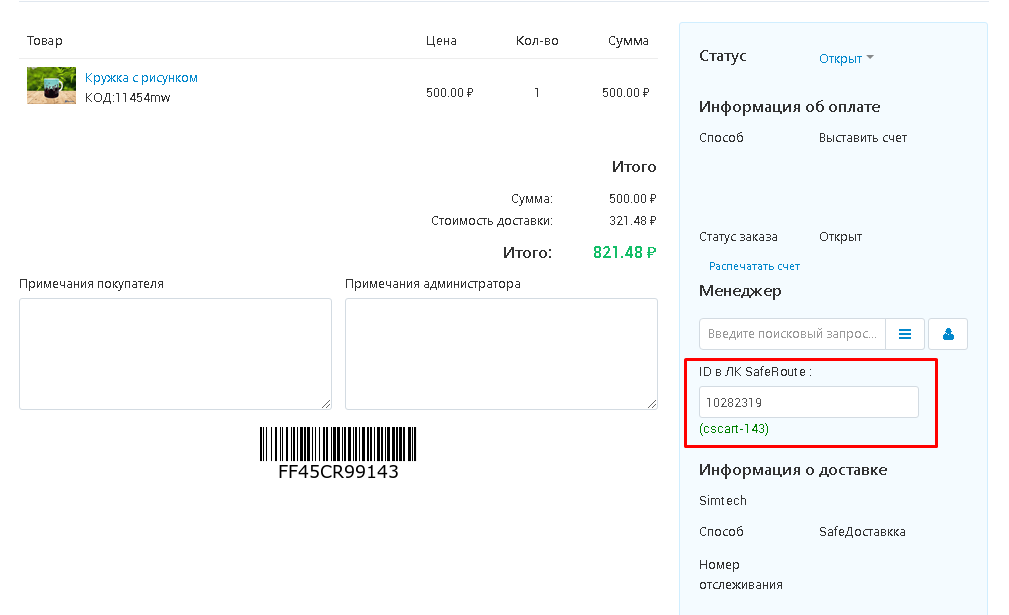
6. 4. In case of changing the order number in the SafeRoute Personal Account, it can be entered manually in the "ID in the SafeRoute LC" field.
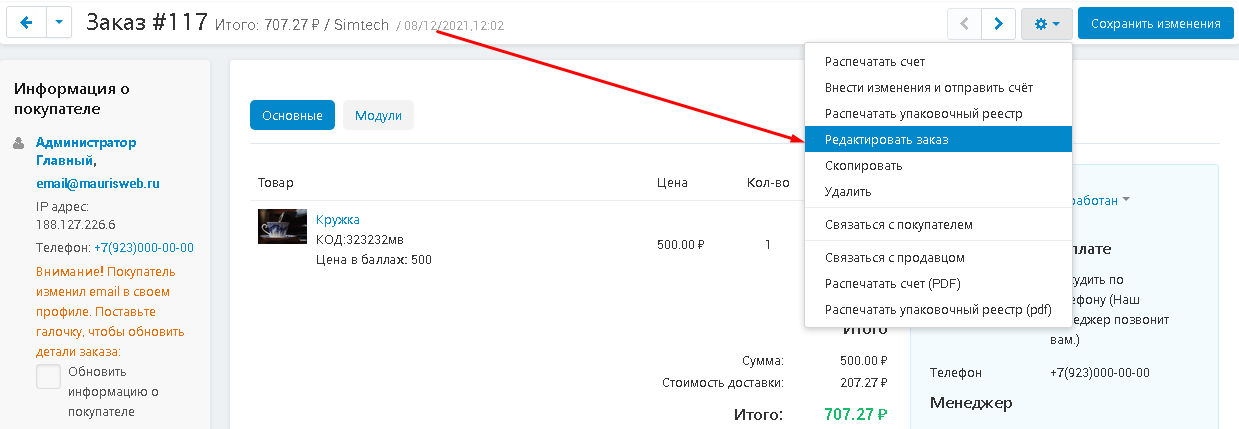
7. You can also change the delivery option. To do this, click on the gear-shaped button in the upper right corner of the panel and select the "Edit Order" function.
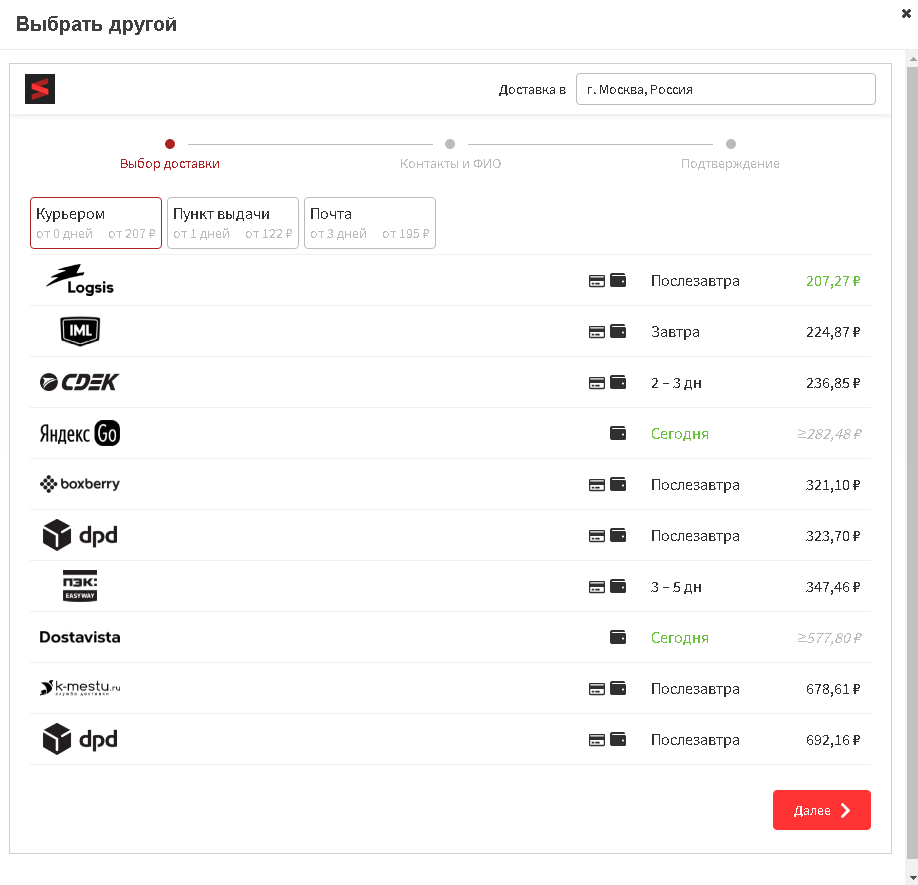
8. In the "Status" section, click on the "Choose another" button highlighted in blue.
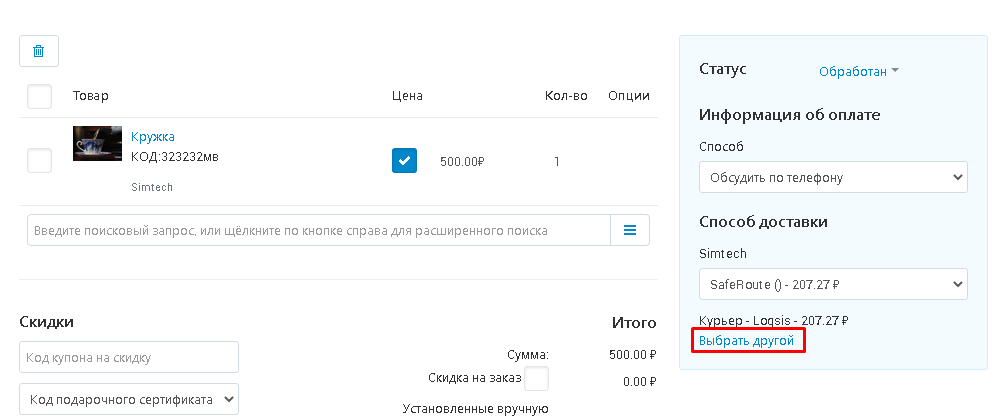
9. A window opens where you can change the delivery option.
09/27/2021 - v 1.0.10 updated the section "Changing the order after registration":
[+] The ability to edit the relationship of the order with the order in the LC SafeRoute