Module "Import PRO: CSV with auto field recognition, creation of characteristics and moderation of the seller's preset"for CS-Cart Multi-Vendor
The module allows you to significantly simplify and automate the process of importing goods. The main functions of the module:
- Automatic matching of the fields from the file with the fields of the product card;
- Import moderation;
- Automatic creation of characteristics.
This module allows you to automate the configuration of the import of goods, simplify the verification of import settings, creates new characteristics, normalizes delivery parameters and much more. Thanks to him, the import of goods instead of several hours is configured in just a few minutes.
Automatic field matching
There are two options for downloading and configuring the file by the vendor:
- The main upload format: *the vendor uploads the file and independently compares the fields from the file with the fields for matching in the import, then confirms and sends for moderation.
- Simplified upload format: *the vendor uploads the file and sends it for moderation, the marketplace administrator checks the file, matches the fields and starts the import.
*In both cases, the module automatically matches the fields from the import file with the fields of the product card, focusing on the previously obtained experience. We have created a self-learning matching algorithm. It remembers exactly how the vendor or administrator matches the fields and creates a mapping directory. For the accuracy of the algorithm, the directory is created in the context of the marketplace and each individual seller.
After the seller uploads a new import file, the algorithm looks through the fields in the file, compares them with the vendor's reference and substitutes the corresponding fields in the preset. If the required field is not in the vendor's directory, the algorithm goes to the marketplace directory and finds the required field there. A person can only visually double-check the comparisons and, if necessary, disable or correct the comparisons.
Restriction on displaying fields for the entire marketplace or for individual vendors
CS-Cart supports a huge number of different fields for the product card. To minimize errors when comparing fields from the vendor, we have taught our module to hide extra fields that are not used in the marketplace.
Fields can be hidden for the entire marketplace or for individual sellers: depending on the tariff, the number of uploaded products, individual terms of cooperation. For example, you allow one of the sellers to export goods and then upload them back. In this case, the file will have to contain a certain amount of internal, additional information: product id, variation group id, and so on. Accordingly, for these sellers, you will need to allow the display of the corresponding fields in the import setup.
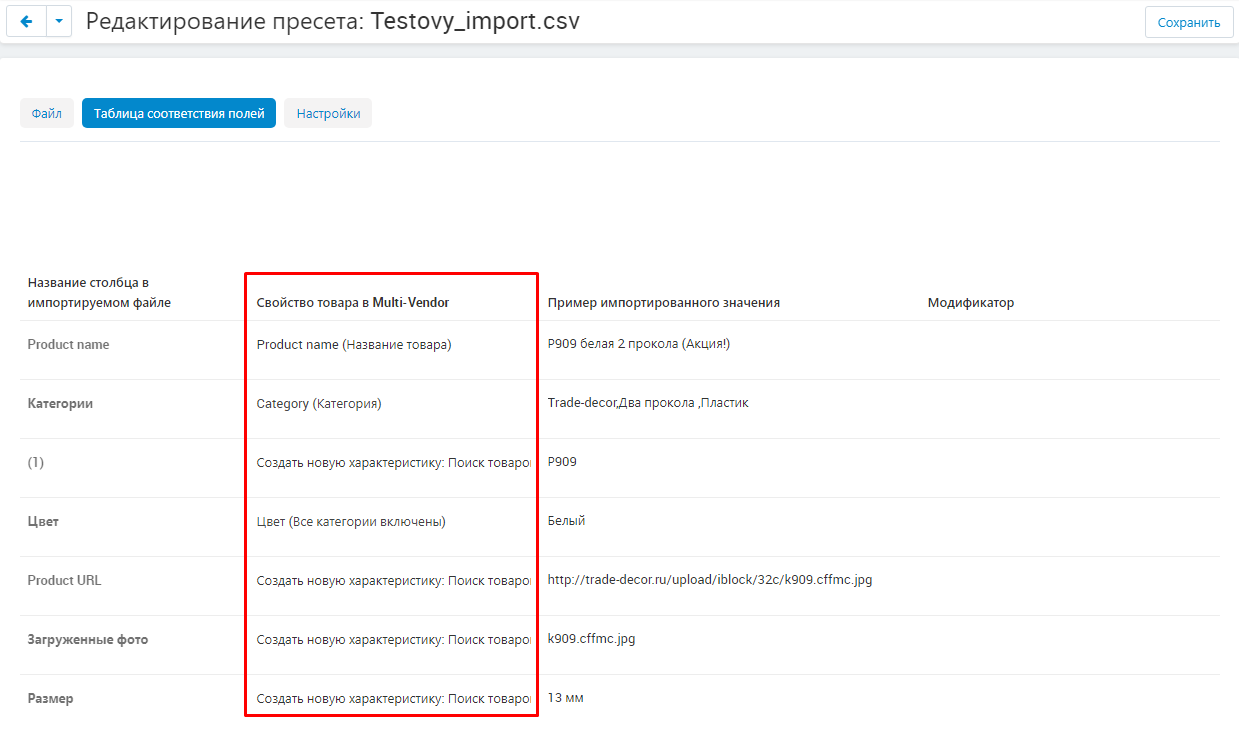
Import moderation
After the vendor downloads the file and clicks the "Import" button, the file gets checked by the marketplace administrator. The administrator checks the file, makes sure that it contains all the necessary information, checks whether the fields are correctly matched, and so on.
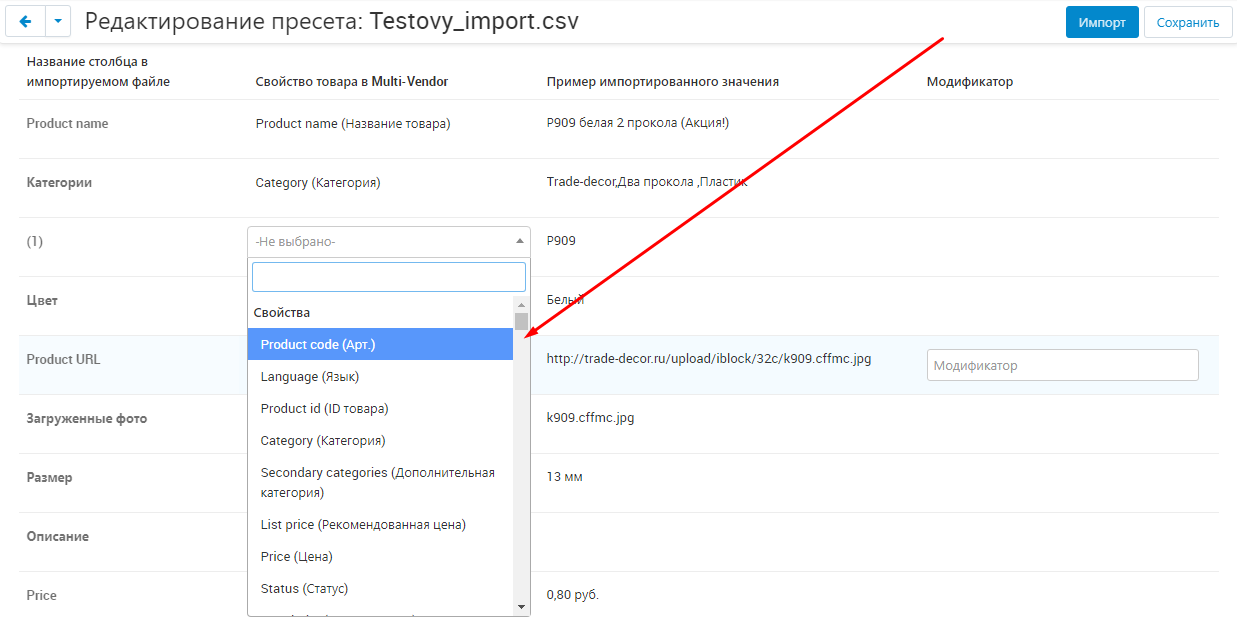
After that, he approves or rejects the import. The vendor must be notified about the results of moderation. The administrator selects the notification text from ready-made response templates. Example of the template for rejecting an import file: "Import rejected, the file does not contain a parameter for calculating delivery."
If the administrator does not find a suitable one among the ready-made templates, he can enter his message with a free field. After that, he clicks the "Approve" or "Reject" button, and the seller receives a notification about the results of moderation.
If the import is rejected, he will be able to understand what is missing in the file, correct it and upload it again.
Importing goods, updating balances, adding new goods
With each new import, the product card is completely overwritten, which greatly loads the system with meaningless actions. Therefore, we recommend creating separate imports for three different cases:
- Initial loading of goods: all fields required to create a product card are compared;
- Updating balances: only three fields are matched – article, price and quantity;
- Adding new products: in the import settings, in the "import strategy" item, select the option "Create only new products".
This will significantly reduce the load on the system with regular import of leftovers.
And in order to speed up the update process, we have shortened the chain of actions required for re-import. The administrator checks and moderates the import only during the initial download. In the future, if the file structure remains unchanged, the file does not go to moderation.
But if the seller changes the structure of the file for any reason, then it will be checked by the administrator again. This is necessary to ensure that the product information is loaded correctly.
Automatic creation of characteristics
In order for the products to be displayed correctly in the site search, before uploading them to the site, it is necessary to create characteristics for them. Our module does this automatically after the field matching is completed.
If, when creating a characteristic, you do not specify the category in which it should be displayed, then it will be available to everyone for all categories in all products. Even for those in which it is absolutely not needed. For example, products from the category "Electronics" and from the category "Clothing" will have completely different characteristics. Such characteristics as "Size" with options "42, 44, 46" and so on, or material with options "Knitwear, cotton, silk" and so on are absolutely not important to the smartphone. Similarly, a T-shirt does not and cannot have a "Screen size" characteristic.
If all the characteristics are available for all categories, the seller will have to scroll through the entire list of characteristics when creating a product card until he finds the right one. And then the buyer will also have to scroll through filters with "Screen Size" characteristics when searching for a T-shirt.
In order to avoid these difficulties, our import module creates characteristics according to a certain algorithm:
- Characteristics are created for the seller, that is, other sellers do not have access to them;
- Seller categories are assigned to characteristics;
- After that, you can add a marketplace category and create filters for these characteristics to display in specific categories on the marketplace showcase.
Assigning characteristics to specific categories makes it easier to work with characteristics. Ensures that each category has only relevant filters for it.
Types of characteristics
Select the correct type for each characteristic in the file:
- To search for products;
- Variation as one product;
- Variation as a multiple commodity;
- Free input field.
The first type of characteristics is used when creating filters to search for products on the site. The second and Third are for combining similar products into variations. The fourth is for the correct display of characteristics containing a large amount of information. For example, it can be a characteristic "Certificate of goods from the manufacturer".
Fields with different types of characteristics can also be disabled both for the marketplace and for individual sellers.
Filling in delivery parameters
Delivery parameters are very important information about the product, as it is necessary for the correct delivery of the order through transport companies. As a rule, filling in this data on the marketplace is considered mandatory. At the same time, it is very important to normalize this data.
However, in practice, it turns out that each vendor has its own units of measurement in the file: someone measures the weight in kilograms, someone in grams, someone writes down the dimensions in centimeters, someone in meters. And the marketplace and transport companies have their own set units of measurement. As a rule, transport companies on their side make all measurements in centimeters and kilograms.
And it's good if the dimension of the seller is indicated in the column, then the administrator, when comparing fields, immediately sees whether the dimension in the file corresponds to the dimension accepted in the marketplace. Then, if the units of measurement do not match, it is enough for the administrator to specify a modifier that will allow you to bring the delivery parameters to the units of measurement accepted on the marketplace.
However, some sellers indicate the dimension directly in the cells for each product. And, often, they do it in different ways: abbreviated, completely, with a dot, without a dot, with errors, and so on.
For example, the default length of the marketplace is measured in centimeters (cm is written), and the weight in kilograms (kg). The new seller's length is also in centimeters, but the dimension is indicated differently – SEE – in large letters and with a dot. And he writes down the weight in grams and also denotes G. – with a capital letter and with a dot.
Previously, I had to download a file, figure out in which units of measurement the delivery parameters are given, manually convert them and download the file again. Or return the file to the seller, coordinate changes with him, wait for a new file. Both options are very long, it distances the seller from the start of sales and loads your employees with extra work.
We solved this issue at the import setup stage. You specify multipliers for converting some units of measurement to others and aliases for them. The algorithm scans the file and, if it finds any of the specified aliases of the unit of measurement, applies the specified multiplier to this cell. At the output, you get the weight or size of the product in your units of measurement.
Delivery parameters are specified in one cell
Sometimes the seller indicates the dimensions of the goods in one cell through a separator: a multiplication sign, a semicolon or any other. For example: 10x40x35, or 10;40;35, or 10*40*35 and so on.
To recognize such a record and correctly transfer the data to the fields of the product card, you only need to tick the box with the appropriate separator: x, *, ; and so on.
Downloading large files
Often marketplaces are forced to impose restrictions on the size of the import file. This is due to the fact that it is necessary to allocate server resources to download a really large file. And this can negatively affect the work of the entire marketplace. But after all, the site is responsible for interacting with customers, and it should not suffer under any circumstances.
We have come up with a different solution that allows you to upload files of any size and not slow down the site. The module splits the import file into smaller files of 200-300 products and loads them one by one.
Moreover, even if there is an error in one of the lines of the file, for example, some important information is missing, the algorithm will not stop the download. He will try to read the problematic line again, and if it still does not work, he will simply move on to the next product.
Detailed instructions for working with the module
The instruction is current at the time of publication. The module is regularly updated and improved. There may be minor differences in the control of the module.
The module expands the possibilities of standard import of goods. Automates the process of matching fields. Self-learning, stores information about uploaded fields for each individual vendor and the entire store as a whole.
SCOPE OF APPLICATION
The module is suitable for marketplaces where vendors upload products themselves via cvs. xml files.
APPLICATION EXAMPLE
If you have access rights, the seller uploads a CSV file, compares the values, and performs the import. The administrator checks the preset and, in the absence of errors, approves. The seller receives an alert.
TECHNICAL SPECIFICATIONS
- The module automatically recognizes values and characteristics, later replacing them with those set by the marketplace administrator when importing;
- Reduces vendor value units to marketplace value units;
- Creates new characteristics, storing them for further import;
- Creates notification templates;
- Adds the possibility of group moderation of imports.
COMMUNICATION WITH OTHER MODULES
Grouped variants of characteristics - during the import of the product, new characteristics will not be duplicated, they will be associated with the already grouped ones.
Seller Characteristics - adds the function of moderation of characteristics created through import.
CSV, XML, CommerceML import queue (MySklad, 1C, Class365) - works directly in tandem with the module "Import with moderation and auto-creation of characteristics", preventing system overload during import. The module configures the import in such a way that until one process ends, the other will not start.
Export/Import of categories - adds an additional ability to form categories separately during import.
For information about compatibility with other modules, see the product features -https://maurisweb.ru/programmy...
MODULE SETUP
1. After installing the module, go to the "Modules" tab, select "Module Management" and "MAURISWEB" from the drop-down menu.

2. In the list that opens, select the module you are interested in and click on its name, highlighted in blue or black.

3. On the page that opens, select the "Basic" tab.If the license key is not set automatically and the module settings are blocked, log in to your account at www.maurisweb.ru copy the license key and paste it into the appropriate item. The key has also been sent to your email.

4. In the "Available domains" and "Test Domains" sections, check the validity of the specified domains. You can add additional domains by clicking on the white "Add Domain" button on the right side of the page. The total number of domains should not exceed three.

5. Go down below, select the "Basic Settings" section and tick the "Save data when deleting the module" option so as not to lose them when reinstalling the module.

6. Go to the "CRON" tab. Configure the frequency of notification of sellers about status changes after moderation, so that sellers receive an email message about the administrator's decision, for this write the CRON command in the scheduler.

7. Save the module settings by clicking on the blue "Save" button in the upper right part of the panel.

PRIVILEGES
SELLER'S PRIVILEGES
1. To set up privileges for the seller, go to the "Buyers" tab and select the "User Groups" tab in the drop-down menu.

2. In the list that opens, select the desired group and click on its name highlighted in blue. Make sure that the group has the "Seller" type.

3. In the window that appears, select the section "MW: Import with moderation and auto-creation of PRO characteristics" and tick the items that you give the seller access to: "Preset settings", "Import button in the import list". Or the "Select all" item to mark all items.

4. Save the changes by clicking the blue "Save" button in the lower right part of the window.

ADMINISTRATOR PRIVILEGES
1. To set up privileges for the seller, go to the "Buyers" tab and select the "User Groups" tab in the drop-down menu.

2. In the list that opens, select the desired group and click on its name highlighted in blue. Make sure that the group has the "Administrator" type.

3. In the window that appears, tick the access rights for the Administrator: "Moderation" (moderation of the preset import list), "Preset Settings" and "Import button in the import list". You can select all the items at once by clicking on the "Select all" button.

4. Save the changes by clicking the blue "Save" button in the lower right part of the window.

MODULE FUNCTIONALITY
UNITS OF MEASUREMENT
Before starting any import, set the required unit values. They are needed in order to compare meters, kilometers, centimeters, decimeters, grams, kilograms, etc. for recognition. Whatever designation the seller has in the file, the self-learning system recognizes which options the vendor can write and will bring it to the desired value automatically.
1. To set the values, go to the Modules tab, select the section "Import with moderation and auto-creation of PRO characteristics" and the item "Units of measurement".

2. To set the value of the unit of measurement of weight, select the "Weight" tab.

3. To create a new value, click on the white "Add" button.

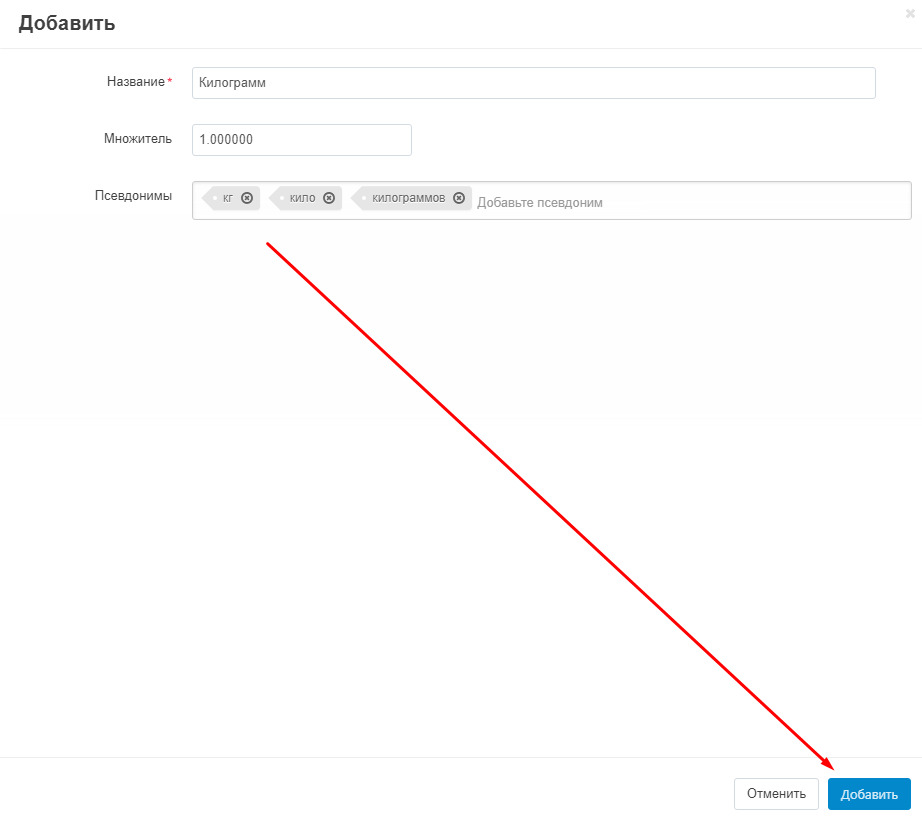
4. A window opens for creating. Be sure to enter the name of the specified value in the "Name" item.

5. In the "Multiplier" item, enter the multiplier (for example: 1 kg = 1000 gr).

6. In the "Aliases" item, enter the synonyms of the characteristics that may appear in the downloaded import file (for example: "kilogram" - "kg"). To do this, enter the value in the input field and press Enter.

7. After that, the specified value is converted to a gray tab.
Enter the maximum number of aliases. In the future, the module will automatically find them in the text and replace them with those installed by the marketplace.

8. After all the items are filled in, click on the blue "Save" button in the lower right corner of the window.
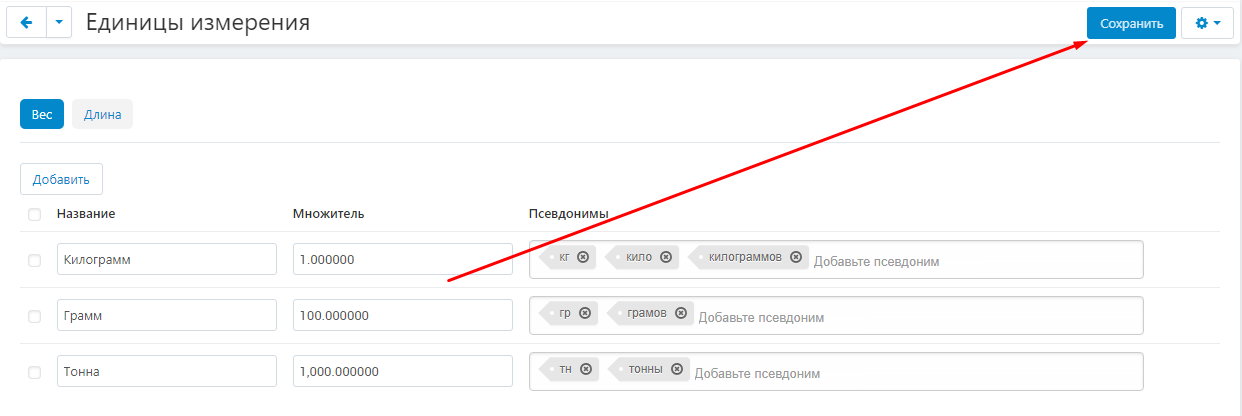
9. Don't forget to save all the values you created by clicking on the "Save" button in the upper right corner of the panel.
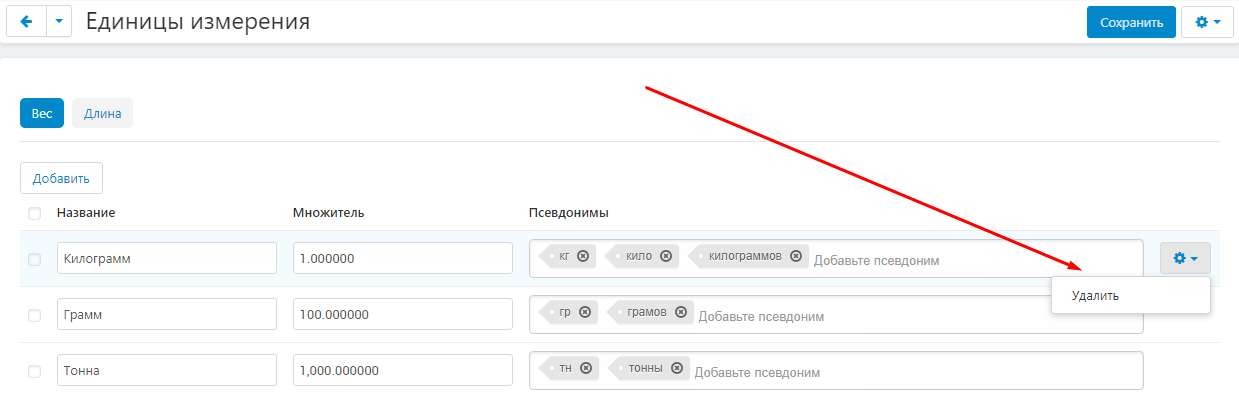
10. To delete any of the values, move the cursor to the right side of the line, click on the blue gear-shaped button that appears and select the "Delete" function.
11. To set values for length units, go to the "Length" tab and proceed according to paragraphs 3-9 of this instruction.

FEATURES
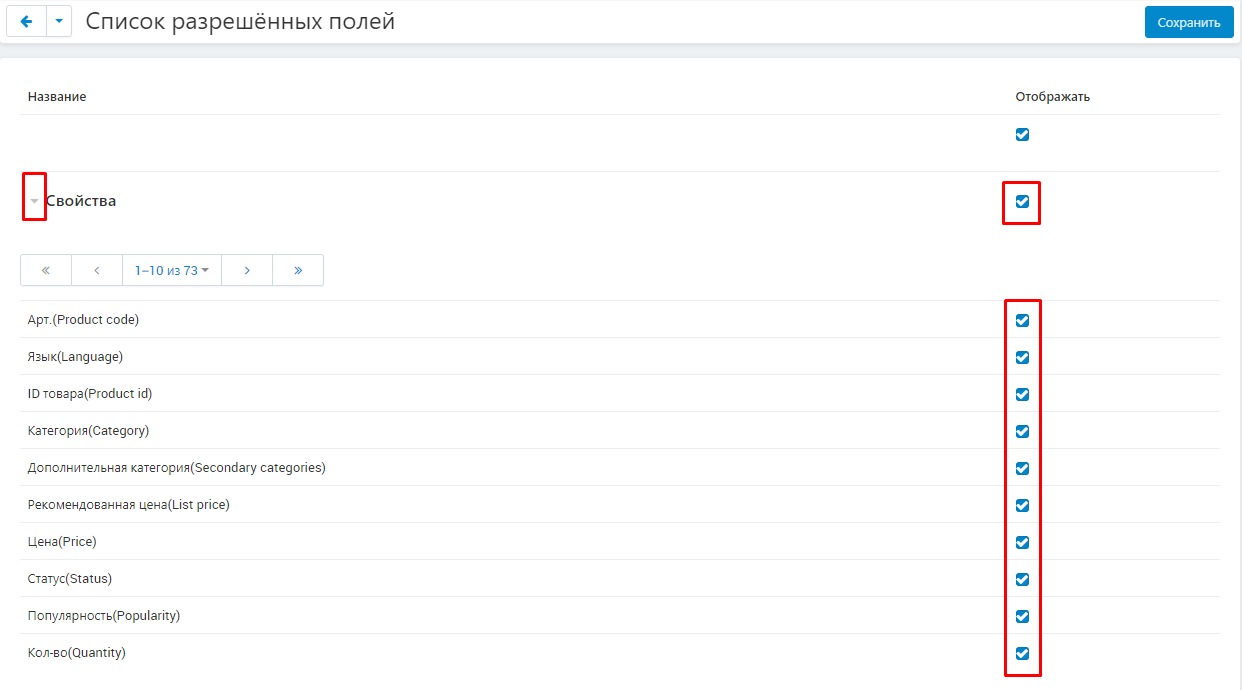
1. Go to the Modules tab, select the section "Import with moderation and auto-creation of PRO characteristics" and the item "List of allowed fields".

2. This section is necessary so that the administrator can designate the fields that are forbidden to work.
To exclude any field, uncheck the "Display" column next to the group name.
Please note that these changes will affect all sellers of the marketplace! To consider special cases of changing groups of characteristics, go to point 6 of this instruction.
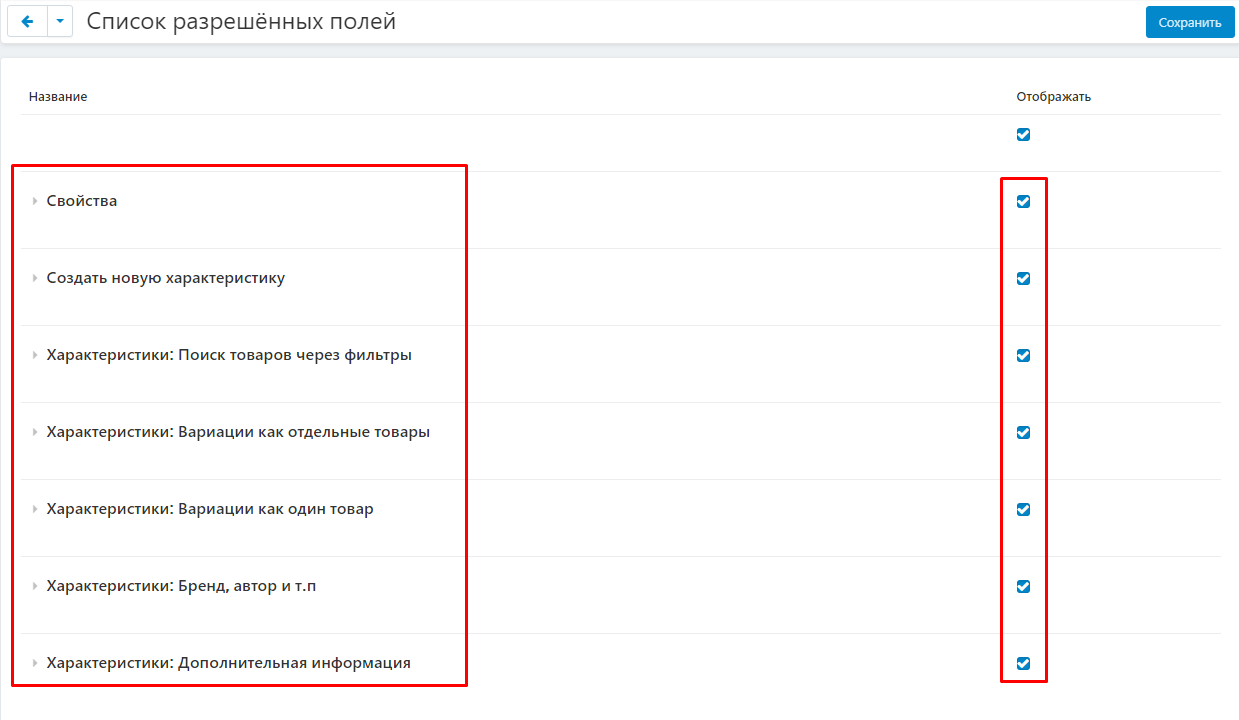
3. If you need to exclude only one field, and not the whole group, then click on the arrow next to the group name and expand the list. Then select the fields you want to exclude and uncheck the "Display" column next to them. Or use a mass exclusion by removing the check mark next to the group name.
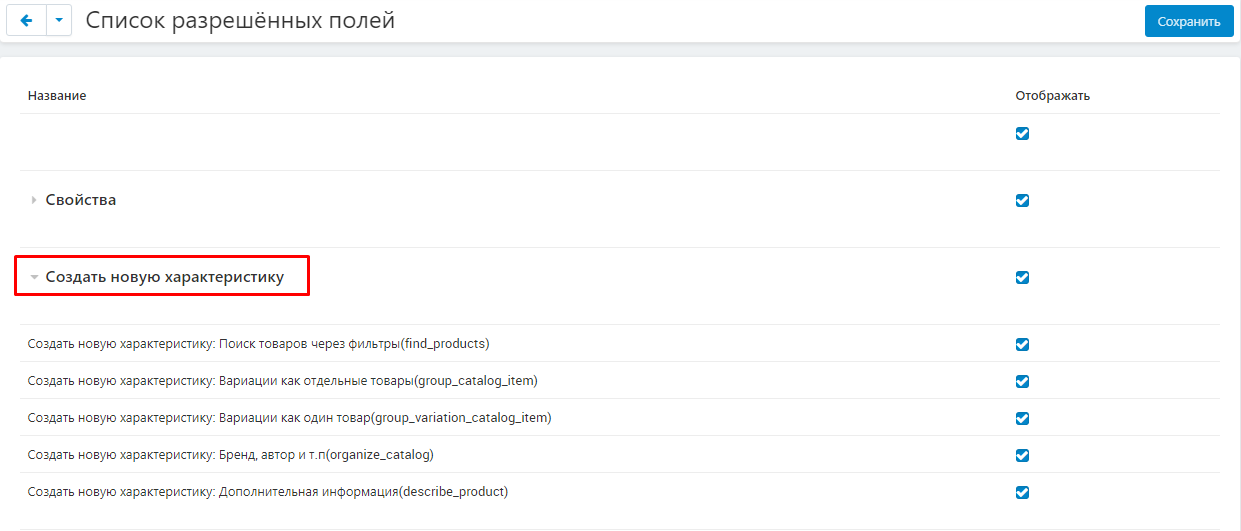
4. Pay attention to the presence of the "Create a new characteristic" field.
The vendor cannot create its own characteristics. The marketplace needs to compare the designated characteristic with the one that was already created earlier. The module itself compares the characteristics, and also, if there is no such characteristic, it will offer to create a characteristic and a variant of the characteristic with different types. They will be created before the import, or during the import.
5. After you have made all the necessary changes, save the result. To do this, click on the blue "Save" button in the upper right corner of the panel.

6. If changing the fields is required only for one specific seller, go to the "Sellers" tab and select the "Sellers" section.

7. In the list that opens, select the desired seller by clicking on its name highlighted in blue.

8. Select "List of allowed fields" from the tabs.

9. The exclusion of any characteristics or groups here is identical to paragraphs 2-3. Uncheck the "Display" column for those characteristics or groups that need to be excluded for this seller.
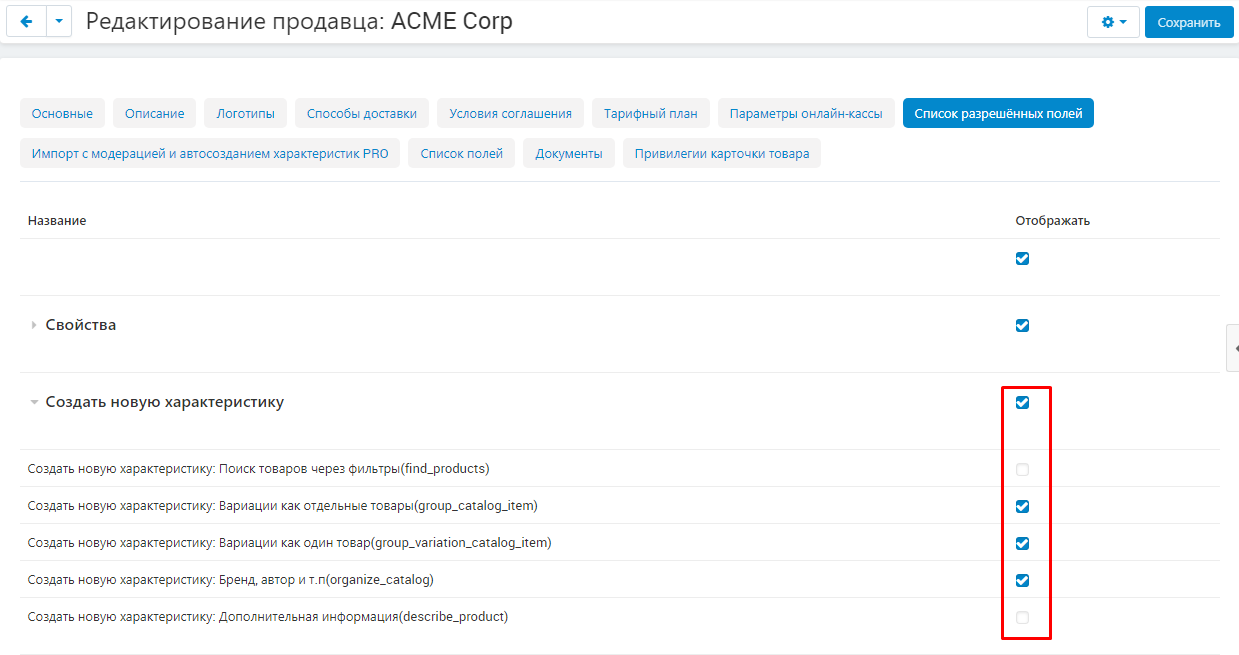
10. Don't forget to save the changes after editing by clicking on the blue "Save" button in the upper right corner of the panel.

11. To further simplify and speed up import moderation, enter the aliases of the characteristics. Entering an alias greatly facilitates the process of matching the characteristics specified by the vendor by the module. For example, the seller specifies the characteristic "Shirt color", and the marketplace has only the characteristic "Color". When an alias is entered in advance, the module automatically recognizes and changes this value.
To do this, go to the Modules tab, select the section "Import with moderation and auto-creation of PRO characteristics" and the item "List of fields".

12. The "List of Aliases" tab displays a table with all available groups and characteristics. Expand the list and select the characteristic for which you want to enter an alias. In the input field, enter an alias for the characteristic.
After each import, the matched fields will be saved as aliases.
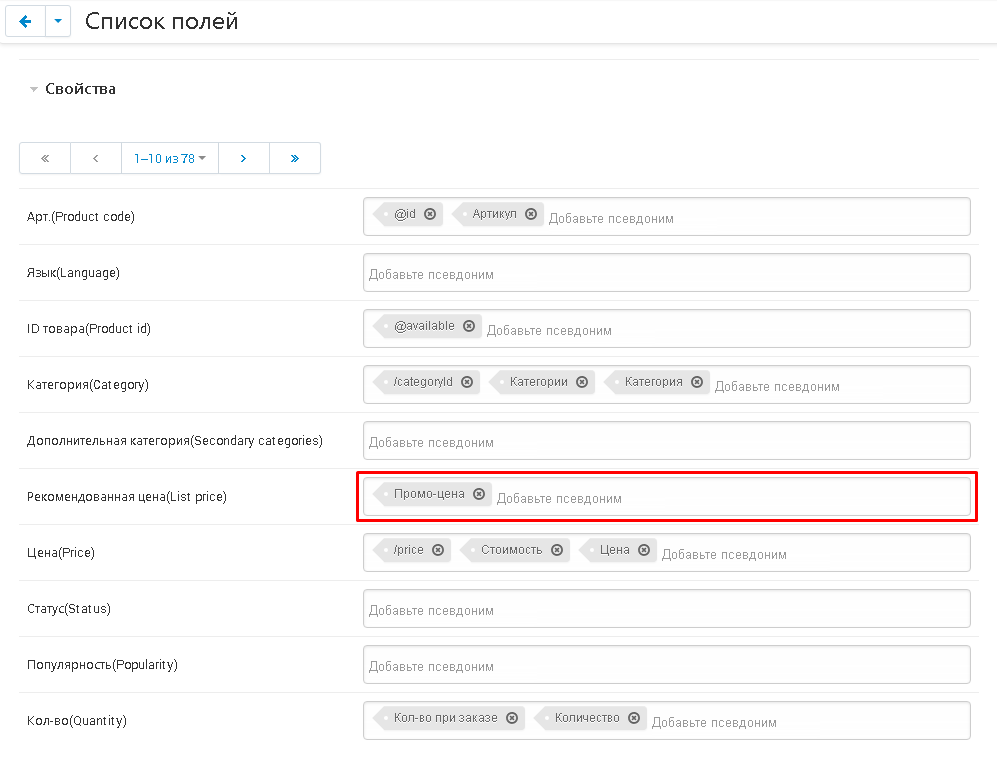
13. Save the changes.

CREATING TEMPLATE TEXT
Text templates are created in order to further simplify the moderation process. Ready-made templates will be displayed in the window upon approval or refusal of moderation. A text message will be sent to the vendor by email.
1. To create a new moderation template, go to the Modules tab, select the section "MW: Moderation templates" and the item "Import".

2. The template creation page opens. In the "Text" field, enter the template text.

3. In the "Status" field, select one of the two available options: "Approved" or "Rejected". After selecting the status, the message will automatically be linked to it.

4. To create a new template, copy or delete, use the edit buttons on the right side of the line.

5. Also, to create a new template, click on the blue "Create" button in the upper right part of the panel.

6. Save the changes by clicking on the blue "Save" button in the upper right part of the panel.

IMPORT CREATION BY THE SELLER
1. To enter the seller's dashboard, click on the icon in the shape of a human silhouette in the upper right corner of the page.

2. Select the "Log in as a seller" function and select a seller from the list that appears.
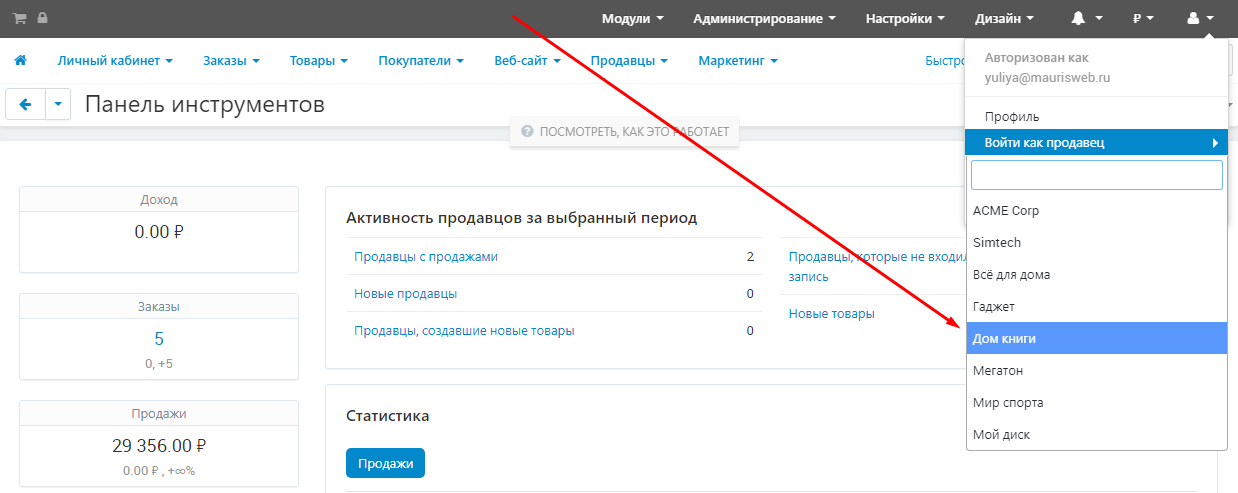
3. Go to the "Administration" tab, select the "Data Import" section and then "Products".

4. To create a new preset, click on the green button with a plus sign in the upper right corner of the panel.

5. Go to the "File" tab, select the "General Settings" section and upload the desired file using one of the available methods:
Note: only files with the following extensions are uploaded: csv,xml
To import CSV files, useOpen Office or Libre Office Calculator.Microsoft Excel uses the Windows-1251 character set, while CS-Cart uses the UTF-8 characters. If you use MS Excel, an error may occur during import.
To import an XLSX file, save it as a CSV and import the CSV file.
This example considers importing a CSV file. Cases of using YML, XML formats are given in the section "Importing YML, XML".

5.1. Click the white "Download" button, select a file from the computer's memory and click "Open".
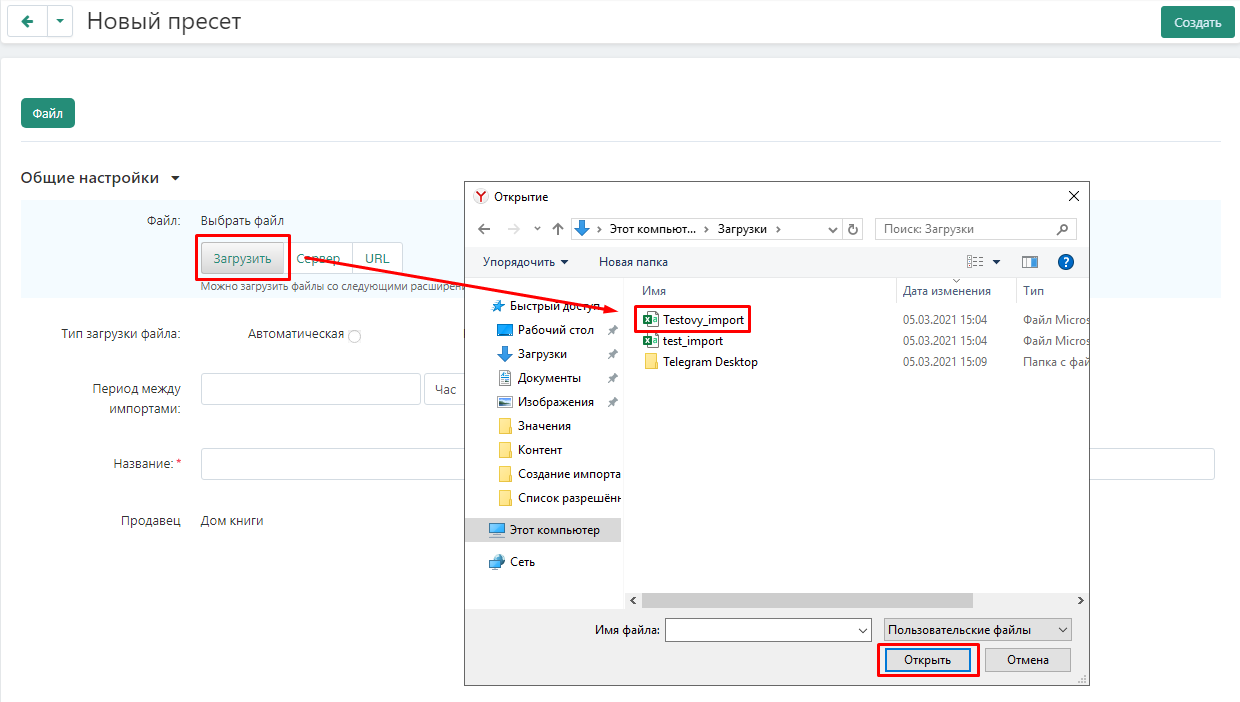
5.2. Click the white "Server" button to select the file available on the server.
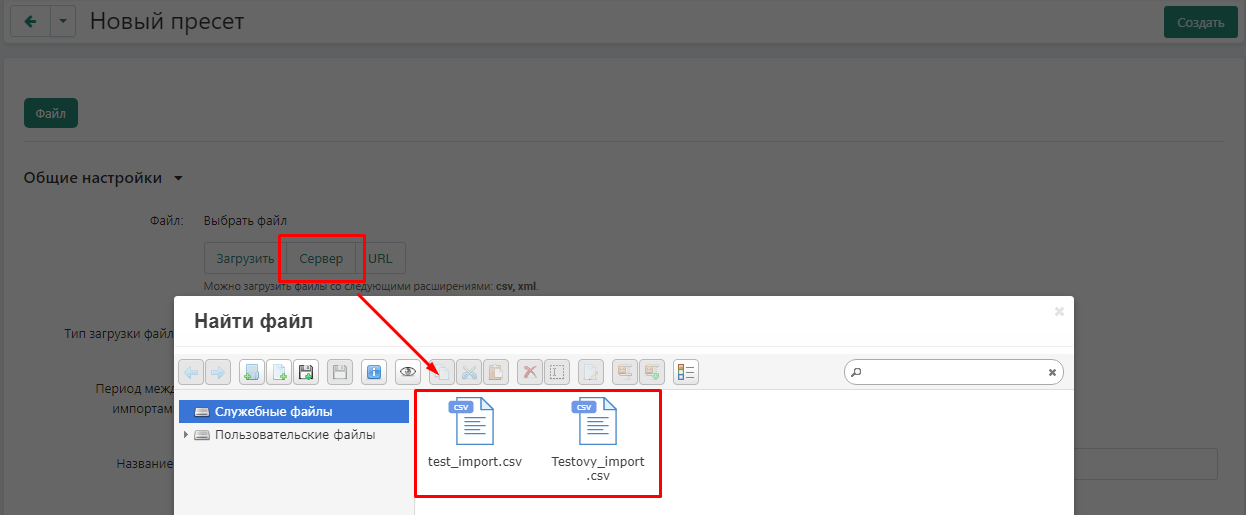
5.3. Click the white "URL" button to enter the file URL.

6. After downloading the file, select the type of its download in the corresponding item. There are two options: "Automatic" - loading by CRON, "Manual" - the administrator downloads the file himself.

7. If in the future the seller plans to constantly update this file and upload it automatically (via CRON), then it is necessary to clarify with him the frequency of this update and specify this value in the appropriate paragraph. Enter the number in numbers and select the interval (hour, day, week, month) in the next field.
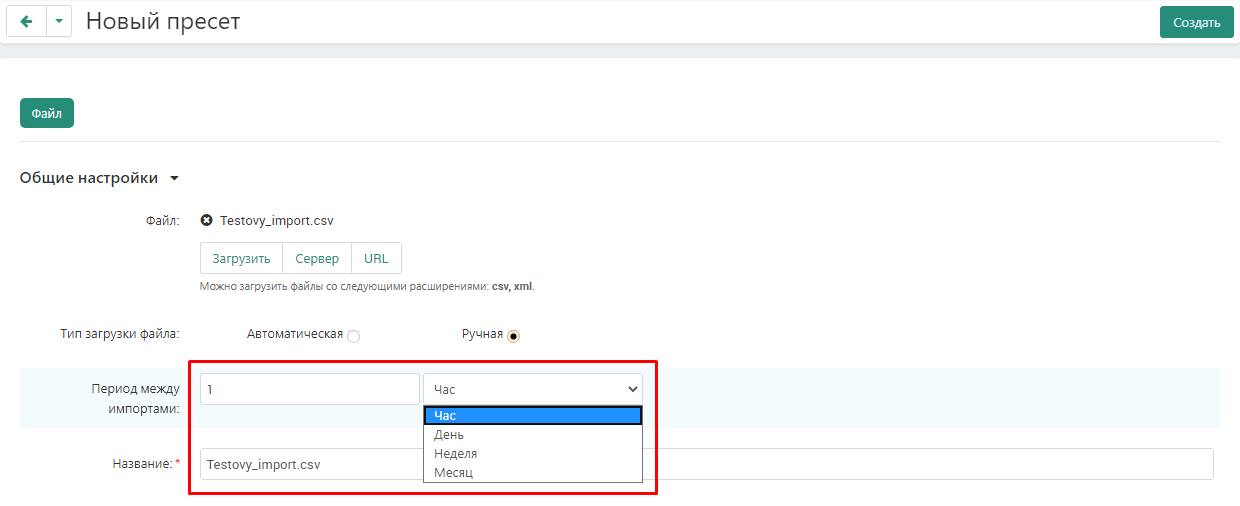
8. In the "Name" field, specify the name of the preset. By default, its name will be the file name.
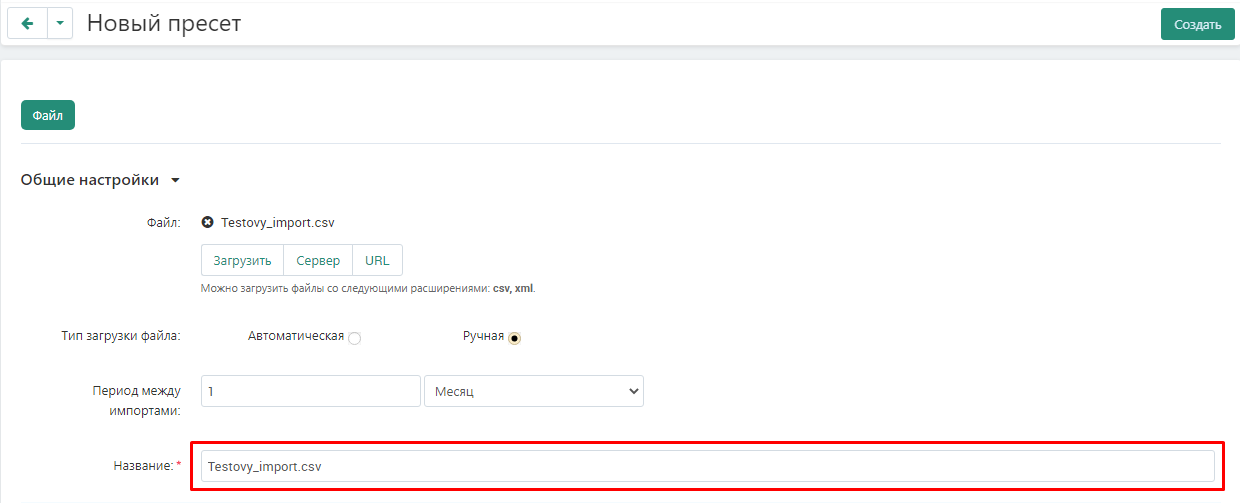
9. To create a preset, click on the green "Create" button in the upper right corner of the panel.

10. After that, a notification about saving changes will appear, a message will be displayed on the page: "ATTENTION! The uploaded file is under moderation..."

11. If you want to delete the preset, go back to the product import page, click on the button in the form of a green gear and select the "Delete selected" function.

12. When the file passes moderation, the "Import" button will appear next to it.

12.1. A window opens where you can download a new version of the import. Choose a convenient download method and click on the blue "Download" button in the lower right corner.
Important! If the new file from the vendor is different, it will automatically go to moderation. The rest can be done by CRON.
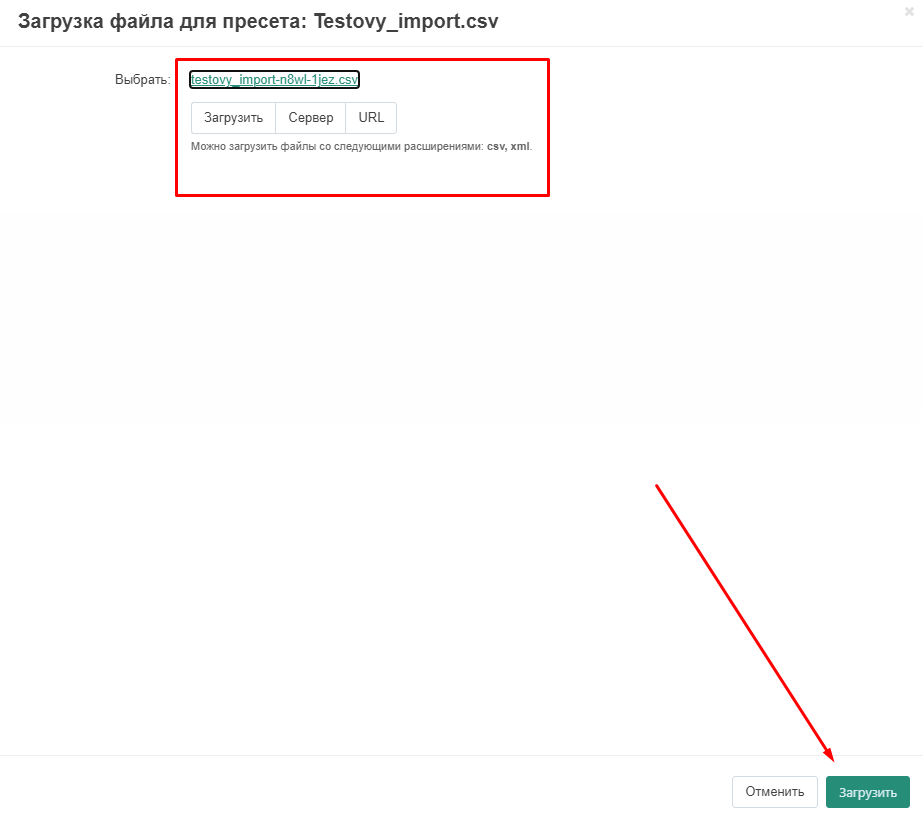
13. An import that has not yet been verified by the administrator will be marked with the message "The preset is under moderation".

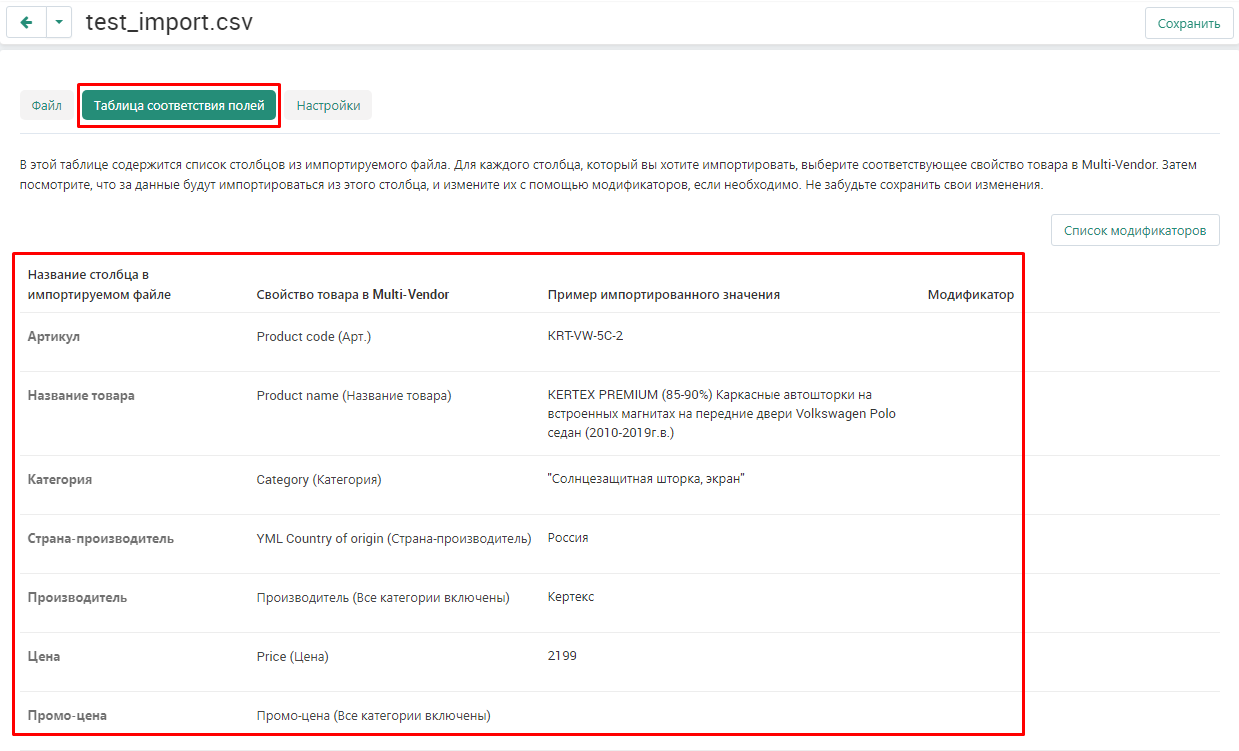
14. If you have the appropriate privileges, the seller can independently configure the preset. To do this, go inside the preset and go to the "Field Matching Table" tab. Read more about this in the section "Import moderation" p.12-16.
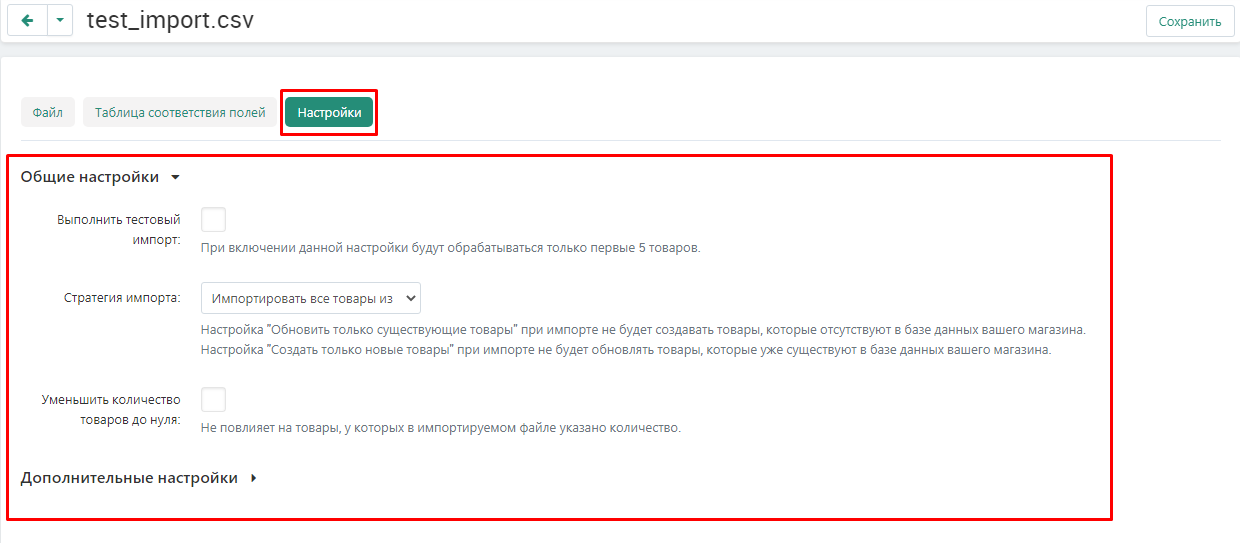
15. It is also possible to change the settings. To do this, go to the "Settings" tab. For more information: section "Import moderation p.17-23.
16. When all the changes are made, click on the white "Save" button in the upper right corner.

IMPORT MODERATION
1. To moderate the uploaded file, go to the Modules tab, select the section "MW: Moderation" and the item "Import".

2. A list for moderation will open. Expand the list by clicking on the arrow next to the name of the vendor who uploaded the file.

3. In the list that opens, open the preset you created. To do this, click on its name highlighted in blue.

4. Go to the "File" tab.

5. If you want to set up the automatic start of the import, then enter the CRON command specified on the page into the scheduler.

6. Go to the "General Settings" section. The same parameters that were entered during the creation of the preset will be duplicated here.
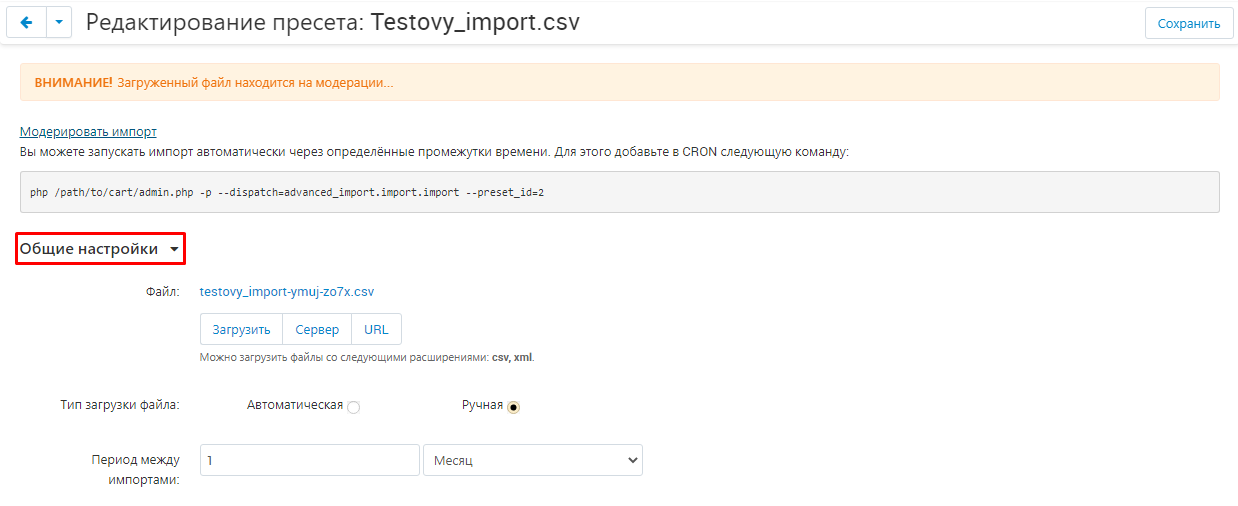
7. If you click on the file name highlighted in blue, you can download the document itself.

8. If you want to set the CRON trigger date, use the calendar in the corresponding item.
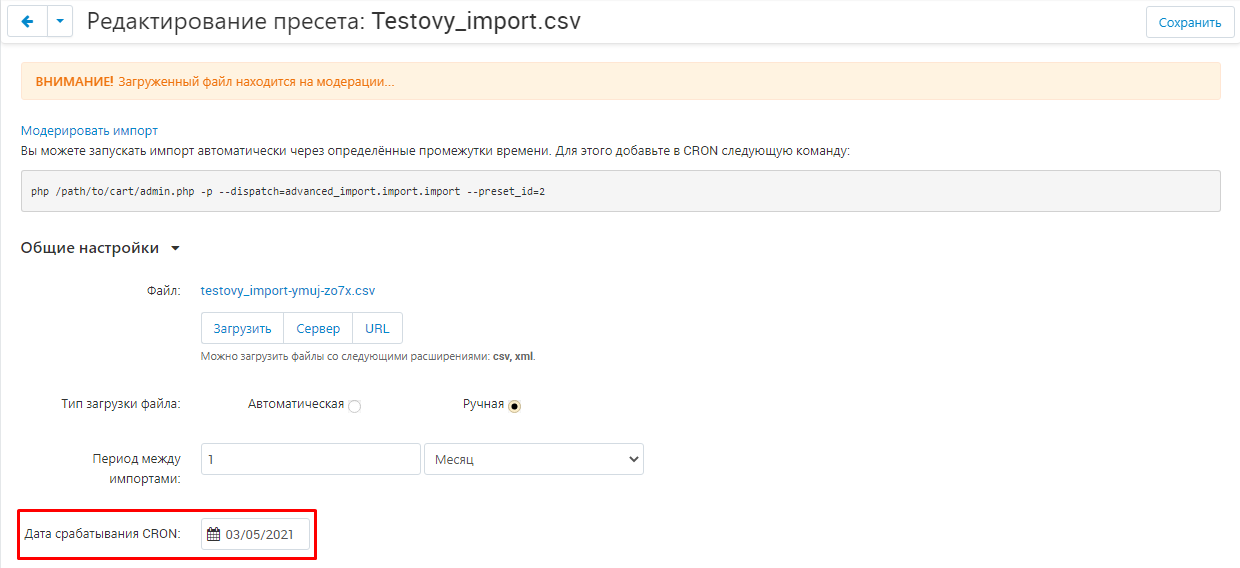
9. Go to the "Advanced Settings" section. Expand it by clicking the arrow to the right of the name.

10. In this section, you can configure various separators that will automatically replace the values in the file.
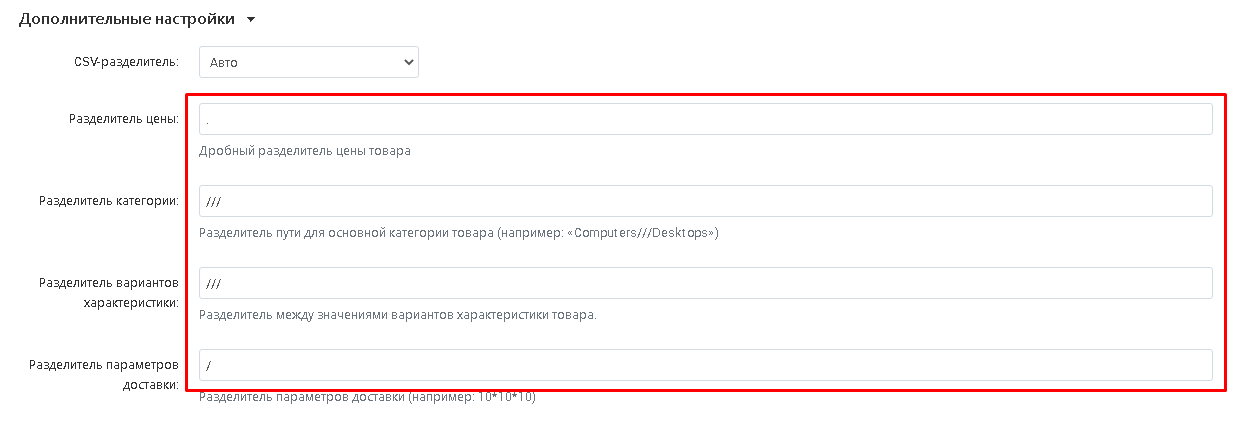
11. To change the value of a separator, in the input field next to it, specify the separator that you need.

12. Expand the additional list and select the order of delivery parameters.

This item directly affects the value to be set in the "Length\width\Height" item.

13. Check the box to link categories to characteristics.

14. Go to the "Field Matching Tables" tab.

15. In this section, the data from the downloaded file will appear, presented in the form of a table.
The first column will show the characteristics that were specified in the imported file.
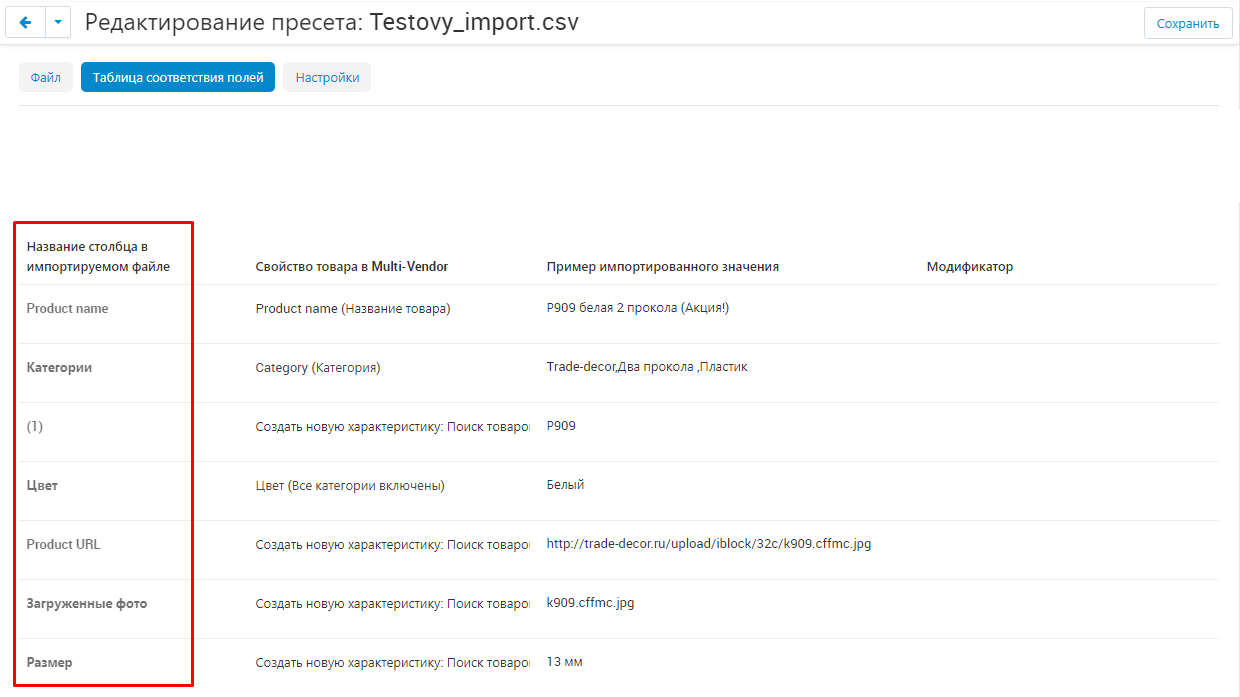
16. The second column will reflect the characteristics that the marketplace has. In most cases, the system tries to pick up the characteristics on its own. However, it is always necessary to check every characteristic, especially if this is the first import of a new file.
17. If the system could not recognize the specified characteristic, "Create a new characteristic" will be indicated by default.
To set the value of the characteristic, click on the line with its definition in the column "Product property in Multi-Vendor". The search menu opens. To find the desired value, enter the name of the characteristic in the search or select from the list that appears.
18. In the event that the marketplace does not have a characteristic and a new one needs to be created, then you need to choose one of several options for a new characteristic.
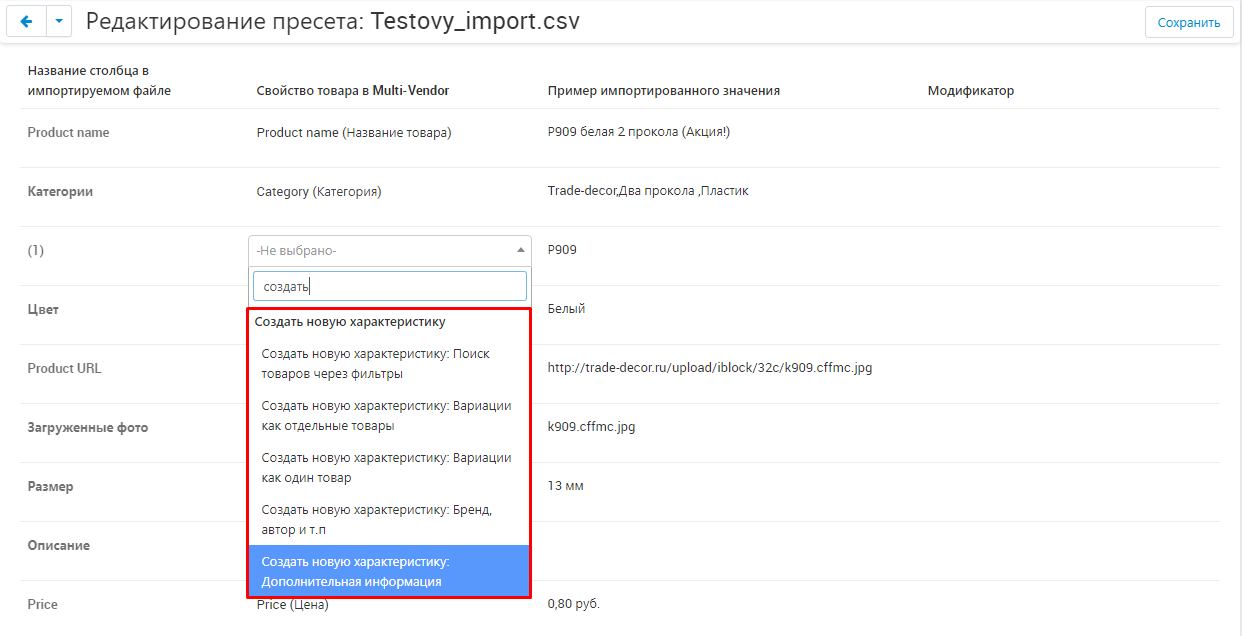
These variants of characteristics are identical to those presented when creating a new characteristic for the marketplace itself. If necessary, you can use them as hints.

19. Go to the "Settings" tab.

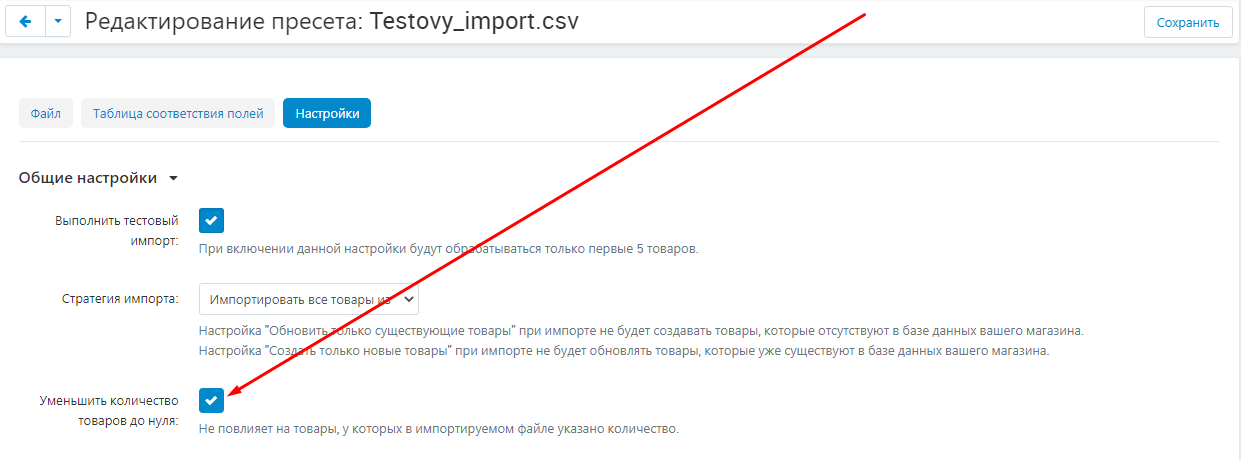
20. Go to the "General Settings" section. If you want to perform a test import, then check the box "Perform test import". When this setting is enabled, only the first 5 products will be processed.

21. In the "Import Strategy" item, select one of the three possible options:
"Import all products from a file" - the system imports all products that are in the file;
"Update only existing products" - when importing, it will not create products that are not in the store's database;
"Create only new products" - when importing, it will not update products that already exist in the store's database.

22. Check the box "Reduce the number of products to zero" if you need to load only those products that are available. The setting will not affect the products that have the specified quantity.
23. Expand the "Advanced Settings" section to use its functionality.
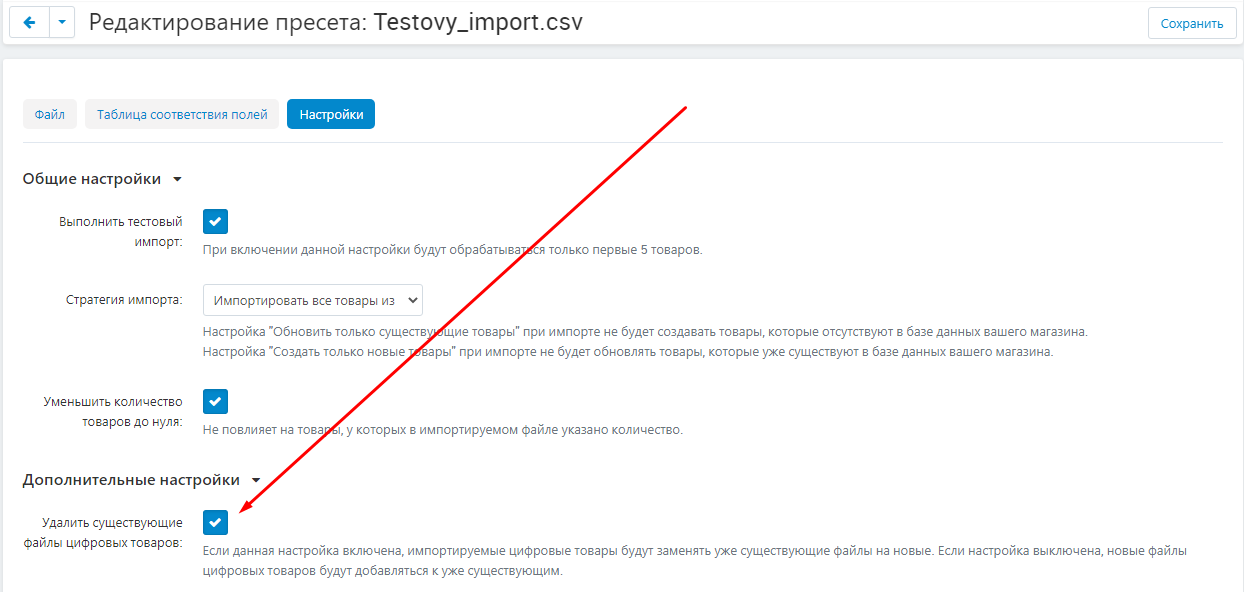
If there are digital goods in the imported file and you want to replace them with new ones, then check the box "Delete existing digital goods files". Otherwise, new files will be added to the existing ones.
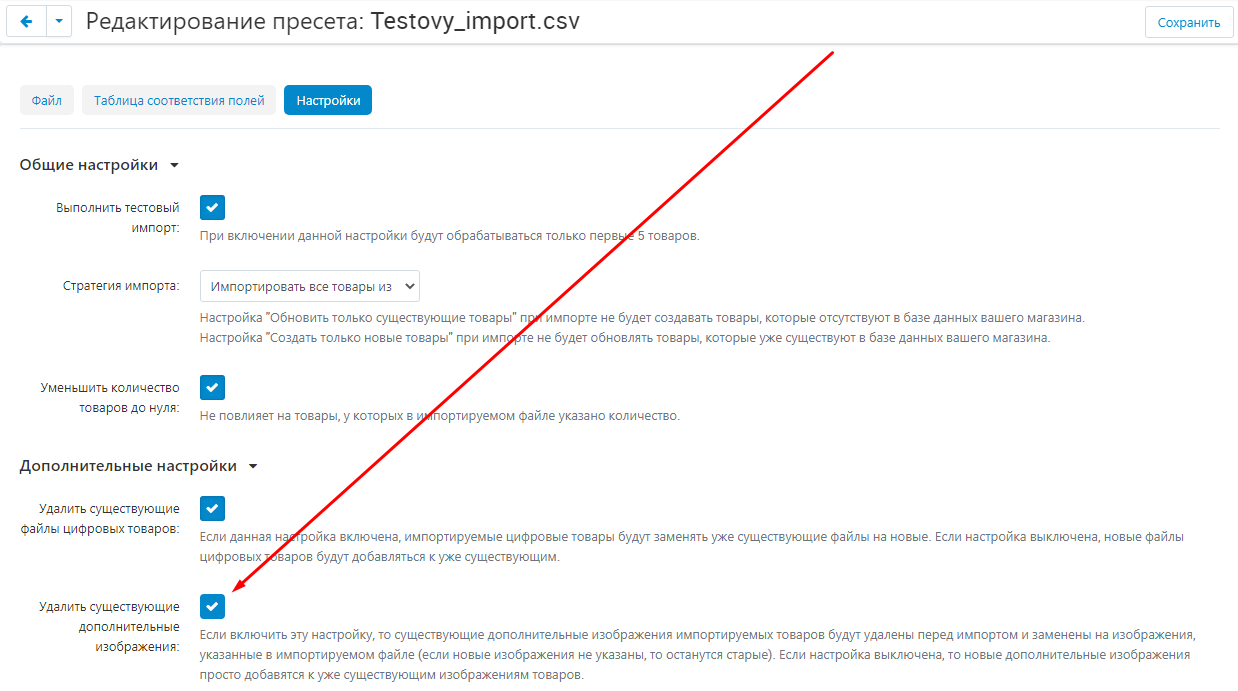
24. If there are images in the imported file that need to be downloaded and replaced with the old ones, then check the box "Delete existing additional images". If this setting is disabled, then new additional images will simply be added to the existing ones.
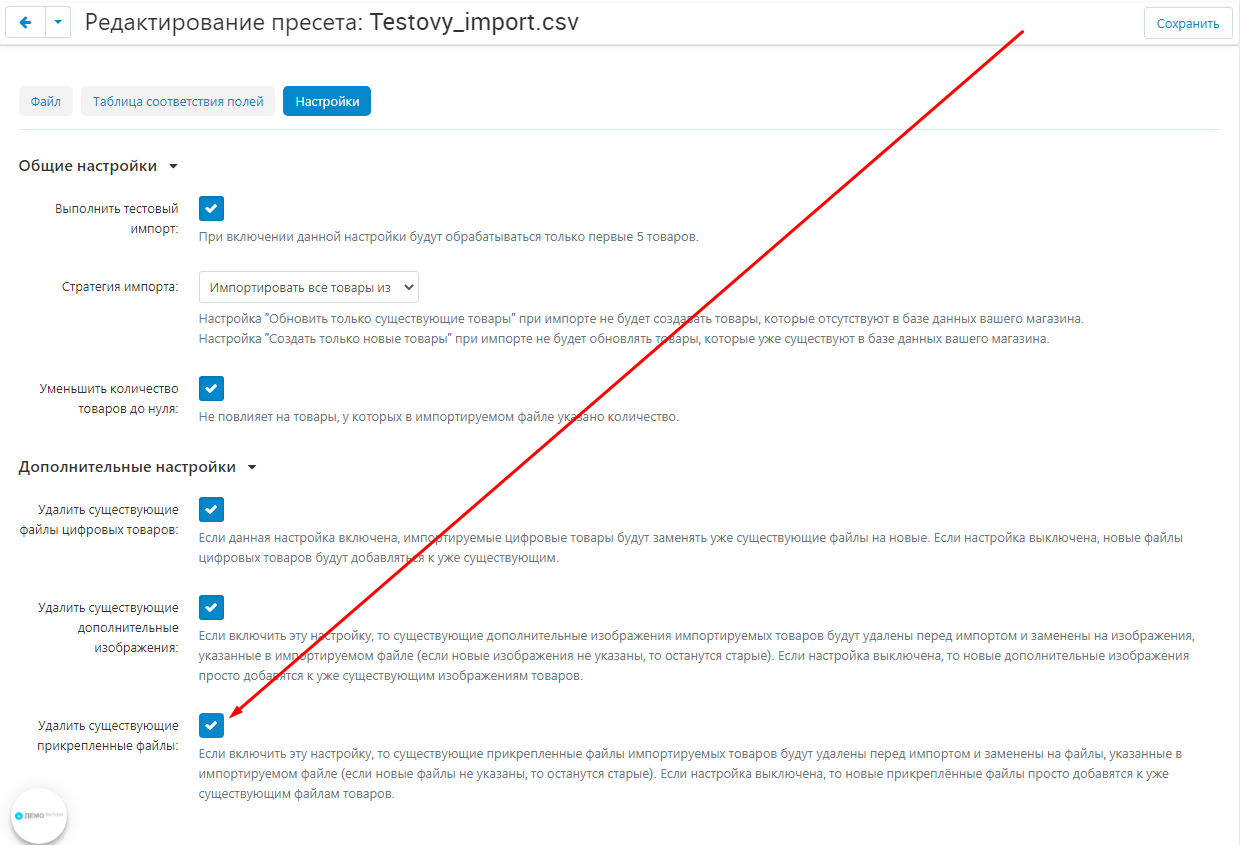
25. Check the box "Delete existing attached files" to replace the old files with new ones. Otherwise, new product files will be added to the existing ones.
26. Save the changes. To do this, click on the white "Save" button in the upper right corner of the panel.

27. To complete moderation, go to the "File" tab and click on the "Moderate import" label highlighted in blue.

28. In the list for moderation, select one of the possible options: "Reject" (thumbs down), "Approve" (thumbs up).

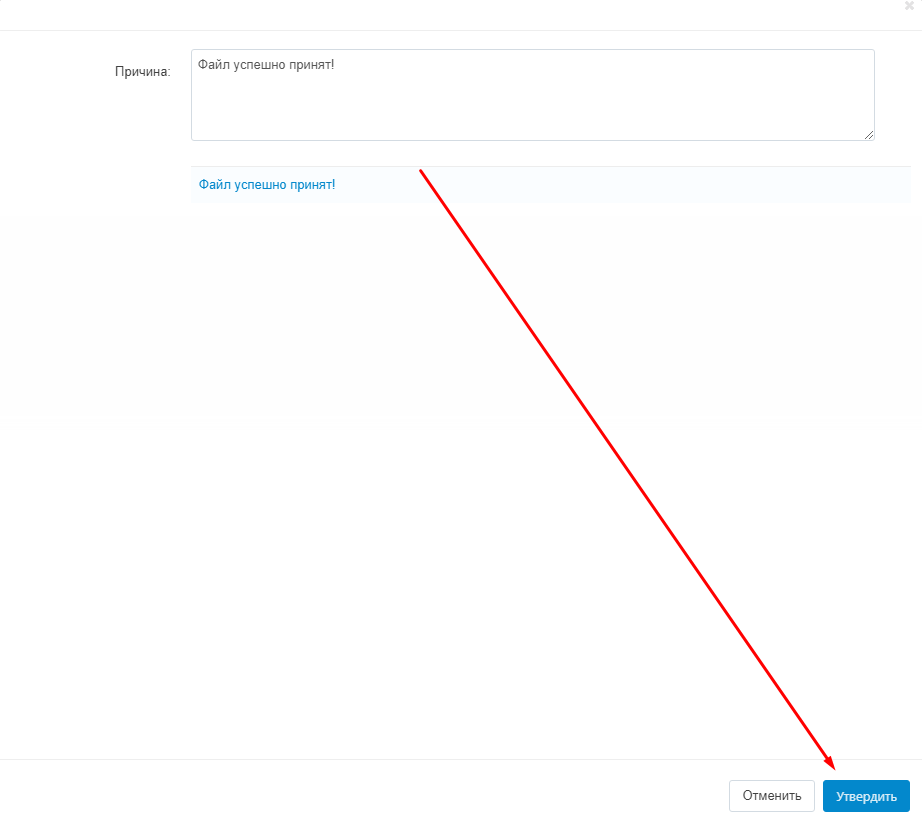
29. In the window that appears, enter the accompanying text in the "Reason" field or use the template. To do this, click on the template text highlighted in blue and it will automatically be transferred to the field.

30. To approve/reject the import, click on the "Approve"/"Reject" in the lower right corner of the window.
31. To conduct a group moderation of presets, select the necessary items by ticks, then click on the button in the form of a blue gear in the upper right corner of the panel and select one of the functions: "Approve selected" or "Reject selected".

32. To send out notifications, click on the white "Notify" button in the upper right corner of the panel.

33. After the moderation is carried out, the comment "The preset is under moderation" will disappear in the seller's account.
