Error debugger for Multi-Vendor
Multi-Vendor Error Search Module
The module is looking for errors that appear in the system, for subsequent analysis and correction. It gives an additional ability to remove the module from the server completely, and also supports the packet installation of Maurisweb modules and the ability to remove additions. The functionality includes a chat with MaurisWeb technical support.
Beta - copying site backup on Yandex and Google Disk - No access, follow upgrades!
For information on compatibility with other modules, see Product features:
For CS-Cart - https://maurisweb.ru/programmy...
For Multi-Vendor - https://maurisweb.ru/programmy...
SPECIFICATIONS
- Download error logs;
- Configuring error search interval;
- Finding errors in real time;
- MariaDB, MySQL, PHP, Smarty;
- Application for accompaniment to search for errors with Maurisweb web studio team;
- Installation, update, extension of subscription and purchase MaurisWeb web studio modules;
- Delete from server any modules.
The functionality is available only for the administrator with ROOT rights.
Functional module
Removing the module from the server completely
The module functionality includes removing modules not only from memory, but also from the server. This feature applies to third-party modules. The module is removed from the server completely and the backup is not saved. Install the module is repeated from the list.
1. Go to the "Modules" tab and in the pop-up menu, select "Management Modules".

2. A list of installed modules will open. Hover the mouse on the right side of the screen and click on the button that appears in the form of a blue gear. In order to remove the module from the server, select the appropriate function.

Creating an application for error search
Error search and site control cause additional load. In order for the module to start collecting data that may cause errors from the site, it is necessary to activate its functionality and create an application.
1. To create a request, go to the "Modules" tab and select the "MW: Error Search" in the pop-up menu.

2. Select the Debug Mode tab. It will open the application form. Do not forget that to create a correct application, you need to fill all its items, especially marked with a red stars! Information should be true and relevant. In case of incorrect filling of any point, the application will be rejected.
This information will be collected from your site and transferred to the software control department. Without your knowledge, information will not be transmitted anywhere. The parameters are necessary for analysis if the automatic error recognition does not work.

3. Enter full surname, name and patronymic.

4. Enter the reference theme. Briefly describe the situation.

5. Enter the position to know the specialist who submits the application and, accordingly, give the right answer: a common or technical.

6. Be sure to enter the phone number in international format (for example, +7 (923) 364-90-07). Enter the phone number by which, if necessary, you can contact you.

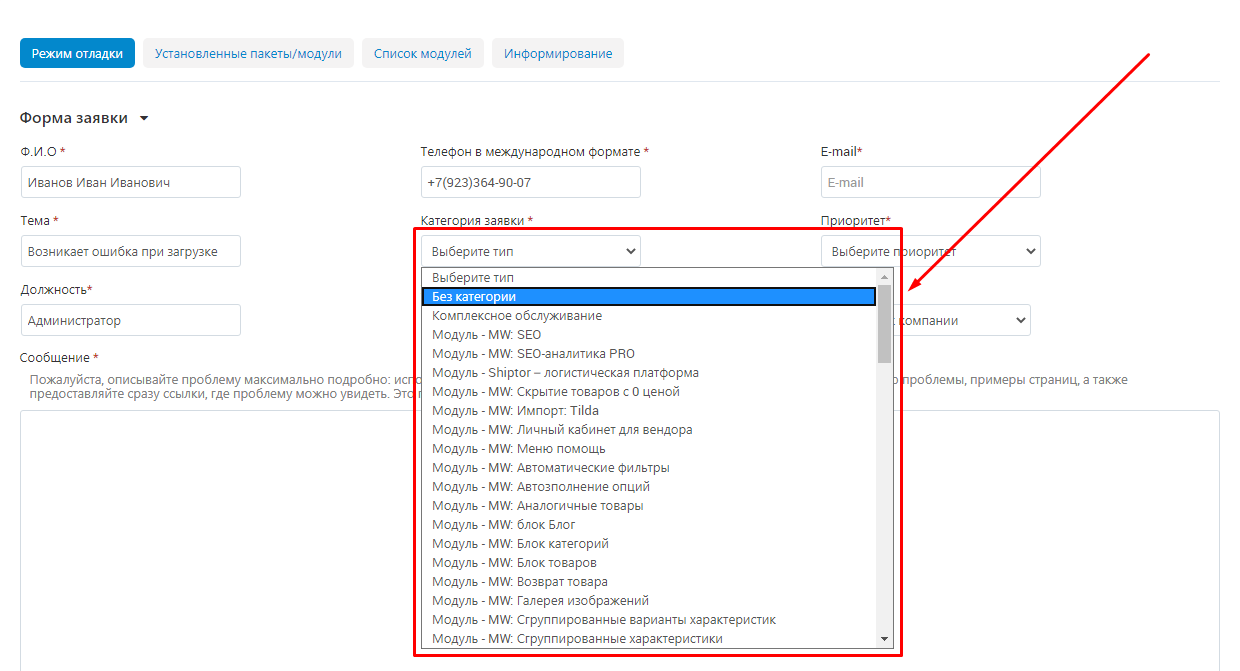
7. In the "Application Category" paragraph, open the Additional List. If the problem is associated with one of the MaurisWeb web studio modules, then select its name. If the problem with the modules of other developers or system errors, click "without category".
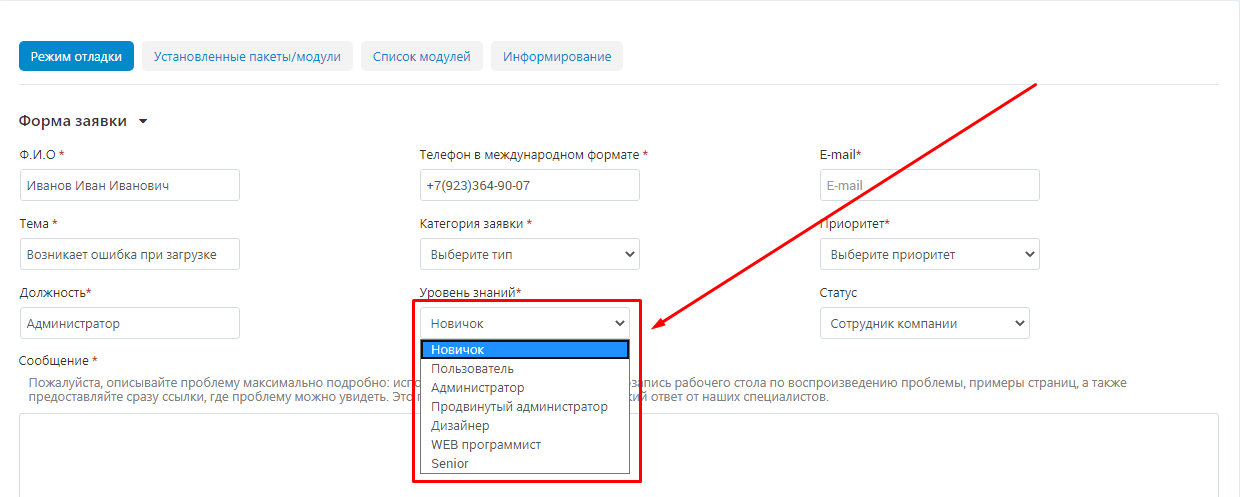
8. Specify the level of knowledge of the user applying. This item is also extremely important for an expert response, since a different level of user knowledge requires a different response.
9. Enter e-mail. Enter the correct and actual address to which you have permanent access, because if necessary, a specialist will send all the necessary information on this e-mail.

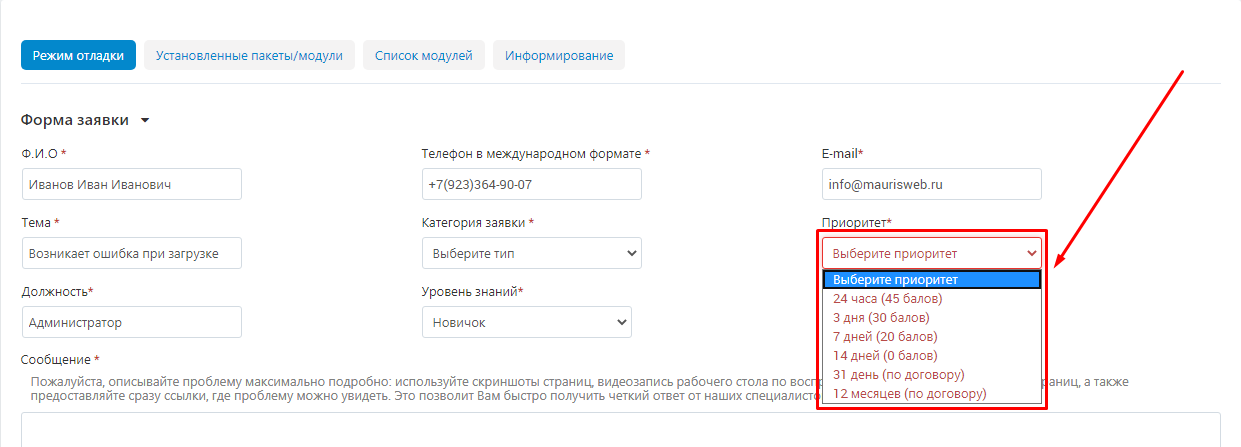
10. In the "Priority" paragraph, expand the additional list to select the application for execution. Each level of priority (application period) corresponds to a certain number of points (more about them can be found in the section "Technical Support").
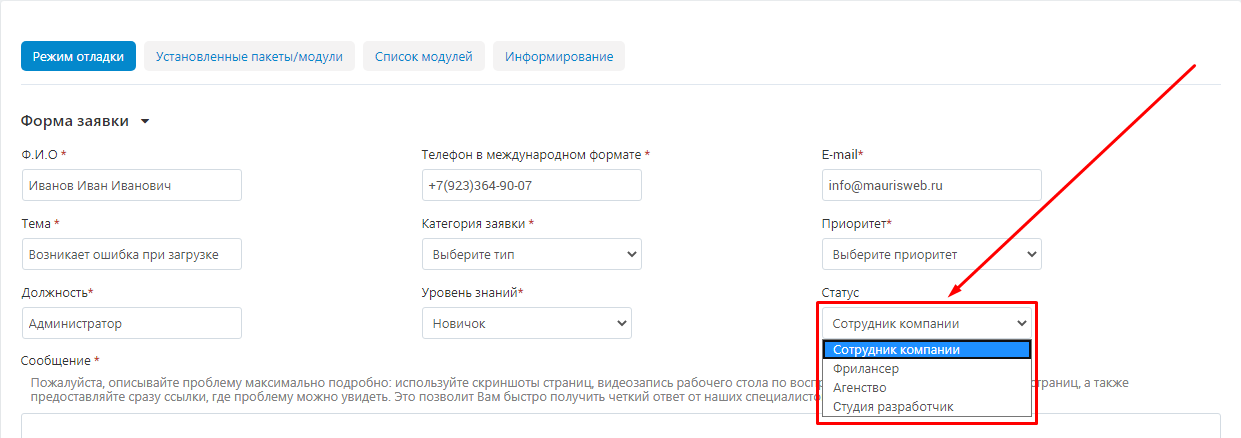
11. Select Status. This item is not required, but it is better to fill it out, since information about the status of the applicant allows a specialist to determine how the user has the level of access and what personal data it can be transmitted.
12. In the "Message" field, as much as possible, describe the current situation, use screenshots, desktop videos, examples of pages, links. Than more you describe the situation, the faster the specialist will solve your problem. This will speed up the process and we will give you information, and will also give us the opportunity to train the functionality more correctly recognize errors.
For example, you can step by step to describe all your actions before an error occurs: the module was loaded by the archive in the manual, the system reported on a successful installation, but when trying to go to the module settings through the Modules tab, an error occurred.
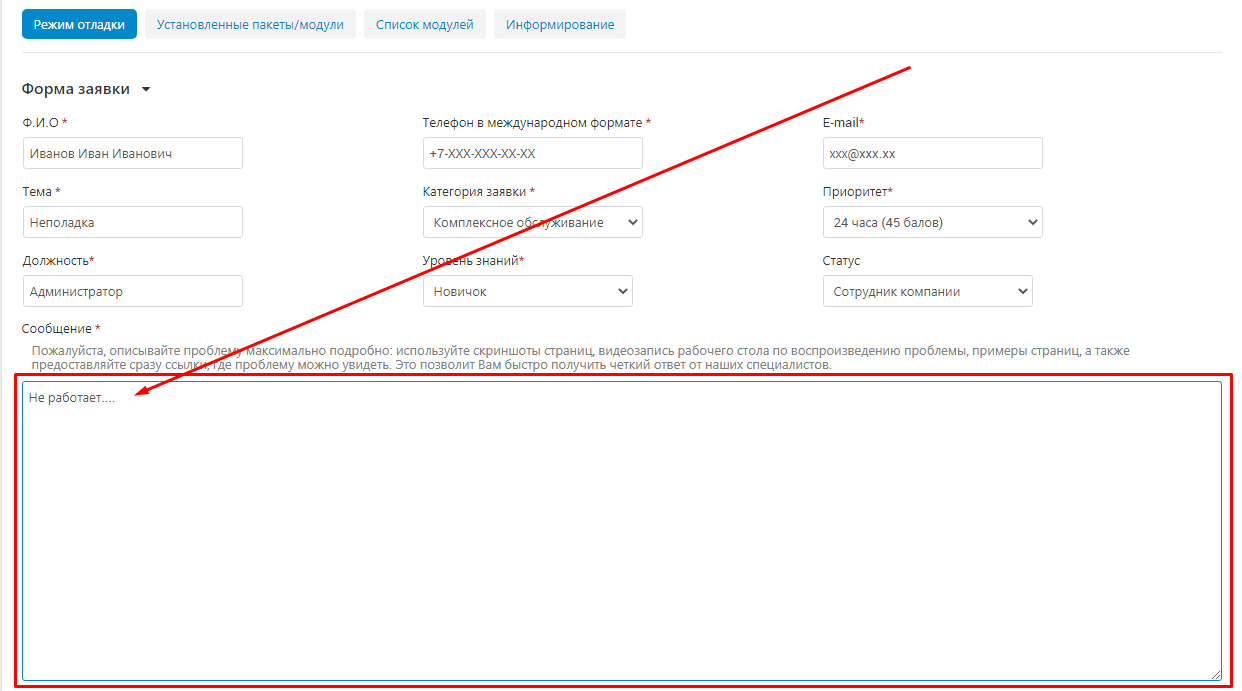
13. Lower below, immediately after entering the input field, you will see fields to provide access. Do not forget that this information needs to be filled every time you create a new application, since each request processes the appropriate specialist who does not have access to information from the previous application.
You do not need to fill all the fields, but the more access features you will provide a specialist, the faster and more efficient will be the solution to your problem.
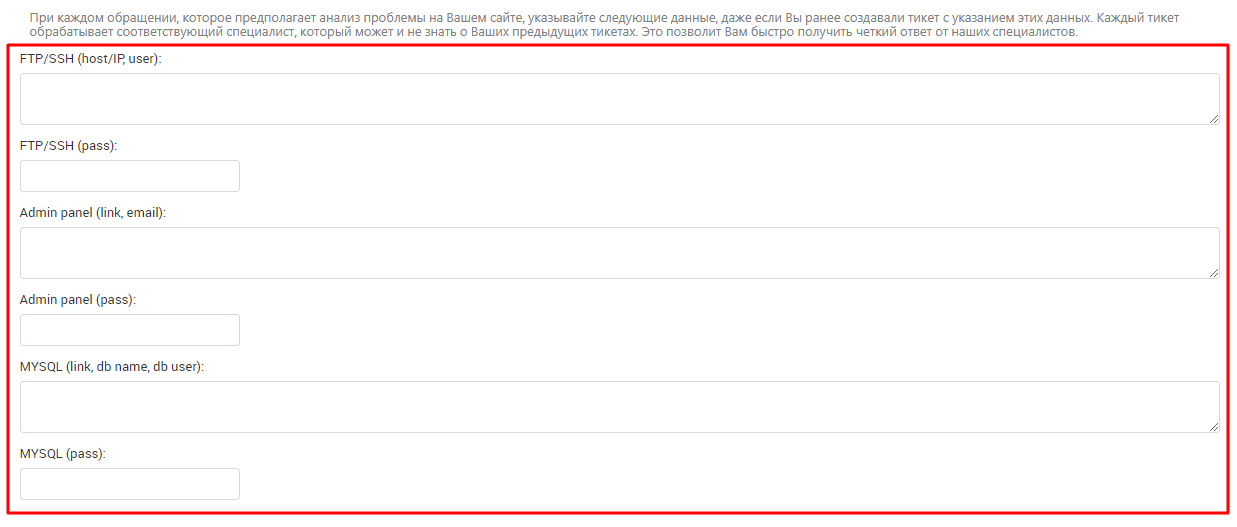
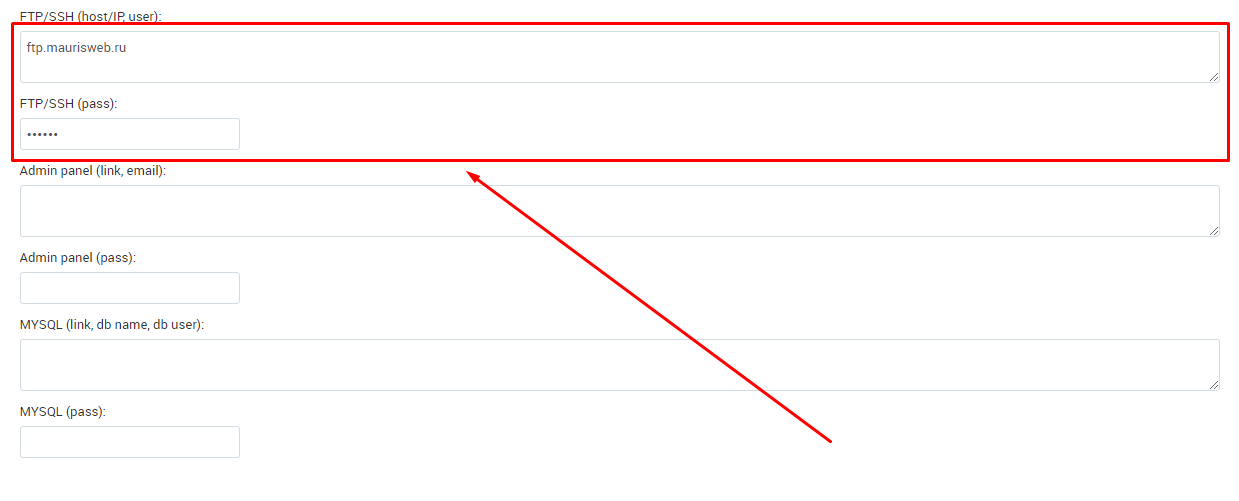
14. You can provide access to the site via FTP / SSH, specifying Host, IP or username, as well as login password.
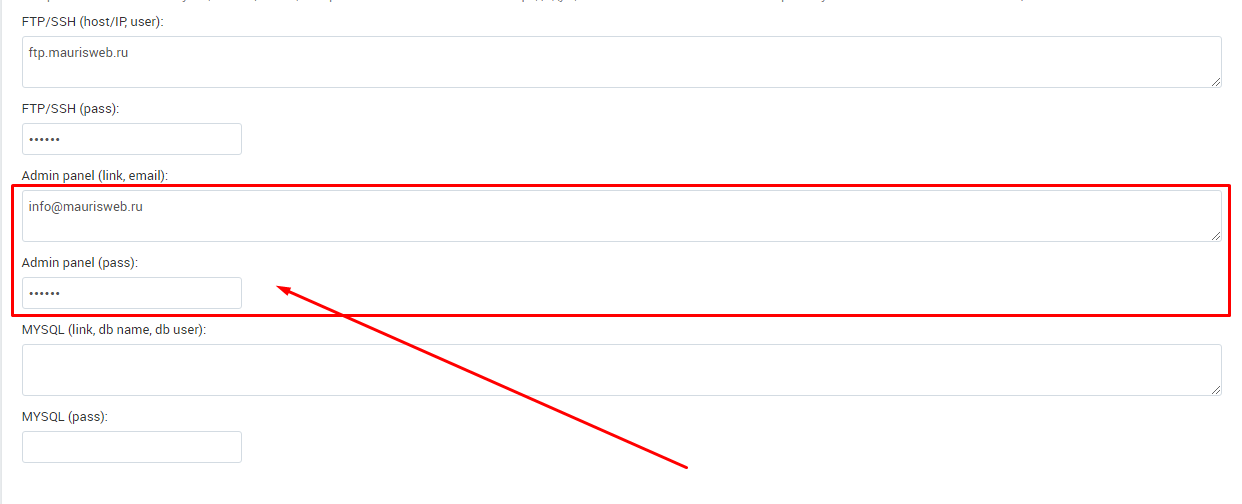
15. You can provide access to the administrative panel by specifying the link or e-mail, as well as the login password.
16. You can provide access to MySQL by specifying the link, DB Name or DB user, as well as a password for login.
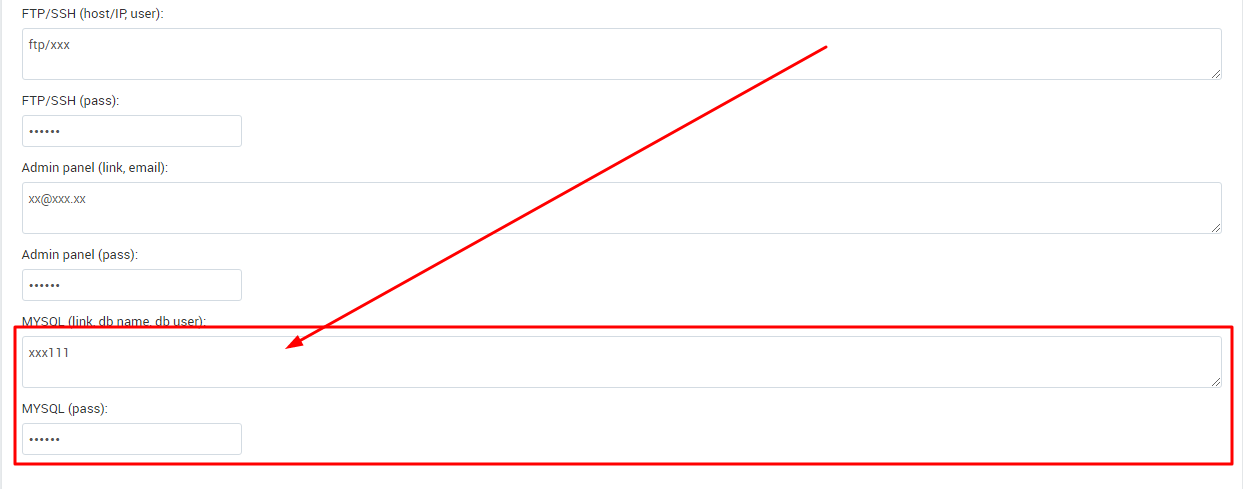
17. When all fields are filled, do not forget to check their correctness.
Read privacy conditions and check the check mark at the point of reference.
To complete the application, click the "Send Application" button.

18. In the event that some points are filled with incorrectly, the system will give you a hint.

19. After sending an application, information about it will affect the page. You will see the sequence number of the application, the date of its creation, time and date of completion, respectively, the selected priority, as well as the status in which the application is located.

20. You can contact a specialist by writing it a message in the input field and pressing the blue "submit" button in the lower right corner of the window.
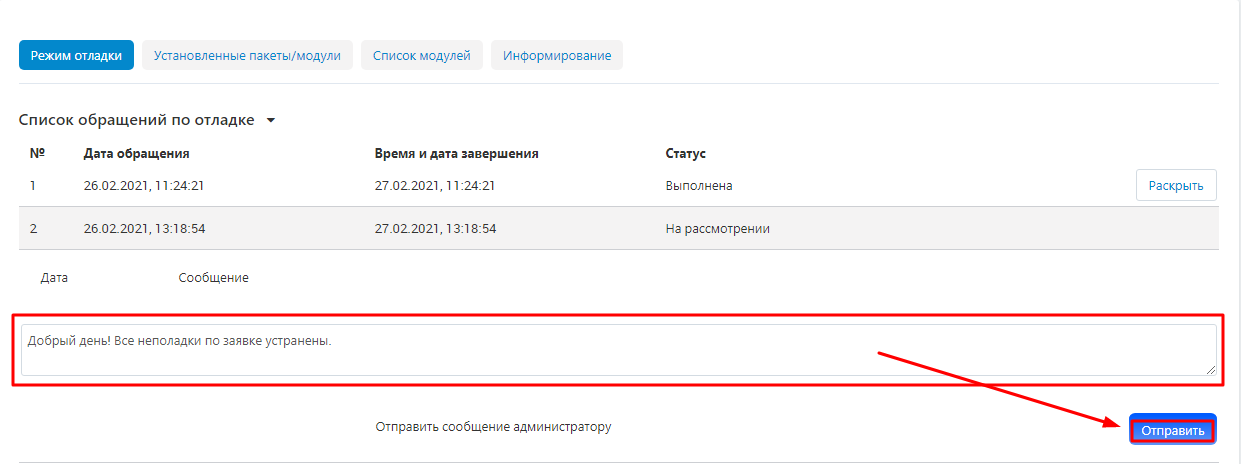
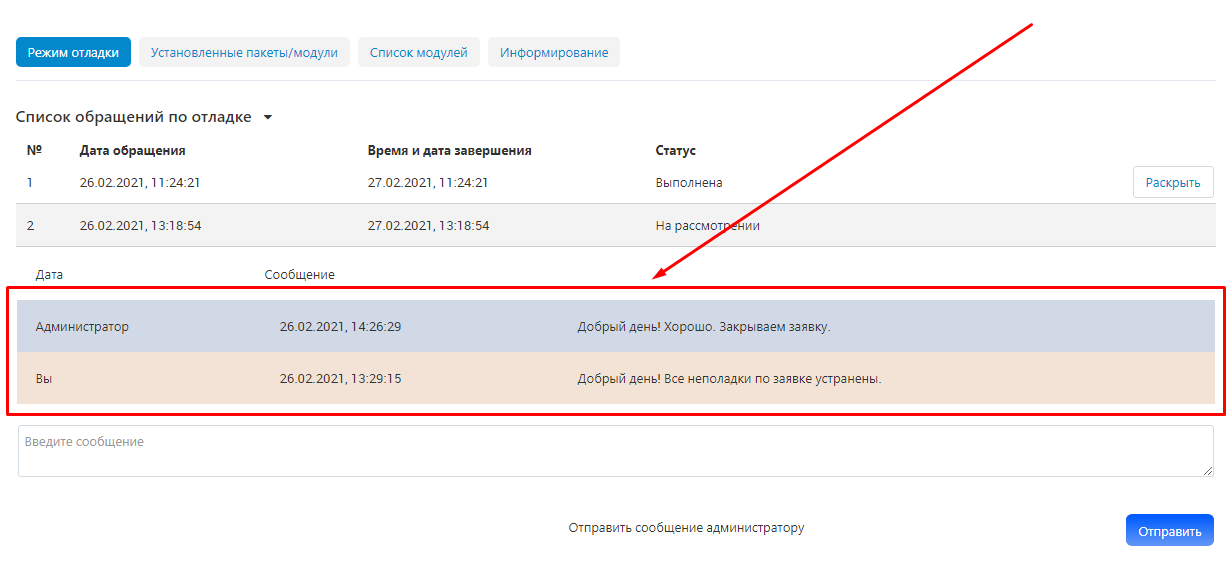
21. All correspondence will appear in the chat.
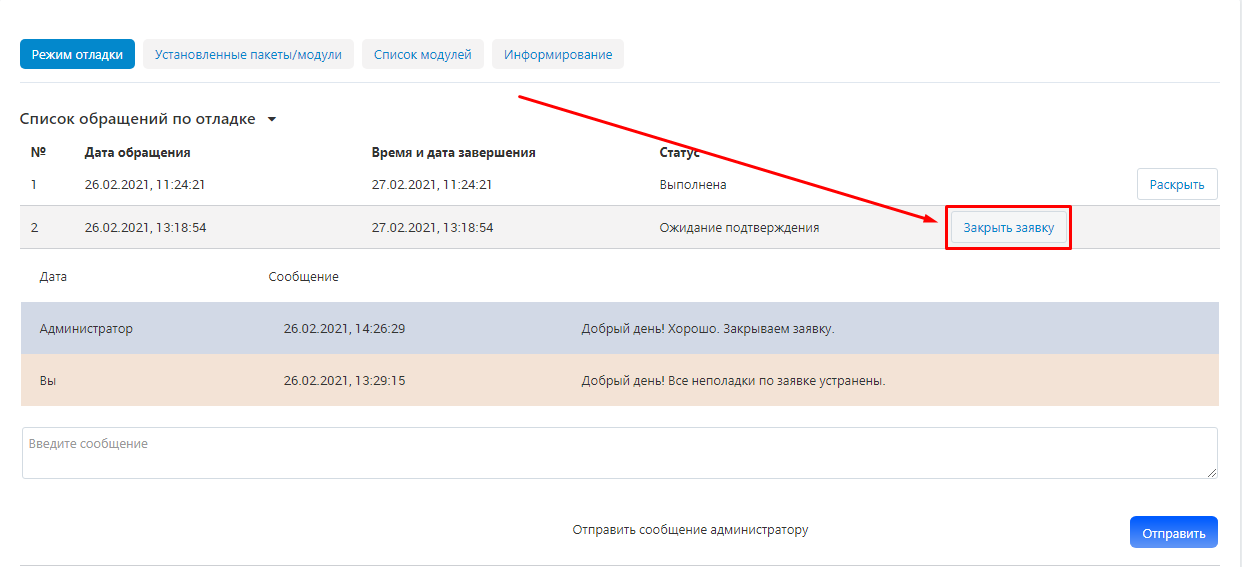
22. After fixing all problems, the status of the application will change to "waiting for confirmation", the white button "Close Application" will appear on the right side of the string. Click it to complete the request.
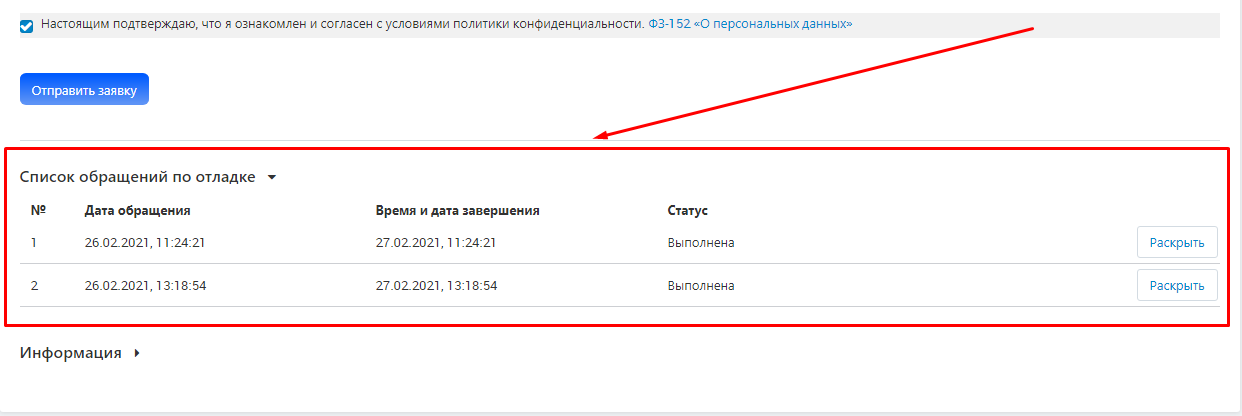
23. You can view previous applications. They are reflected at the very end of the page, immediately after the application form.
INSTALLING AND UPDATING MAURISWEB MODULES
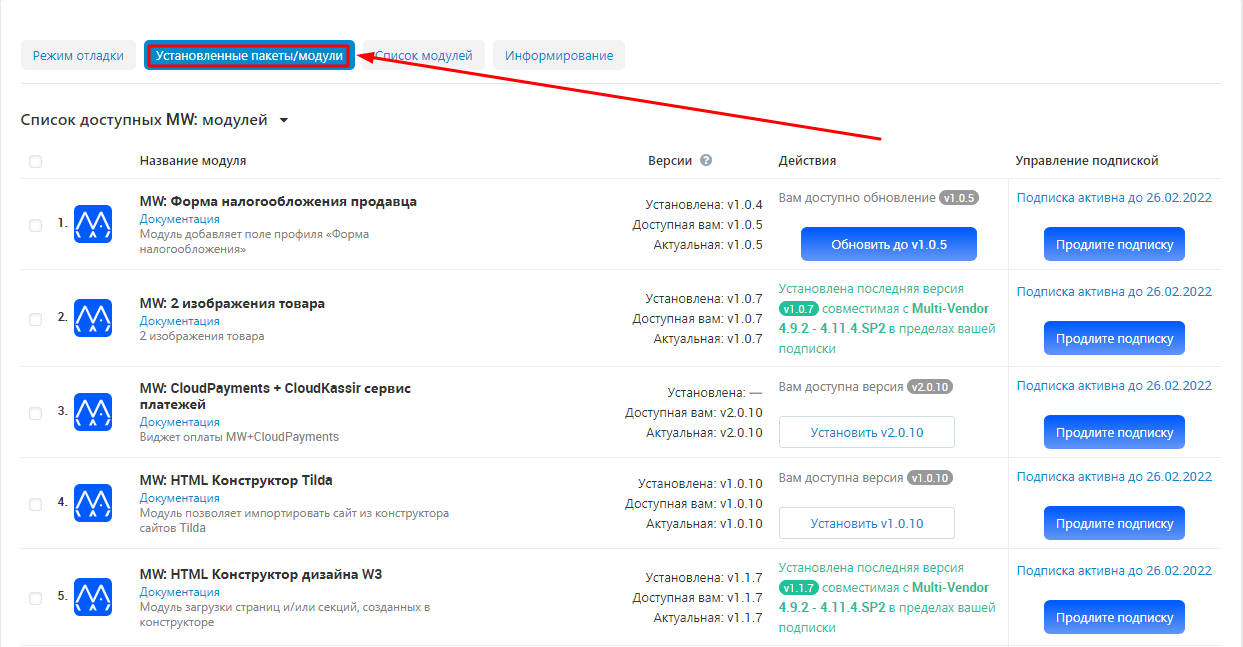
1. Go to the Installed Package / Modules tab. This tab contains all the necessary tools for updating, installing, renewing the subscription of Maurisweb modules. Here, in a table format, all purchased modules and information about them are reflected.
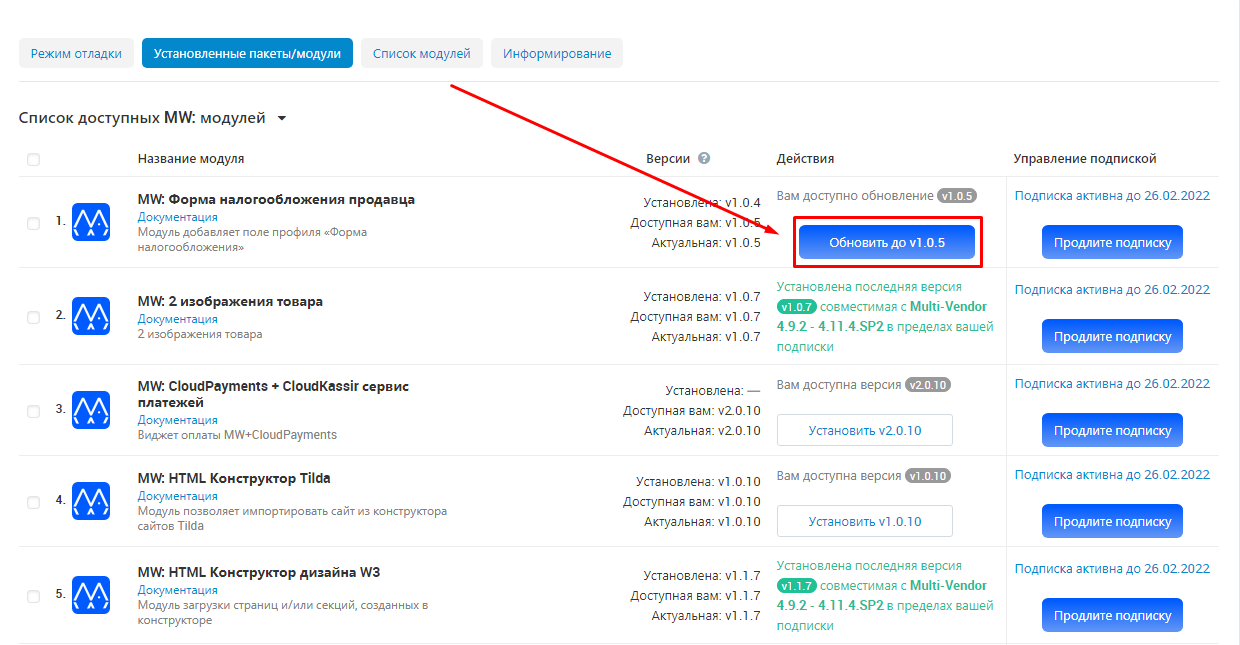
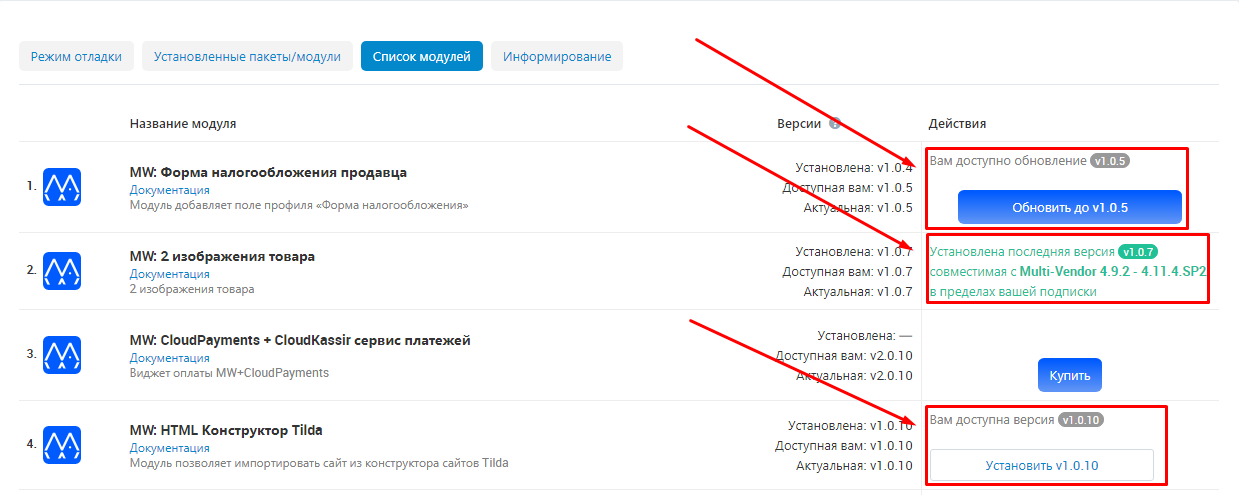
2. Next to the modules for which updates are available, a blue "Update to (module version)" button will appear in the "Actions" column. Click on it to download the update.
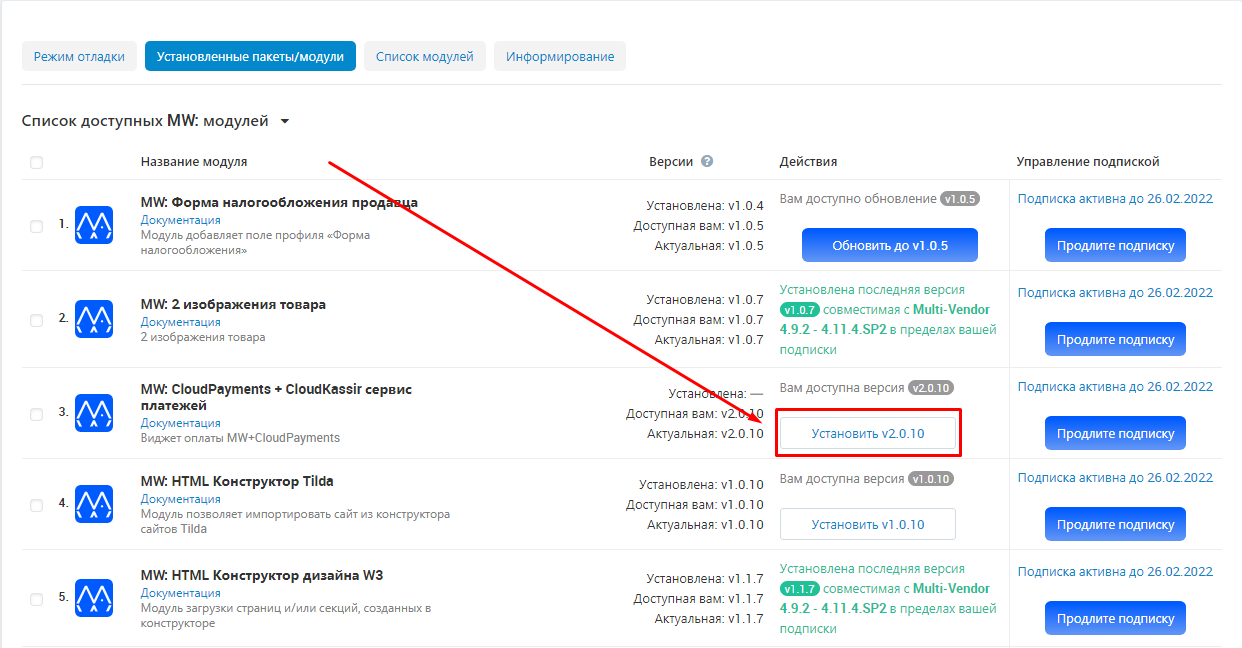
3. Next to the purchased but not installed modules in the "Actions" column, a white button "Install (module version)" will appear. Click on it to install the module.
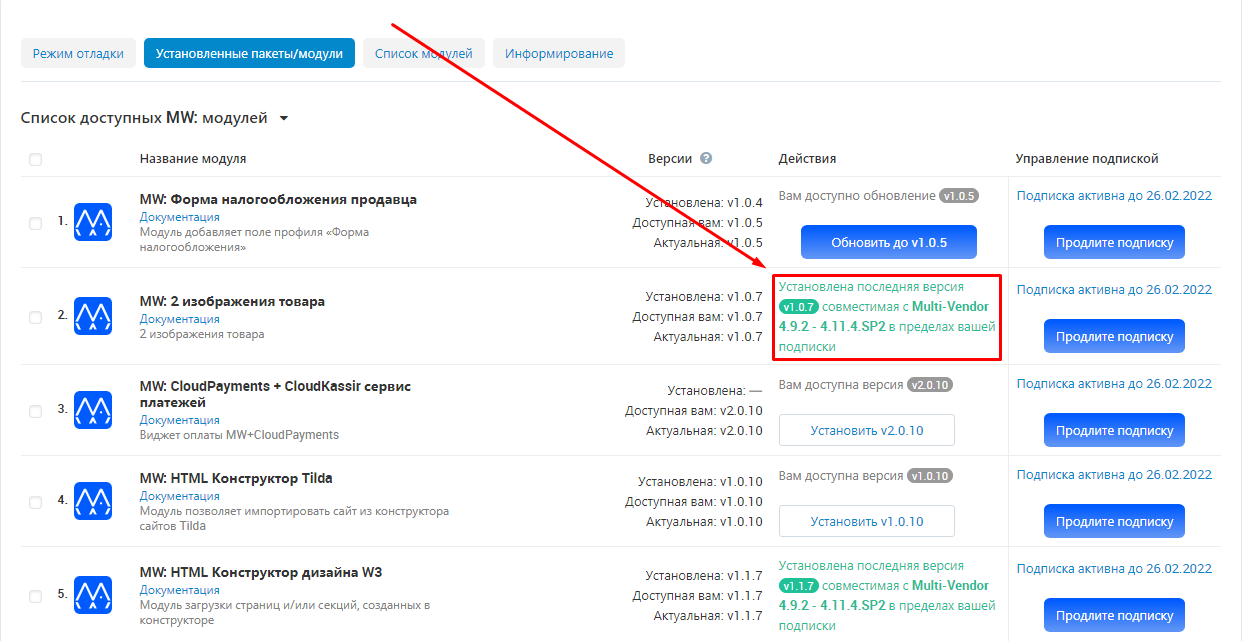
4. Green color in the "Actions" column reflects information about the modules for which the latest version is installed.
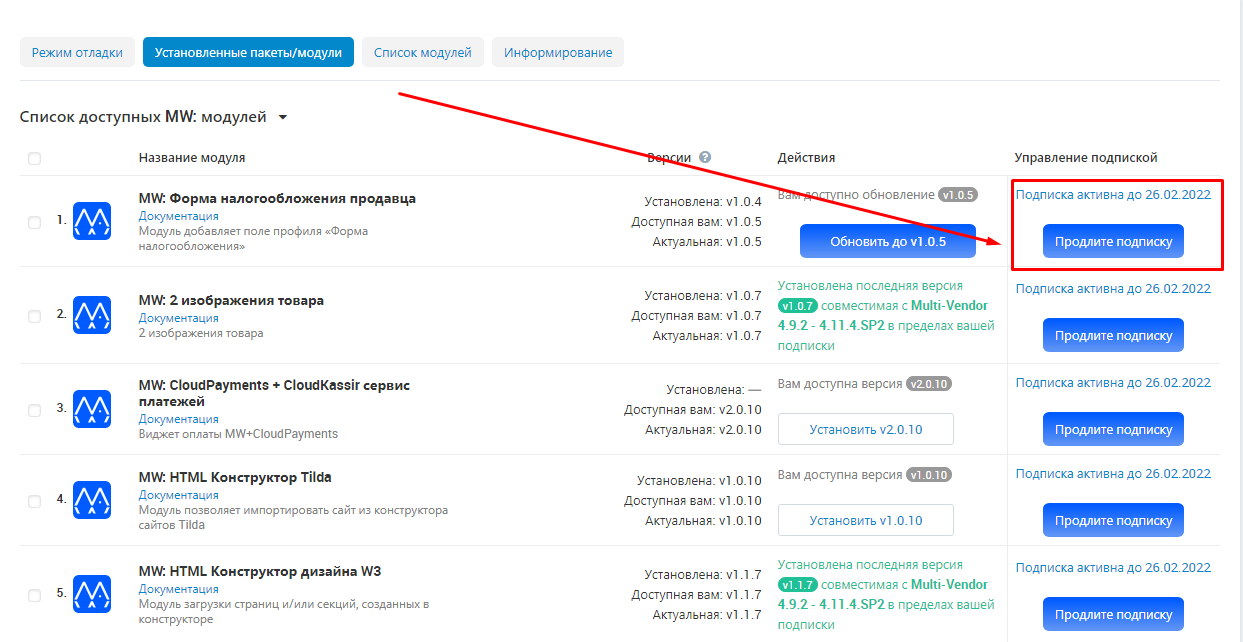
5. In the most extreme column of the table - "Subscription Management" - there is information about the duration of the current subscription. You can also renew your subscription here. To do this, click the blue "Renew Subscription" button.
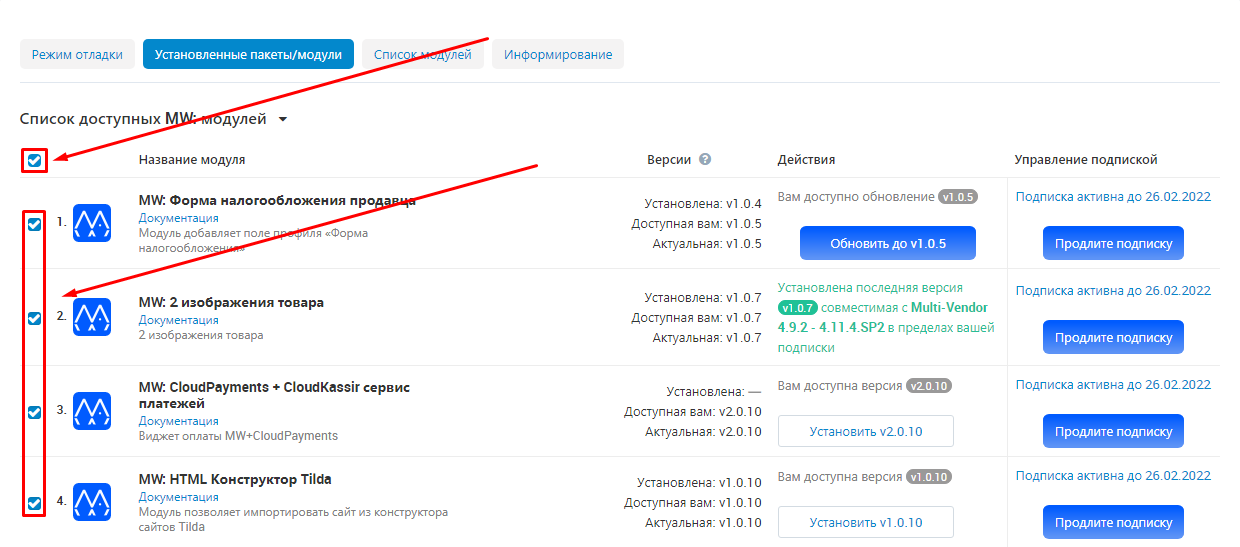
6. Additionally, group control of modules is provided. To do this, check all modules (the very first item in the first column), or check the boxes next to those modules that need to be changed (update, install, enable, disable, uninstall).
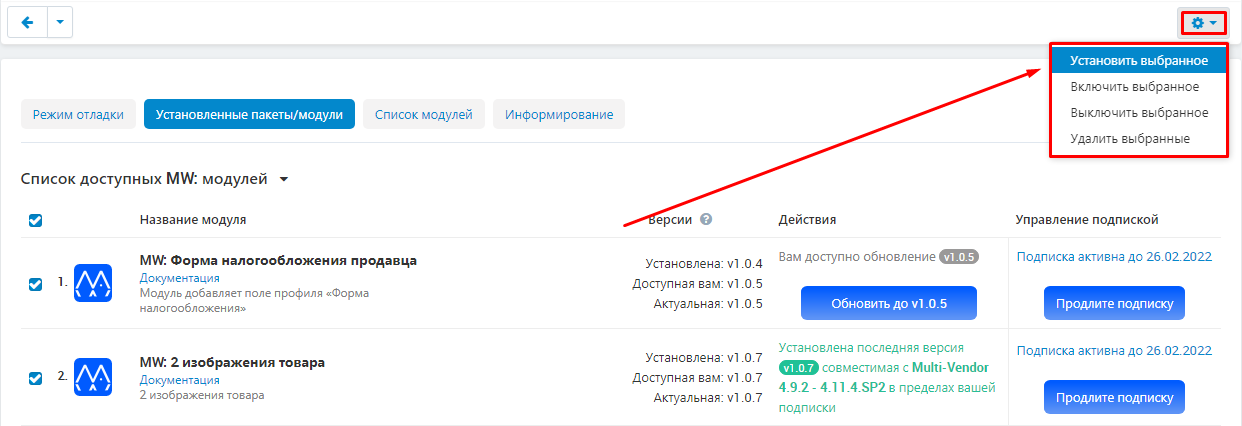
7. Next, click on the blue gear-shaped button in the upper right corner and select one of the available functions:
"Install selected" - install the checked modules;
"Include selected" - enable checked modules;
"Disable selected" - disable checked modules;
"Remove selected" - remove marked modules.
8. If you want to purchase a new module, then go to the "List of modules" tab. A blue Buy button appears in the Actions column next to the modules you can buy. Click on it to download the update.
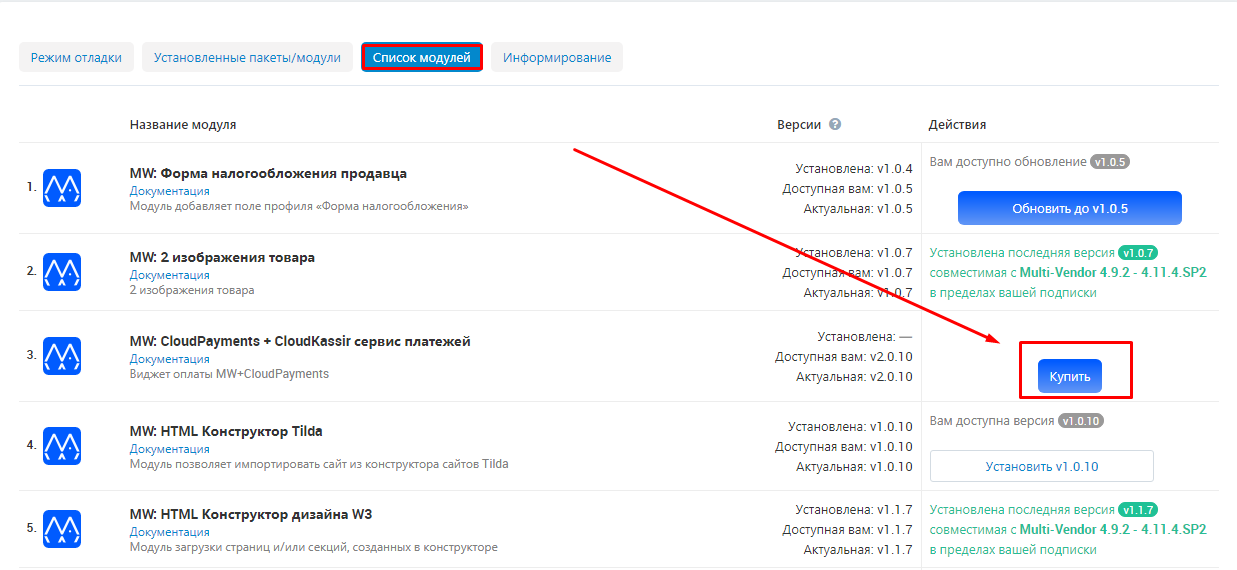
9. This tab also contains information on installing, updating modules and corresponding buttons.
INFORMATION
In order to receive information about those errors that were detected and eliminated by the module itself, fill out the application.
1. Go to the "Information" tab.

2. Fill out the application. Do not forget that to create a correct application, you must fill in all of its items, especially those marked with a red star! The information must be correct and up-to-date. In case of incorrect filling of any item, the application will be rejected.

3. Check all the entered data and click on the blue "Add user" button. If necessary, you can add multiple users.
