HTML designer W3
HTML designer w3
The functionality of the module adds the ability to easily and quickly layout pages using the Weber constructor. This is a simple and straightforward game-like way that makes you feel like a pro without having any programming skills.
For information on compatibility with other modules, see product features:
For CS-Cart - https://maurisweb.ru/programmn...
For Multi-Vendor - https://maurisweb.ru/programmy...
SCOPE OF APPLICATION
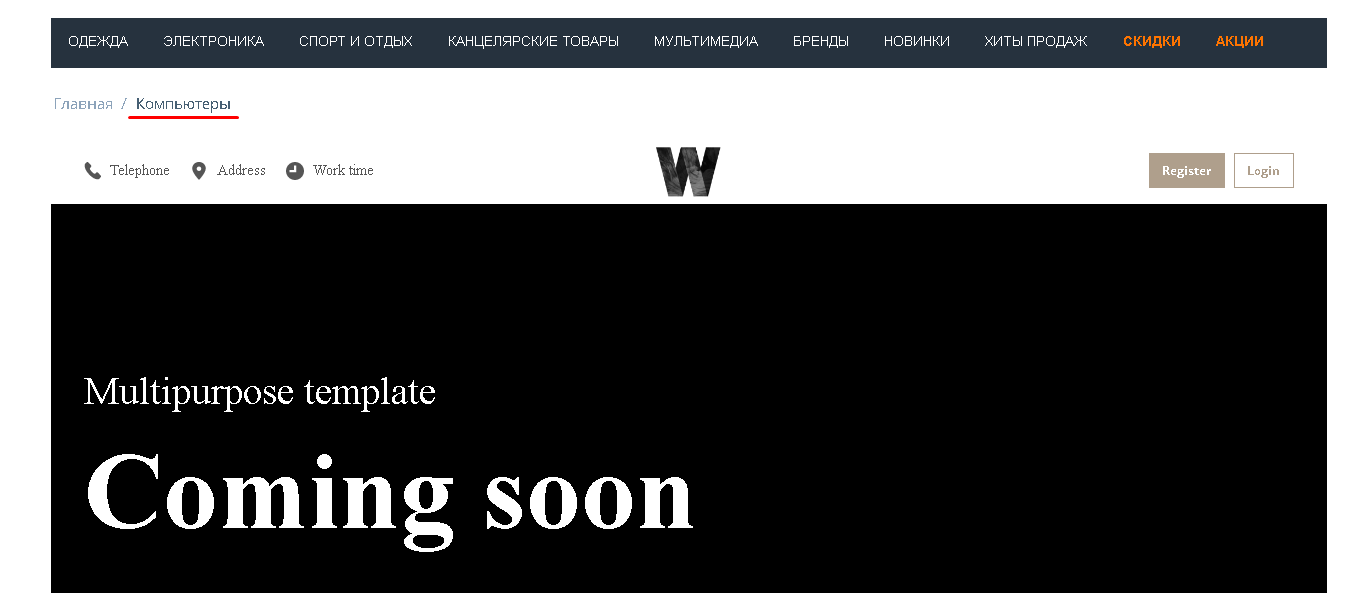
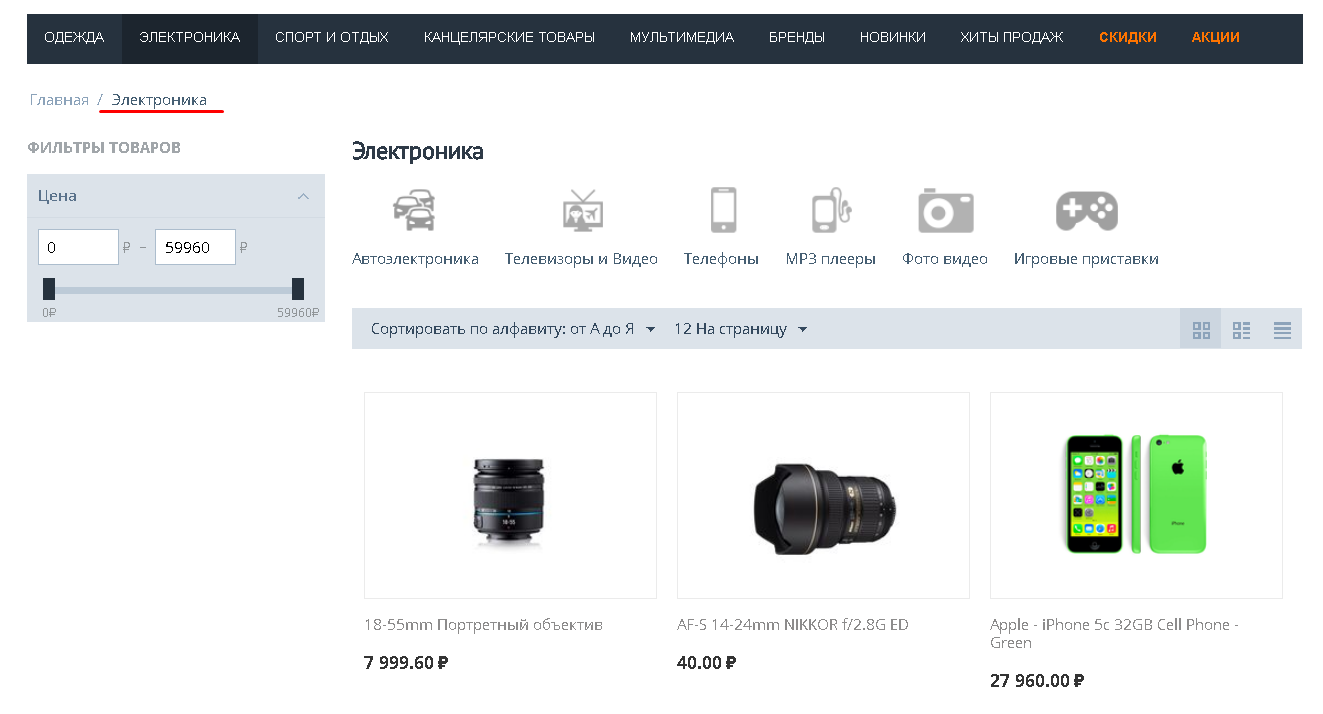
The module is suitable for any stores that require a site with a beautiful and understandable design.
EXAMPLE OF APPLICATION
- Homepage;
- Page "About the Company";
- Catalogs of goods and services;
- Section "Team", etc.
SPECIFICATIONS
- Creation of projects in the website builder;
- Editing different versions of the project;
- Creation of custom templates;
- Creation of privileges to change the project.
FEATURES OF THE MODULE
- Simple and straightforward website development;
- Flexible styling system;
- Simple but powerful modal block.
DESIGNER POSSIBILITIES
Using the constructor, it won't be difficult to create a website!
The ready-made set of tools contains everything you need to create web pages.
Choose from 33 ready-made templates.

You can build powerful yet simple websites with ease. Create web pages by simple navigation without coding skills.
Drag and drop sections, edit content with one click. No more coding skills required.
One of the most important features is the new responsive styling system. Work with a full set of CSS options, pre-built visual effects classes, local and global adaptive style changes for multiple elements at the same time.

Edit everything without getting confused by a huge number of files. Create content faster and easier with a new search tool and new folder systems. Now you will be doing the right things at the right time and in the right place.
A simple yet powerful dropdown is a technique for creating a small block per page. Modal dialog boxes are a way to quickly display information to users on the same page they are working on, which improves the usability of your site and reduces unnecessary page reloads.
Use the Code Editor system to quickly edit color-coded code.
Create blocks very quickly by switching from the visual editor to the source editor, while the changes are always visible on both screens.
The constructor has a complex visual editor for creating forms for any purpose. Contains standard and specific input elements such as "attach file" or "set date". Customize any form and connect it to your email or marketing service.

CONFIGURING THE MODULE
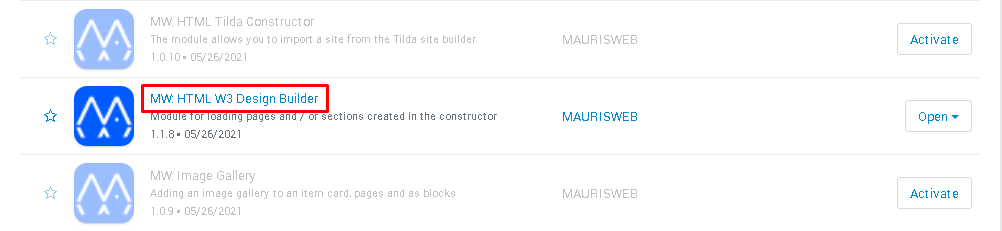
1. To install a module, go to the "Modules" tab, in the pop-up menu, select the "Manage Modules" and "MAURISWEB" items.

2. In the list that opens, select the module you are interested in and click on its name highlighted in blue or black.
3. On the page that opens, select the "General" tab. If the license key is not set automatically and the module settings will be blocked, go to your account at www.maurisweb.ru, copy the license key and paste it into the appropriate item. The key has also been sent to your email.

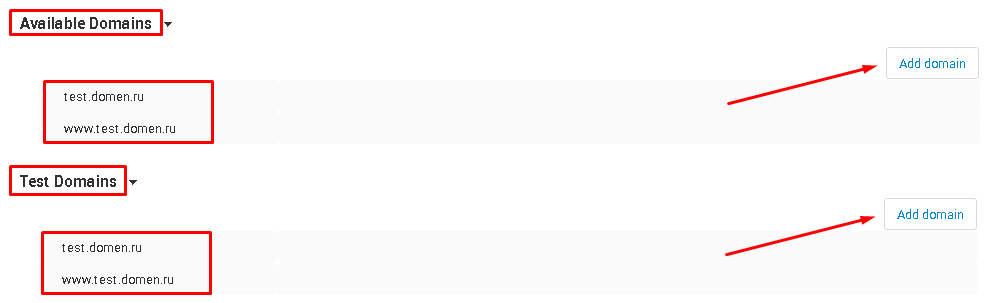
4. In the "Available domains" and "Test domains" sections, check the correctness of the specified domains. You can add additional domains by clicking on the white "Add Domain" button on the right side of the page. The total number of domains should not exceed three.
5. Go down below, select the "Basic settings" section and tick the box "Save data when removing the module" so as not to lose them when reinstalling the module.

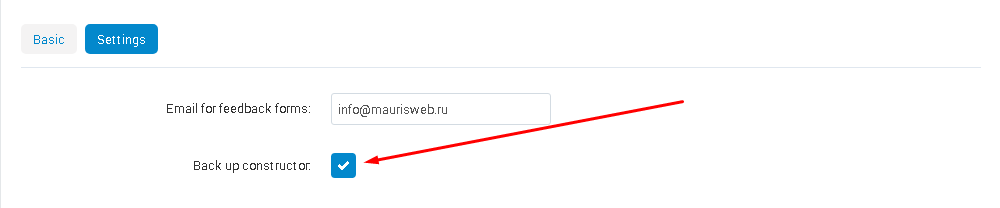
6. Go to the "Settings" tab and enter the email, which will receive letters from the feedback forms.

7. In order to copy the constructor when creating a backup copy of the site, check the box "Make a backup copy of the constructor".
8. Save the module settings. To do this, click on the blue "Save" button in the upper right corner of the panel.

PRIVILEGE
The functionality of this module is available only to the administrator, respectively, and privilege settings are required only for this user group.
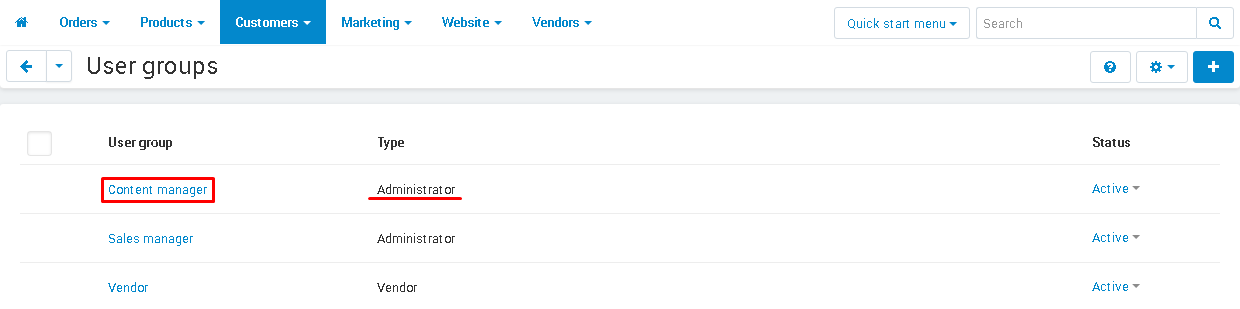
1. To set up privileges, go to the "Customers" tab and select the "User groups" section.
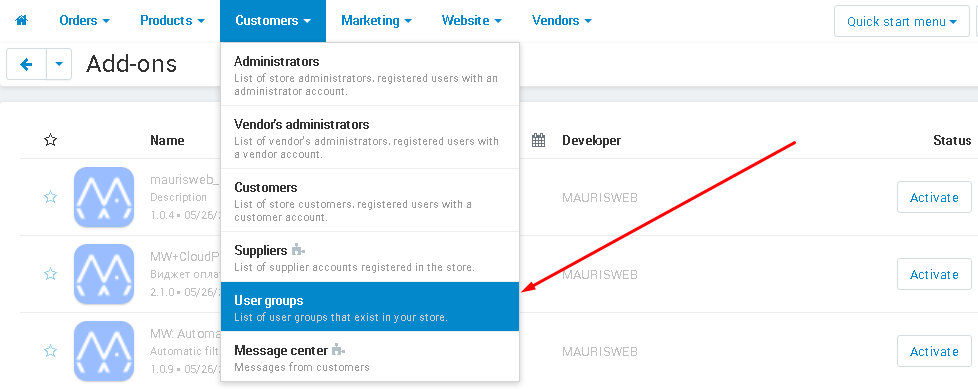
2. On the page that opens, select the required group by clicking on its name, highlighted in blue. Make sure the group is of type Administrator.
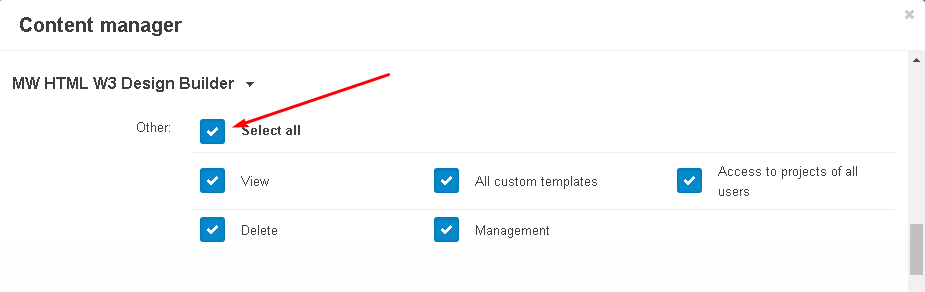
3. In the window that appears, go to the section "MW: HTML Designer W3". You can check all the items by ticking the "Select all" item or select those items that you want to give the administrator access to:
"View" - gives you access to view your projects, content, templates;
"Delete" - gives you access to delete your projects;
"All custom templates" - provides access to viewing and using all custom templates;
"Management" - provides access to the creation, editing of their projects, content, templates, to delete content (but not projects);
"Access to projects of all users" - provides access to viewing and editing projects that are created by all users.
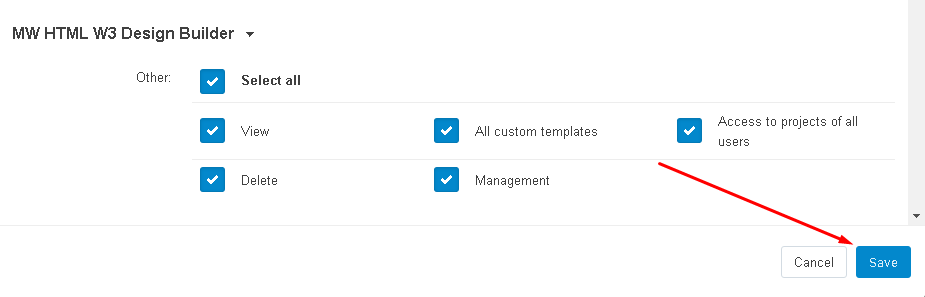
4. When finished, save the settings by clicking the blue "Save" button in the lower right corner of the window.
FUNCTIONALITY OF THE MODULE
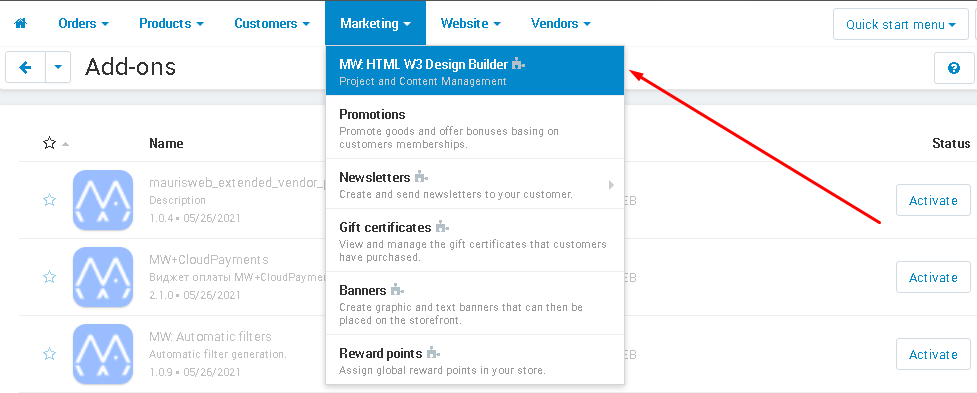
1. To go to the module's functionality, go to the "Marketing" tab and select the "MW: HTML Design Builder W3" section.
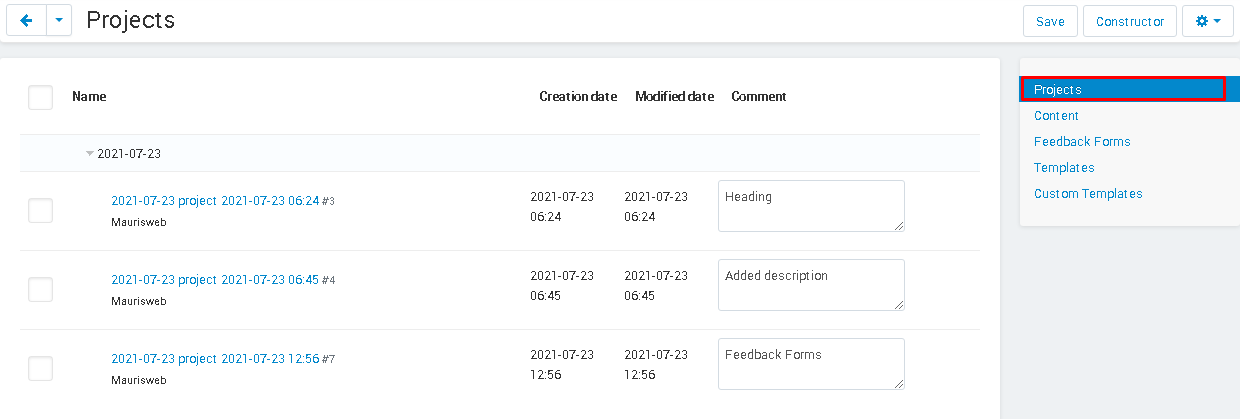
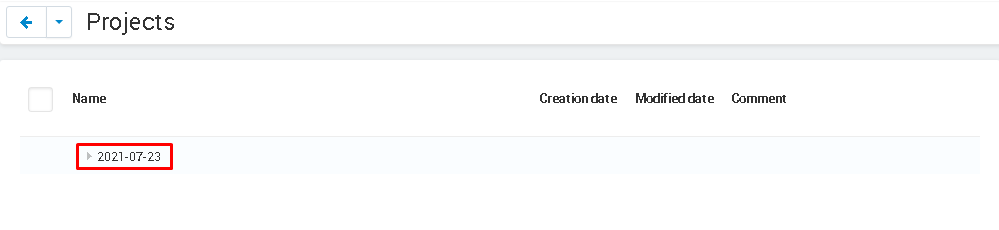
2. In the "Projects" section, all saved projects and their versions will be displayed.
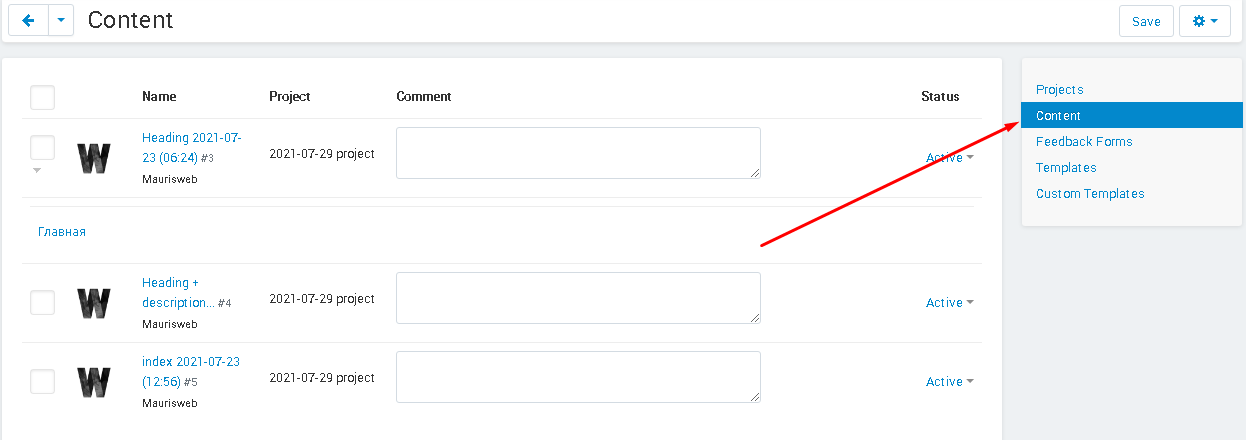
3. In the "Content" section, all available content will be displayed.
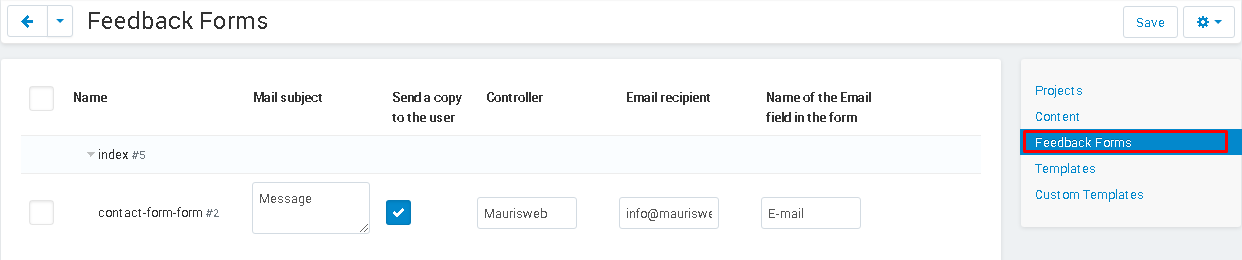
4. In the "Feedback Forms" section, content with feedback forms will be displayed.
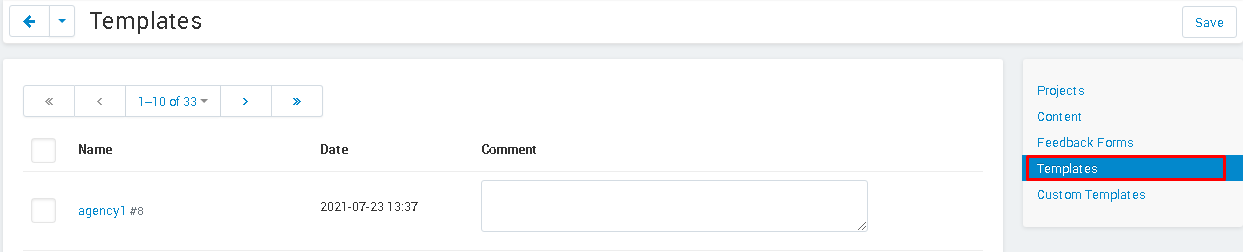
5. The "Templates" section displays the available designer templates.
6. The Custom Templates section displays the custom templates.

PROJECT CREATION
1. The constructor is embedded in the platform, to go to the creation of the project, click on the white button "Constructor" in the upper right corner of the panel.
Attention!
To protect kernel data, the constructor runs in a browser session. If you have been working for some time and reloaded the page, or the browser session has ended, then access will be closed until you enter through your personal account.

3. After finishing work with the designer, the project will appear in the "Projects" tab. By default, its name will be the date of creation.
4. Click on the triangle to view the project tabs.
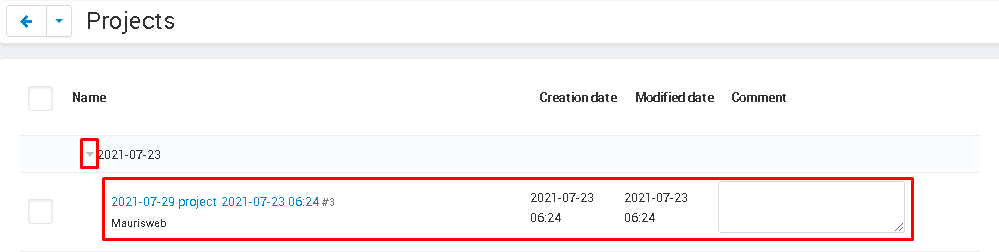
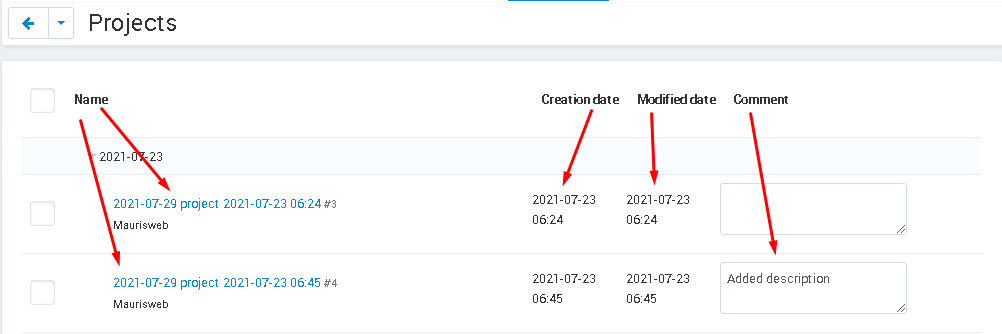
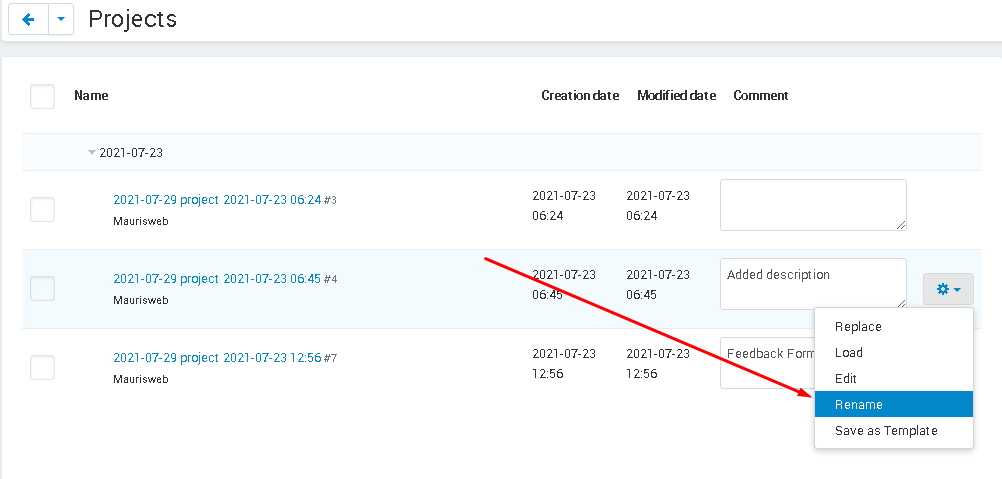
5. If the project has several versions, they will be displayed in different lines. The name will reflect the date and time the version was created. You can also add a comment for each version so you know what changes have been made.
6. To change the name of the version, click on the gear-shaped button and select the "Rename" function.
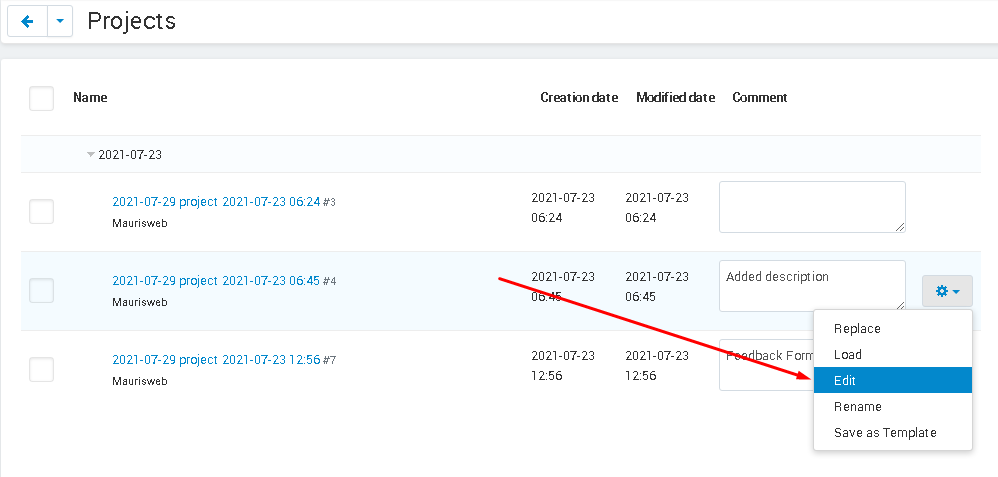
7. To proceed to editing the version through the designer, select the "Edit" function.
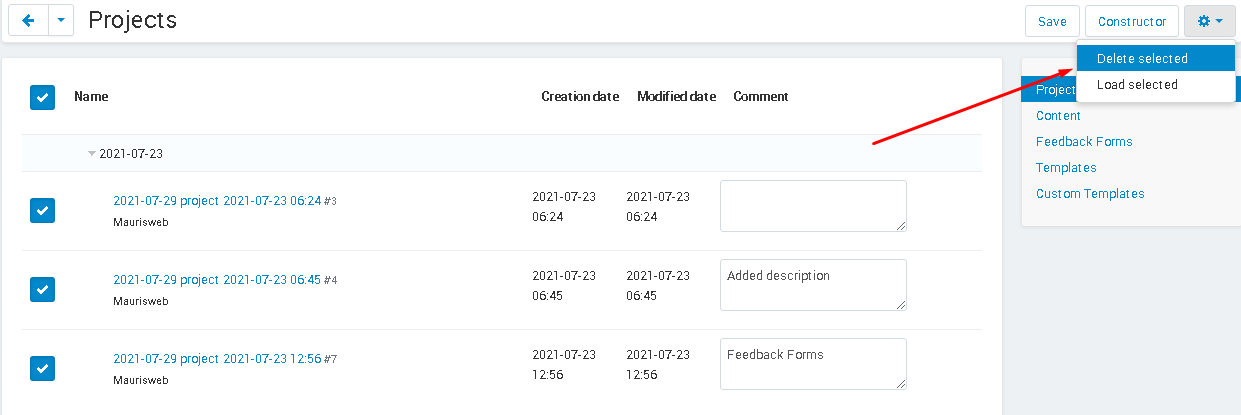
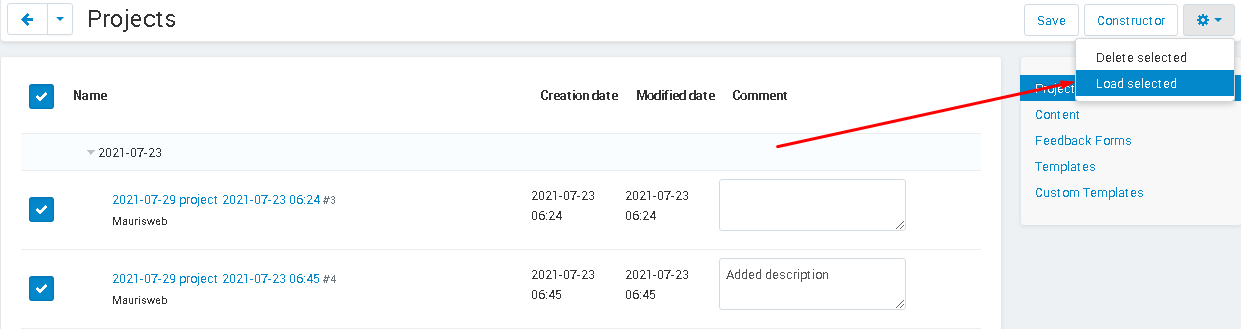
8. To delete a version or project, mark it with a checkmark, click on the gear-shaped button in the upper right corner of the panel and select the "Delete Selected" function.
CONTENT
1. To translate projects created in the constructor into content pages, click on the gear-shaped button and select the "Load" function
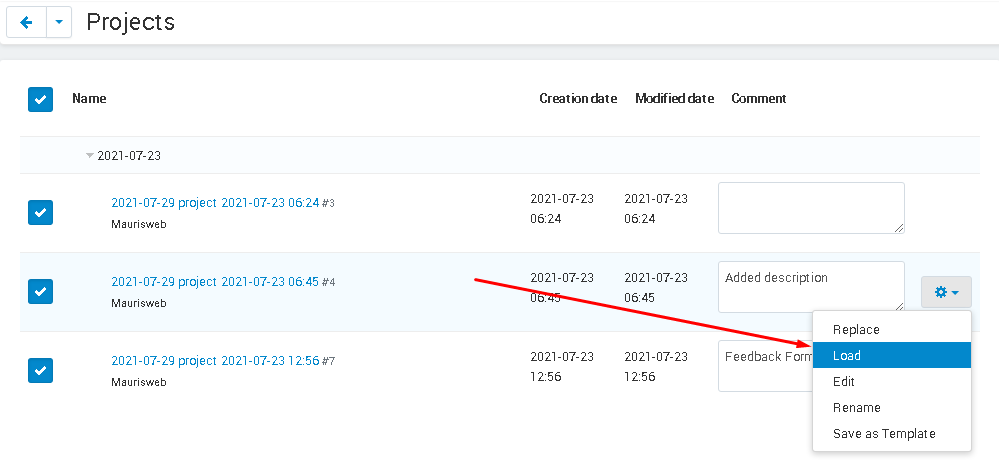
or use bulk upload.
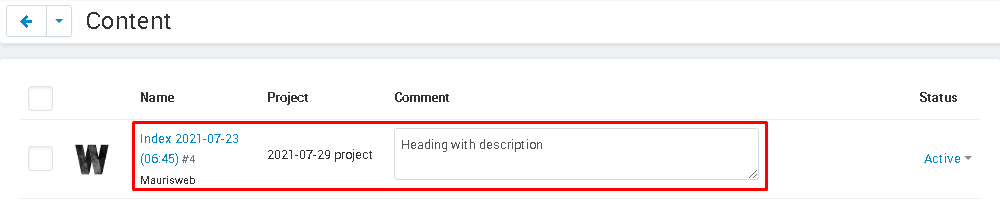
2. Projects are converted to content. You can add a description to the page in the "Comment" column.
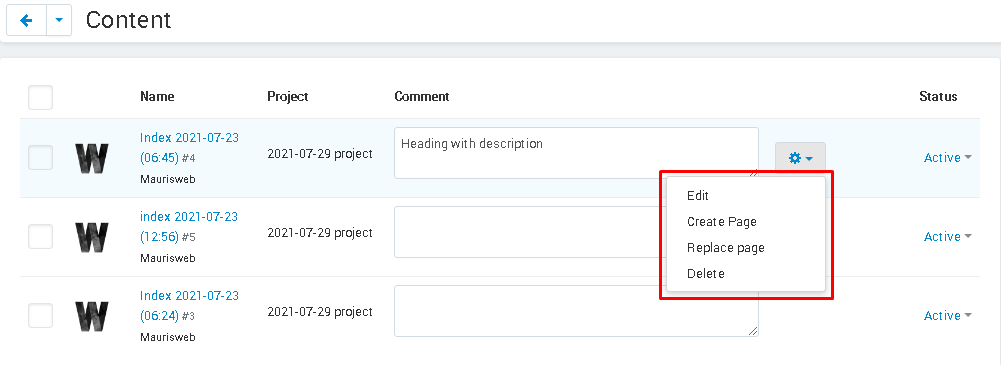
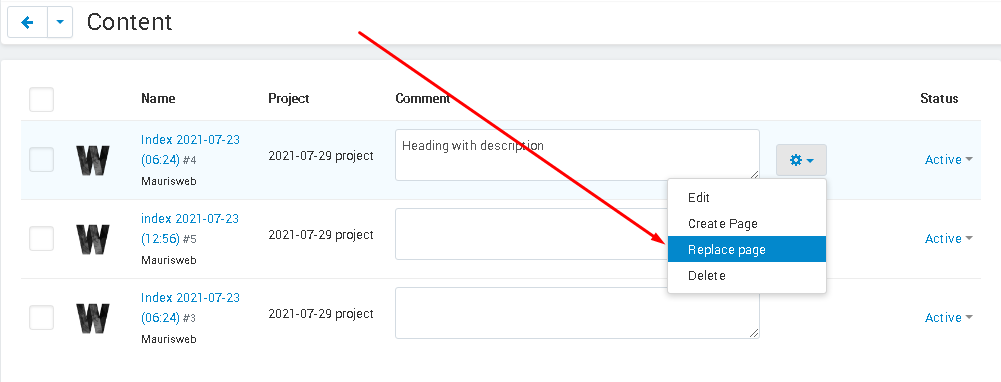
3. Click on the gear-shaped button on the right side of the row to make changes to the page:
"Edit" - change content;
"Create Page" - create a new empty content page;
"Replace page" - replace one content page with another;
"Delete" - delete the page.
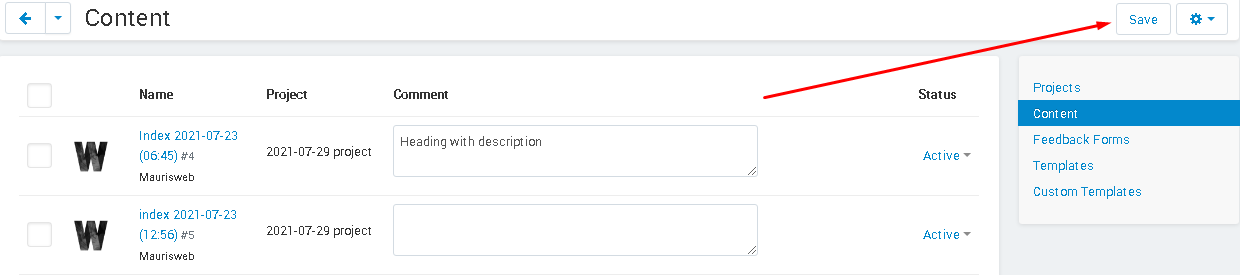
4. After making changes, click on the white "Save" button in the upper right corner of the panel.
REPLACEMENT OF PROJECT / CONTENT
1. To replace one page with another, in the projects tab, click on the gear-shaped button next to the required project and select the "Replace" function.
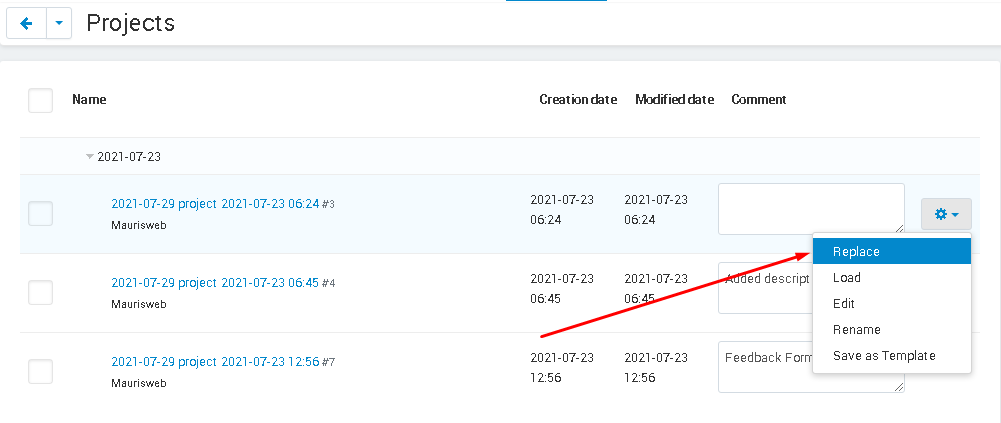
2. A list of pages available for replacement will open. Check the box next to the selected page and click on the "Replace" button in the upper right corner of the panel.

3. You can also replace the created content with any existing page on the marketplace.
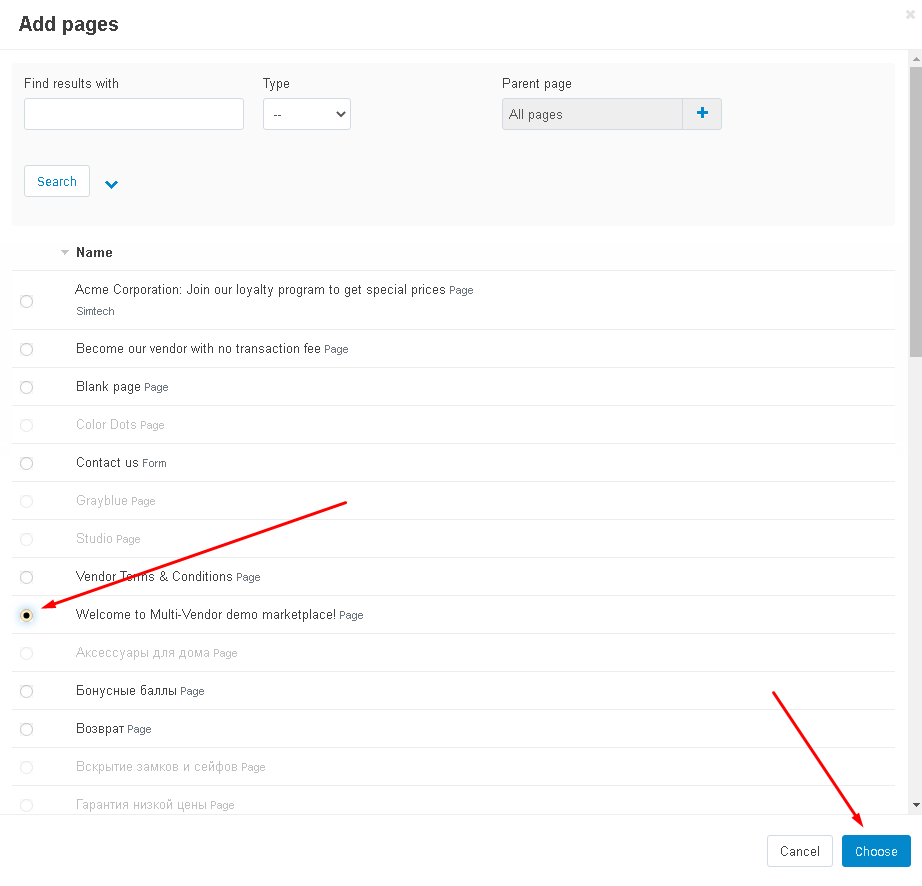
4. In the window that appears, click the button in the form of a plus sign.
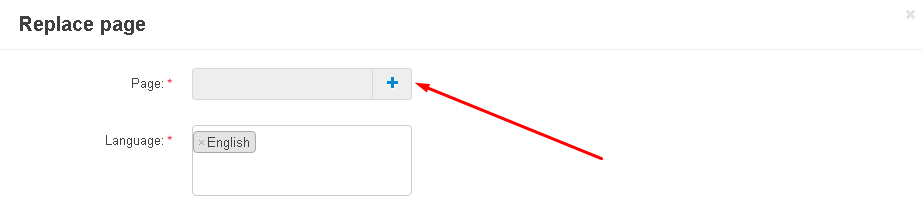
5. Select a page from the list that appears and click on the blue "Select" button in the lower right corner of the window.
6. Complete your selection by clicking the white Change Page button in the lower right corner of the panel.

CREATING A TEMPLATE
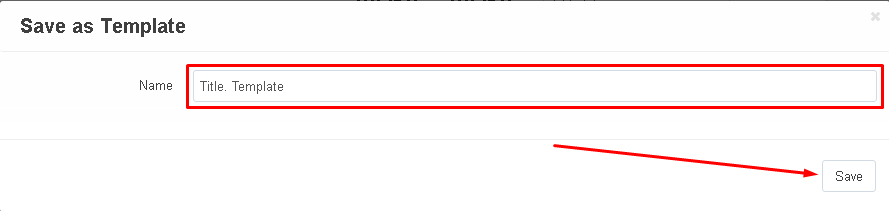
1. To create a template from the created page, click on the gear-shaped button next to the required project and select the "Save as template" function.
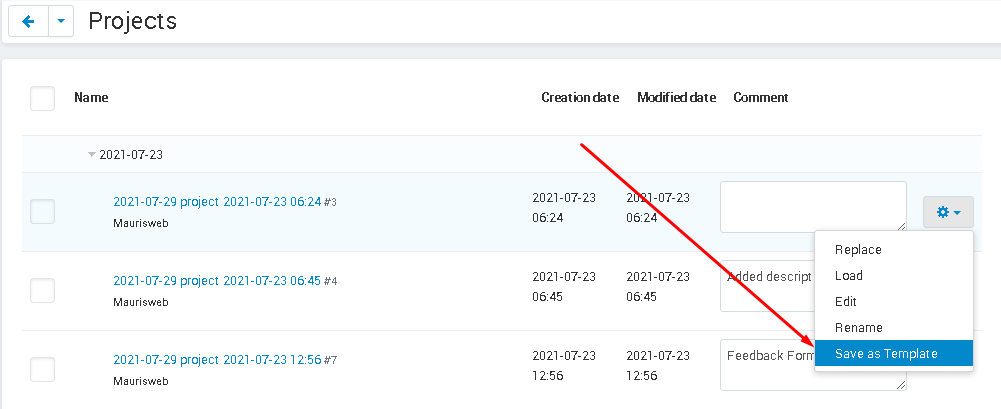
2. Enter the name of the template and click the "Save" button.
FEEDBACK FORM
1. If a project is created with a feedback form, then it can be configured.
2. To do this, the project must be loaded into the content page (see the section "Projects" and "Content") and displayed in a separate tab.

3. Click on the triangle next to the title, expand the list and write the subject of the letter.
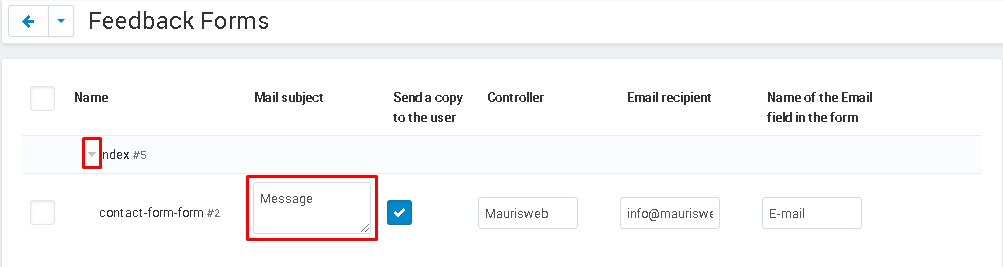
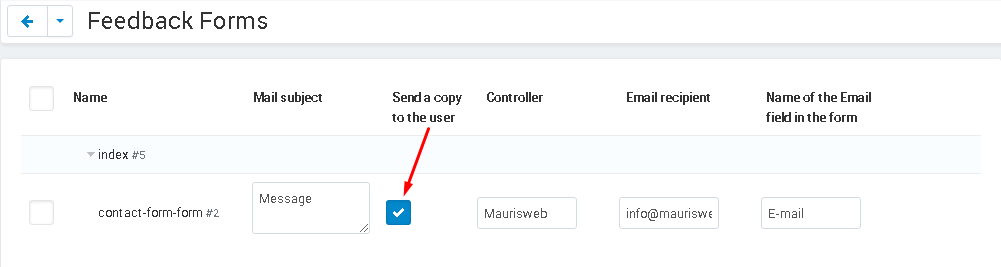
4. Check the box "Send a copy to the user" if you want a copy of the message that the user sent through the feedback form to be sent to his mail.
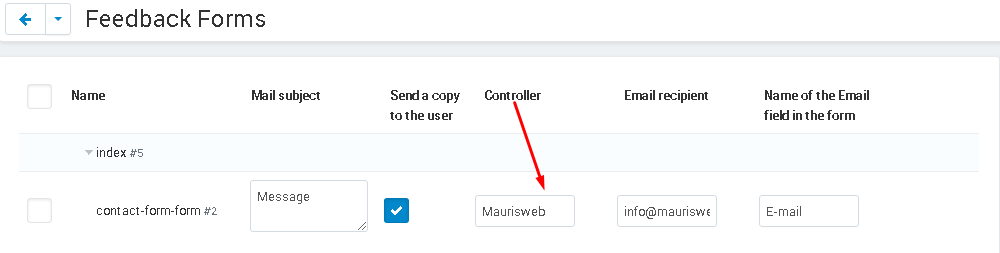
5. In the "Controller" section, enter the name or position of the letter controller.
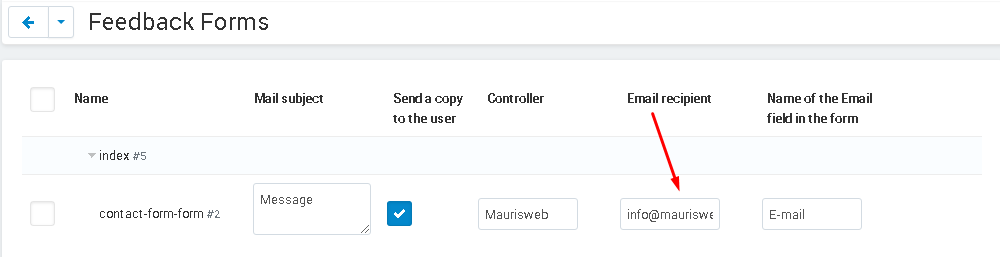
6. In the item "Email of the recipient" enter the email of the recipient.
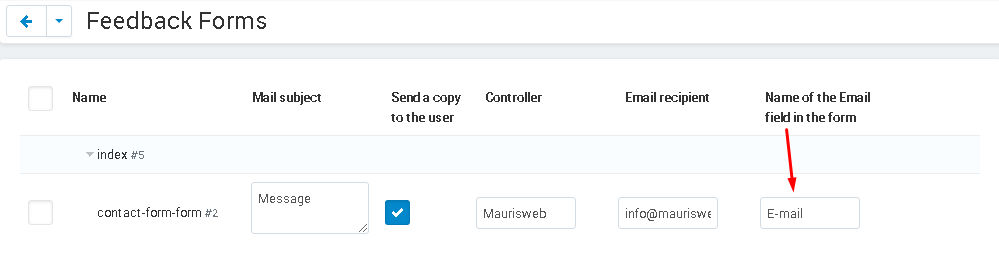
7. In the "Name of the Email field in the form", enter the name of this field, which will be displayed in the feedback form.
8. When you are finished making all the changes, click the white "Save" button at the top right of the panel.

TEMPLATES
1. Go to the "Templates" tab. When using the module for the first time, you need to click the white "Refresh" button in the upper right corner of the panel to display a list of templates on the page.

2. After the update, a list of standard templates will be displayed. There are 33 of them. To open a template, you need to click on its name, highlighted in blue.
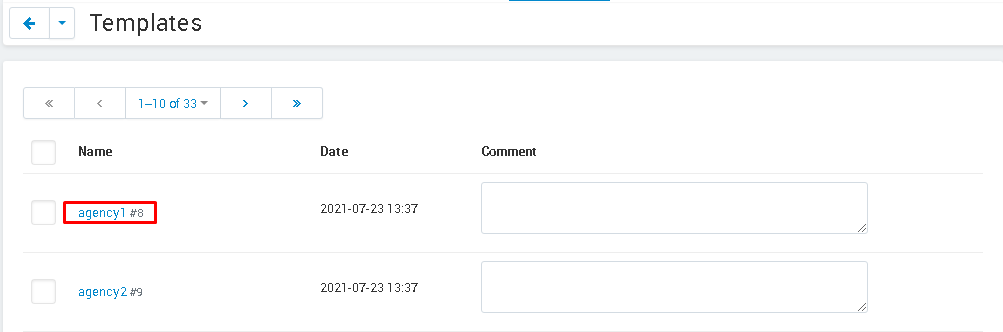
3. When the designer opens, in the left side menu select the "Project Pages" button (the third button from the top is in the form of a white square with three small blue stripes in the right corner).
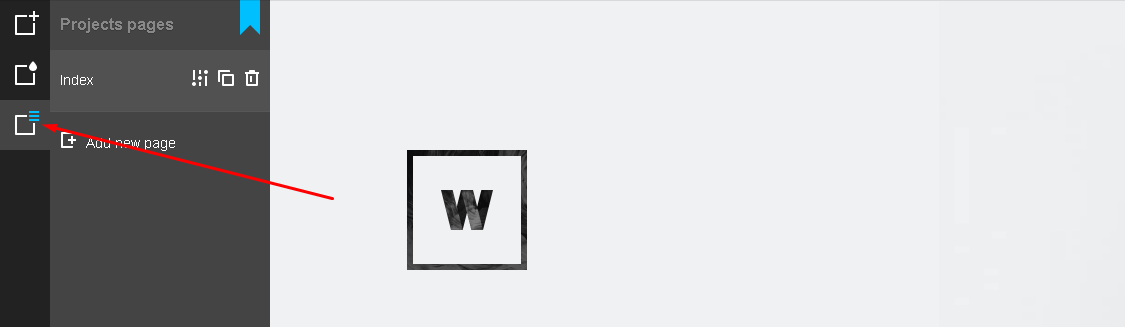
4. In the drop-down menu at the very bottom of the page, select the download icon (third from the left).

5. The template will be loaded, which you can change as you wish.
ADD CONTENT TO BLOCK
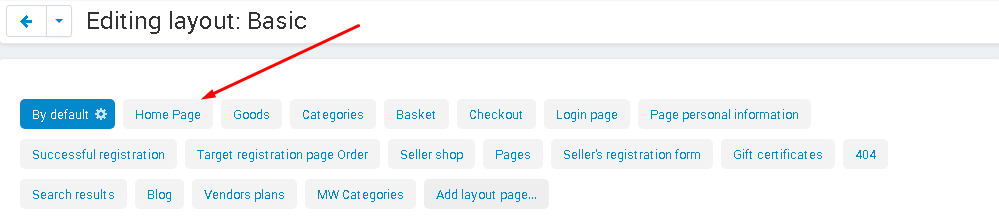
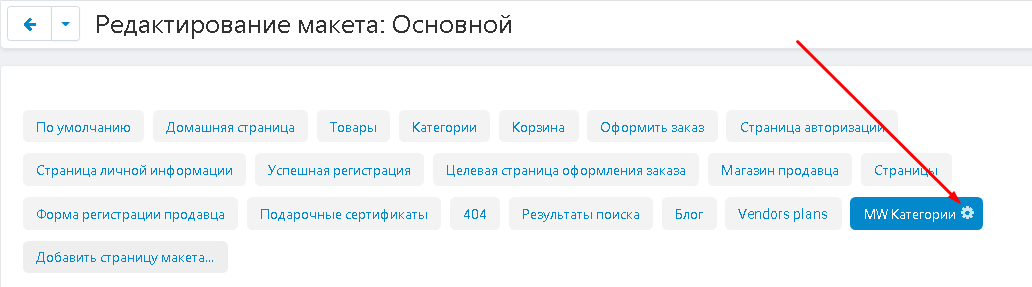
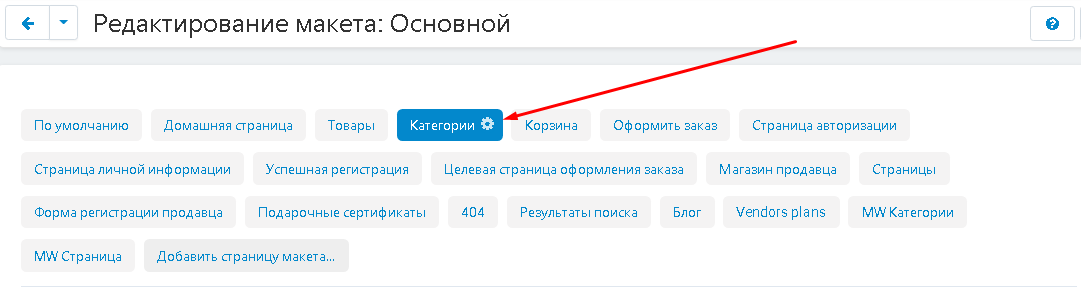
1. To display content on the storefront, go to the "Design" tab and select the "Layouts" section, the "Layouts" subsection.

2. Among the tabs that appear, select the appropriate page on which you want to place the page you have created.
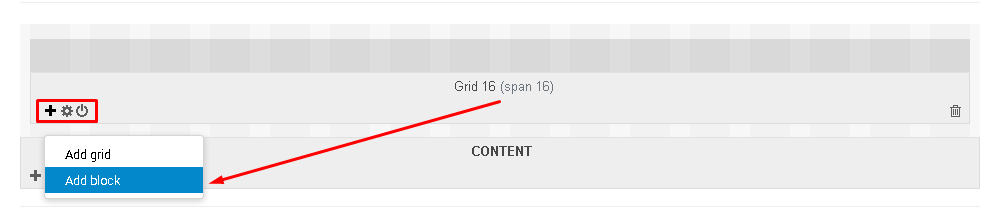
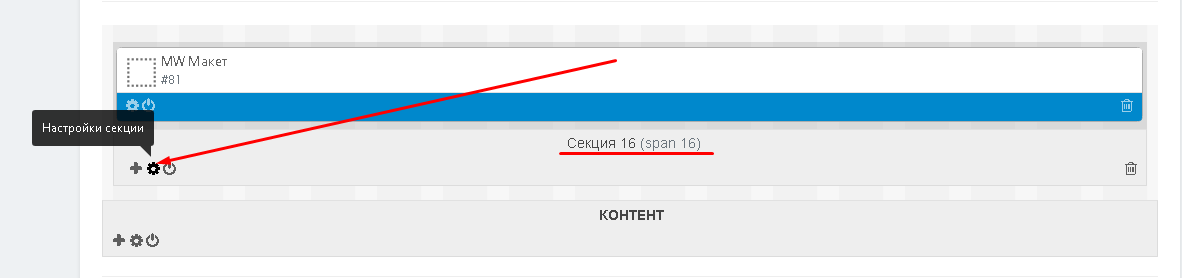
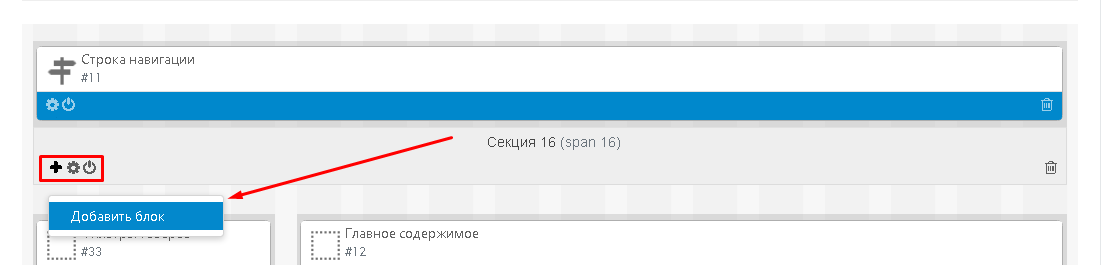
3. Scroll down to the "Content" section. Move your cursor to the lower left corner where three buttons will be reflected. Click on the button with the plus sign (a hint will pop up on hover) and select the "Add section" function.

4. In the window that opens, in the "General" tab, select the "Width" item, click on the arrow and set the value "16", since this is the optimal width for this section.

5. If you need to make indents between sections, then in the "Custom CSS class" field, insert the necessary CSS classes without quotes, separated by a space. In order to indent the desired pixel value from 1 to 5, in the name of the below CSS classes, replace the number 1 with the desired one:
"mw_wm-padding-top1" - if you need to indent the top;
"mw_wm-padding-bottom1" - if you need to indent from the bottom;
"mw_wm-padding-left1" - if you need to indent to the left;
"mw_wm-padding-right1" - if you need to indent to the right.
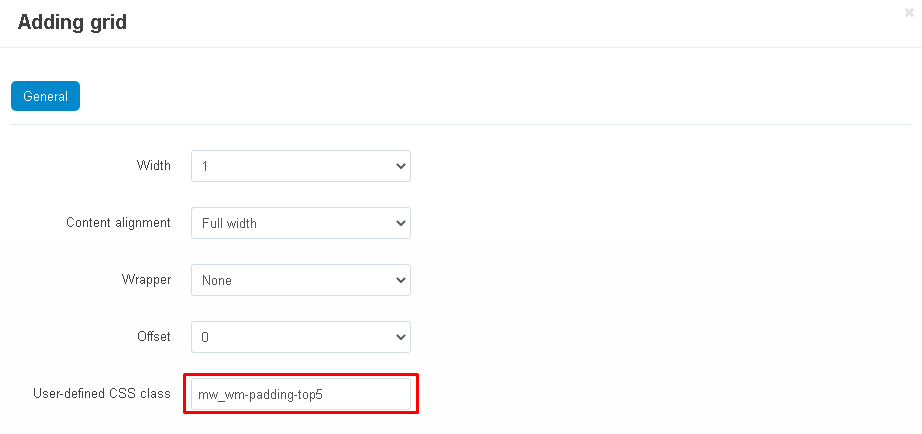
6. To complete the creation process, click on the blue "Create" button in the lower left corner of the window.

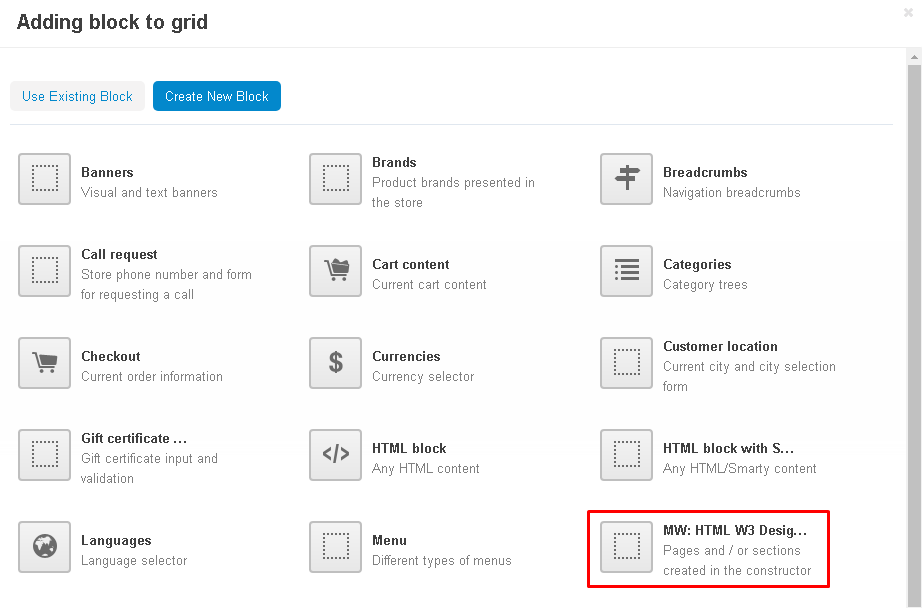
7. Move the cursor over the left corner of the created section, click the plus sign button and select "Add Block".

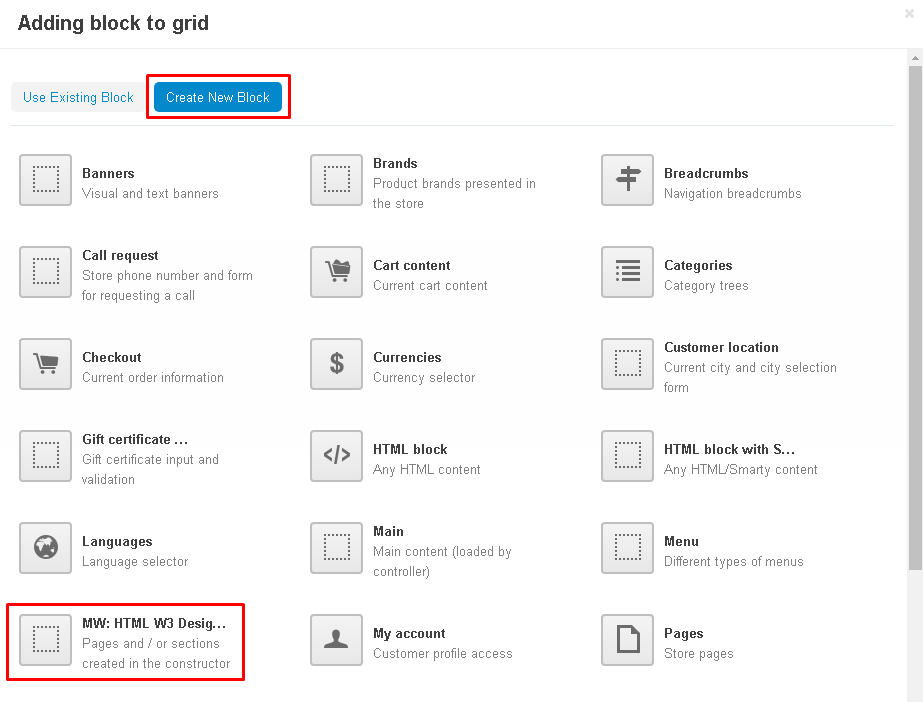
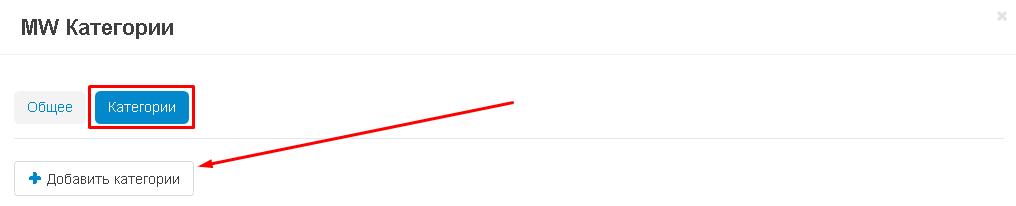
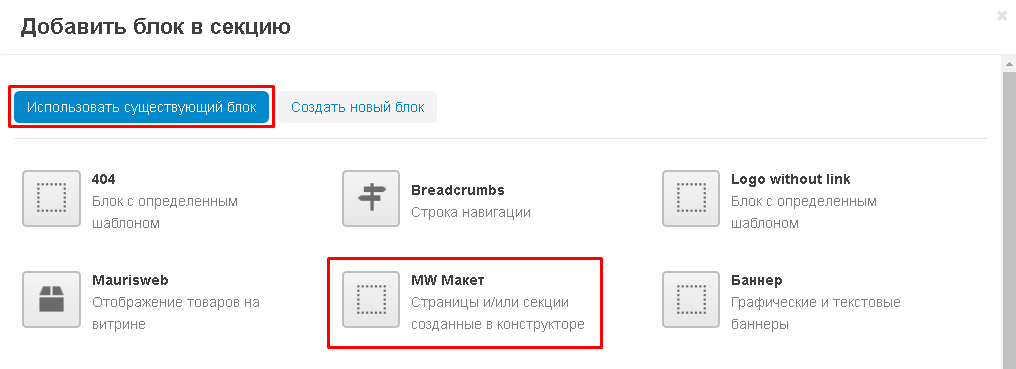
8. In the window that opens, go to the "Create a new block" tab and select the "MW: HTML Constructor W3" block.
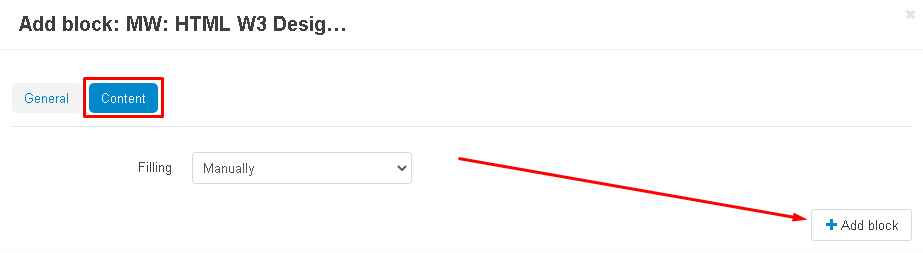
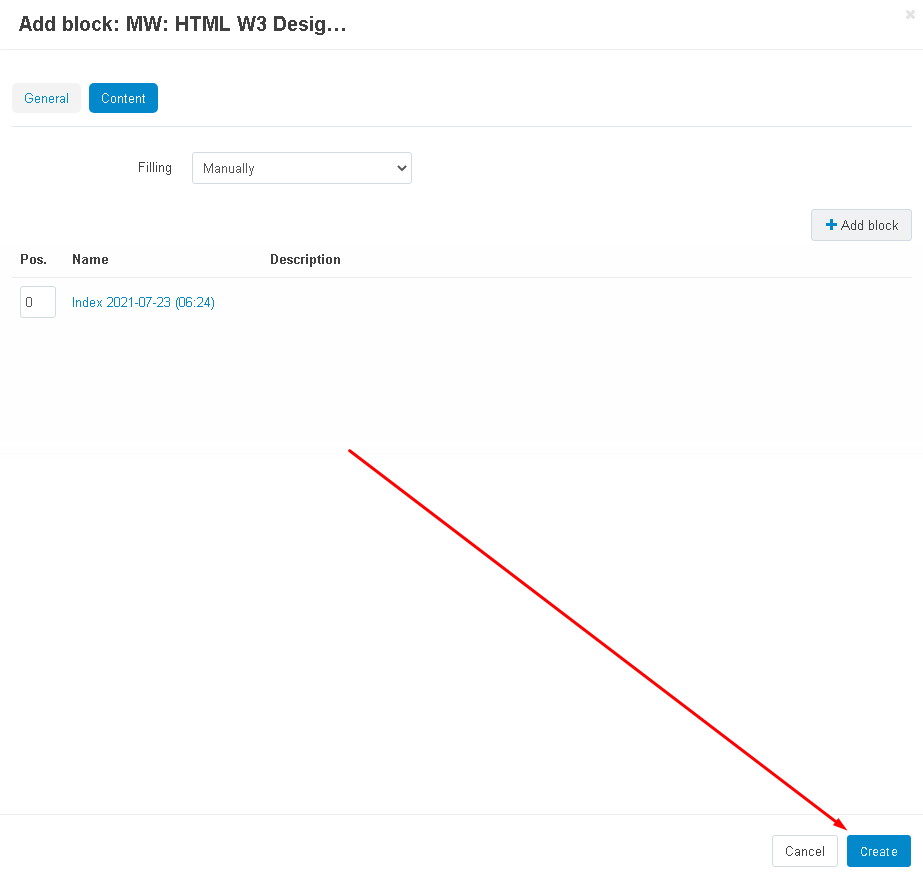
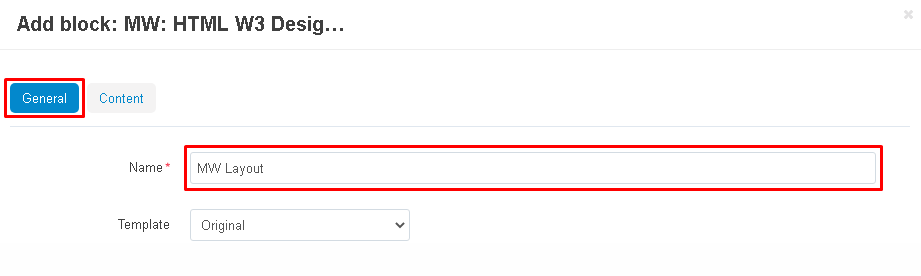
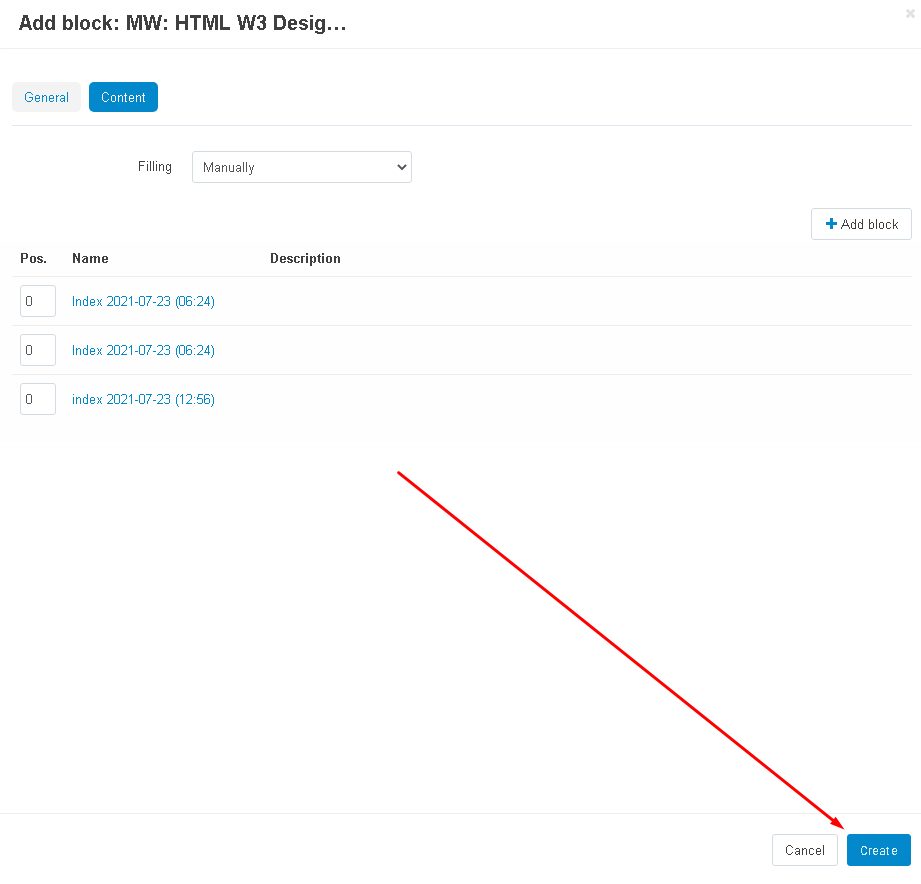
9. The window for adding a block will open. In the "General" tab, enter the name of the block in the "Name" field.

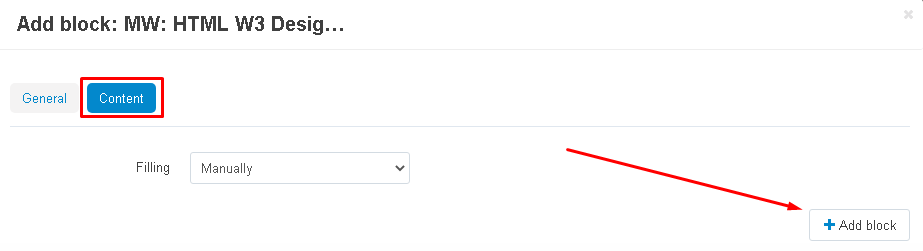
10. Go to the "Content" tab and click the white "Add Block" button in the right corner.
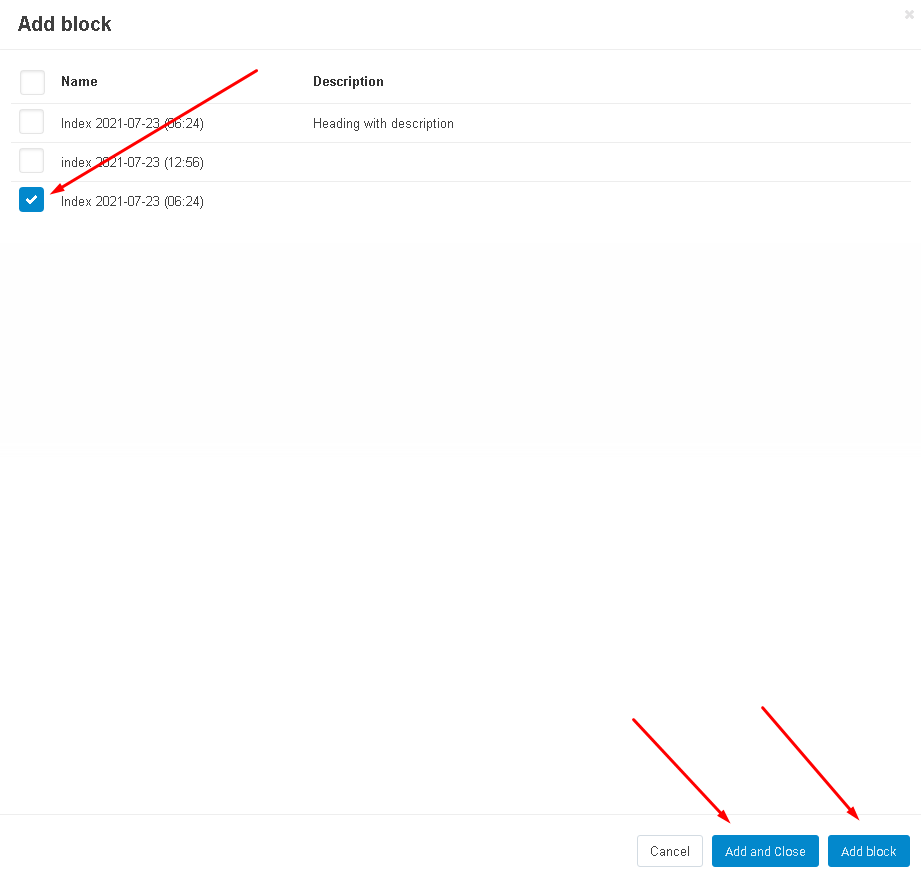
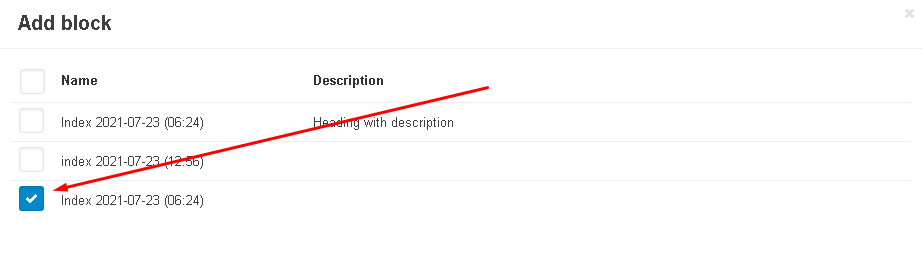
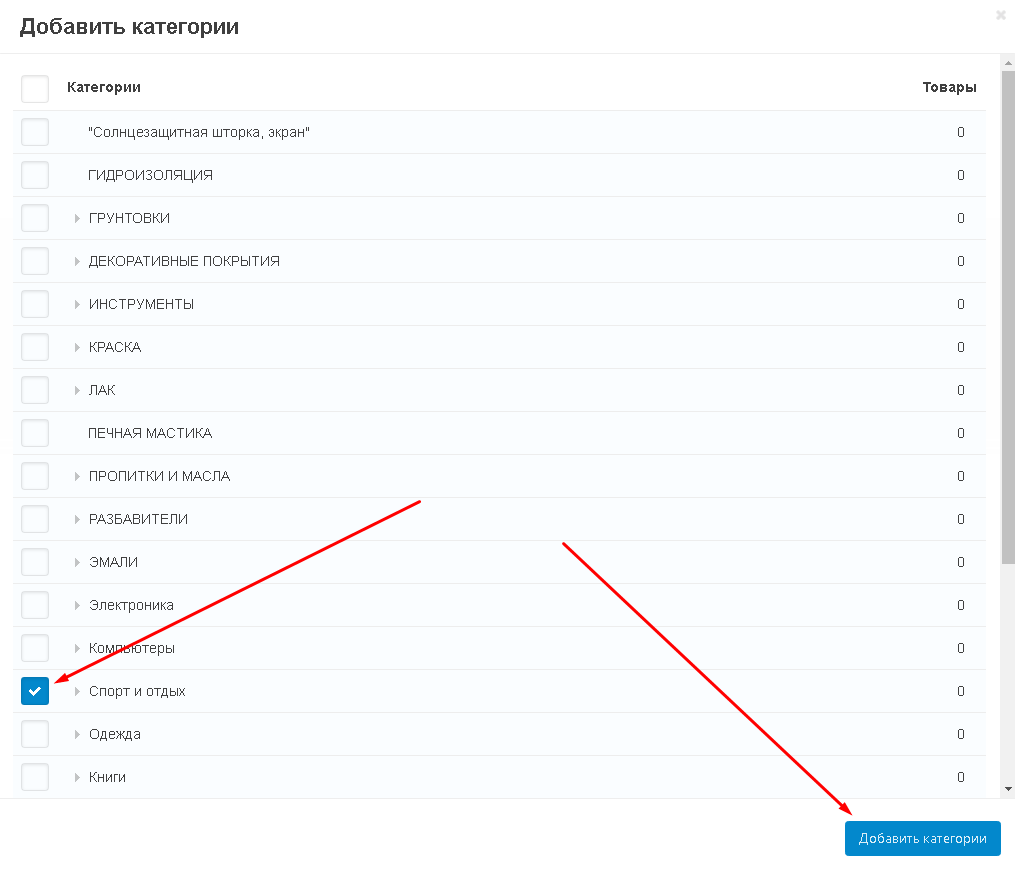
11. In the window that opens, check the box next to the content you want to add. Click "Add Block" in the lower right corner to continue with content selection. Or "Add and Close" if the selection is complete.
12. Complete the block creation by clicking the "Create" button in the lower right corner.
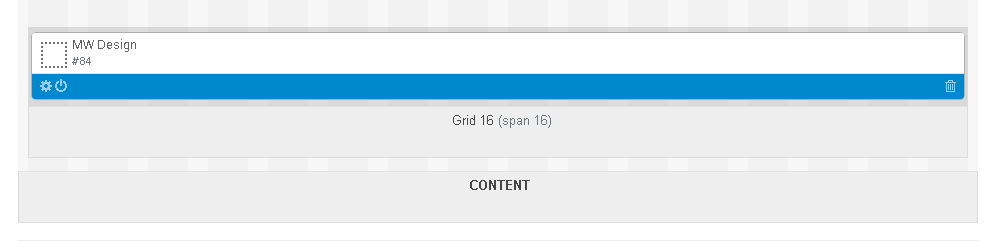
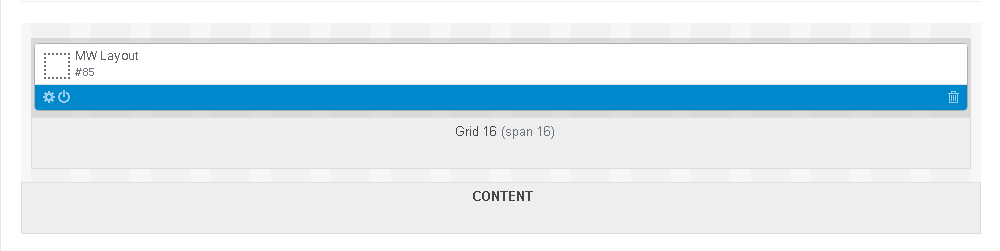
13. The block will appear in the section.
ADD CONTENT LIKE LAYOUT
You can create a separate page for your content. This can be a regular page or a category page.
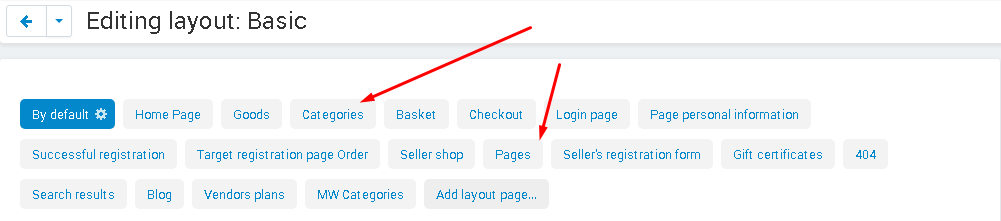
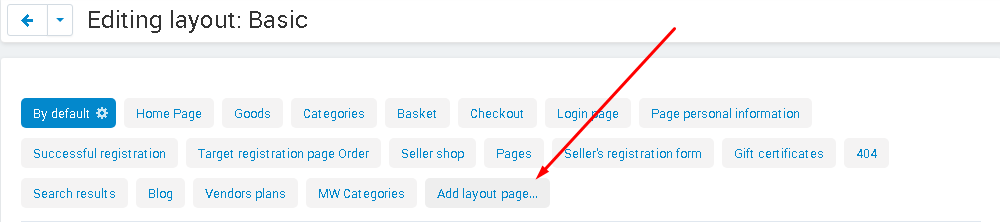
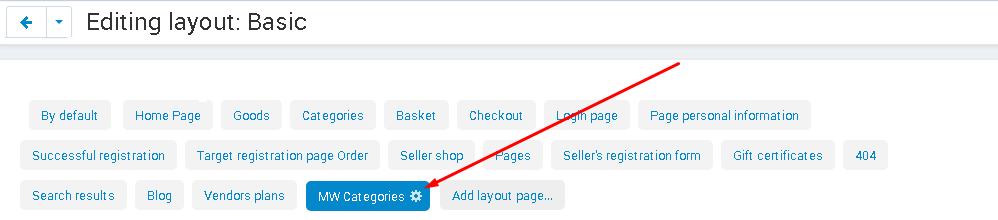
1. On the layout edit page, select the "Add Layout Page" tab.
2. In the page creation window, in the second input field of the "Page" item, enter "pages.view" (if you are creating a page) or "categories.view" (if you are creating a category page) without quotes.

3. In the "Name" field, enter the name of the item. Please note that the items "Title" and "Page title" are different fields. In the first case, this is the internal name of the page, in the second, it will be reflected in the browser window.
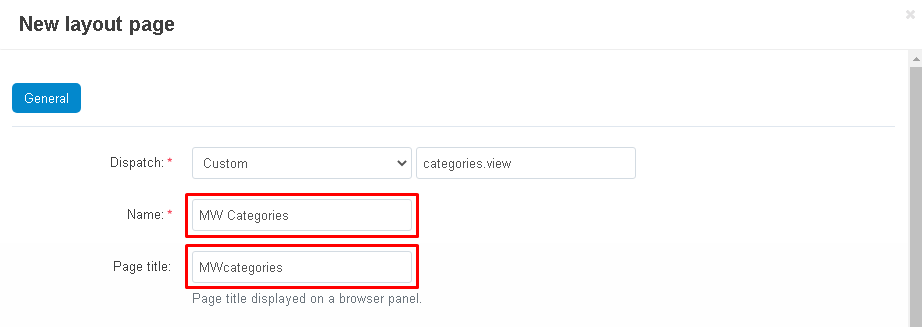
4. When finished, click the blue "New" button in the lower right corner of the window.

5. A new tab will appear in the list. Select it.
6. Scroll down to the "Content" section. Click on the plus button and select the "Add Section" function.

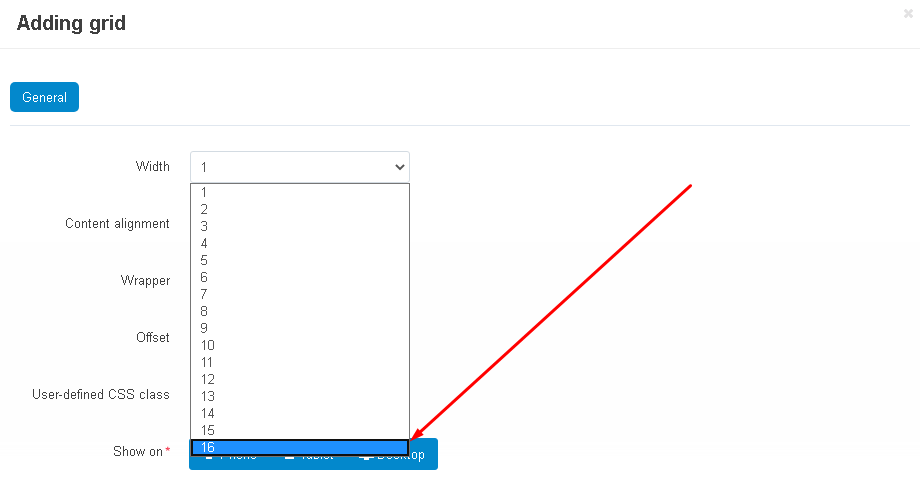
7. In the "General" tab, select "Width" and set the value to "16", since this is the optimal width for this section.
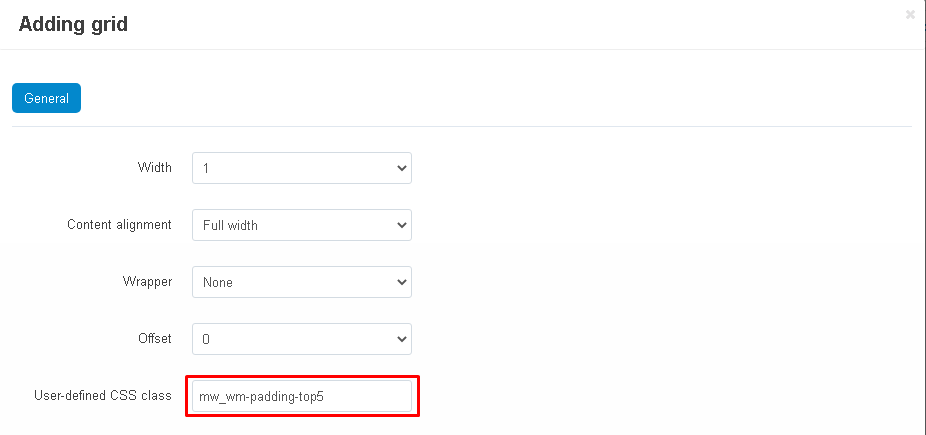
8. If you need to make indents between sections, then in the "Custom CSS class" field, insert the necessary CSS classes without quotes, separated by a space. In order to indent the desired pixel value from 1 to 5, in the name of the below CSS classes, replace the number 1 with the desired one:
"mw_wm-padding-top1" - if you need to indent the top;
"mw_wm-padding-bottom1" - if you need to indent from the bottom;
"mw_wm-padding-left1" - if you need to indent to the left;
"mw_wm-padding-right1" - if you need to indent to the right.
9. To complete the creation process, click on the blue "Create" button in the lower left corner of the window.

10. Move the cursor to the left corner of the created section (it will appear above the "Content" block), click the button in the form of a plus sign and select the "Add block" function.
11. In the window that opens, go to the "Create a new block" tab and select the "MW: HTML Constructor W3" block.
12. The window for adding a block will open. In the "General" tab, enter the name of the block in the "Name" field.
13. Go to the "Content" tab and click the white "Add Block" button in the right corner.
14. A list will appear with the pages loaded from the constructor. Select one or more by ticking them. Or check all by checking the box next to the title.
15. If you added a block and want to return to the content selection, click on the blue "Add" button in the lower right corner of the window. If the selection is complete, click on the "Add and Close" button.

16. Complete the block creation by clicking the "Create" button in the lower right corner.
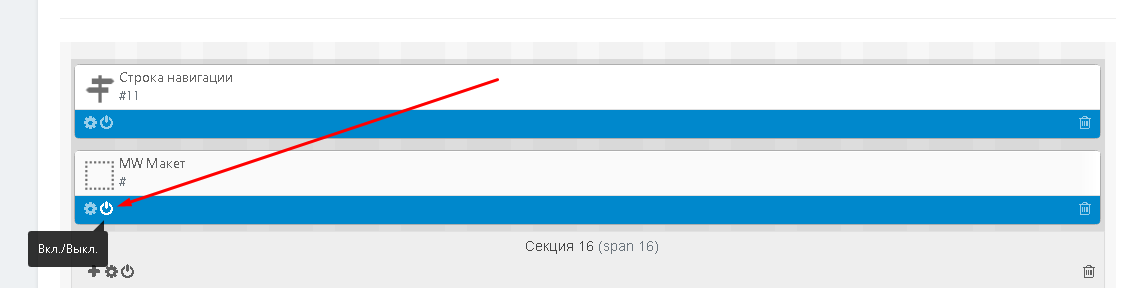
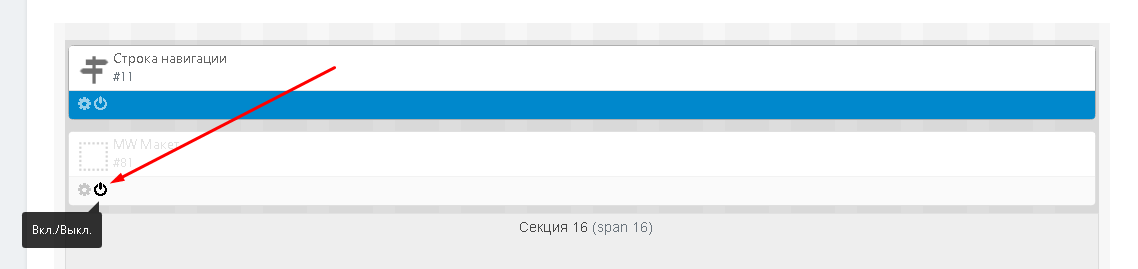
17. The new block will appear in the general layout. Using the buttons, it can be edited or turned off.
BLOCKS IN THE FULL WIDTH
In the meantime, there is no need to worry about it. ”
The "Full Width Blocks" module comes with the kit and is used to stretch blocks to the full width of the screen. If you have the Alexbranding "UhiTheme2" or "YOUPI" modules installed, then you do not need to enable the module.
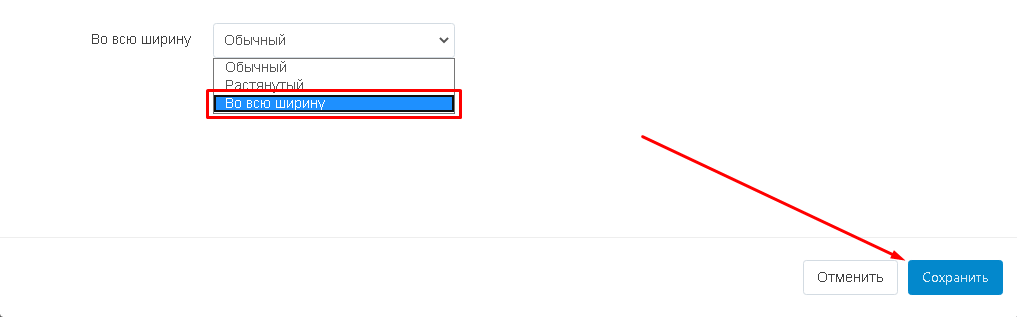
1. To stretch the blocks in full width, go to the settings of the required section.
2. Go to the item "Full Width", expand the additional menu and select the value "Full Width".
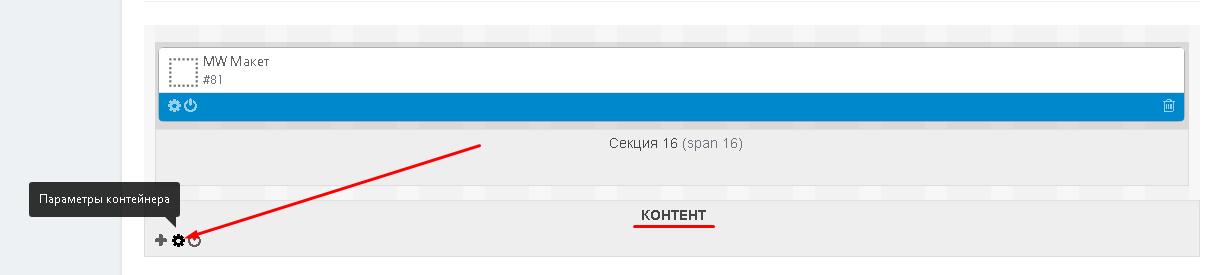
3. Go down to the "Content" container and go to the container settings.
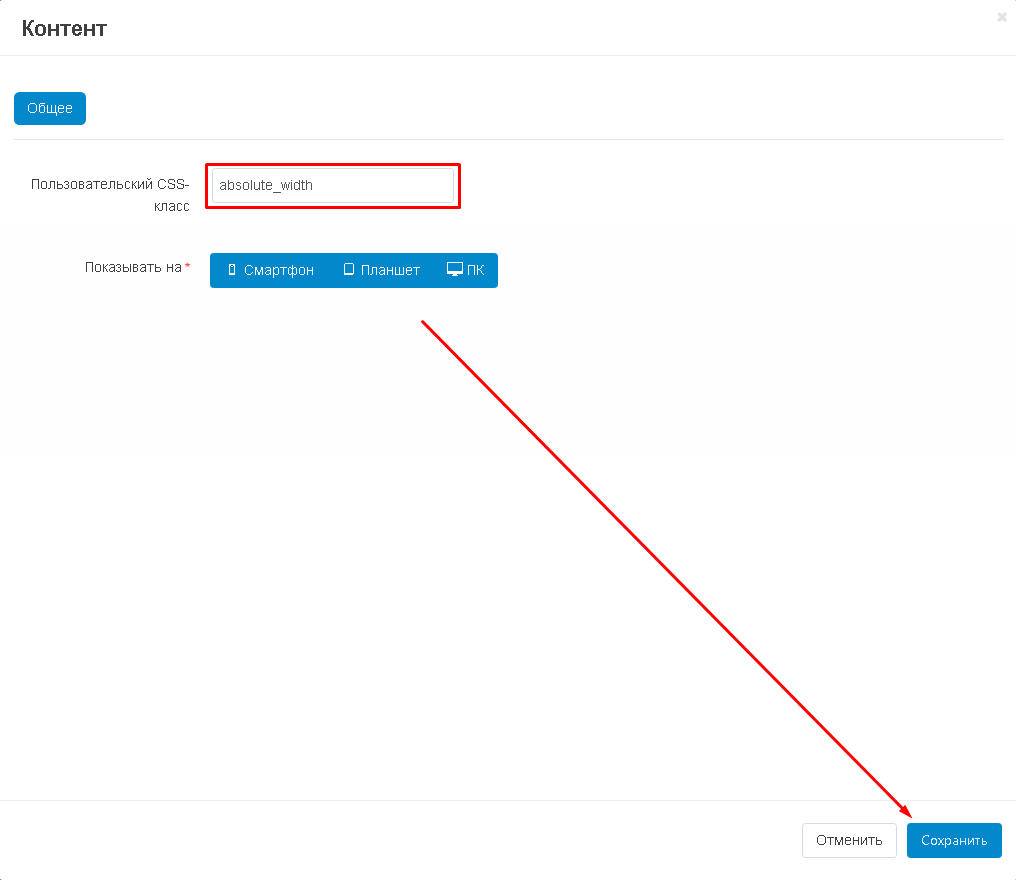
4. Under "Custom CSS Class", write "absolute_width" without quotes.
PUBLICATION OF THE PAGE
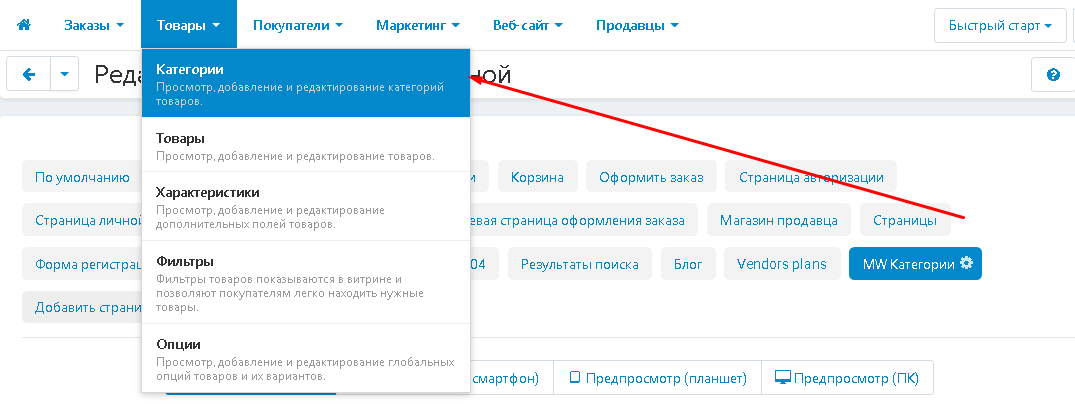
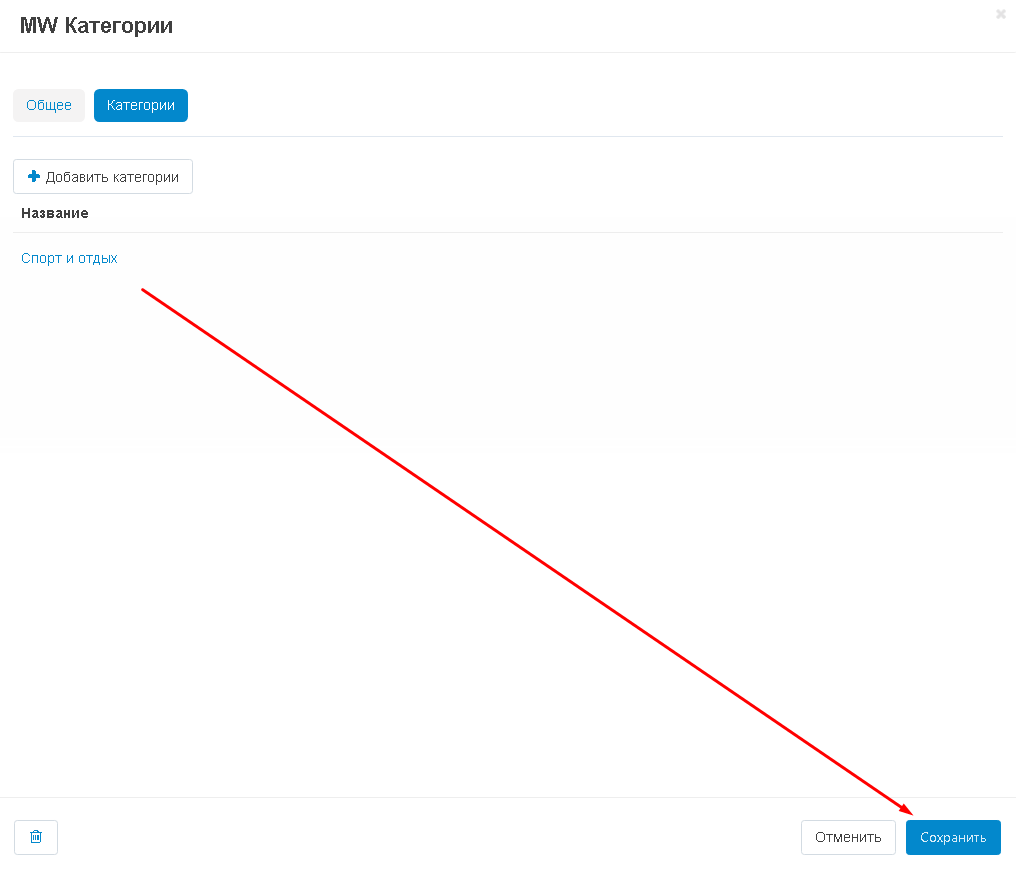
1. To publish the created page, it must be linked to an existing layout. To do this, go to the "Products" tab and select "Categories" (or "Website" - "Pages", if you are publishing a page).
2. Here is a list of all available categories.
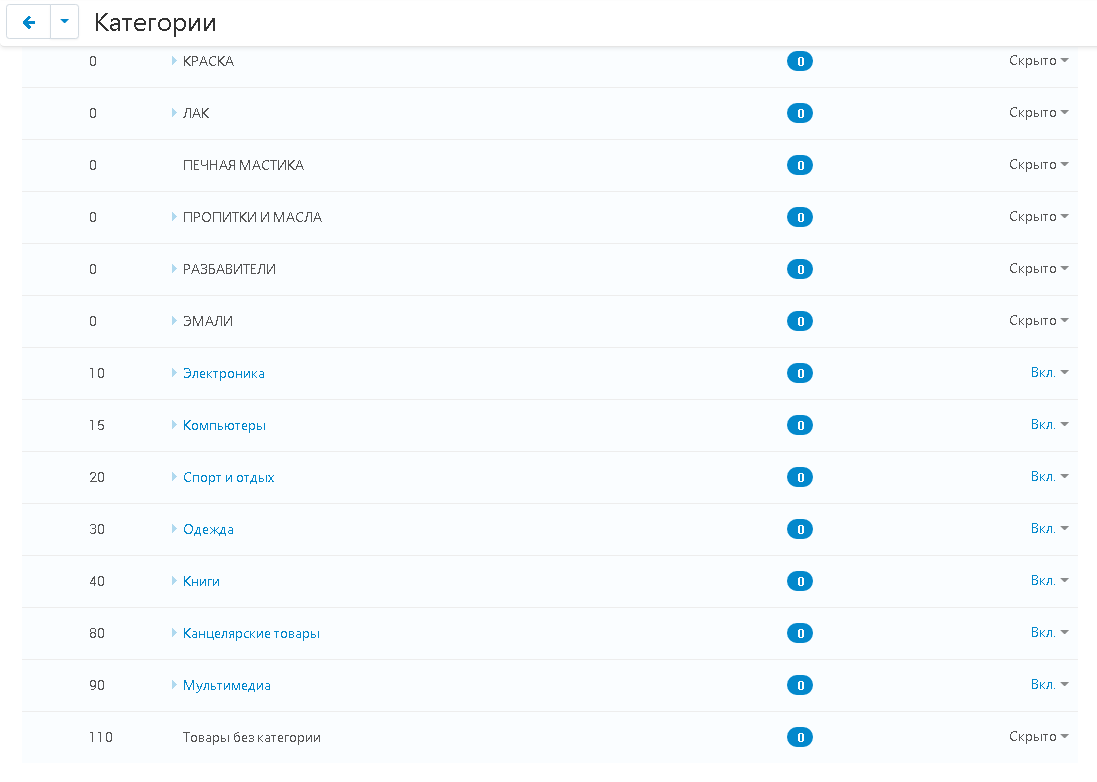
3. In order to bind the created category page to the selected layout, go to its settings by clicking on the gear next to the tab name.
4. Go to the "Categories" tab and click on the "Add Categories" button.
5. Select a category, tick it and click on the blue "Add Categories" button in the lower right corner of the window.
6. Save your changes by clicking on the "Save" button in the lower right corner.
7. The content will be published on a separate page, stretched to the full width of the screen.
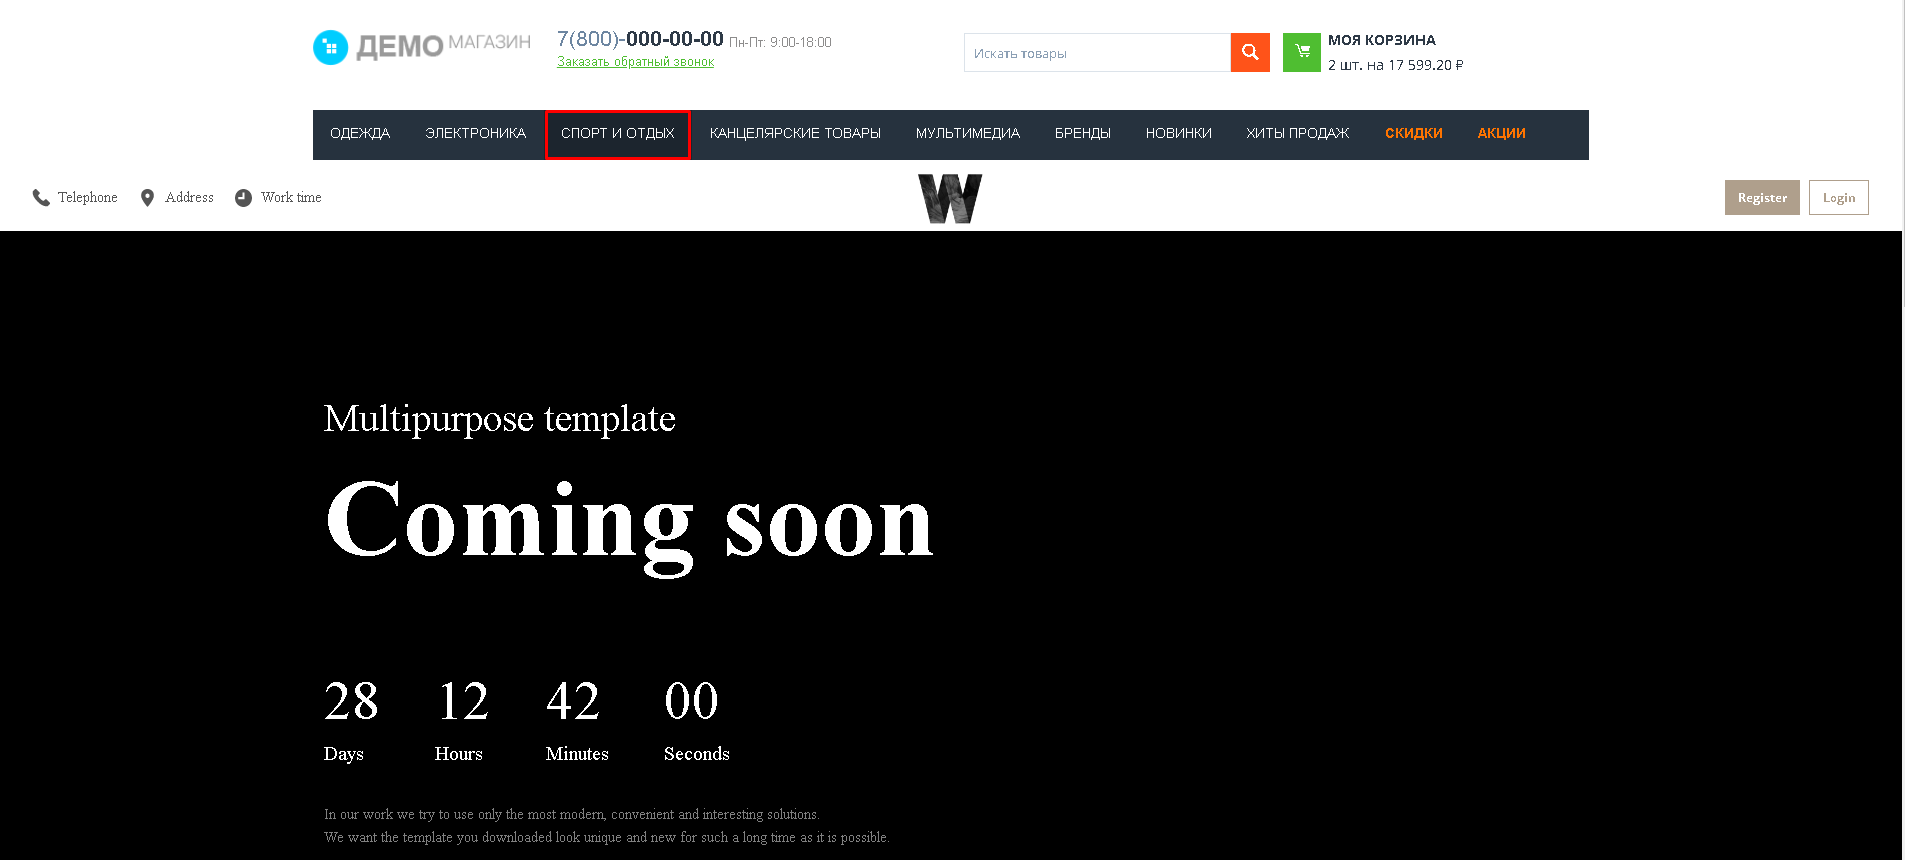
CONTENT FOR INDIVIDUAL CATEGORY
You can also create custom content for a category.
1. Go to the "Categories" tab.
2. Select the section to which you want to add content, click on the plus button and select the "Add block" function.
3. Use an existing block with imported pages from the W3 builder or create a new one.
4. Turn off the unit by pressing the corresponding button.
5. Go to the "Products" tab and select the "Categories" section.

6. Select a category and click on its name to go inside.
7. Go to the "Layouts" tab.

8. Scroll down to the section where the block was added and turn it on.
9. The content will be published on the category page.
10. At the same time, for other categories it will not be applied.
ADAPTABILITY and PREVIEW
1. At any stage of creating a project, you can turn on the preview and look at how the showcase will be displayed on the screen of a phone, tablet or computer. At the bottom of the side menu, there are three buttons that are responsible for this function of the constructor.
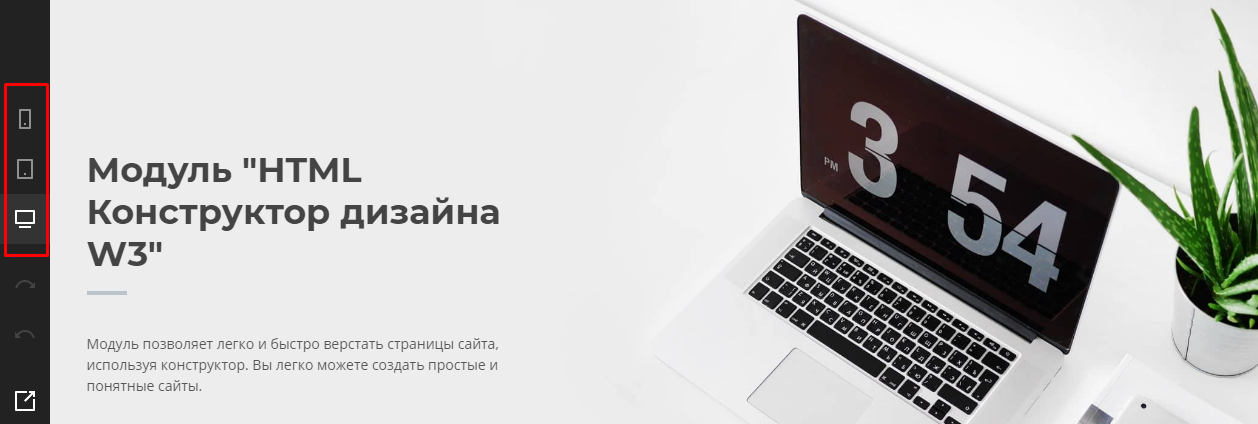
2. By default, the display of the computer screen is set in the constructor. You can switch to it by pressing the button in the form of a monitor (the first one from the bottom).
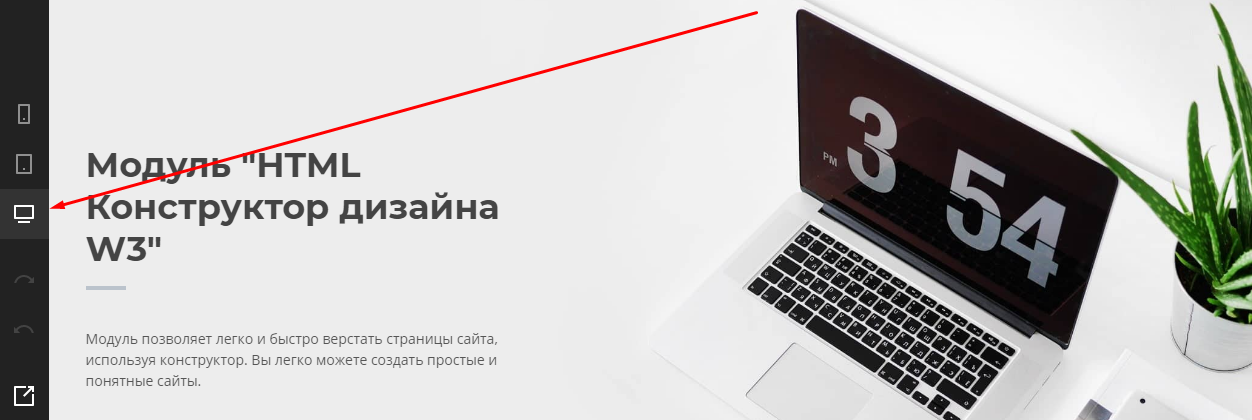
3. To see the tablet mapping, click the tablet-shaped button (second from the bottom).
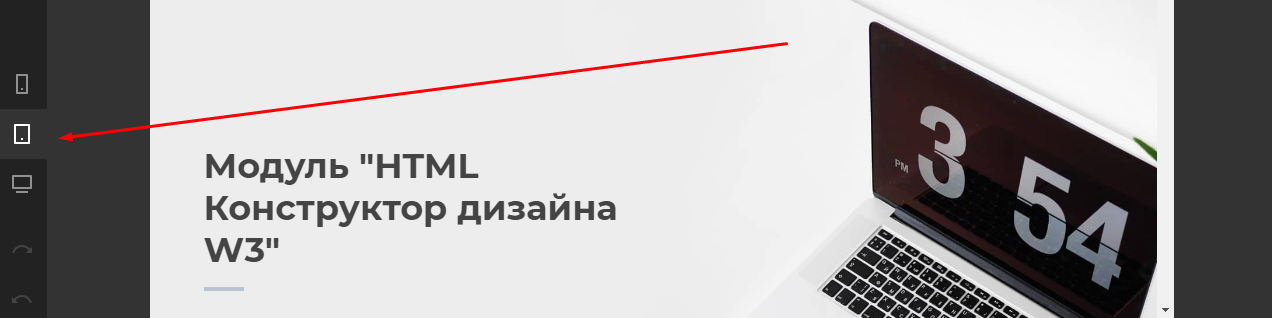
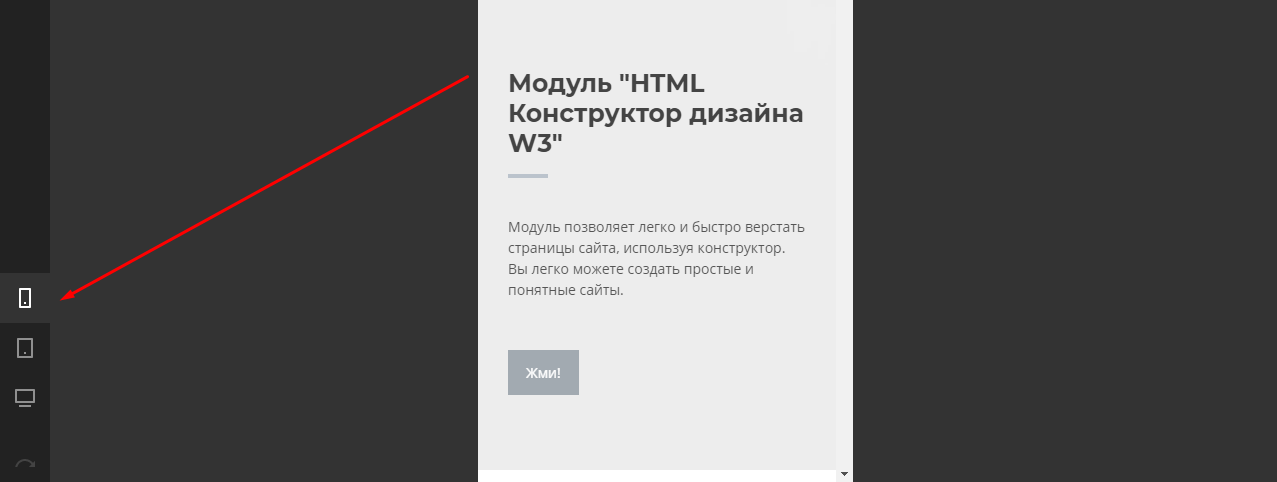
4. To see the display for a mobile phone, click the smartphone-shaped button (third from the bottom).
5. To enable project preview, click on the square-shaped arrow button ("Preview") at the very bottom of the side menu.

NOTES:
1. Names of pages should be no longer than 50 characters without using special characters and Cyrillic, write only in English. The name must start with a Latin letter, it can contain only Latin letters, numbers and underscores.
2. You cannot use special characters and Cyrillic in the form settings for the "Field name" field, write only in English. The name must begin with a latin letter, may contain latin letters, numbers and underscores.
3. Using modal panels is not possible in UniTheme2, YOUPI Theme (it is impossible to close pop-up messages).
4. All data about changes to the project is stored in the browser cache, so if the website or browser is accidentally closed, the computer is turned off or the power is turned off, no data will be lost when opening the designer, the last edited project will be loaded. To open the required project, which is not the last one, you need to press the "Load project" button.
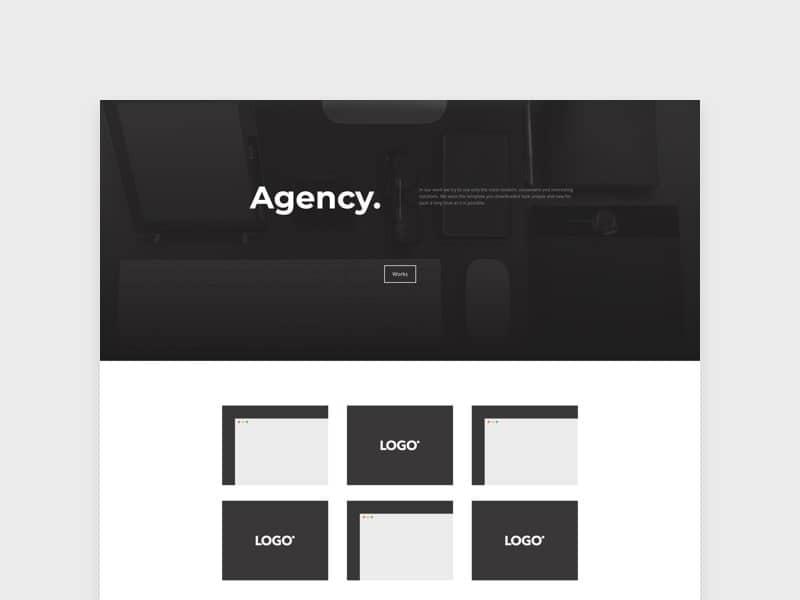
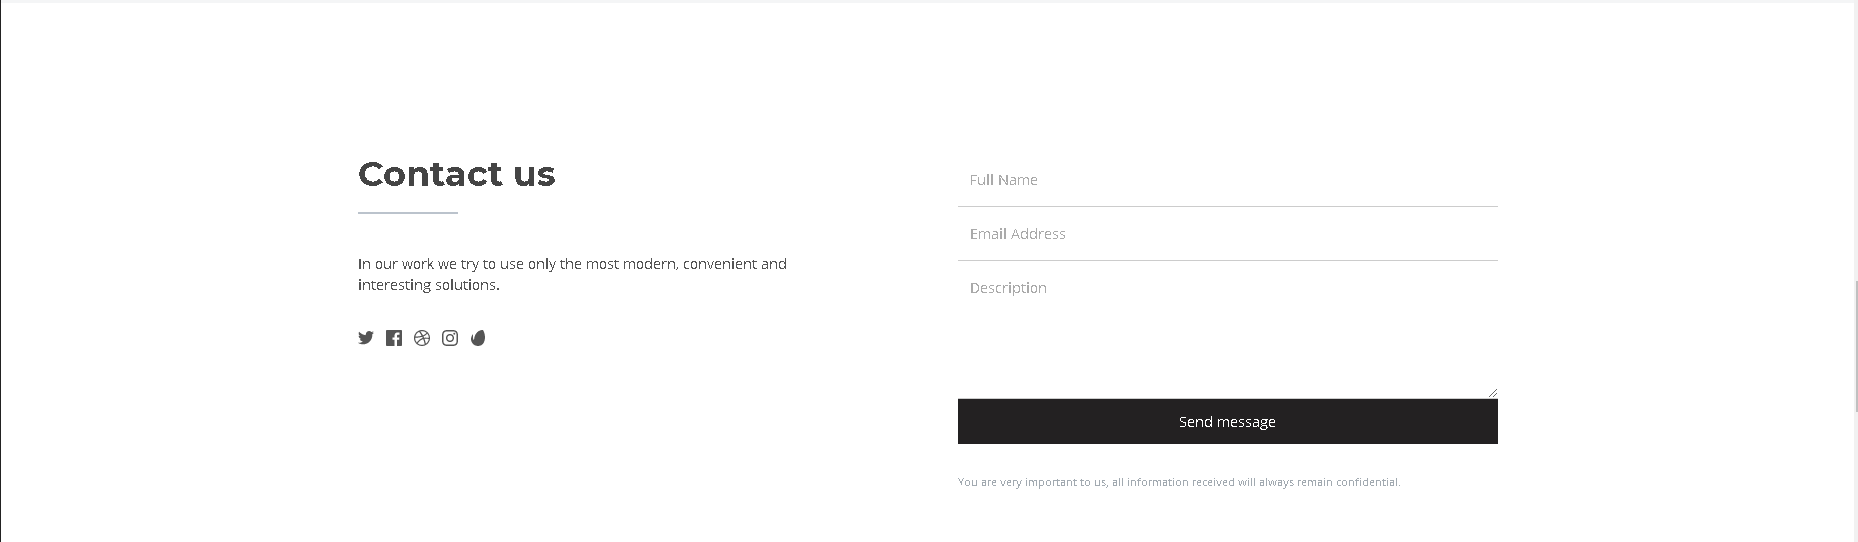
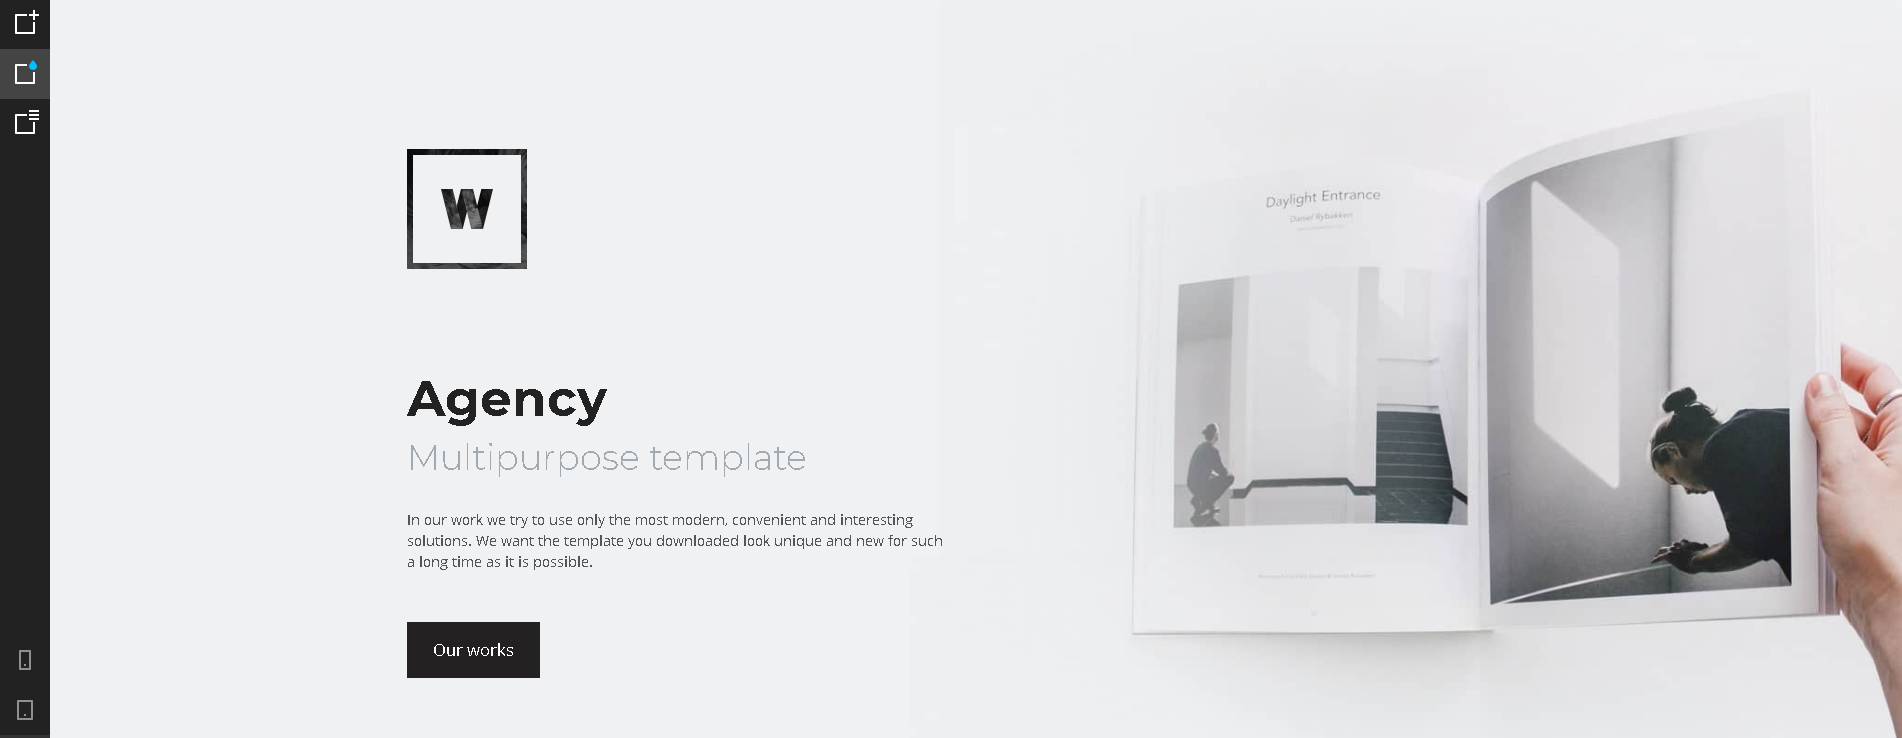
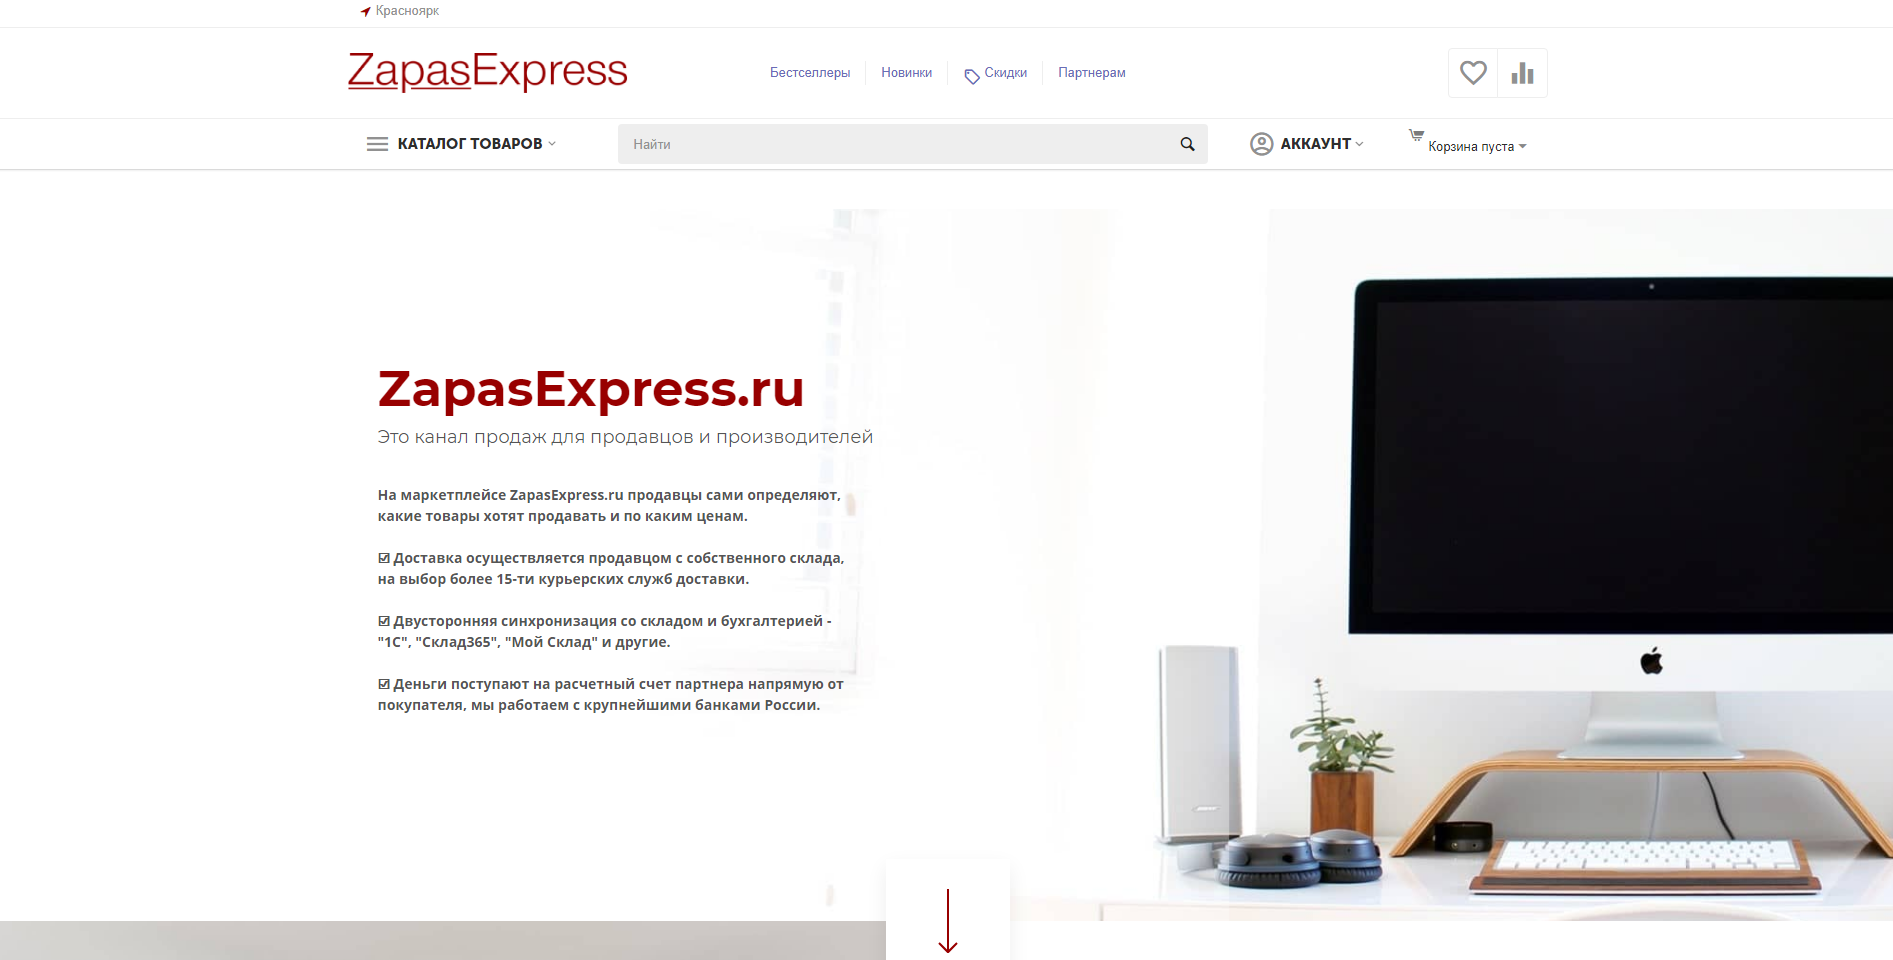
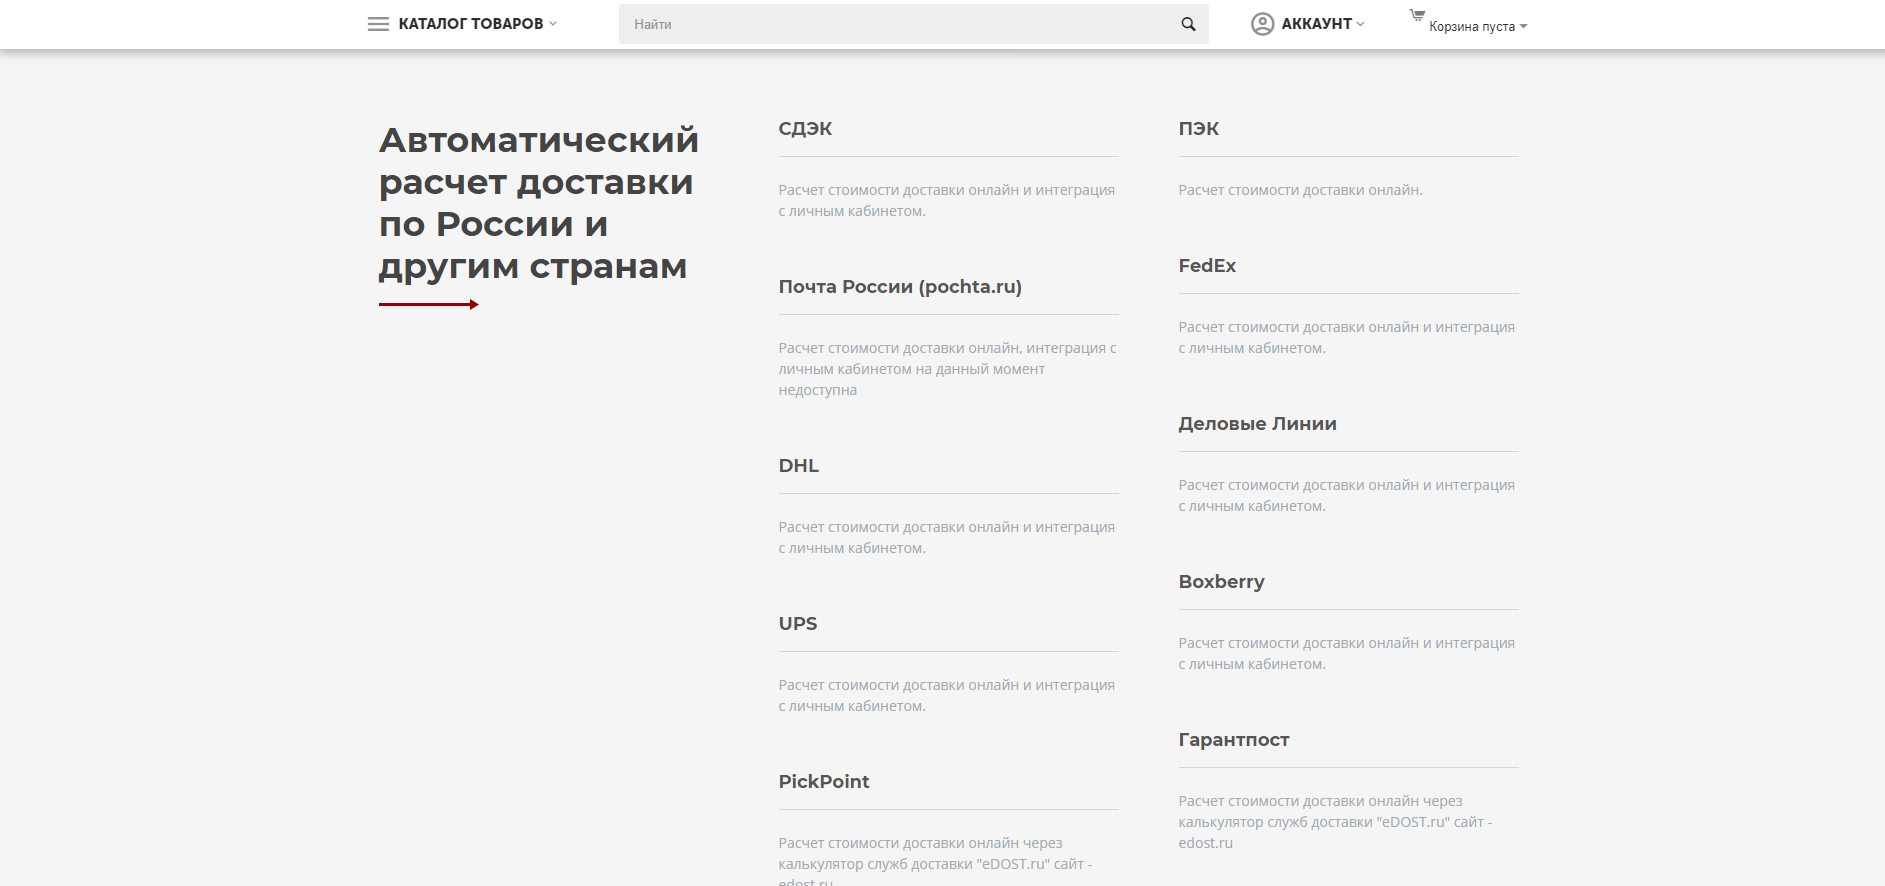
EXAMPLE OF A READY WEBSITE MADE IN THE DESIGNER W3

Relevance of the instruction - v. 1.1.8