Reflection on the Author's Account or Debt
The Module helps to prepare templates of documents necessary for the sale of goods and/or services in advance, as well as to build a hierarchy of documents: the main contract, an additional agreement, an annex to the contract, an invoice, an act, an invoice, and so on.
For one-time links to one-time documents
The offer of one batch of a small company does not require additional help with paperwork: to insure yourself against "fraud". - Count" and reject it to the client. The customer pays for it, receives the delivery, and the transaction is closed. In this case, it is enough to create a template and configure the automatic creation of an invoice for a specific payment method. After placing an order, the invoice will be sent to the client's email automatically. < / p>
Only some companies have higher requirements for document management. Before concluding a transaction, they need to coordinate with the legal department, then sign a workaround sheet with responsible employees for confirmation, and in the final – sign the contract with the head. < / p>
Every time to go through a whole circle is long and laborious. In this case, our module suggests setting up a hierarchy of documents: first you agree and sign the body of the contract, as well as the invoice and invoice for a specific delivery. And for each next delivery, an additional agreement or an appendix to an existing contract, an invoice and an invoice are automatically drawn up. This will avoid the need to go through the entire approval cycle every time. < / p>
Autofill
When creating a document for a specific conclusion, it is possible to automatically fill in the field. To do this, you need to create additional fields that the buyer will fill in when registering or placing an order. In the future, all the necessary information will be taken from them to fill out the contract. < / p>
The author's reflection from various legal dictionaries
Many companies conduct business from diverse activities. For example, sole proprietors and public organizations. This allows us to offer different customers different conditions that are convenient for them. When making a contract using our module, you can choose on behalf of which legal entity to make this particular contract. < / p>
With our modules, working in the B2B sector becomes much easier and more enjoyable. The execution of contracts and other documents takes a few seconds. The one who remembers the time and makes a profit.
< / p>
CONTACTS
Up-to-date information about changes in the functionality of the module, as well as compatibility with other modules, is published in our Telegram channel and in the group VKONTAKTE
Telegram t.me/maurisweb
VKONTAKTEvk.com/maurisweb
You can submit a request to the support service, ask questions to the managers about the work or completion of the module via messengers, the groupVKONTAKTE and mail.
- WhatsApp +7-923-364-90-07
- Telegram t.me/mauriswebru
- Telegram +7-923-364-90-07
- VKONTAKTEvk.com/maurisweb
- E-mail: info@maurisweb.ru
Detailed instructions for working with the module
The instruction is current at the time of publication. The module is regularly updated and improved. There may be minor differences in the control of the module.
Contract execution for Multi-Vendor
The module enters into a contract with the vendor on the condition of using the marketplace. The contract is formed from the seller's personal account. The seller can form a contract for the buyer on behalf of his legal entity (functionality is added through privileges).
Legally, the contract can be drawn up in such a way that the fact of payment of the invoice is an agreement with the terms and the contract is considered concluded. This reduces the workload of document management (consult a lawyer).
SCOPE OF APPLICATION
Suitable for forming contracts, invoices, acts, invoices, etc.
APPLICATION EXAMPLE
- Execution of a contract for services;
- Invoice for payment;
- Certificate of completed works, etc.
TECHNICAL SPECIFICATIONS
- Forms templates of contracts, acts, invoices, etc. and their components;
- Makes it possible to form a multi-level agreement: a basic agreement + an addendum to the current agreement + an invoice + an act or invoice. The hierarchy of documents is formed in a free form, according to the requirements of business processes;
- Generates a contract in PDF format, and archives it page by page in JPG format;
- Supports the function of sending the contract by e-mail.
It is possible to form several types of contracts of different levels:
- sole proprietor, LLC or legal entity (for the initiator of the contract);
- for sole proprietor, LLC (for the recipient of the contract);
- for goods of groups of goods or services.
For information about compatibility with other modules, see the product features
For Multi-Vendor-https://maurisweb.ru/programmy...
MODULE SETUP
1. After installing the module, go to the "Modules" tab, select "Module Management" and "MAURISWEB" from the drop-down menu.

2 . In the list that opens, select the module "MW: Contract Execution" and click on its name, highlighted in blue or black.

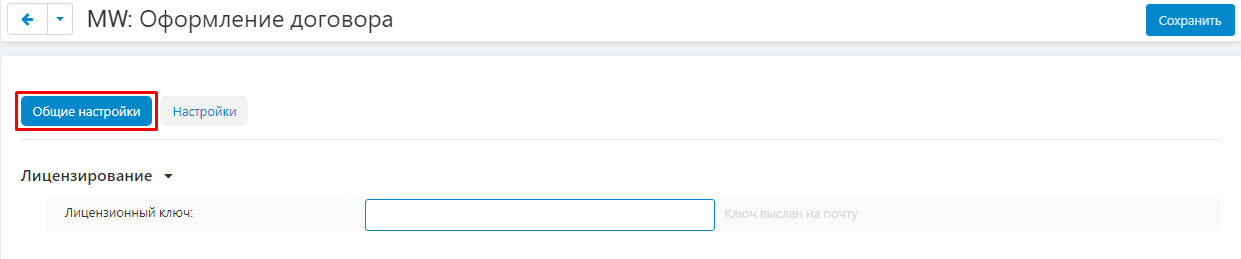
3 . On the page that opens, select the "General Settings" tab.If the license key is not set automatically and the module settings are blocked, log in to your account at www.maurisweb.ru copy the license key and paste it into the appropriate item. The key has also been sent to your email.
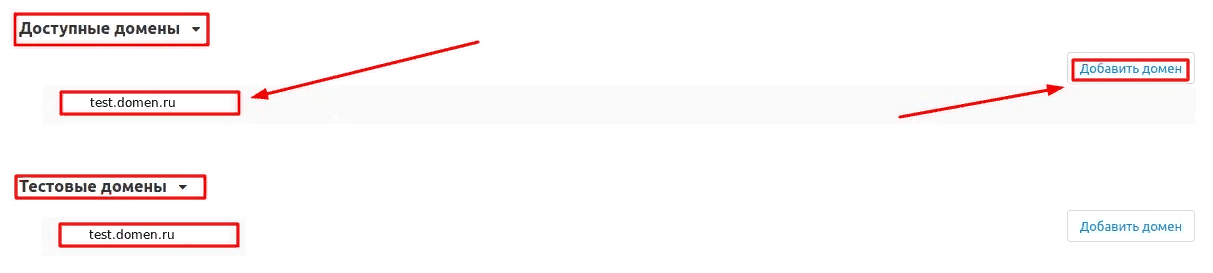
4. In the "Available domains" and "Test Domains" sections, check the validity of the specified domains. You can add additional domains by clicking on the white "Add Domain" button on the right side of the page. The total number of domains should not exceed three.
5. Go down below, select the "Basic Settings" section and tick the "Save data when deleting the module" option so as not to lose them when reinstalling the module.

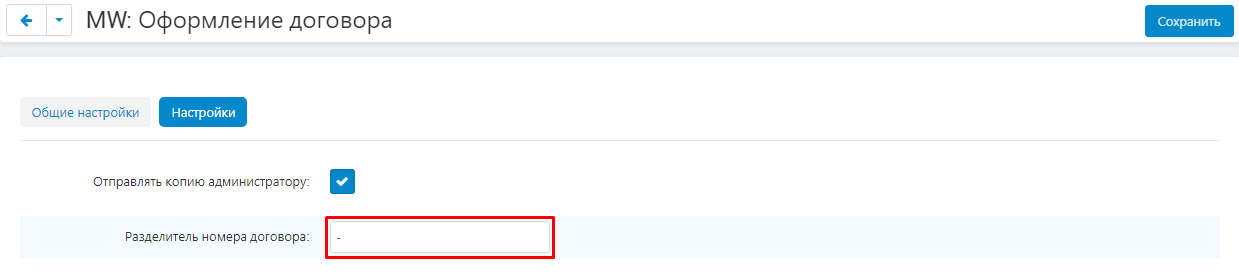
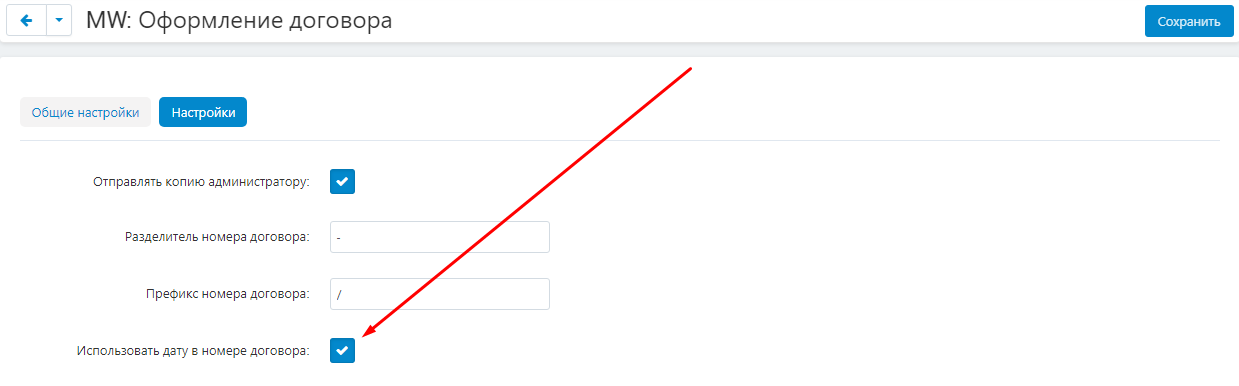
6. Go to the "Settings" tab and check the box "Send a copy to the administrator" if you need to send a copy of the contract to the administrator in the future.

7. In the item "Contract number separator", enter the sign of the contract number separator.
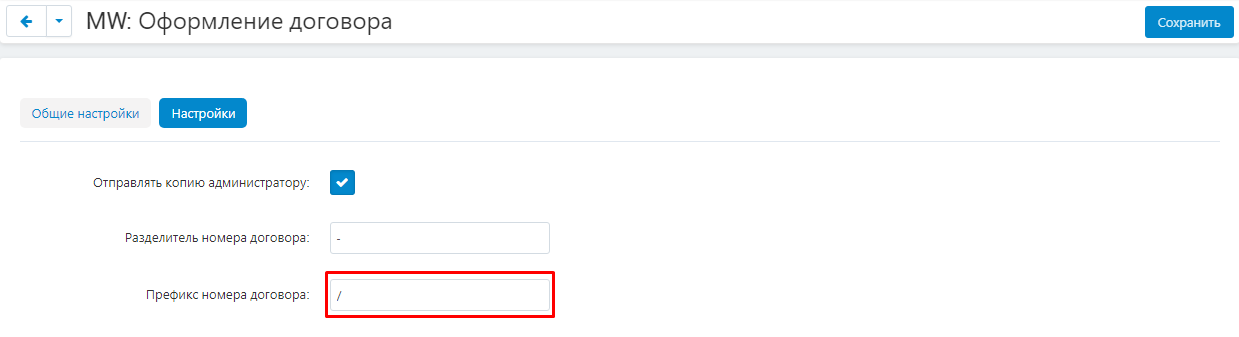
8. Enter the prefix of the contract number in the corresponding paragraph.
9. To use the date in the contract number, check the appropriate box.
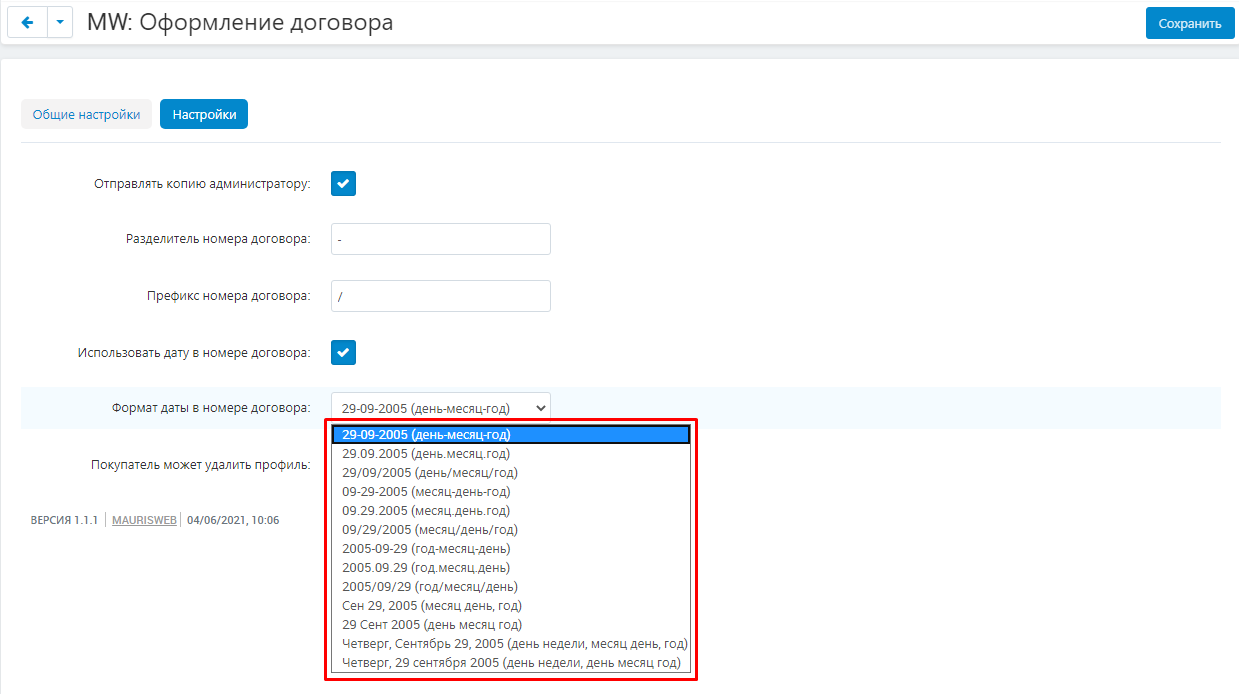
10. Expand the additional menu in the item "Date format in the contract number" and select the option that will be used in the contract.
11. To give the buyer the opportunity to delete the profile, check the appropriate box.
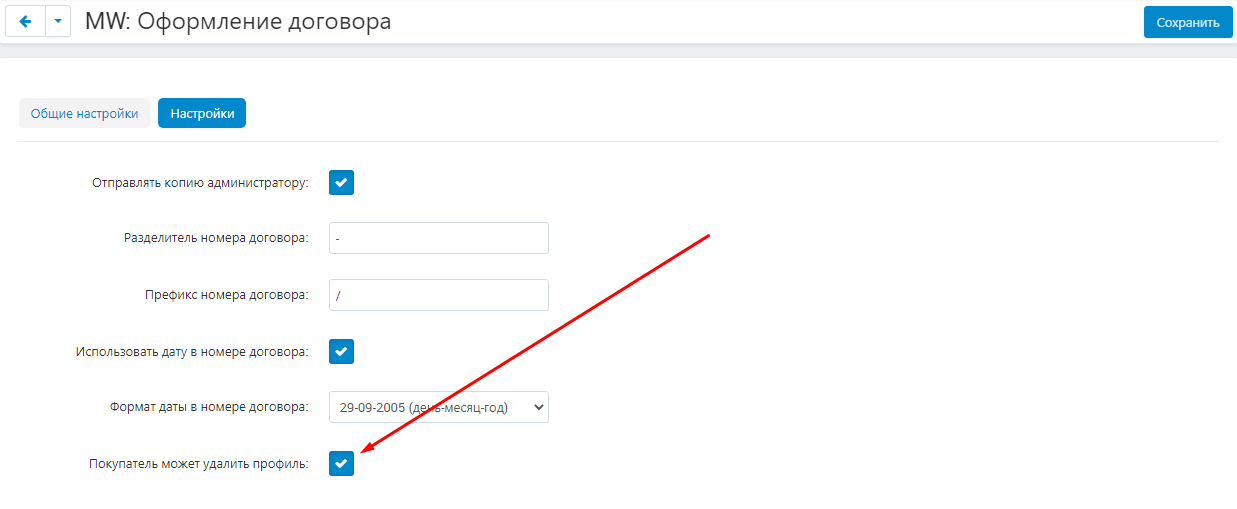
12. Save the module settings by clicking on the blue "Save" button in the upper right part of the panel.

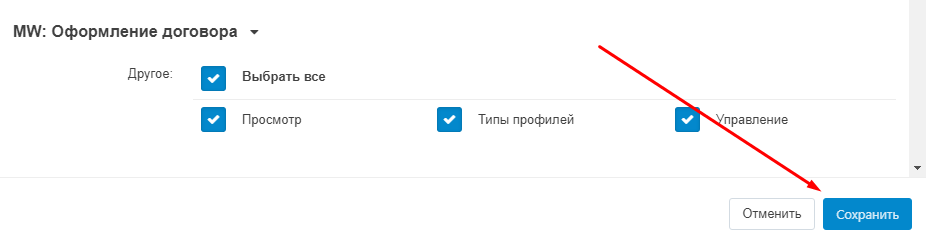
PRIVILEGES
1. To configure privileges, go to the "Buyers" tab and select the "User Groups" section.

2 . In the list that opens, select the desired group and click on its name highlighted in blue.

3 . In order for the user to have access to the module's functions, in the window that appears, go to the section "MW: Contract Execution". You can check all the items by checking the "Select all" box or select the items that you want to grant access to the administrator: "View", "Profile types", "Management".
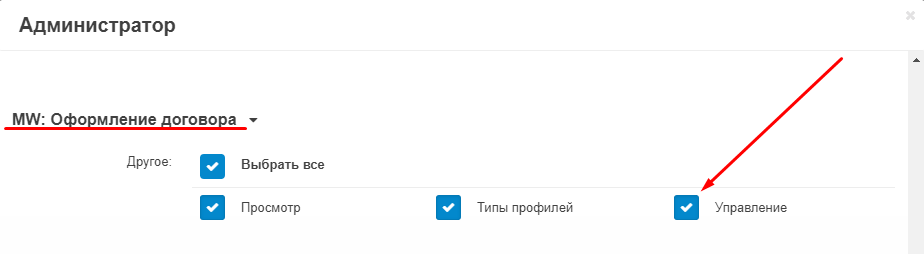
4 . Save the module settings by clicking on the blue "Save" button in the upper right part of the panel.
MODULE FUNCTIONALITY
Before you draw up a contract, you must first create all its components. They are variables, snippets, and templates.
CREATING A VARIABLE
A variable is a part of the text that is repeated many times in the text and can be replaced in the future.
1. To create variables, go to the "Modules" tab, in the drop-down menu, select the "Contract Execution" section, the "Variables" subsection.
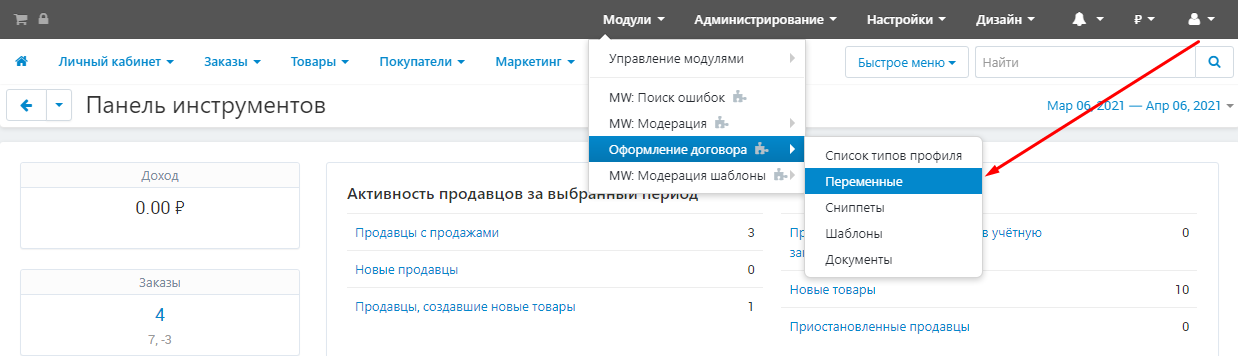
2. To create a new variable, on the page that opens, in the upper-right corner of the panel, click the blue button with a plus sign.

3. Go to the "General" tab and enter the name of the variable in the "Name" field.
Please note that the items with an asterisk are mandatory!

4. In the "Variable type" field, select one of the two available options:
"Text" - for text variables;
"Date" - for variables in date format.

5. Click the blue "Create" button in the upper right corner of the panel to create a variable.

CREATING A SNIPPET
A snippet is a small template that can later be inserted into the main template or text.
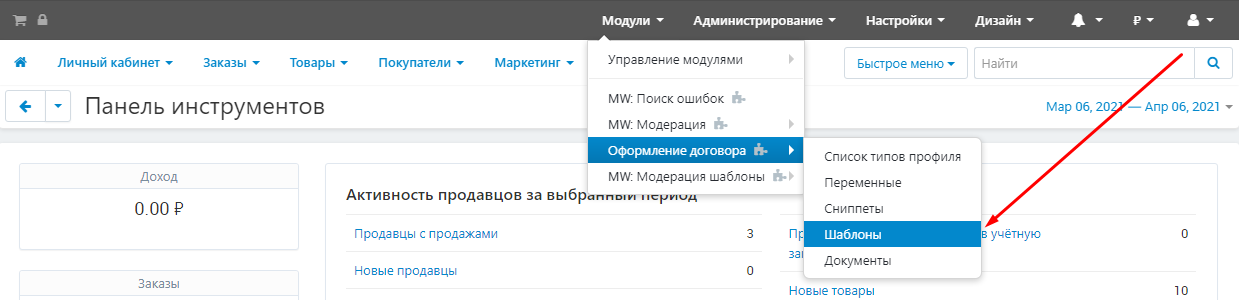
1. To create snippets, go to the "Modules" tab, select the "Contract Execution" section and the "Snippets" subsection.
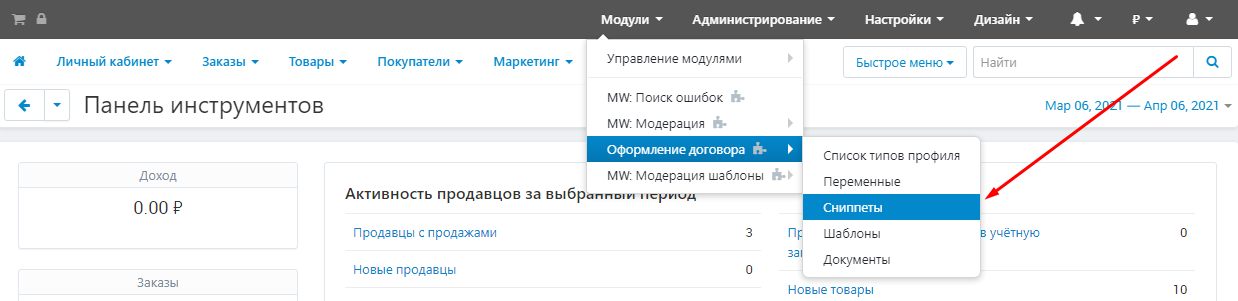
2. To create a new snippet, on the page that opens, in the upper-right corner of the panel, click the blue button with a plus sign.

3. Enter the name of the snippet in the "Name" field.

4. In the Snippet Type field, select one of the three available options:
"Template" - a small part of the text, information that can be inserted into the text of the contract;
"Table of goods" - a table of goods that is attached to the contract;
"Seal" - the seal of the organization that can be inserted into the contract.
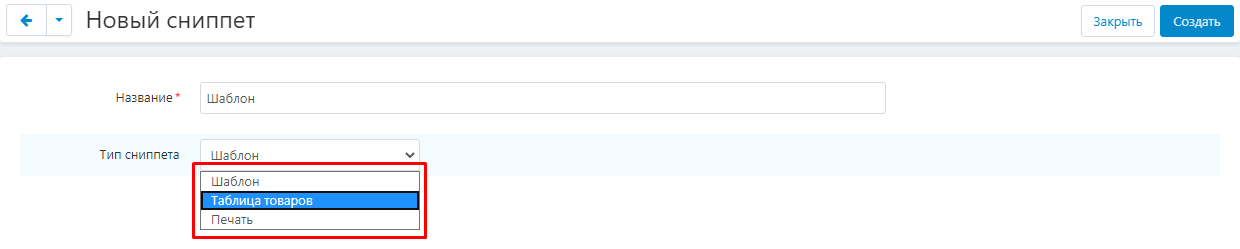
5. Click the blue "Create" button in the upper right corner of the panel to create a snippet. After that, additional tabs corresponding to the selected snippet type will open.

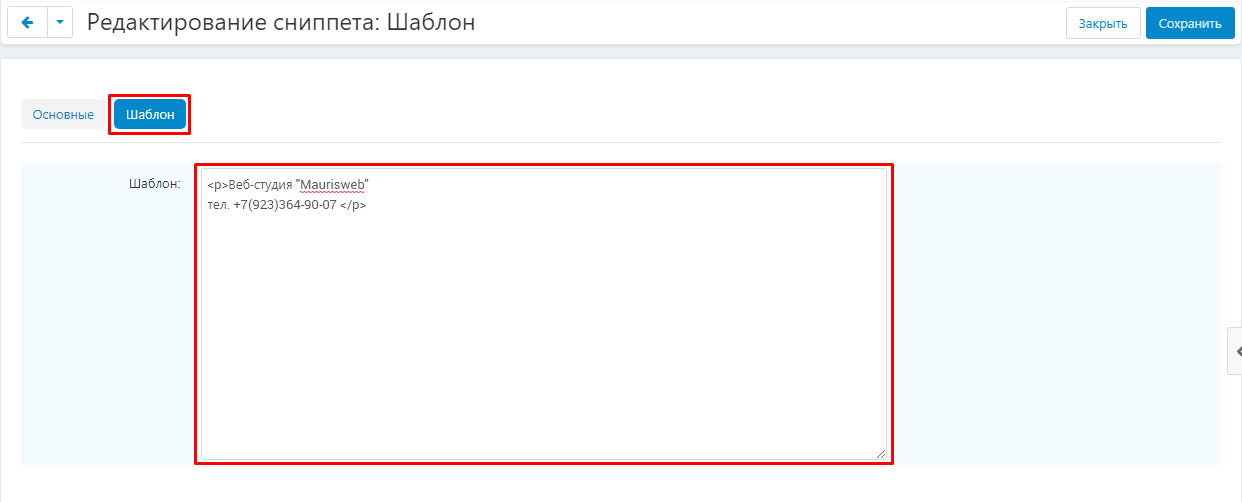
5.1. Type "Template" is a small text template that can be used several times in the text (for example, contact details).
To enter the template text, after selecting this type of snippet in the "General" tab, go to the "Template" tab and enter your text in the appropriate input field.
5.2. The "Table of goods" type allows you to add a table with goods to the text of the contract. To do this, go to the tab with the name of the snippet being created and click on the white "Add column" button.

5.2.1. In the window that opens, enter the name of the new column in the "Name" field.

5.2.2. In the "Template" field, enter the data that will be displayed in the column. To do this, you can use the variables that are located right there in the corresponding section. To select a variable, click on its name highlighted in blue and it will appear in the "Template" field.
5.2.3. Save the data by clicking on the "Create" button in the lower right corner.
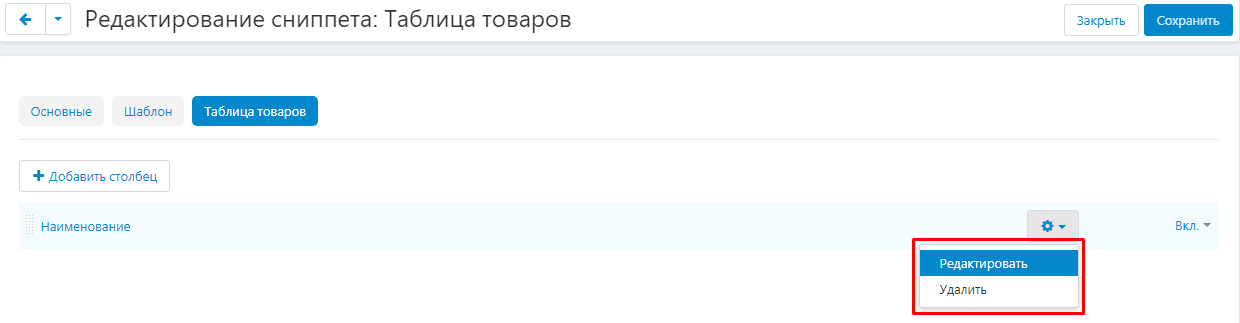
5.2.4. The created column will appear in the list. You can edit it by clicking on the button in the form of a blue gear, which will appear when you hover the cursor over the right side of the line.
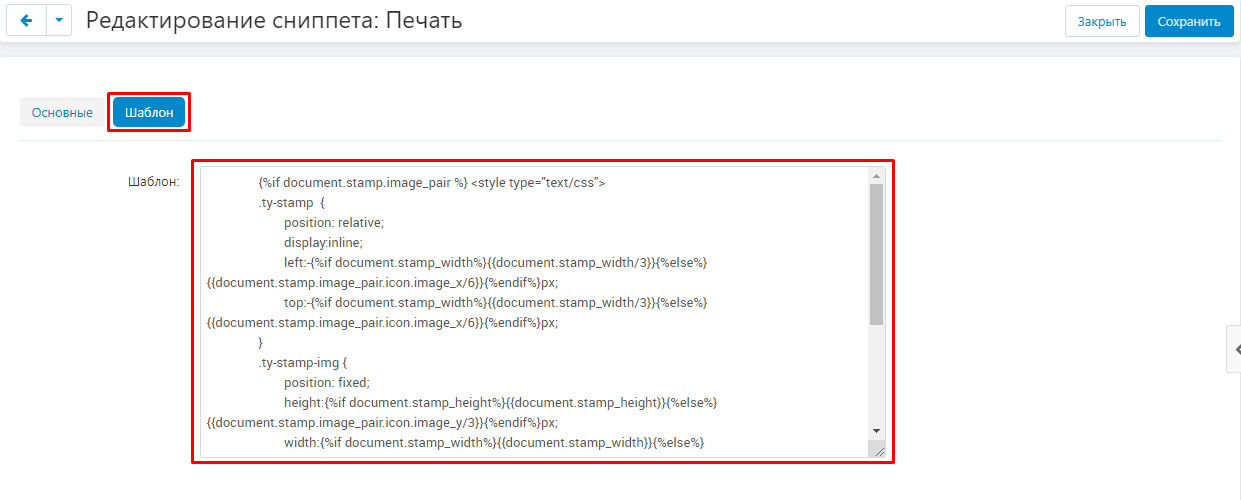
5.3. Type"Print" is used to add a seal to the contract and set its location. To do this, go to the "Template" tab. By default, the print location settings are already set here, but they can be changed manually if necessary.
6. In the upper right corner of the panel, click the blue "Save" button to save the changes.

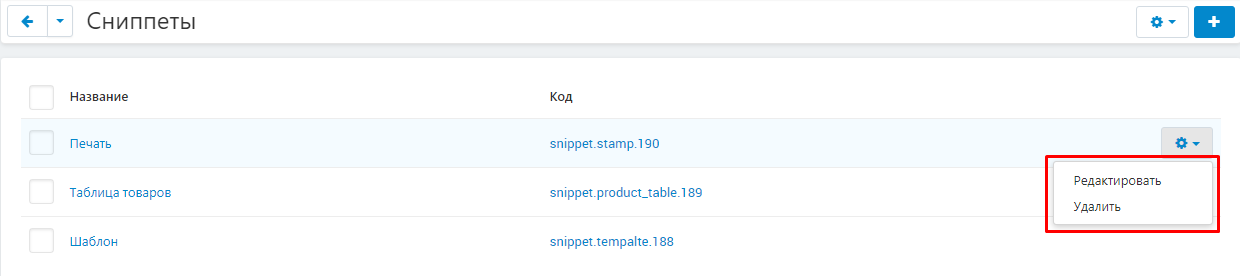
7. To delete or edit the created snippet, click on the button in the form of a blue gear on the right side of the line and select the desired function.
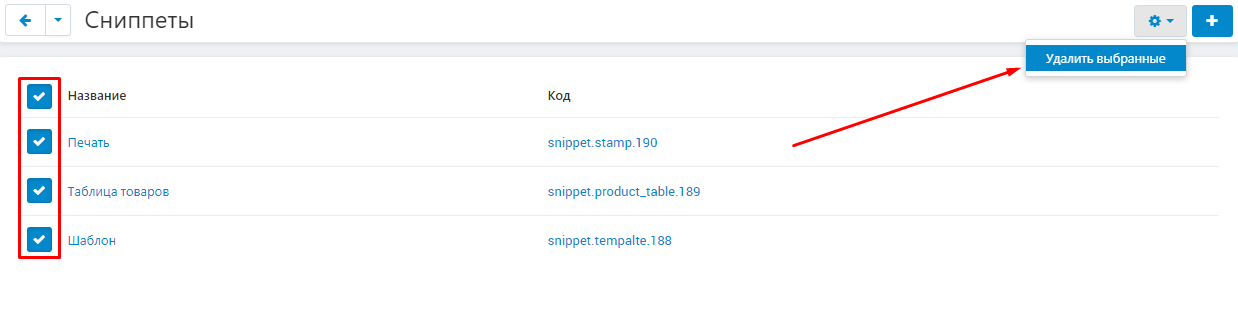
8. To delete several snippets, select them by ticks, click on the button in the form of a blue gear in the upper right corner and select the "Delete selected" function.
CREATING A TEMPLATE
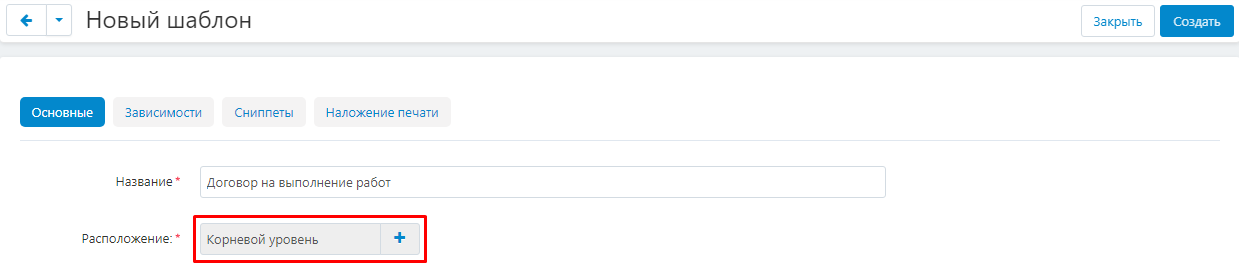
1. To create a template, go to the "Modules" tab, select the "Contract Execution" section and the "Templates" subsection.
2. To create a new template, on the page that opens, in the upper-right corner of the panel, click the blue button with a plus sign.

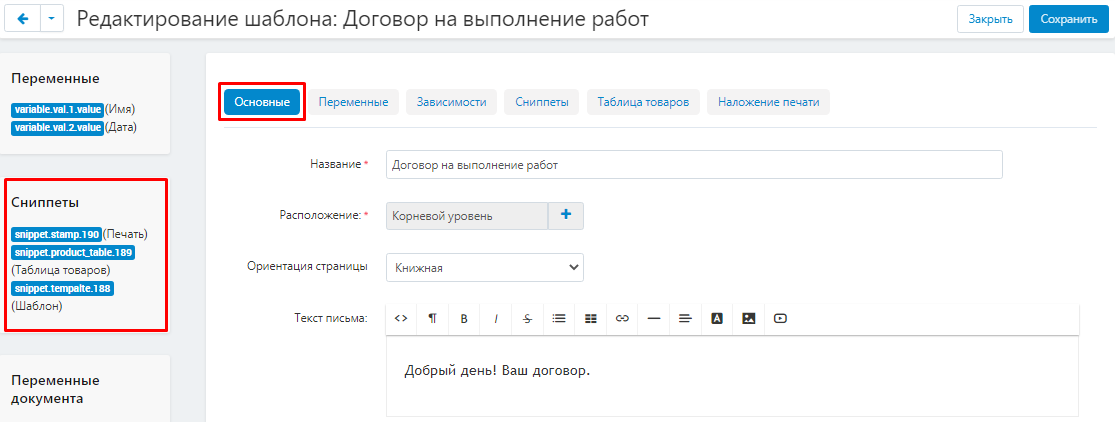
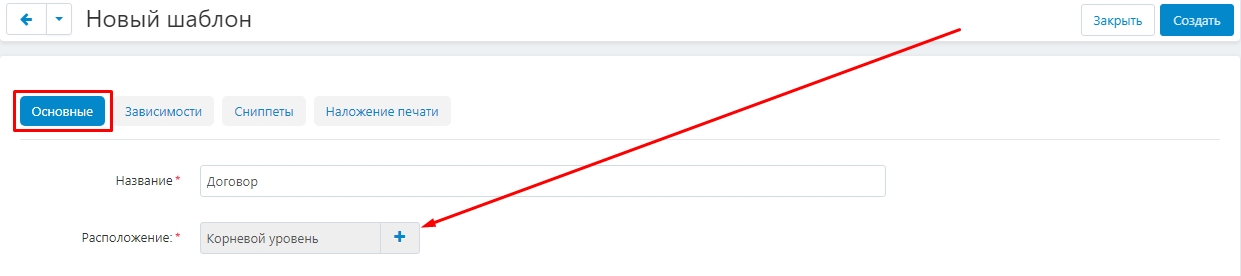
3. Select the "Basic" tab and enter the template name in the "Name" field.

3.1. By default, the page is linked to the root level. In the "Location" item, you can select another page. To do this, click on the plus sign and change the location of the page (see the section "Multi-level agreement").
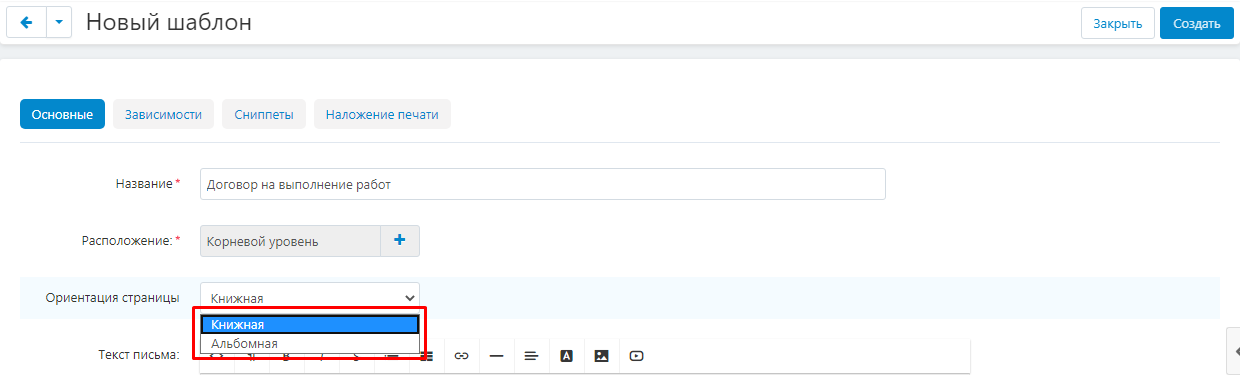
3.2. In the "Page orientation" item, select the page orientation option: "Portrait" or "Landscape".
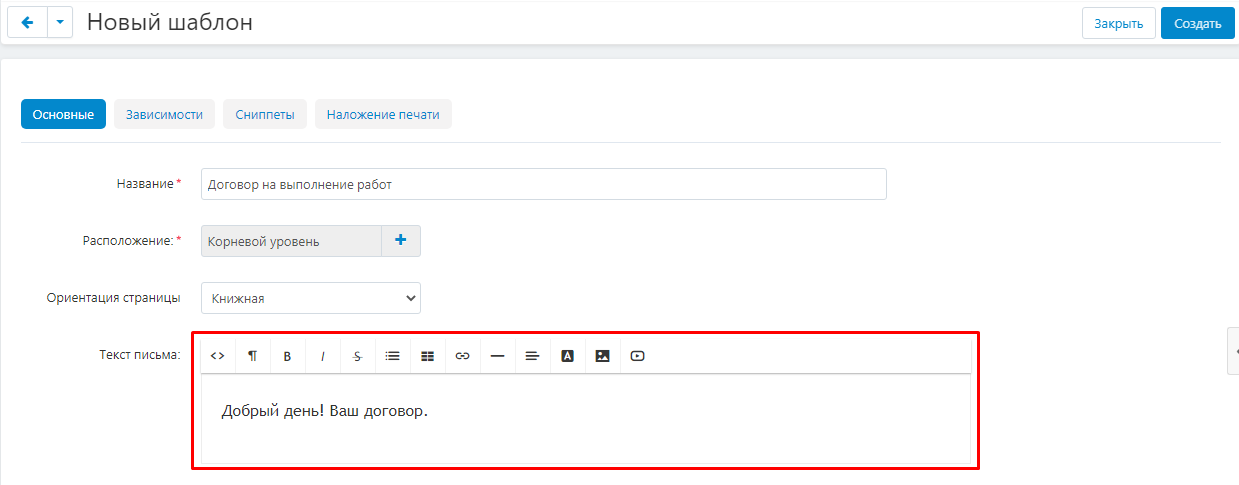
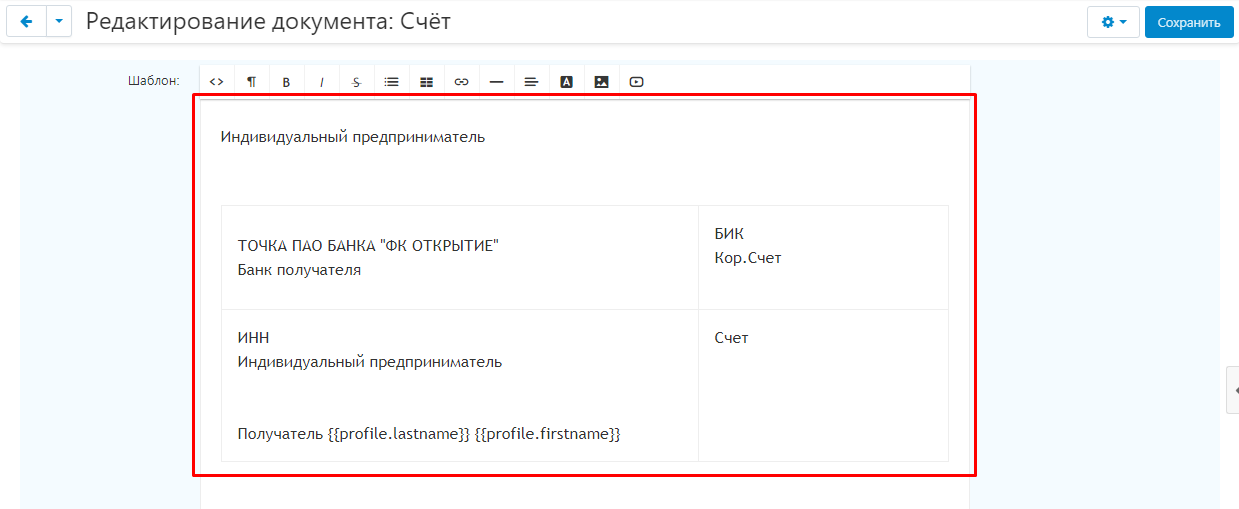
3.3. In the "Letter text" field, enter the accompanying text to the contract.
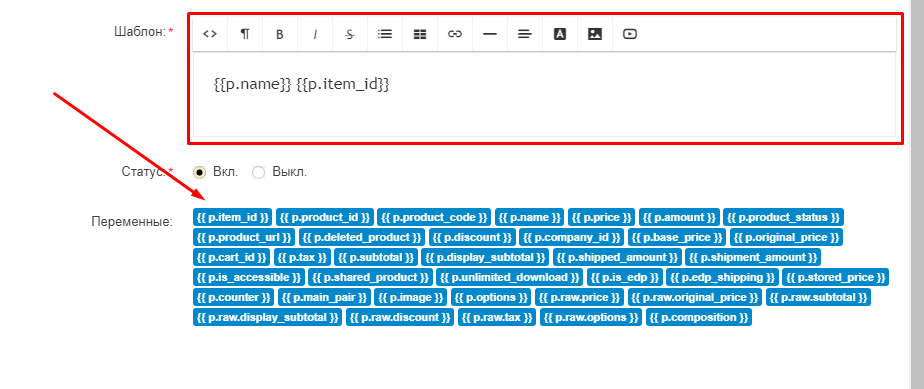
3.4. Go to the "Template" field and enter the text of the contract. You can adjust the text using standard text editors.
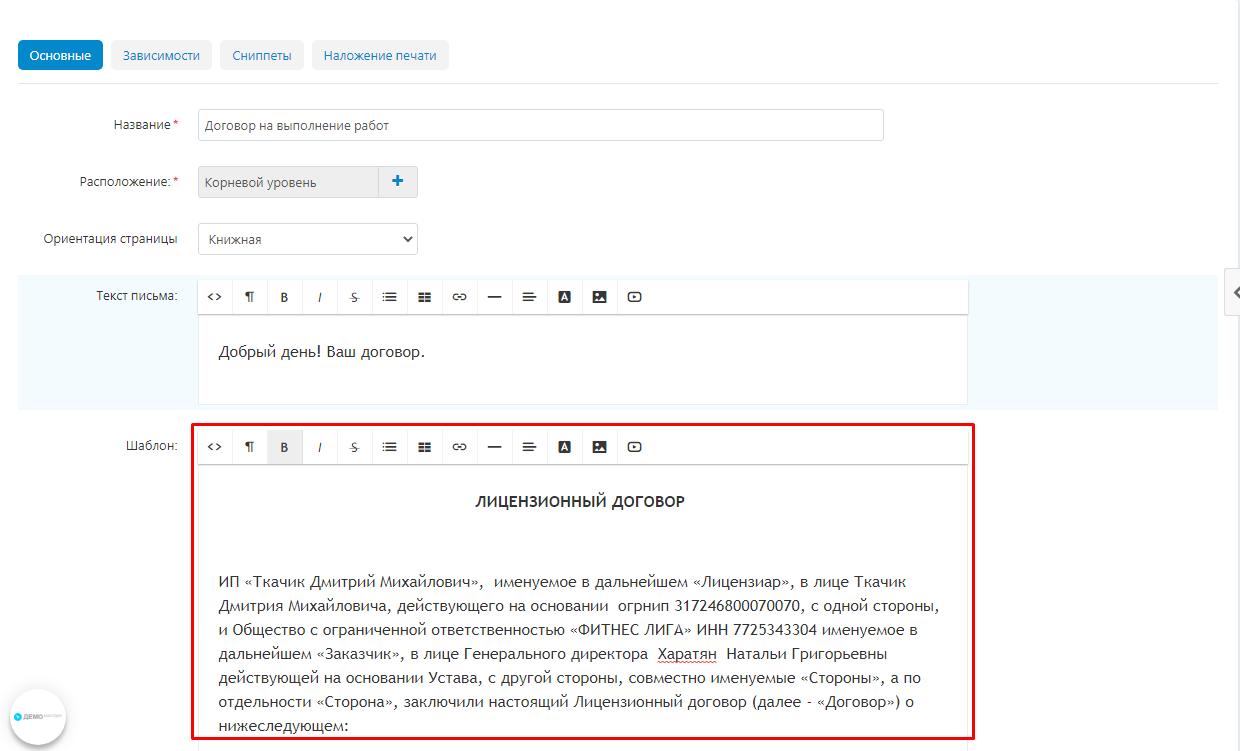
3.5. After you have edited the template text, add the necessary variables to it. They are located in the additional menu on the left side of the screen.
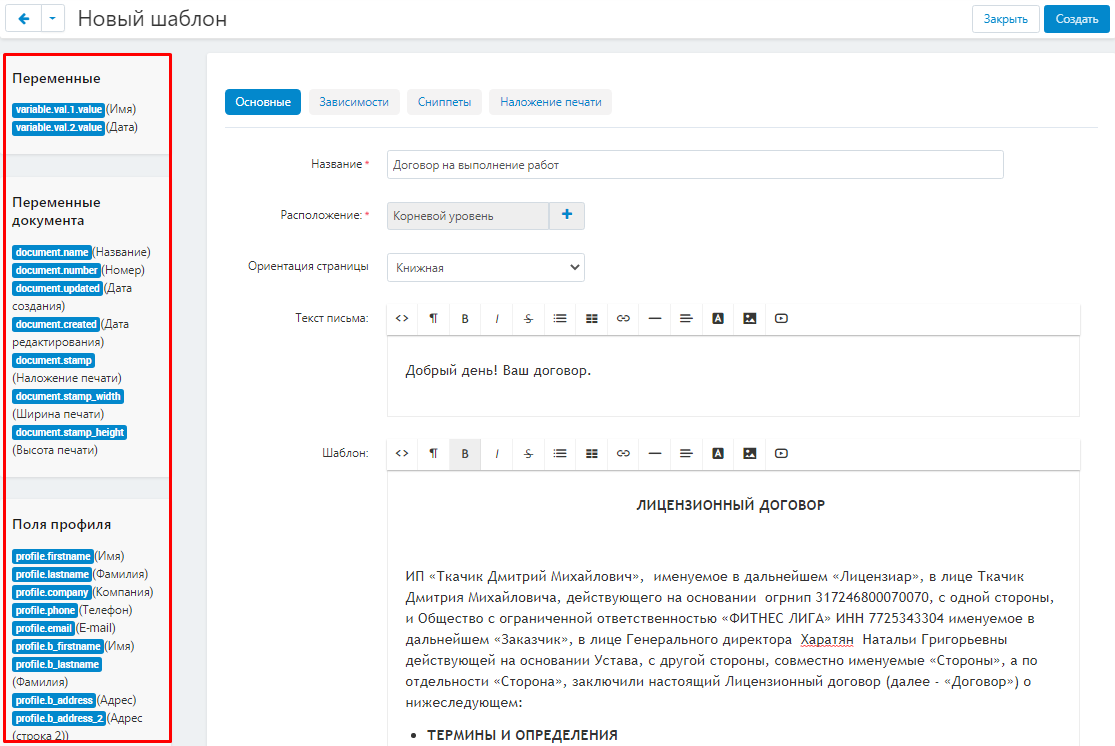
3.6. Click on the variable name highlighted in blue and it will move to the template text.
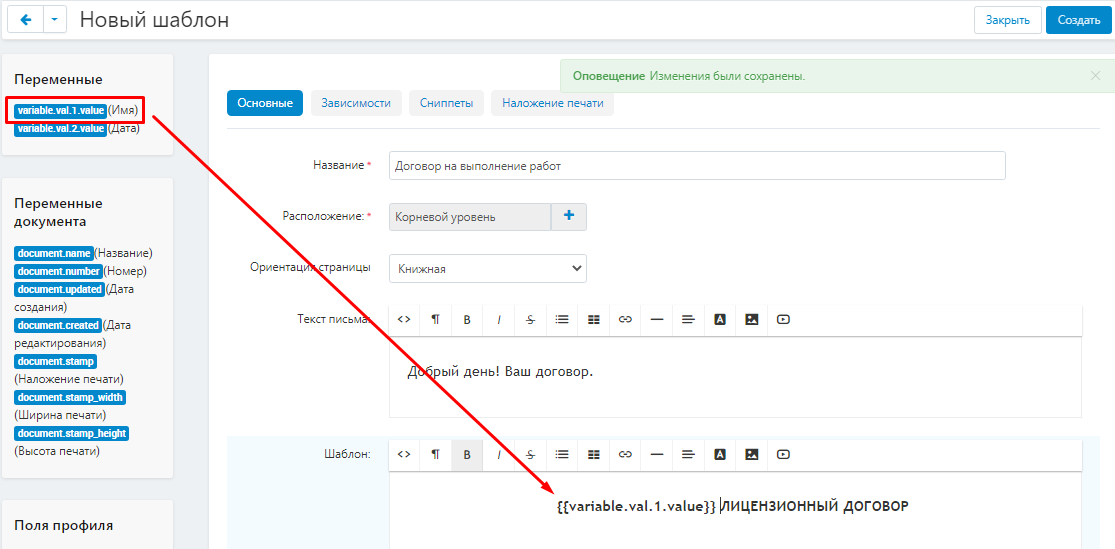
3.7. In the "Variables" section, the variables created by you will be reflected. In the future, their value can be set manually.

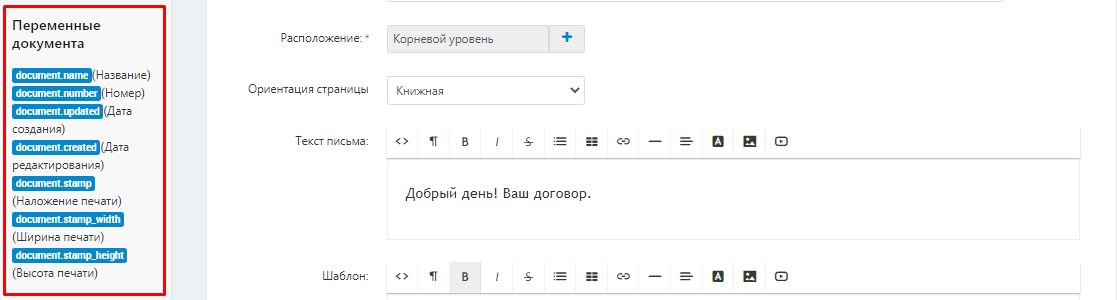
3.8. In the "Document Variables" section, you can add variables of the document itself ("Title", "Creation date", etc.)
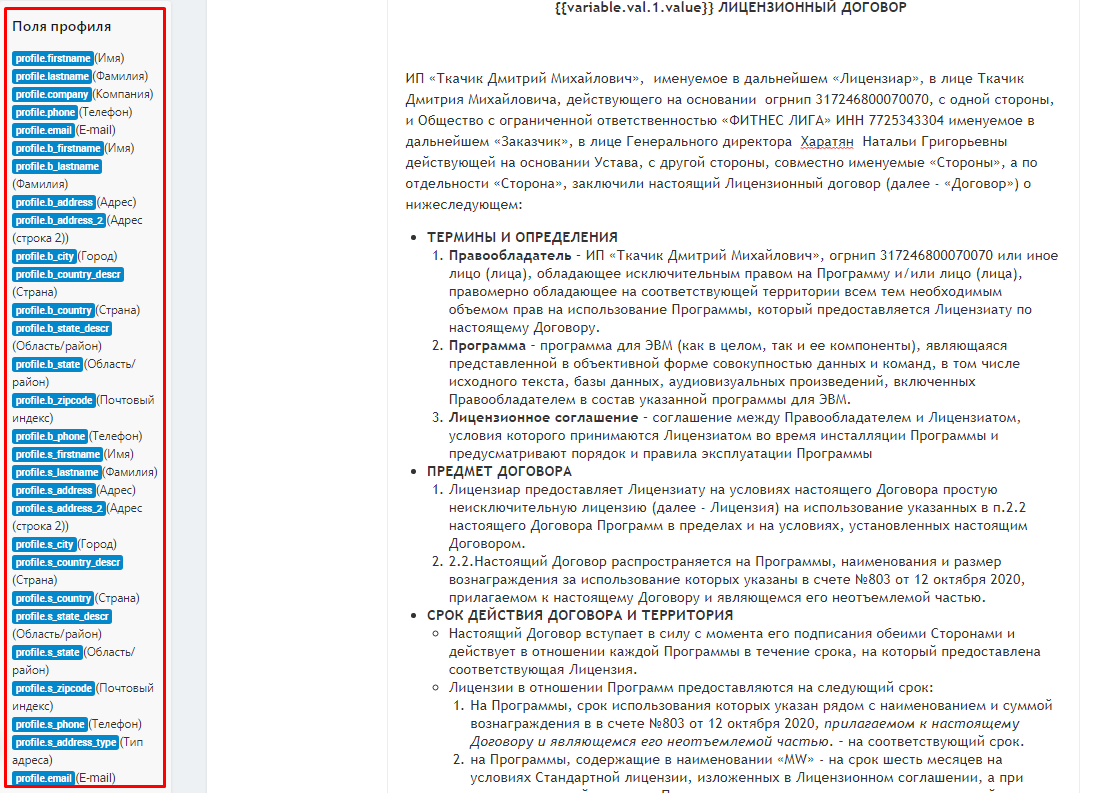
3.9. In the "Profile Fields" section, variables are available that can be copied from the user profile fields. The vendor enters these data independently during registration.
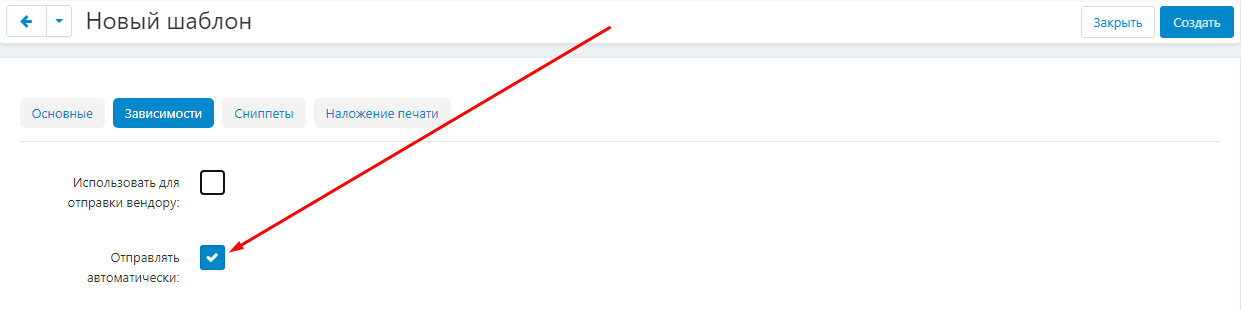
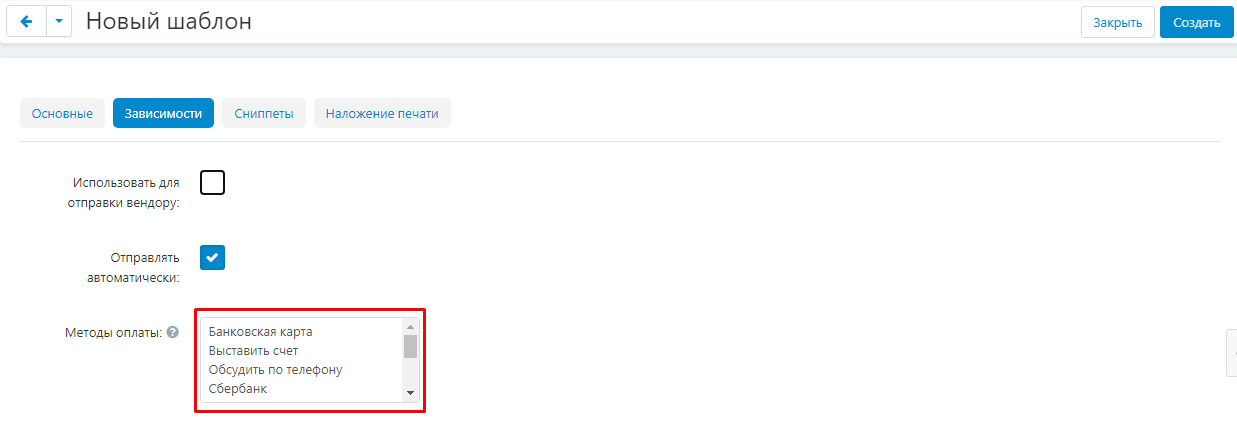
4 . Go to the "Dependencies" tab and check the box "Use to send to the vendor", if in the future the contract will need to be sent to the vendor.

4.1. Check the box "Send automatically" so that the contract is sent to the vendor automatically.
4.2. In the "Payment methods" item, select the remote payment option. This implies that the document will be generated automatically. Please note that this item is only available if there is no check mark in the "Use to send to vendor" item.
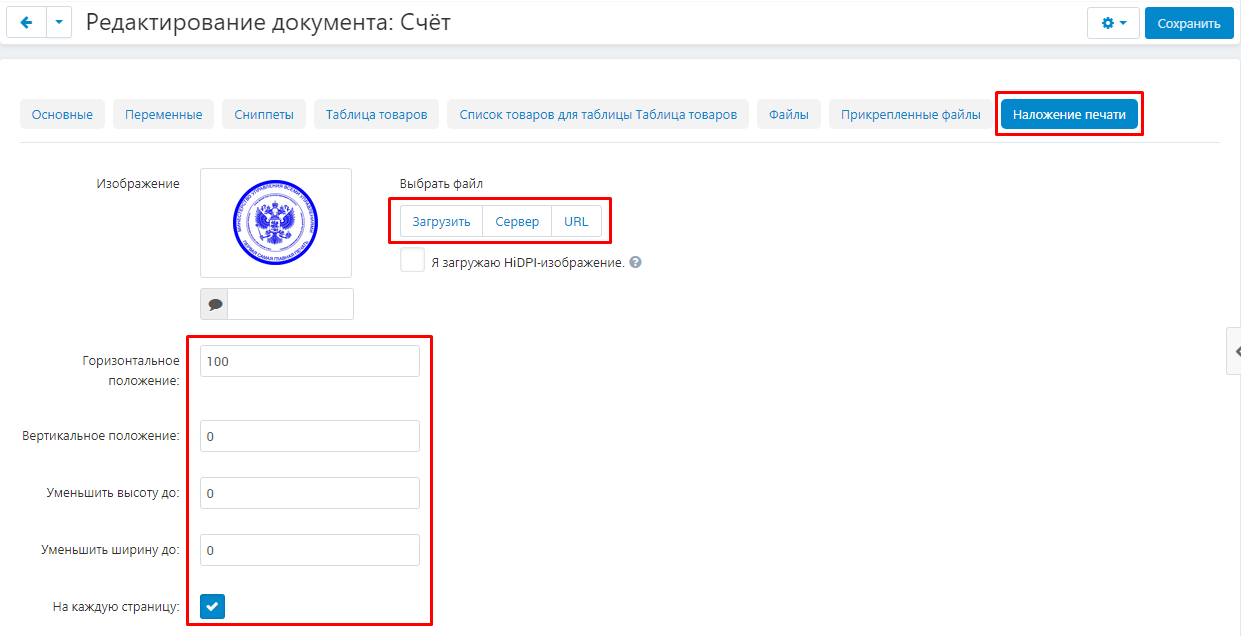
5. Go to the "Print Overlay" tab. In this tab, you can add an image of the organization's seal to the contract.

PRINTING REQUIREMENTS
In order to upload a print image to a contract document, it must meet the following requirements:
1. The standard round print size is from 38 to 42 mm (from 300 to 600 pixels). The triangular seal has sides with an equal length of 38-42 mm. There are also rectangular seals with side sizes from 35x50 mm to 70x100 mm.
2. The image format is PNG.
3. The print image must be WITHOUT a BACKGROUND, otherwise the print will overlap the text.

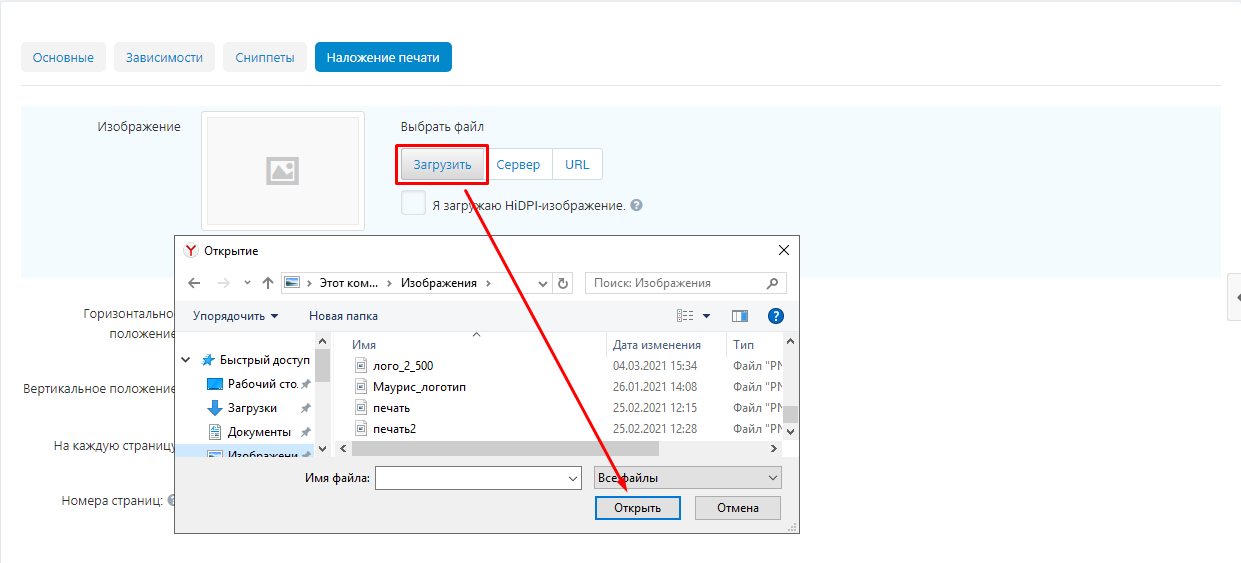
5.1. In order to upload an image, use one of the available methods in the "Image" item:
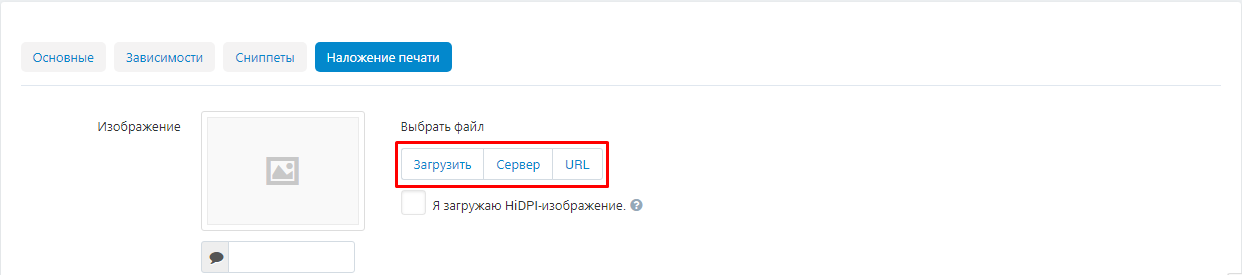
5.1.1. Click the white "Upload" button, select an image from the computer's memory and click open.
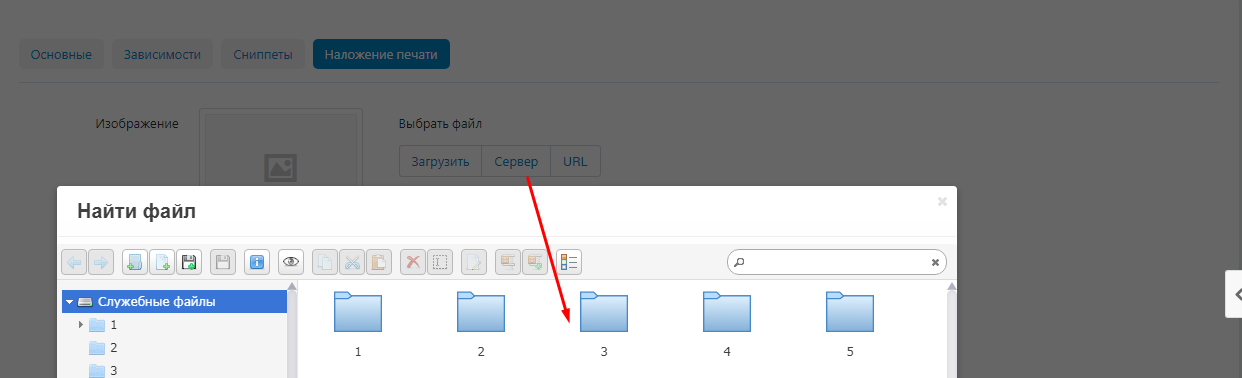
5.1.2. Click the white "Server" button to the right of the logo window to select the image available on the server.
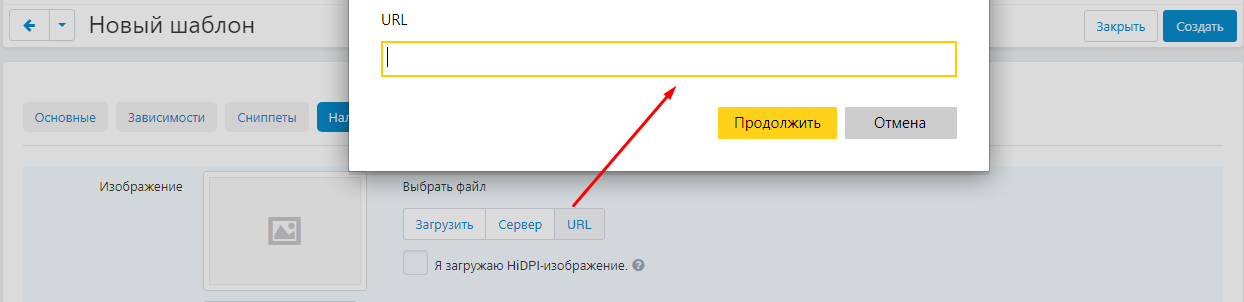
5.1.3. Click the white "URL" button to the right of the logo window to enter the image URL.
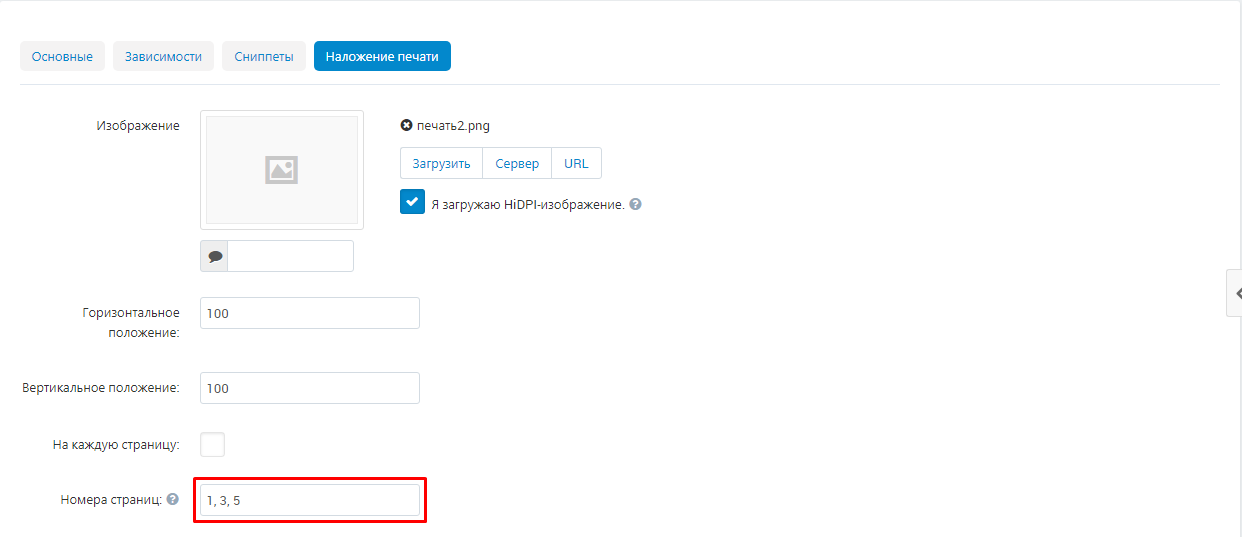
5.1.4. Check the box "I upload a HIDPI image" so that the original image is reflected in half the size.

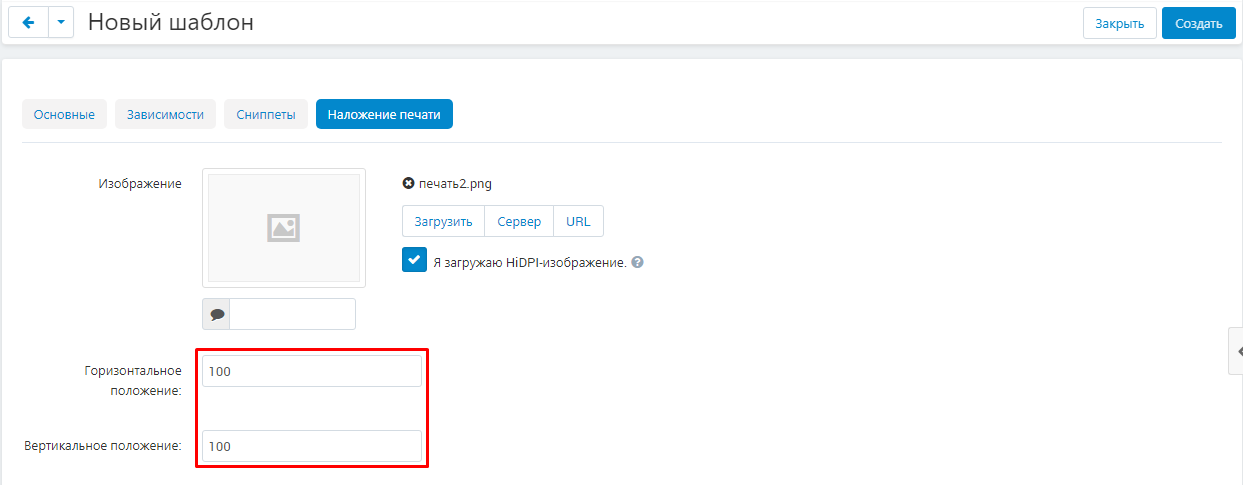
5.2. In the "Horizontal position" and "Vertical position" fields, enter the boundaries of the uploaded image location in numbers (measurements are in pixels).
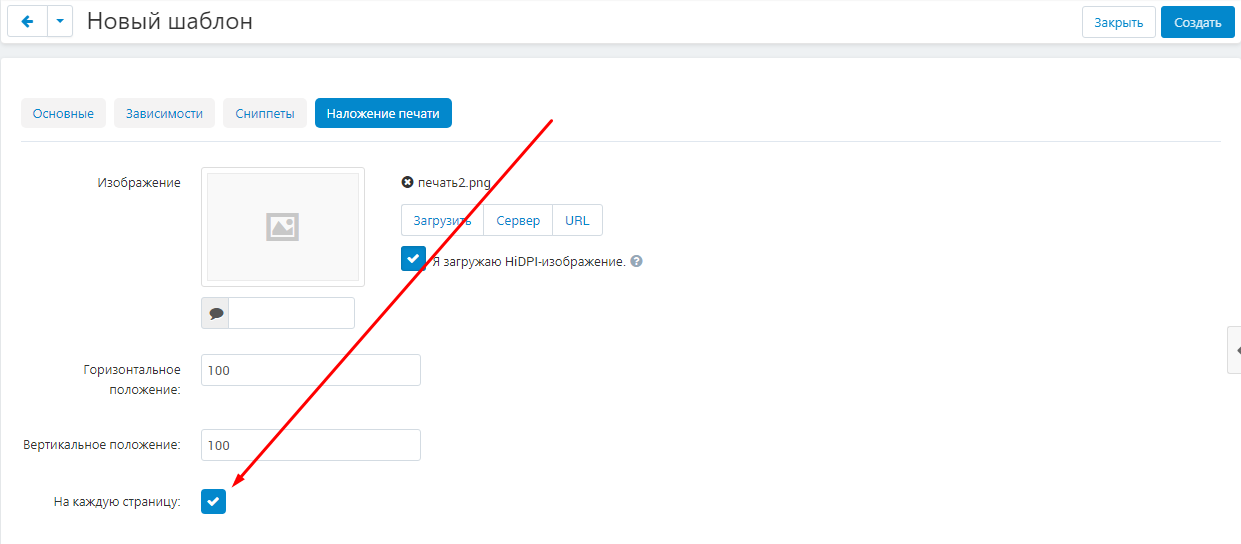
5.3. Check the box "On each page" if an overlay is required for each page of the contract.
5.4. In the "Page numbers" item, specify the pages on which the overlay is required. Please note that this item is only available if there is no check mark in the "Per page" item. The numbers are entered in numbers, separated by commas. Intervals 1-3 are acceptable.
6. Click the blue "Create" button in the upper right corner of the panel to create a template.

7. Go to the Snippets tab.

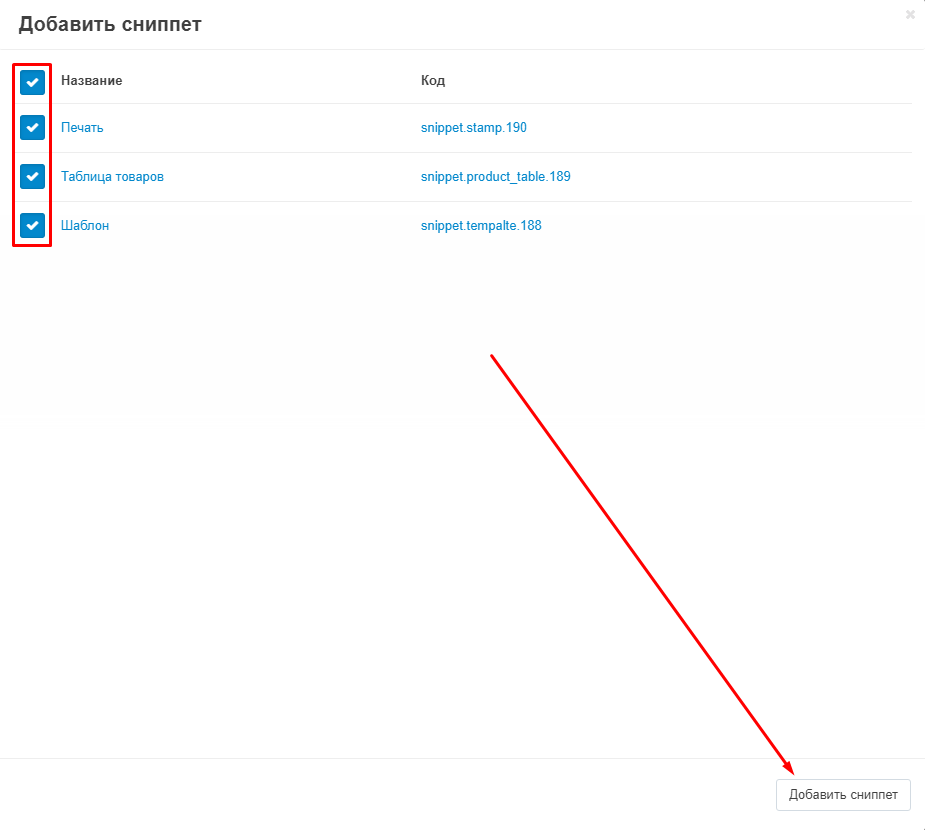
7.1. To add snippets to the template, click on the white "Add Snippet" button.

7.2. A list of available snippets will appear in the window that opens. Check the box that you want to add to the template and click on the white "Add snippet" button in the lower right corner of the window.
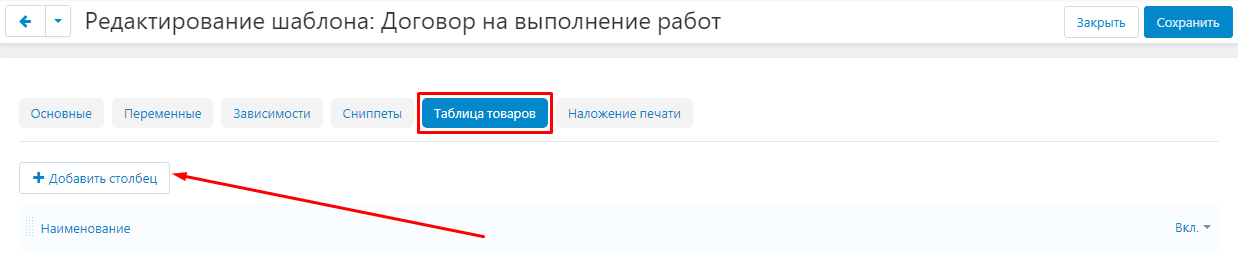
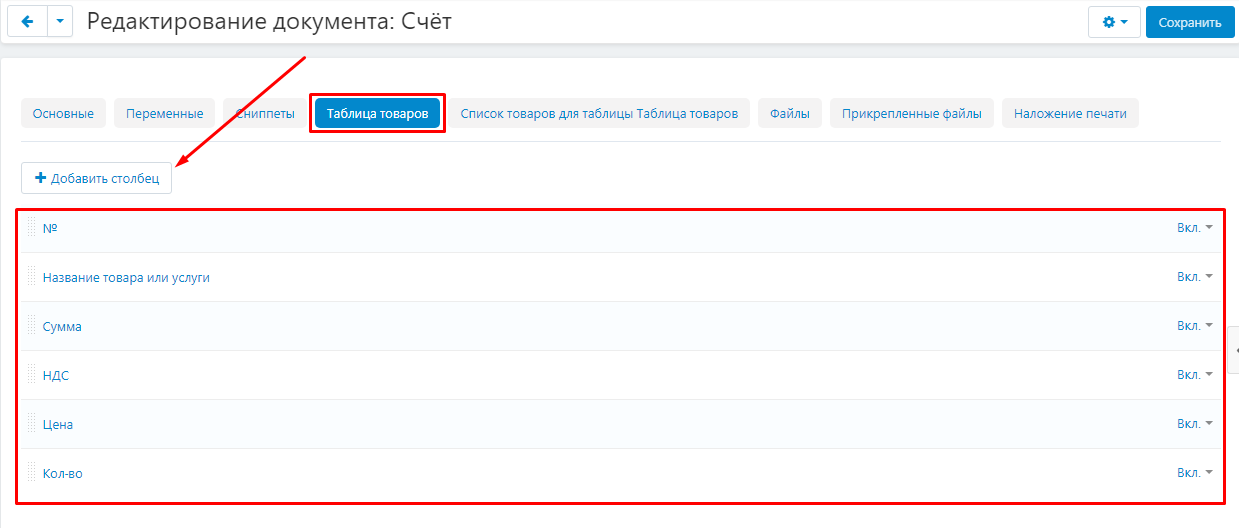
8. In the "Product Table" tab, you will be able to add columns. To do this, click the white "Add column" button.
9 . Go back to the "Basic" tab and use the additional menu to add snippets to the template.
10. After all the adjustments are made, click the blue "Save" button in the upper right corner of the panel.

LIST OF PROFILE TYPES
1. To create a new profile type, go to the Modules tab, select the Contract Execution section and the List of Profile Types.
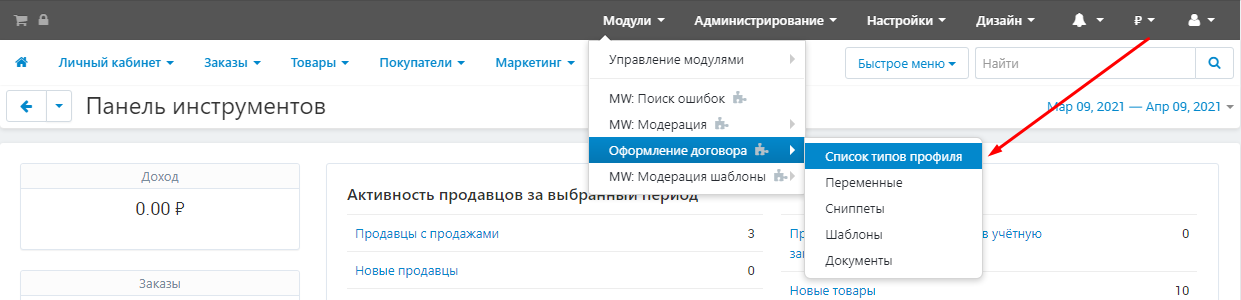
2. Click on the blue button with a plus sign in the upper right corner of the panel.

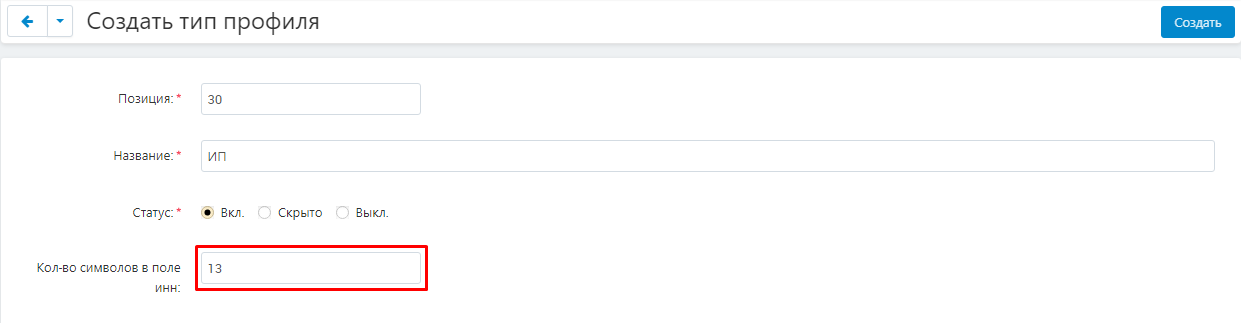
3. Specify the position where the new profile type will be displayed.

4. Enter the name of the profile type in the "Name" field.

5. Fill in the item "Number of characters in the TIN field" with numbers.
6. Check the box "Legal entity" if the profile type is a legal entity.
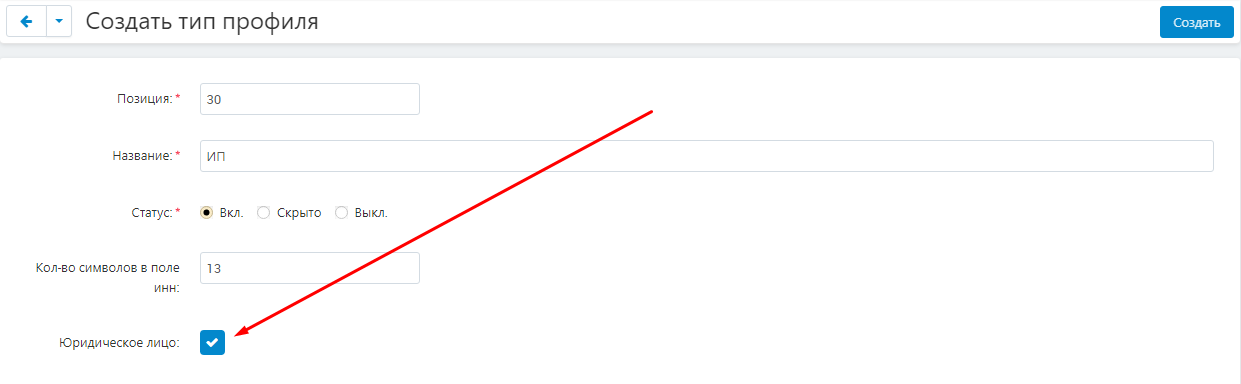
7. Complete the creation of the profile type by clicking on the blue "Create" button in the upper right corner of the panel.

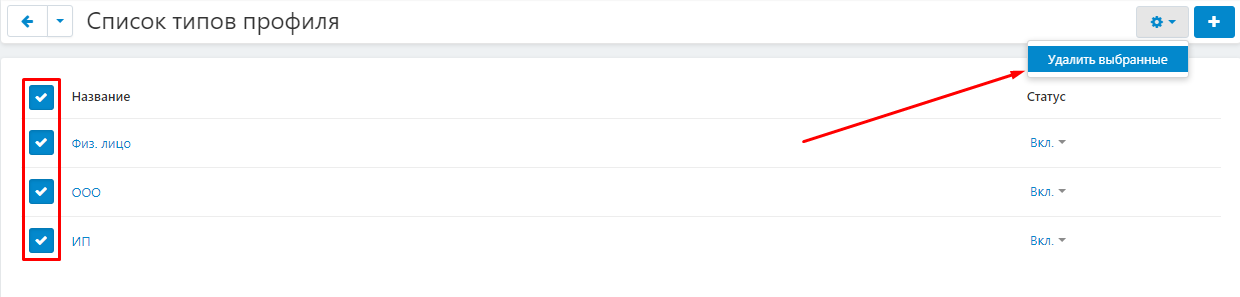
8. To delete a profile type, click on the gear-shaped button on the right side of the line and select the "Delete" function.
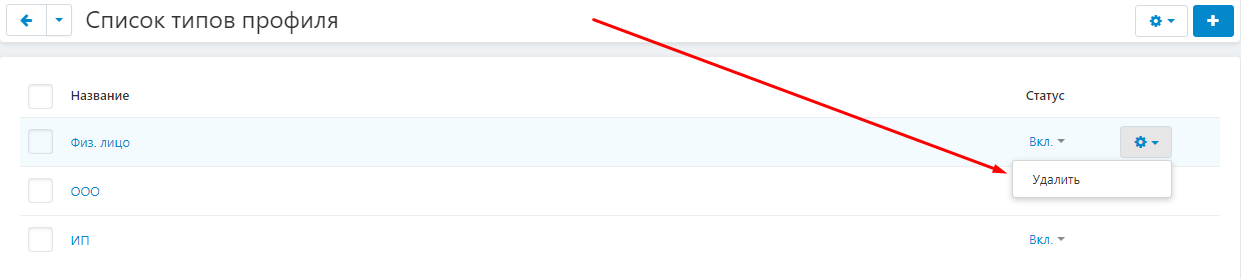
9. To delete several profile types, tick them, click on the button in the form of a blue gear in the upper right corner and select the "Delete selected" function.
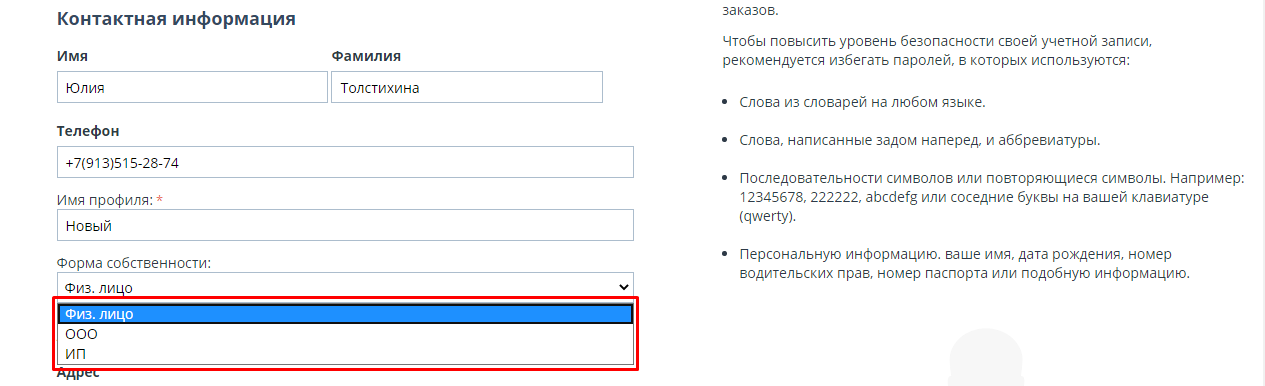
10. After that, in the buyer's account settings, when creating a new profile

the "Form of ownership" field will appear, in which the entered profile types will be displayed.
CONTRACT EXECUTION
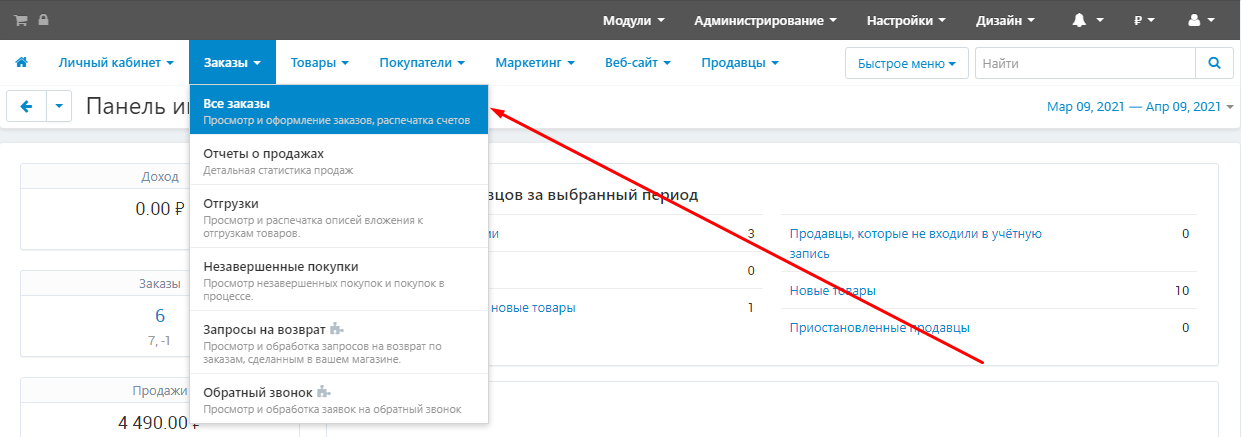
1. To create a new contract, go to the "Orders" tab and select the "All orders" section.
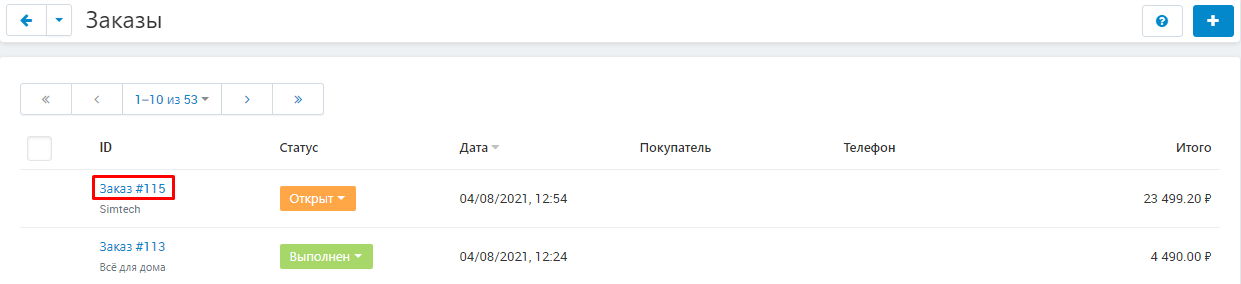
2. On the page that opens, select the desired order number from the list. To do this, click on its name highlighted in blue.
3. Go to the "Issue a Contract" tab and select the contract template. To do this, in the "Template" item, click on the button with a plus sign.
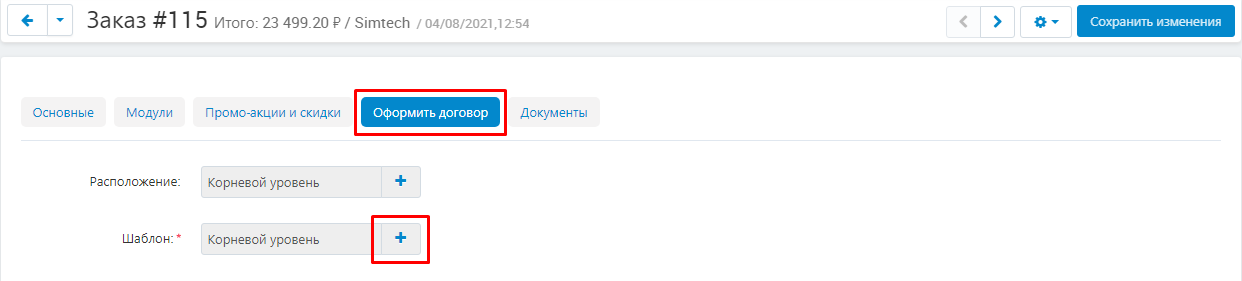
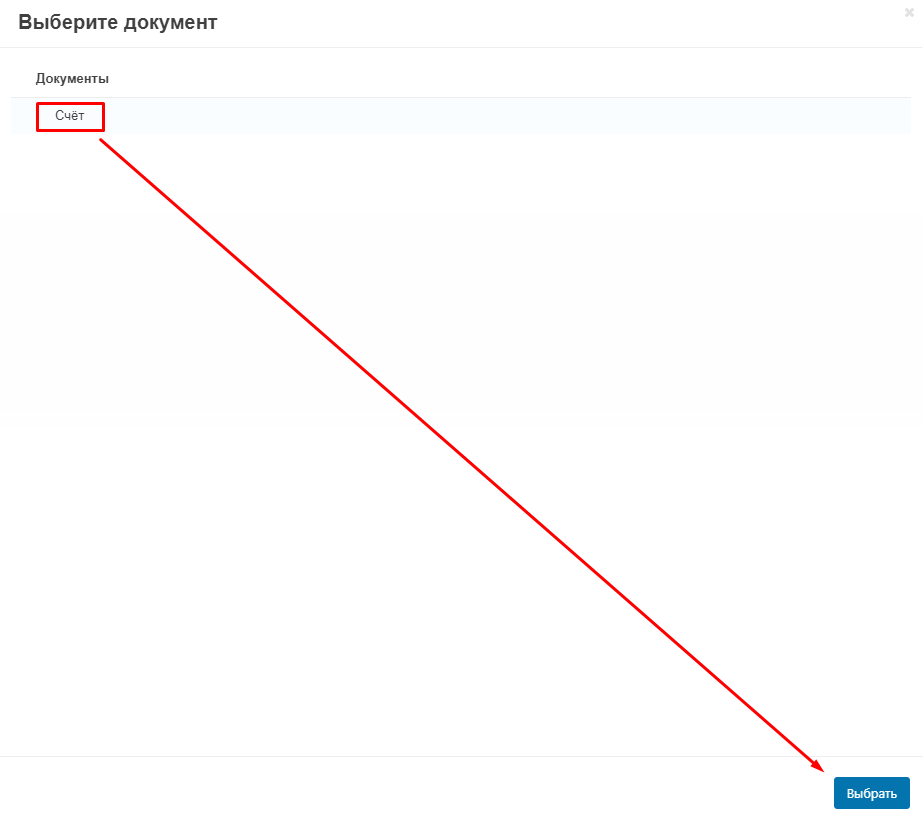
4 . In the window that opens, select the desired template from the list and click the blue "Select" button in the lower right corner.
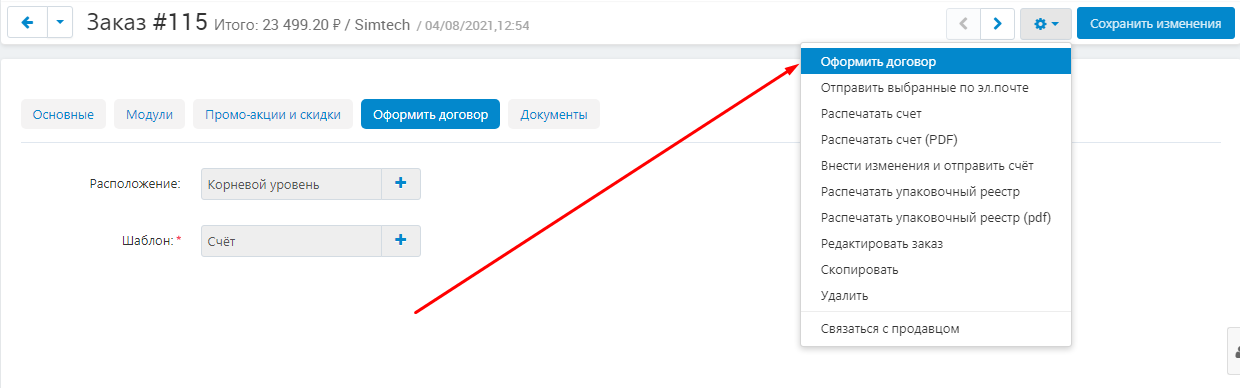
5. After selecting the template, click on the button in the form of a blue gear and select "Issue a contract".
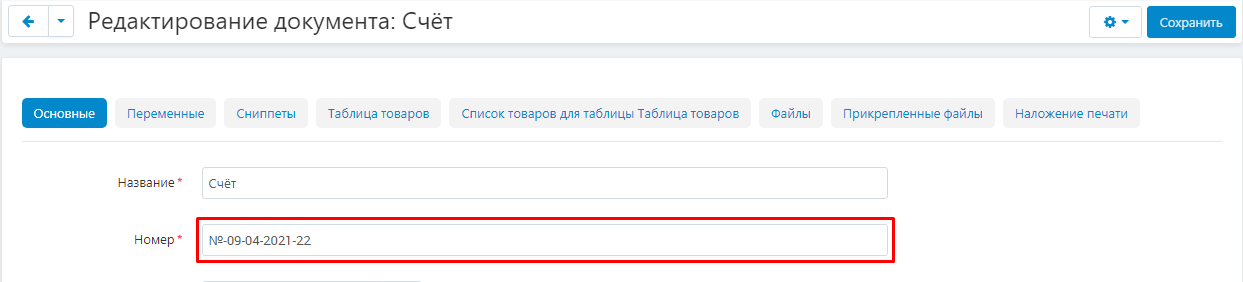
6. The page of the selected template opens. Go to the "Basic" tab. In the "Name" item, you can change the name of the document being created. By default, it will be assigned a template name.

6.1. In the "Number" item, the document number is automatically generated.
6.2. In the "Template" item, you can change the text and add the necessary variables.
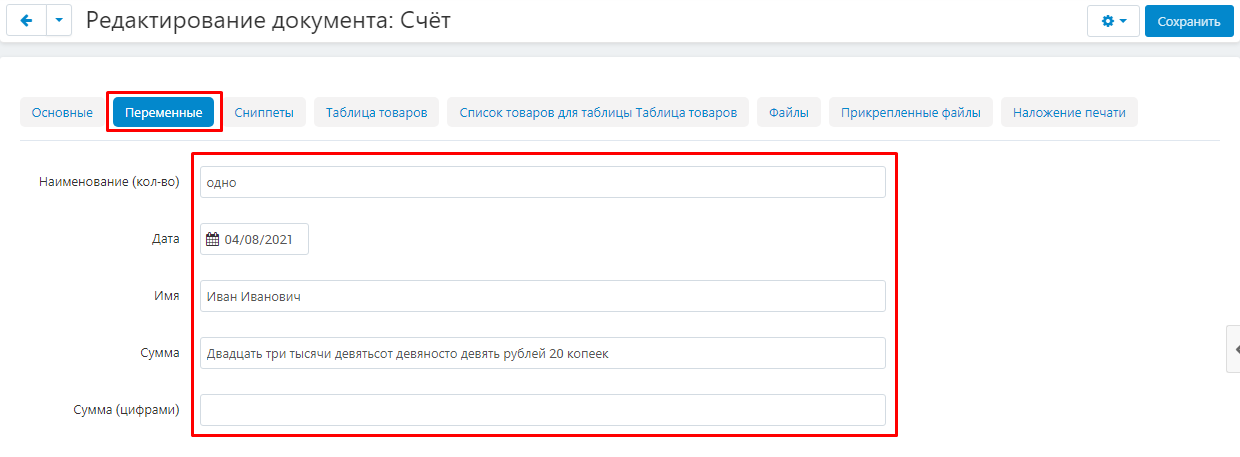
7. Go to the "Variables" tab. A variable with the value "Date" is set automatically. but you can edit it if you want. The value of the variable "Text" must be entered manually.
8. In the Snippets tab, you can add or remove snippets.

9. In the "Product Table" tab, you can add, edit and remove columns.
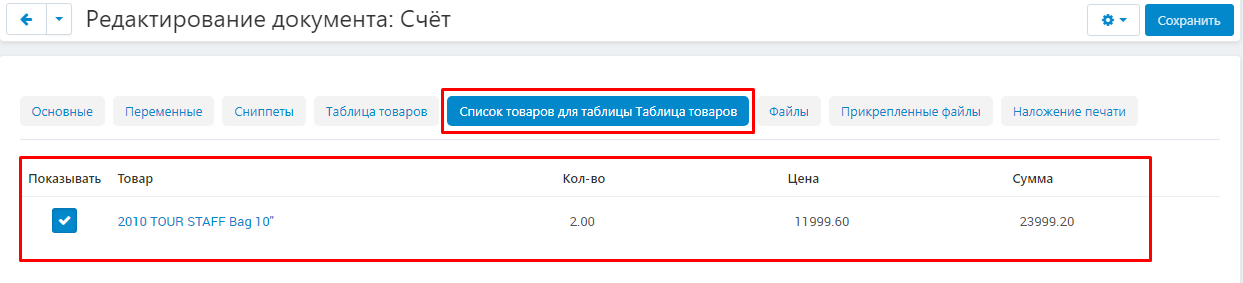
10. Go to the "List of products for the table of Products" tab. The products listed in the order will be listed here. If necessary, products can be excluded by removing the check mark next to their name. The quantity and price of the product can also be changed manually in the corresponding sections. The amount is recalculated automatically.
11. Additional files can be attached to the contract. To do this, go to the "Attached Files" tab and click the white "Attach files" button on the right side of the window.

12. Go to the "Print Overlay" tab. All the tools for editing the print and its parameters will also appear here.
13. Click the blue "Save" button in the upper right corner of the panel.

14. To complete the creation of the contract, click on the button in the form of a blue gear in the upper right corner of the panel and select the desired function:

14.1. To formalize a new contract, select the "Contract Execution" function (for more information, see the section "Multi-level contract").

14.2. To form a contract in PDF format, select the "Print" function.

14.3. To enable preview, select the Preview function.
Attention! During the preview, the seal can travel abroad!

15. After the contract is formed in PDF format (the "Print" function), click on the "Save" button and go to the "Files" tab.
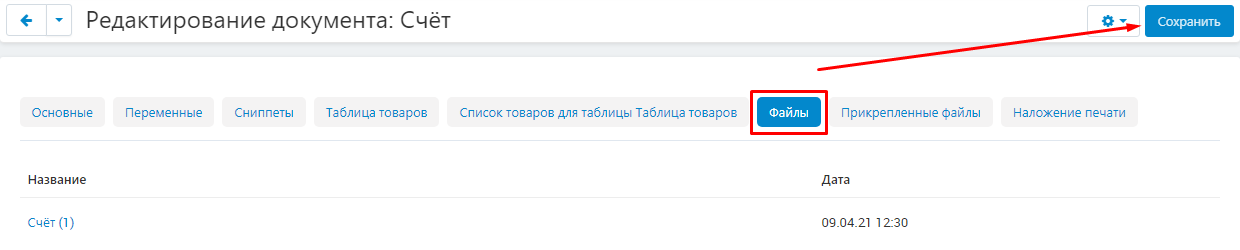
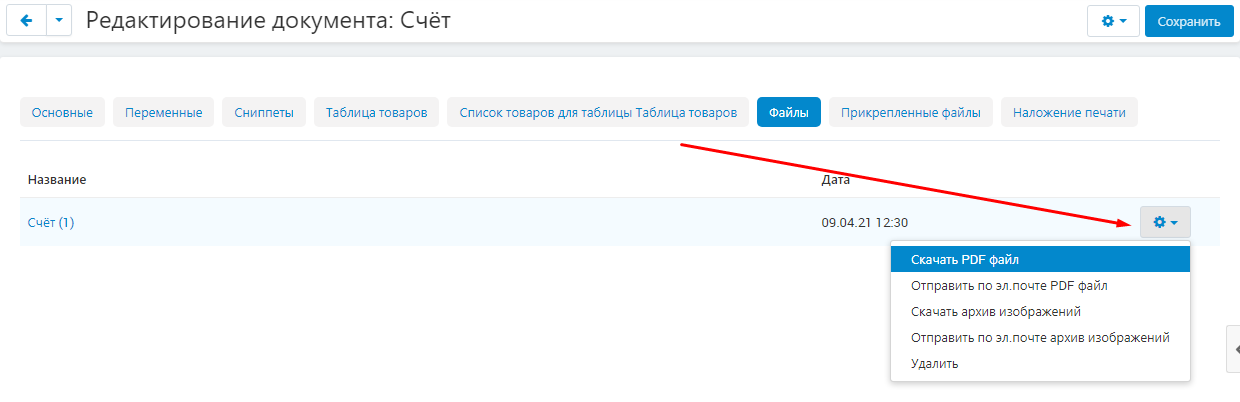
16. A file will be generated. To take advantage of additional features, click on the button in the shape of a blue gear and select one of the available functions:
"Download PDF file" - download documents in PDF format to your computer;
"Send by e-mail PDF file" - the PDF file will be sent by e-mail;
"Download image archive" - an image archive will be generated, in which the print will be placed according to the settings (on each page, or on the specified ones);
"Send an image archive by e-mail" - the archive will be sent by e-mail;
"Delete" - delete the file.
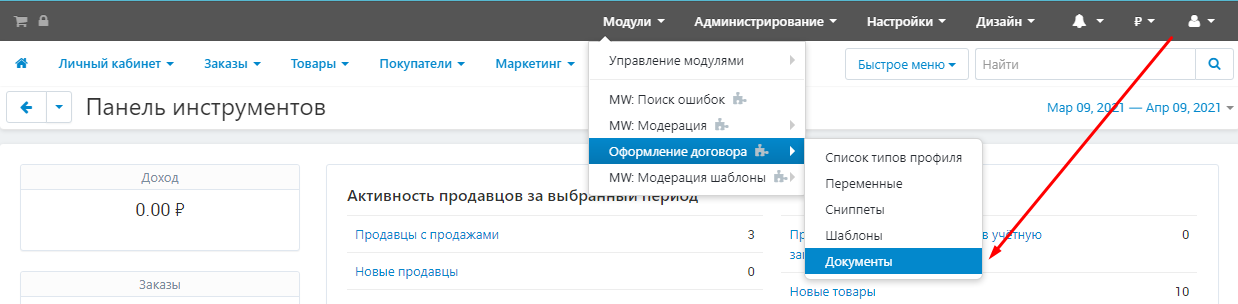
17. After registration, the document will be archived. To open the previous document, go to the "Modules" tab, select "Contract Execution" and "Documents".
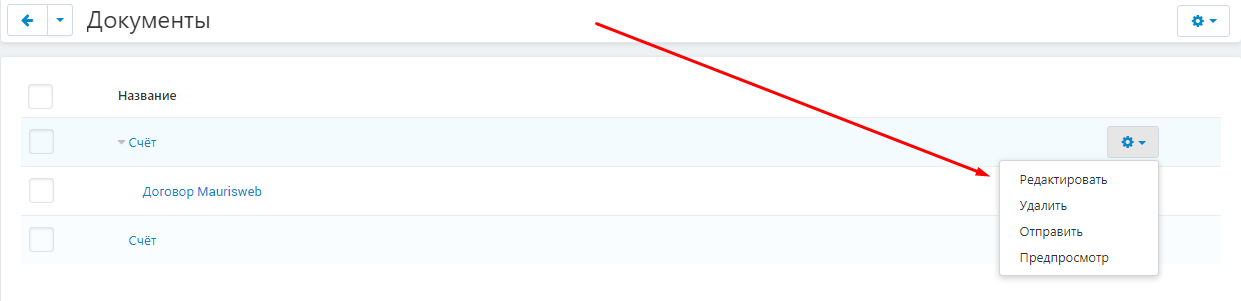
18. All documents in this section can be edited, deleted, sent, viewed by clicking on the gear-shaped button on the right side of the line.
MULTI-LEVEL AGREEMENT
CREATING A TEMPLATE
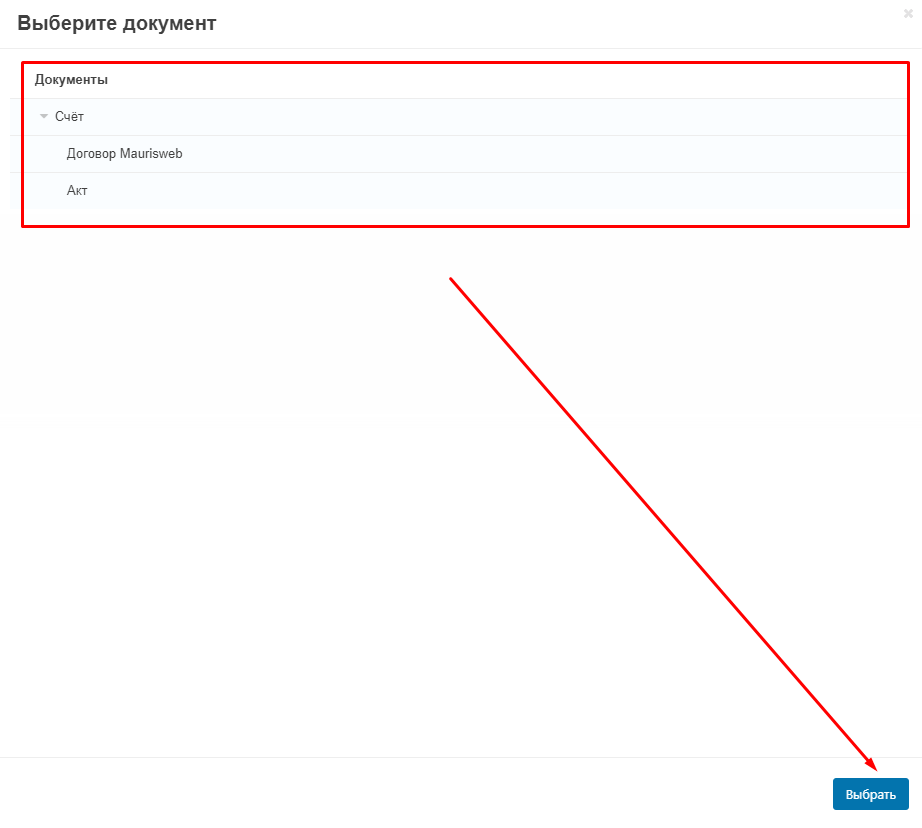
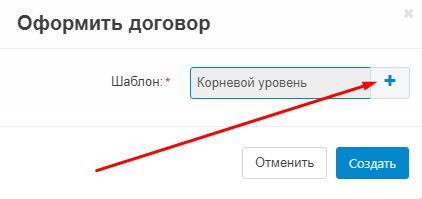
1. To make a multi-level agreement, create a new template, select the "Basic" tab and click on the button in the plus form in the "Location" item.
2. In the window that opens, select the parent template, click on the "Select" button or double-click on its name.
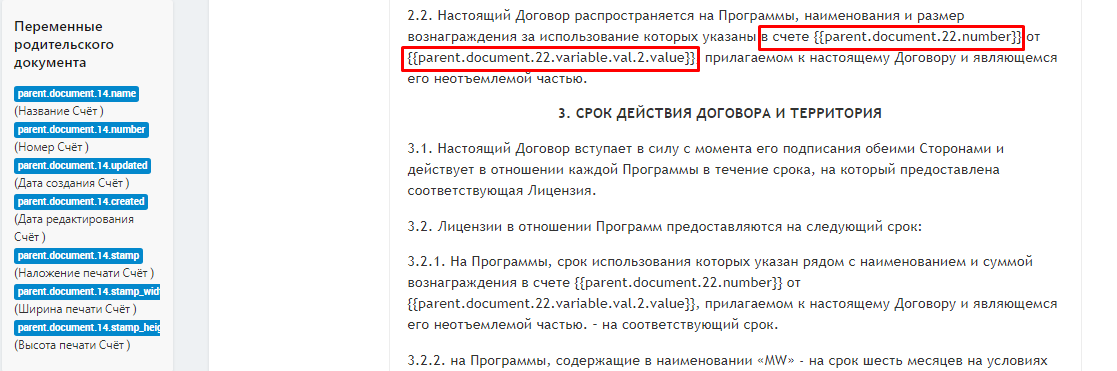
3. Additional variables called "Parent Template Variables" will appear in the additional menu
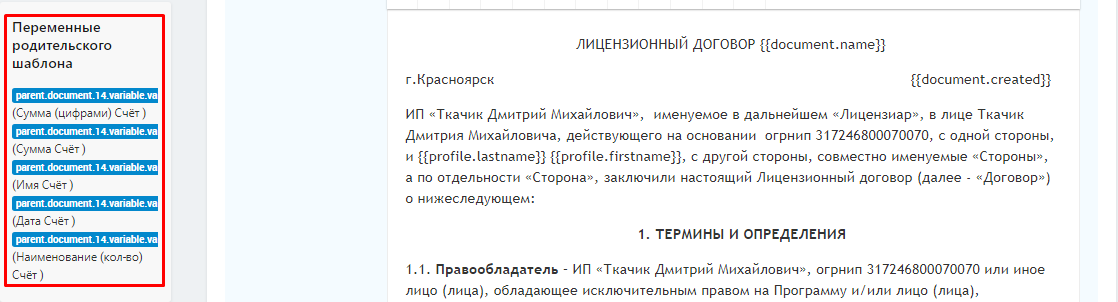
and "Parent document variables". Paste them into the template text so that they can link to data from the parent document.
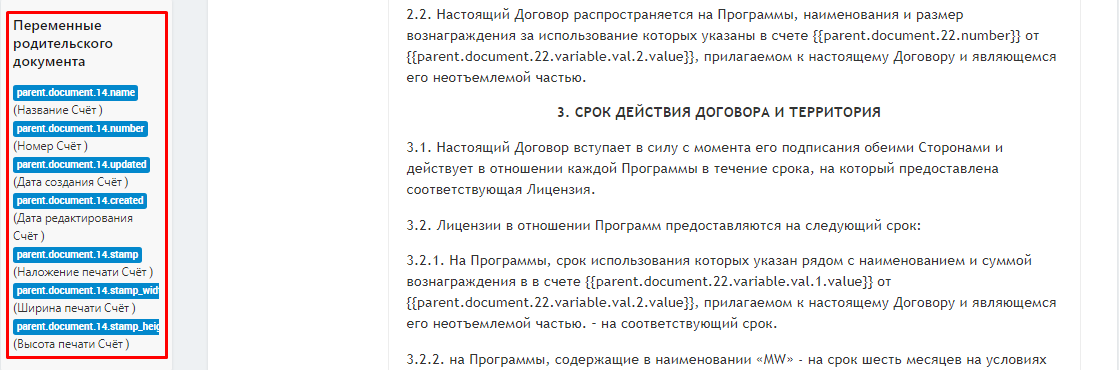
4. For example, when you need a link to the parent document number or date.
CREATING A DOCUMENT
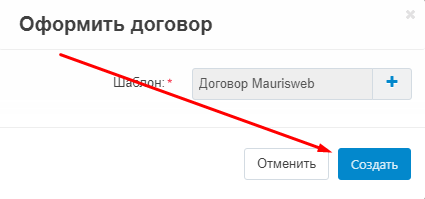
1. After completing the parent document, click on the button in the form of a blue gear and click on the "Issue contract" button.

2. In the window that appears, in the "Template" item, click on the button in the form of a plus.
3. Select the desired template, click on the "Select" button or double-click on its name.

4. Click on the "Create" button and proceed to creating a new document.
5. The generated contract will refer to the data from the parent document.
