MODULE "SEPARATION OF PAYMENTS FROM CLOUDPAYMENTS (GOOGLE PAY, APPLE PAY) + CLOUDKASSIR CASH REGISTER + HONEST SIGN = REPORTING" FOR CS-CART MULTI-VENDOR MARKETPLACE
CloudPayments: more than a payment system
The integration module of the CloudPayments + Cloud Kassir payment system, which solves the problem of financial interaction between the store owner, customers, the tax inspectorate and the "Honest Sign".
Module functionality
- Acceptance of payment for goods;
- Sending information to the OFD about the product and the type of contractual relationship (agent, commission agent, owner of the product);
- Sending to the "Honest Sign" information about the departure of the goods during the sale and its return to circulation in case of return by the buyer;
- Supports a one-stage payment scheme and a two-stage - Holding (from the English word hold – hold) freezing of funds, adding the ability to independently specify the freezing time on the buyer's checking account, from several hours to seven days.
- Sending a receipt and closing receipt;
- Cancellation of the operation in the ofd and refund to the buyer for the order;
- Order Editing (Beta)
Interaction models first
When developing the functionality of the module, the main models of interaction between the marketplace and the vendor were taken into account:
Marketplace - recipient of money (This is how Wildberries, OZON, Yandex Market, Sbermegamarket and others work)
The marketplace signs a contract with CloudPayments, configures the parameters of integration with the payment service in the module settings, prescribes its parameters and the format of working with vendors (Agent, Commission Agent), the type of payment calculation, etc.
Personally, for each seller, the "Type of relationship", TIN, and the form of taxation is taken from the product card are configured in the personal account.
- The buyer visits the marketplace website, makes a purchase, the money is frozen on the current account (holding) until the seller confirms the availability of the goods.
- If there is no product for the order in the seller's warehouse, the money on the account is defrosted automatically and returned to the buyer, and the marketplace does not pay interest for acquiring. This provides significant savings on banking services and guarantees a quick refund to the buyer.
- If the order is confirmed and all the goods are available, it is assigned the status "Paid", the money is unfrozen. A receipt is sent to the buyer, which states: who is the recipient of the money (marketplace), the list of products and who is the owner (vendor) of this product, its type of taxation with VAT, as well as the type of relationship with the marketplace (agency or commission).
- The information is automatically transmitted through the operator of the OFD to the tax service. Thus, the tax service will already know that you have received money to your checking account for the services rendered. The seller will independently pay VAT taxes according to his taxation, and the marketplace from the profit received that remained on the settlement account for the services rendered after transferring money for the goods to the real owner. As a result, the seller will receive his money and paid taxes, and the marketplace paid tax on the amount of profit.
- When the transport company delivers the cargo to the recipient, it will be assigned the status "Issued" and a closing receipt will be sent to the buyer. This information will be transmitted to the tax service, confirming that the transaction has been completed in full. If the product is required to be labeled "Honest mark", the withdrawal from circulation will occur automatically.
You can additionally set up a payment method for each seller. In this case, reporting and payment acceptance will be on a specific seller for the sale of goods.
Interaction models second
When developing the functionality of the module, the main models of interaction between the marketplace and the vendor were taken into account:
The seller is the recipient of the money (This is how some specialized trading platforms work)
The seller signs a contract with CloudPayments, configures the parameters of integration with the payment service in the payment method settings, prescribes its parameters and the format of work, the type of payment calculation, etc.
Personally, for each seller, the "Type of relationship", TIN, and the form of taxation is taken from the product card are configured in the personal account.
Payment without going to the payment system's website
CloudPayments allows the buyer to pay for the goods without going to the bank's website or payment system. Technically, this is implemented on the side of the widget, in which the buyer enters all the data necessary for payment. The widget transmits this information to the bank via an encrypted secure protocol, which ensures complete security of payments.
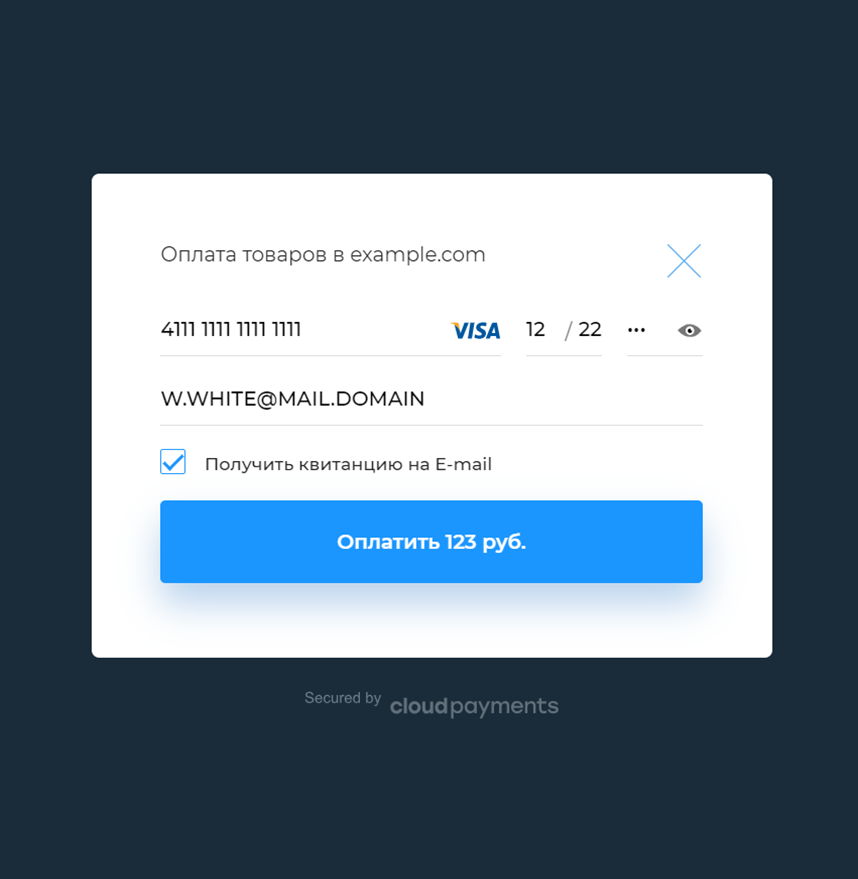
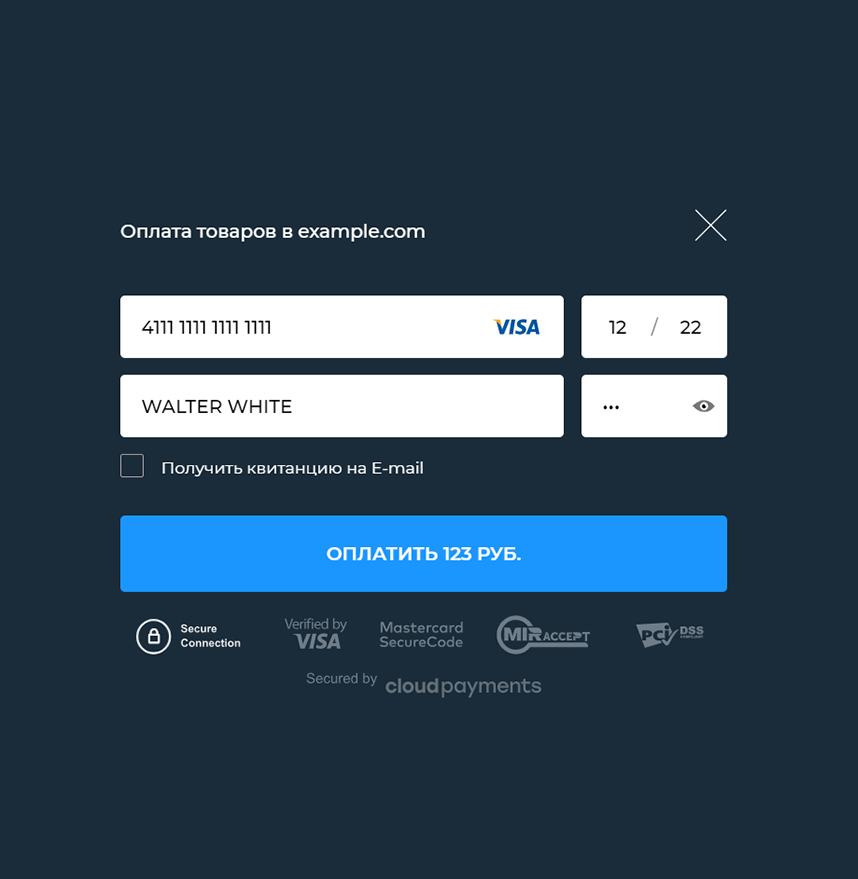
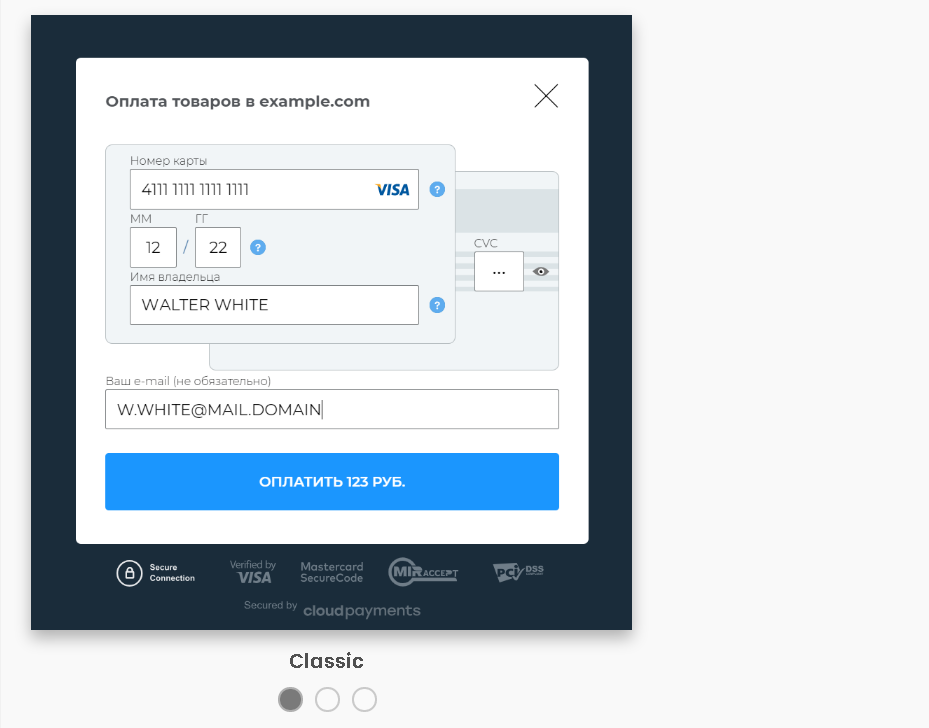
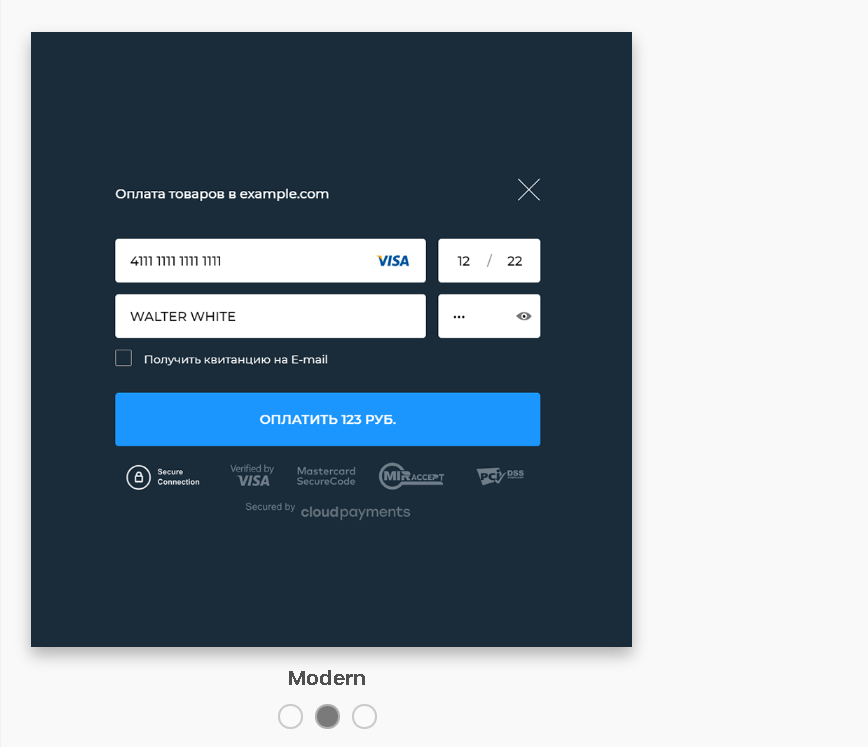
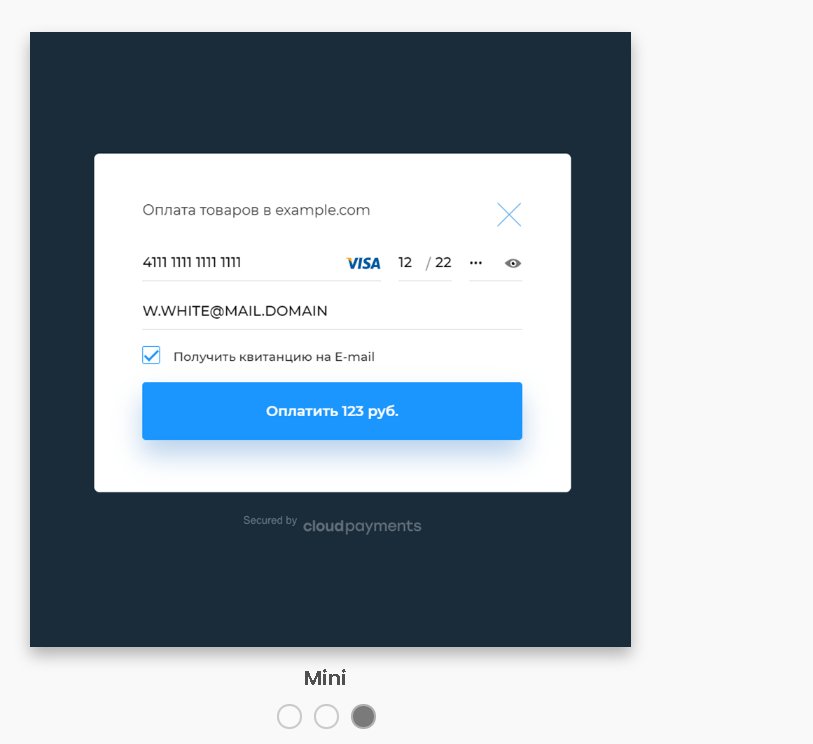
Payment widget - a pop-up form for entering card details and the payer's e-mail address. The widget automatically detects the type of payment system: Visa, MasterCard, Maestro or MIR, as well as the issuing bank of the card and shows the corresponding logos. The form is optimized for use in all browsers and mobile devices. An iframe opens inside the widget, which guarantees the security of card data transmission and does not require TSP certification for use.
The widget is implemented in three visual solutions:
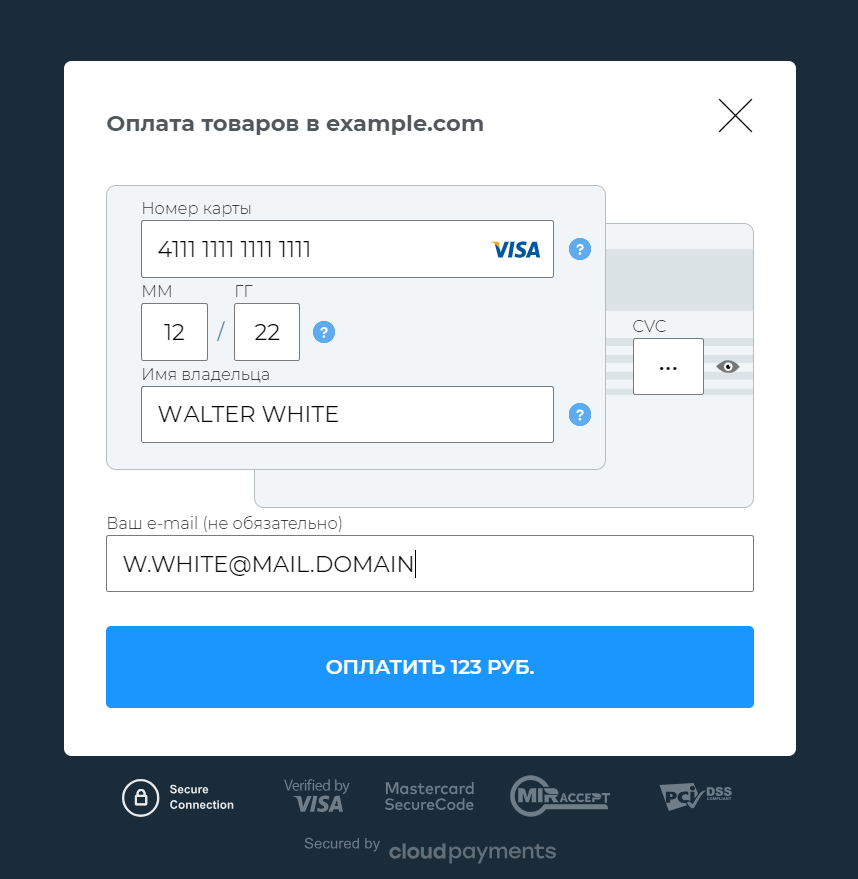
Classic
Modern
Minimal
Advantages of payment without switching to third-party resources
- Bypassing IP blocking of Russian banks in some countries (EU, Ukraine, Belarus, Georgia);
- No additional information burden on the client in the form of advertising additional services of the bank or payment system,
- Saving time, since you do not need to load extra pages and return to the online store's website after payment.
Apple Pay and Google Play
The module allows you to connect the Apple Pay and Google Pay payment systems. The connection of these services is configured individually in the CloudPayment personal account.
Mobile version of the widget
The module automatically determines the type of device from which the user makes the payment, and displays the most appropriate version of the widget: standard or mobile. For convenience, the mobile version is displayed in full-screen mode and immediately prompts the user to choose a payment method:
- Card;
- Apple Pay or Google Pay (depends on the device).
One-click payment - "Saving the card after payment"
An additional advantage of the CloudPayments module is the ability to pay in one click, for this the buyer must save the card data. At the same time, only partial information about the card number is stored on the site side, the rest of the data is stored on the CloudPayments service side, which allows you to ensure the security of data storage.
In the future, the buyer presses one button, confirming the desire to make a payment with this card. He will not have to re-enter the data. Moreover, the module allows you to enter several cards and payment systems into the system, and in the future, when paying for goods, choose the one that is most convenient at a particular time. At any time, the user can delete one card or all at once.
Localization of the widget
The default language is Russian, but it can be easily changed in the settings. At the moment, the widget supports the following languages:
- Russian;
- German;
- English;
- Latvian;
- Azerbaijani;
- Kazakh;
- Ukrainian;
- Polish;
- Vietnamese;
- Turkish;
- Portuguese;
- Spanish;
- Czech.
Cloud Kassir and FZ -54
According to the new version of FZ-54 dated 03.07.16, when selling goods via the Internet using electronic means of payment (including bank cards), you are required to comply with the same requirements as regular stores.
Main provisions of the law
According to the provisions of the law FZ-54, you need to:
- Use a new-style cash register with a fiscal drive installed;
- Connect the cash register to the Internet;
- Conclude an agreement with the fiscal data operator to transfer data from the cash register online to the FSN;
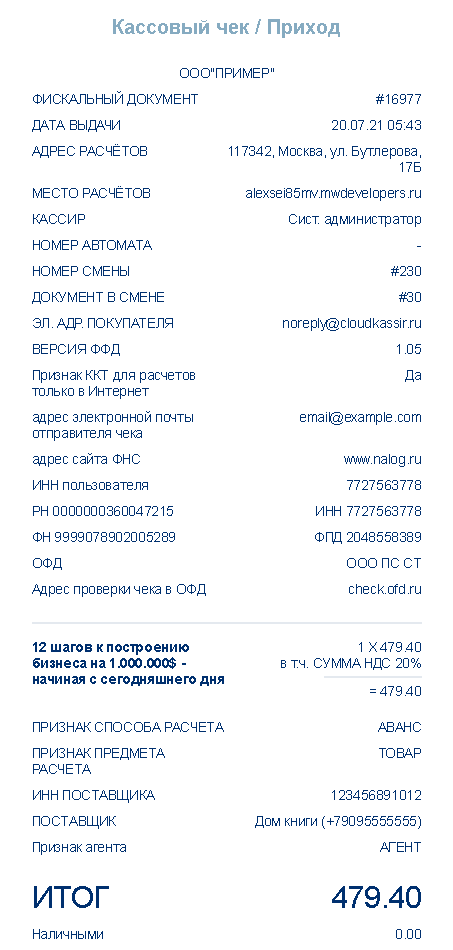
- Specify all product items in the receipt: name, price, quantity, amount, VAT rate;
- Issue a receipt to the buyer at the time of payment (when selling via the Internet, the receipt is sent to an email address or phone number);
- Change the fiscal drive after expiration or as the memory fills up.
Online fiscalization: Cloud Kassir
The CloudPayments service offers you a ready-made solution to this problem. Cloud Kassir is a cloud service for online fiscalization of Internet payments in compliance with the law FZ-54. When you connect to this service, an online cash register of one of two models is registered for your company: "Micropay-FAS" and "Micropay-FS" and a fiscal drive is connected to it.
The ticket office will work around the clock, closing shifts according to the schedule. At the time of payment, it will automatically generate a receipt and send it to the buyer. With a high load, a queue of receipts will be created, but each of them will definitely get to the buyer.
All the necessary information about all transactions is sent to the tax service in a timely manner. In addition to the amount, the receipt contains the TIN of the company and the form of its taxation.
Sending an online receipt to the buyer
The buyer chooses where to send the receipt: to an email address or in an SMS message to a phone number. Cloudpayments can automatically send receipts provided that the buyer's email address or phone number is transmitted. Or you send the receipt yourself, the system sends all the details in notifications.
Connection procedure
To receive the online fiscalization service, you must perform the following actions:
- Connect to the Cloud Kassir service;
- Get an electronic signature to work with the FSN website;
- Register in the personal account of the tax service;
- Sign an online fiscalization contract with Cloud Kassir.
List of available fiscal data operators
- LLC "PS ST";
- The first OFD;
- Taxcom;
- OFD platform;
- OFD-I;
- Yandex OFD;
- OFD guarantor;
- Astral OFD;
- TENSOR Company, LLC.
The list may change, check the information on the CloudPayments website.
List of currencies
• Russian Ruble;
* Belarusian Ruble;
* Euro;
* US Dollar;
• Canadian Dollar;
• Pound Sterling;
• Ukrainian hryvnia;
• Kazakh tangue;
• Azerbaijani manat;
• Swiss Franc;
• Czech Crown;
• Swedish Krona;
• Polish zloty;
• Turkish Lira;
• Chinese Yuan;
• Indian Rupee;
• Brazilian Real;
* South African Rand;
• Uzbek sum;
* Bulgarian lev.
Integration scenarios
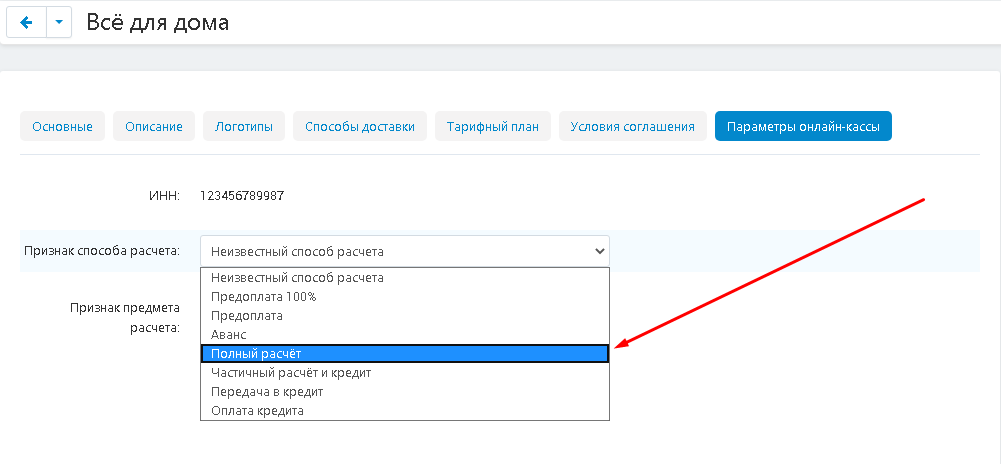
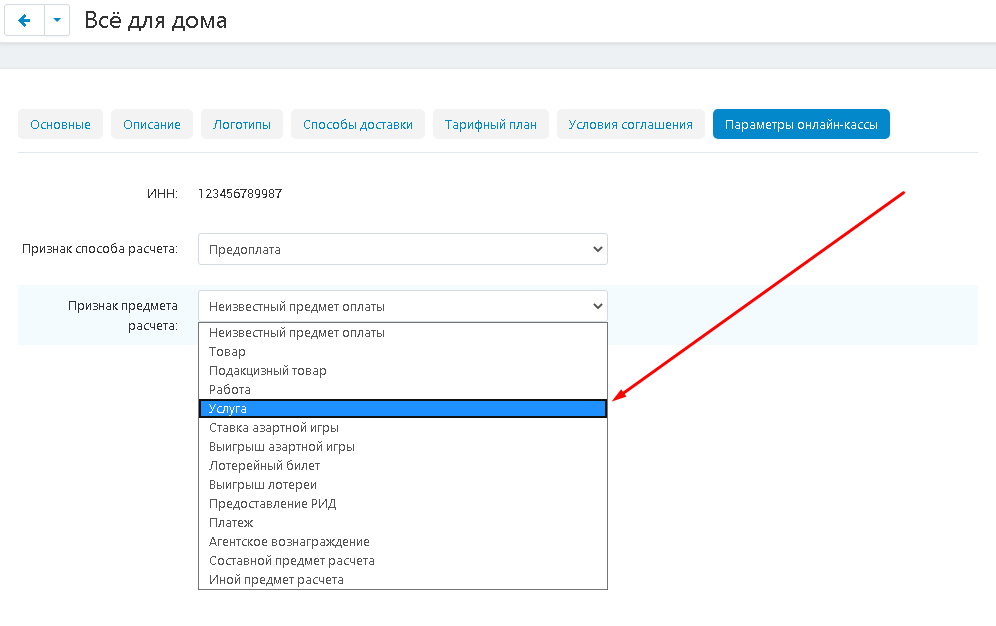
Module settings support the ability to select the attribute of the calculation method and the attribute of the calculation subject. Thanks to this, you can flexibly configure different payment methods and the sale of goods and services on a variety of conditions, taking into account all legal and financial nuances.
Possible signs of the calculation method:
• Prepayment;
• 100% prepayment;
• Advance payment;
• Full calculation;
• Partial settlement and credit;
• Transfer on credit;
* Payment of the loan.
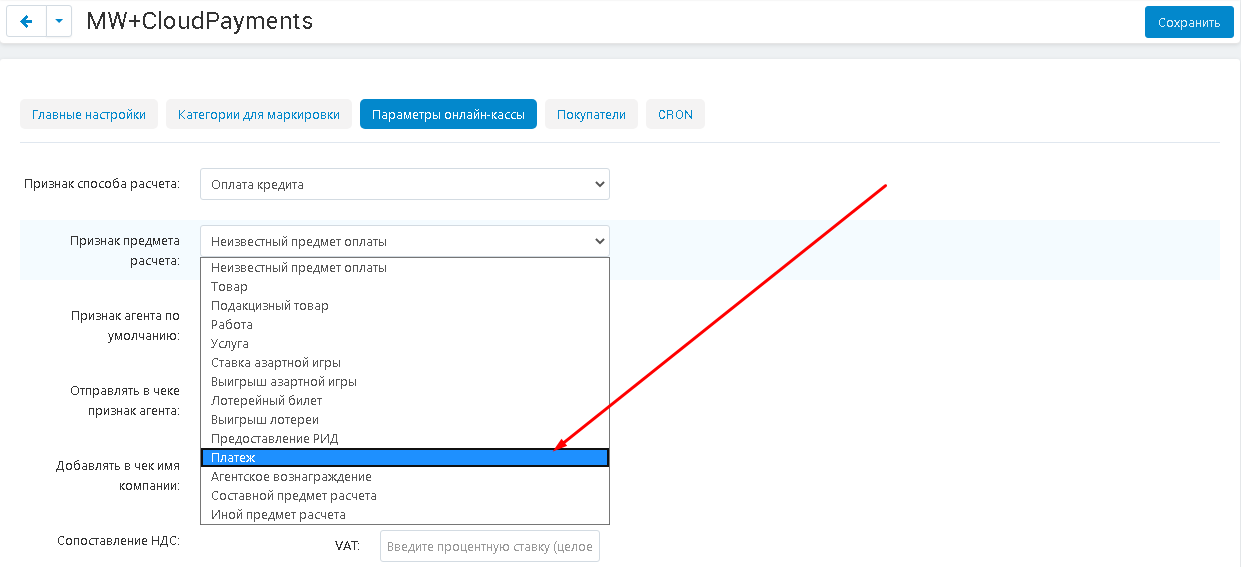
Possible signs of the subject of calculation:
* Product;
• Excisable goods;
* Work;
• Service;
• Gambling rate;
• Gambling winnings;
• Lottery ticket;
• Providing RID;
• Sales;
• Agency fee;
• Composite subject of calculation;
• Another subject of calculation.
Checkout Script
The task of this script is to transfer data to a bank or payment system. He collects them in the appropriate fields, forms a cryptogram from them using the RSA algorithm. The key length is 2048 bits, which fully meets the standards of card data transmission. Thanks to this script, user data does not get to you, but do not forget that your site is also responsible for the security of the payment operation.
Holding (from the English word hold - hold)
A banking term denoting the following procedure: at the time of authorization of the bank card, the credit institution reserves the transaction amount for a certain period during which it expects settlements from the acquirer.
- After the buyer has selected the goods, placed an order and clicked the "Pay" button, the amount required to pay for the order is frozen on his account. The administrator has a new order with the status "Open" in the list. The money can be frozen for up to 5-7 days.
- The administrator checks the availability of goods and if everything is in order, then changes the status of the order to "Processed". At this point, the money is debited from the buyer's account and transferred to the store's account.
- If the product is not available, the buyer is notified about it, and the money is unfrozen on his account, which helps him avoid difficulties associated with the return. At the same time, you also win, since you do not lose money on acquiring and reputation due to unnecessary complaints and conflicts.
Marking "Honest mark"
If there are products in the order that are subject to mandatory labeling, then after payment for the order, fields appear in it for entering the "Honest Sign" identifier (configured separately for the desired categories). When the administrator or courier changes the status to "Completed" (status matching is provided in the settings), the module sends the closing receipt via the OFD via a secure channel to the tax service and the buyer. At the same time, information about the departure of the commodity item is sent to the "Honest Mark".
If the buyer subsequently wishes to return the goods, then together with the correction receipt, information about the return of the commodity item to circulation is sent to the "Honest Sign".
Important!
For the module to work correctly, you need to enable the "Payment directly to the seller" module from CS-Cart and select this payment method for all sellers in the settings.
If your business process involves combining orders for different sellers, use the module " Combining orders".
Ask our managers for information on the implementation of any other logic for your business processes.
Detailed step-by-step instructions for the module can be found at Maurisweb.ru/help - section"Help".
CONTACTS
Up-to-date information about changes in the functionality of the module, as well as compatibility with other modules, is published in our Telegram channel and in the group VKONTAKTE
Telegram t.me/maurisweb
VKONTAKTEvk.com/maurisweb
You can submit a request to the support service, ask questions to the managers about the work or completion of the module via messengers, the groupVKONTAKTE and mail.
- WhatsApp +7-923-364-90-07
- Telegram t.me/mauriswebru
- Telegram +7-923-364-90-07
- VKONTAKTEvk.com/maurisweb
- E-mail: info@maurisweb.ru
Detailed instructions for working with the module
The instruction is current at the time of publication. The module is regularly updated and improved. There may be minor differences in the control of the module.
SEPARATION OF PAYMENTS FROM CLOUDPAYMENTS (GOOGLE PAY, APPLE PAY) + CASH OFFER CLOUDKASSIR + HONEST SIGN = REPORTING FOR MARKETPLACE CS-CART MULTI-VENDOR
The module interacts with CloudPayments, a Russian group of companies providing Internet acquiring services. Fastest integration in the e-commerce market.
Pop-up form with a minimum number of fields for entering card data. Online payment on your website without additional transitions to the payment gateway (redirect) with automatic identification of the issuing bank and payment system (Visa, Mastercard, Mir, etc.).
SCOPE OF APPLICATION
Suitable for marketplaces interacting with CloudPayments.
EXAMPLE OF APPLICATION
When placing an order, the buyer chooses the CloudPayments payment method, enters the bank card details, and completes the purchase. The system will remember the card details and you will not need to enter them again the next time you purchase.
SPECIFICATIONS
- Allows you to set the time for freezing funds in hours;
- Allows you to add and exclude categories for product labeling;
- Adds settings for online checkout parameters by default and for an individual vendor;
- Adds the name of the company and the name of the agent to the check;
- Adds VAT of goods to the receipt;
- Works on CRON;
- Saves data previously entered by the buyer bank cards and displays them for the next purchase.
FOR CORRECT OPERATION OF THE MODULE:
1. Configure the module (see the section "Module settings")
2. Set up a payment method (see the section "Creating a payment method")
3. Set up taxation (see the section "Working with taxes")
4. Adjust tax rates.
5. Indicate the tax in the product.
CONFIGURING THE MODULE
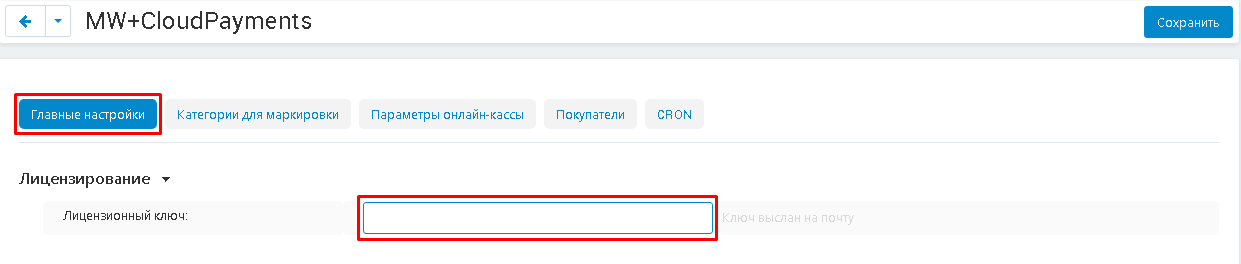
1. To configure a module, go to the "Modules" tab, in the pop-up menu, select "Modules Management" and the "MAURISWEB" section.

2. In the list that opens, select the module you are interested in and click on its name highlighted in blue or black.

3. Go to the "General Settings" tab. If the license key is not set automatically and the module settings will be blocked, go to your account at www.maurisweb.ru, copy the license key and paste it into the appropriate item. The key has also been sent to your email.
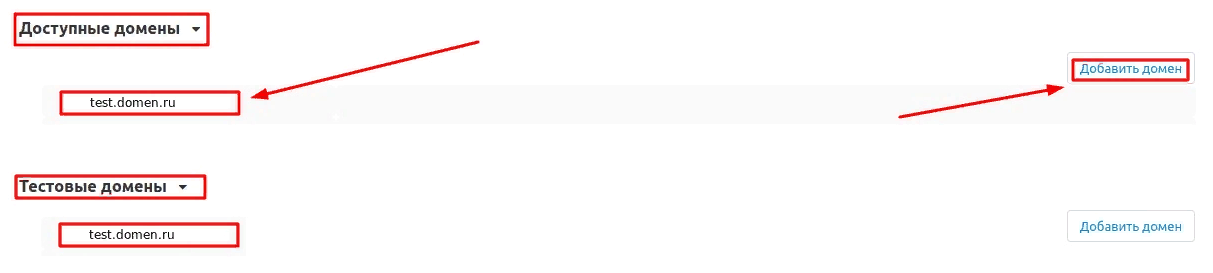
4. In the "Available domains" and "Test domains" sections, check the correctness of the specified domains. You can add additional domains by clicking on the white "Add Domain" button on the right side of the page. The total number of domains should not exceed three.
5. Go down below, select the "Basic settings" section and tick the box "Save data when removing the module" so as not to lose them when reinstalling the module.

6. In the "Time of funds freezing. (In hours)", enter in figures the period of time during which the funds will be frozen on the intermediate account.

7. Check the box "Add logo by default" for the CloudPayment icon to be displayed during payment.

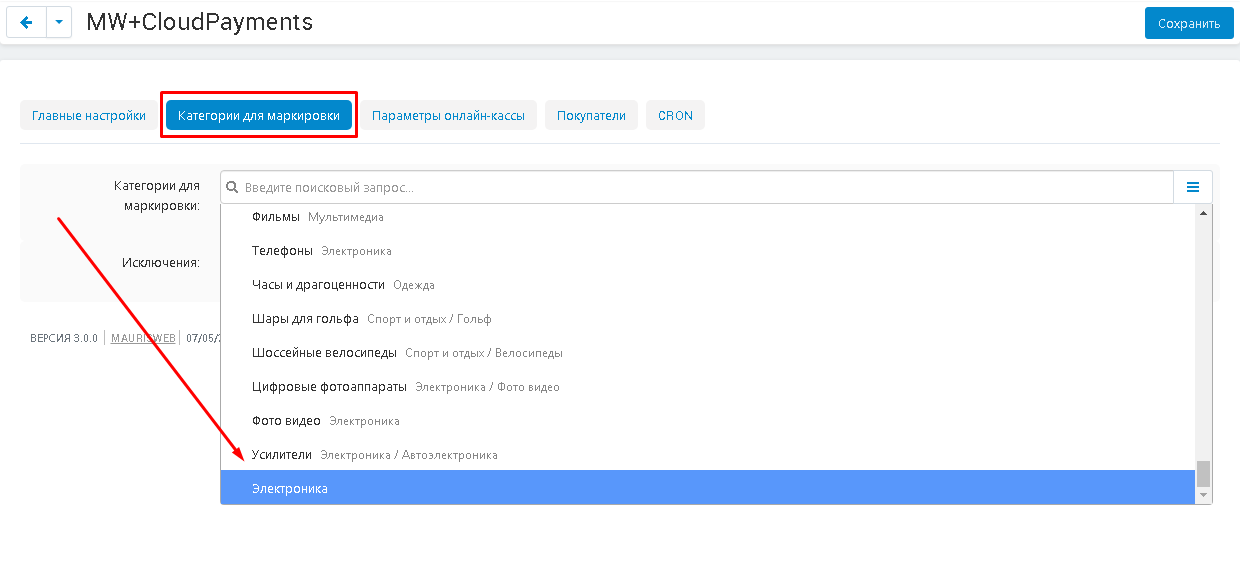
8. Go to the "Categories for Labeling" tab. In the "Categories for labeling" item, expand the additional menu to select the required categories. If necessary, use the search. If no categories are selected, no labeling will take place.
Note! If you have installed the Maurisweb module "Prohibiting the selection of non-finite categories", then for the correct display of categories for marking, it must be turned off.
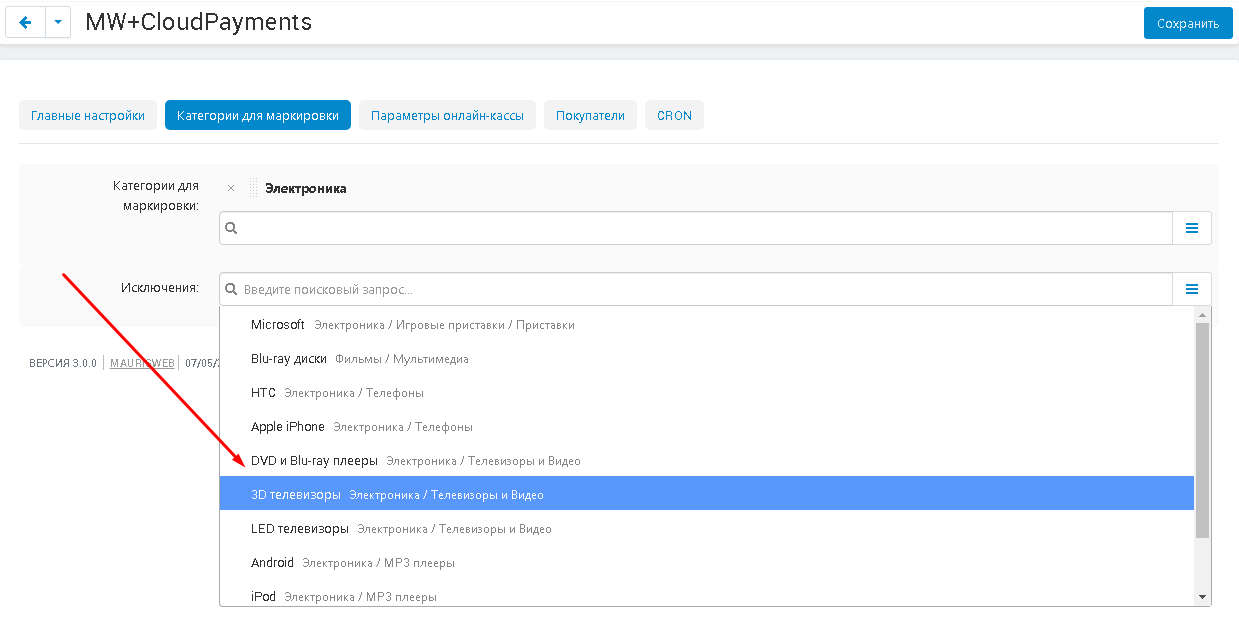
9. In the exclusion section, select those categories or subcategories that will not be tagged. For example, selecting the category "Electronics" selects the subcategory "3D TVs", which will not be labeled.
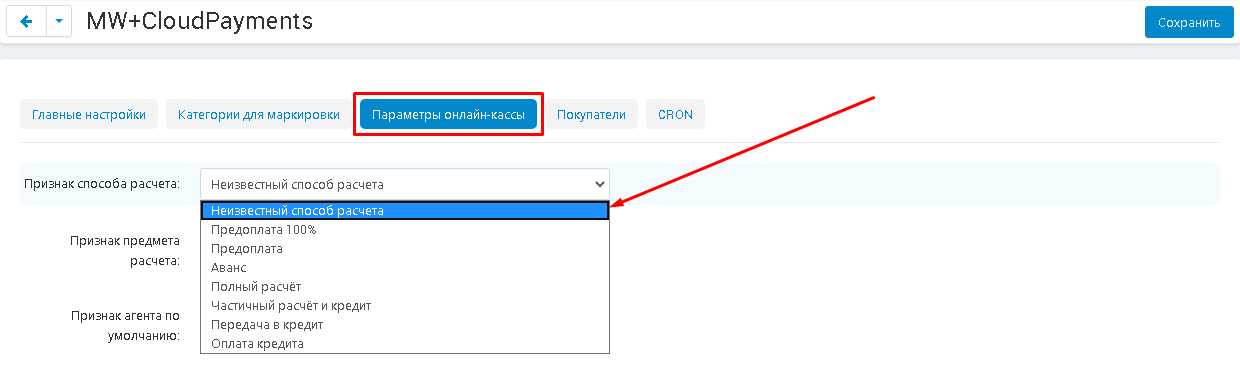
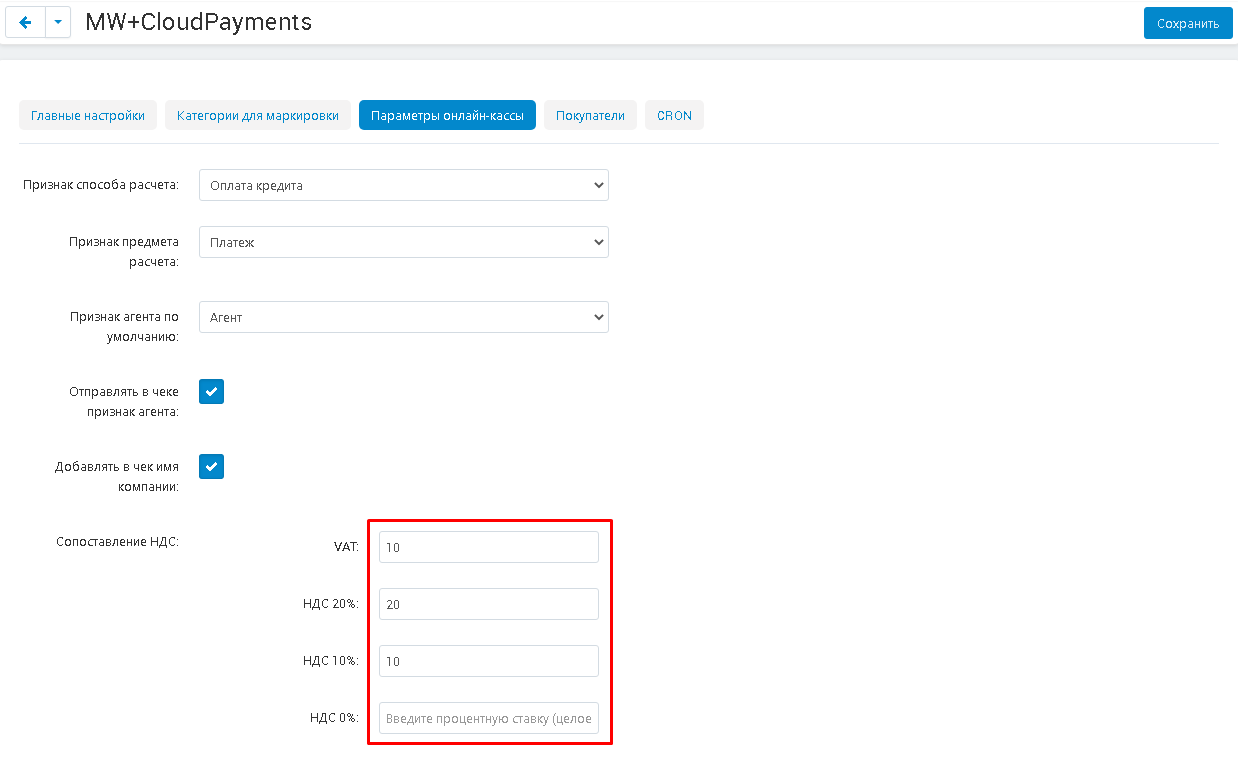
10. Go to the "Online checkout parameters" tab. In the item "Sign of the payment method", open the additional menu and select one of the options for how the payment will be made.
11. Open the menu in the item "Sign of the subject of calculation" and select one of the options, in the form of which the payment will be accepted.
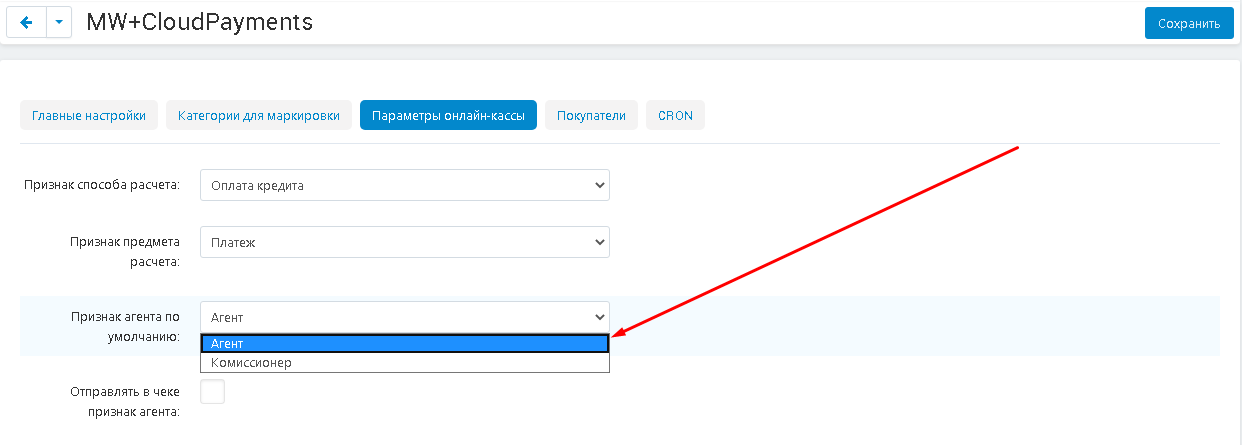
12. Expand the menu under "Default agent attribute" and select one of the options: "Agent" or "Agent".
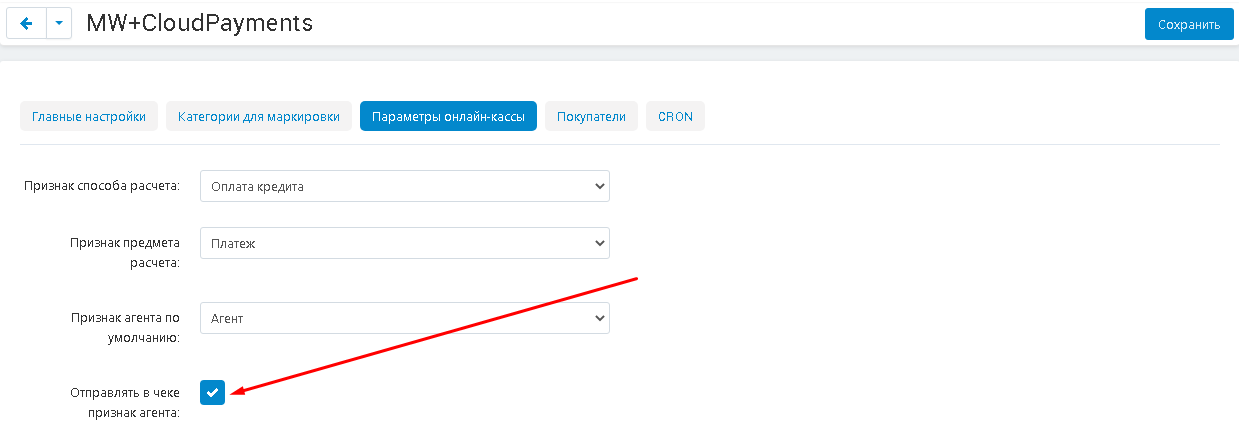
13. To send a sign of the agent in the check, put a tick in the corresponding item.
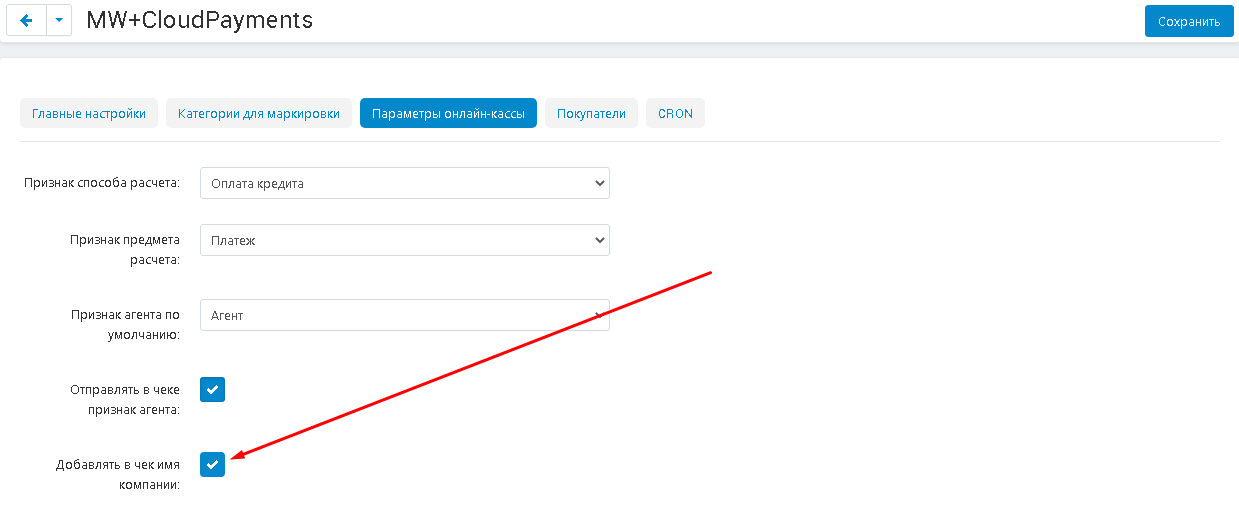
14. To add the name of the company to the check, check the corresponding box.
15. In the item "VAT comparison" specify the percentage rate for calculating VAT.
For more information about working with VAT, see the section "Working with taxes".
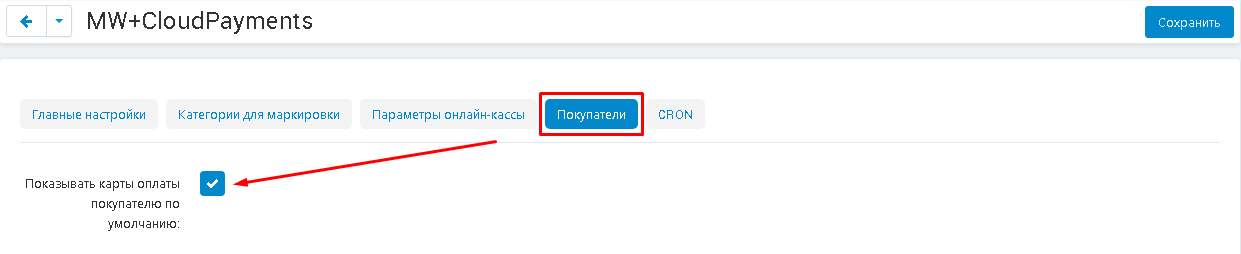
16. Go to the "Buyers" tab. To display the buyer's payment cards on the storefront by default, check the corresponding box.
17. Enter the name of the block in which the bank cards will be displayed.

18. Add a command to the scheduler to get all the tokens from the CloudPayments service.

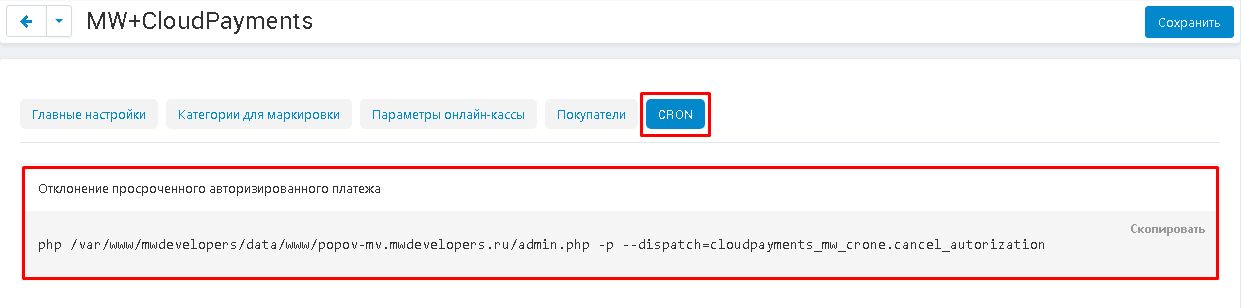
19. Go to the "CRON" tab. Add a command to the planner to reject an overdue authorized payment.
20. Save the module settings by clicking on the blue "Save" button at the top right of the panel.

21. The module automatically makes changes to the profile fields. To check this, go to the "Administration" tab, select the "Profile fields" and "Vendor information" sections.
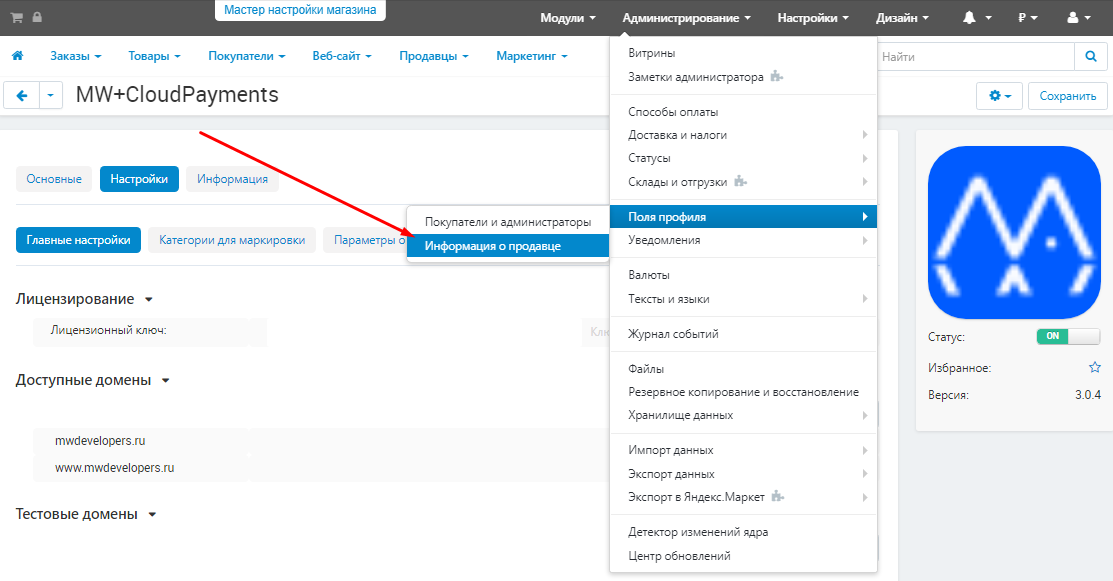
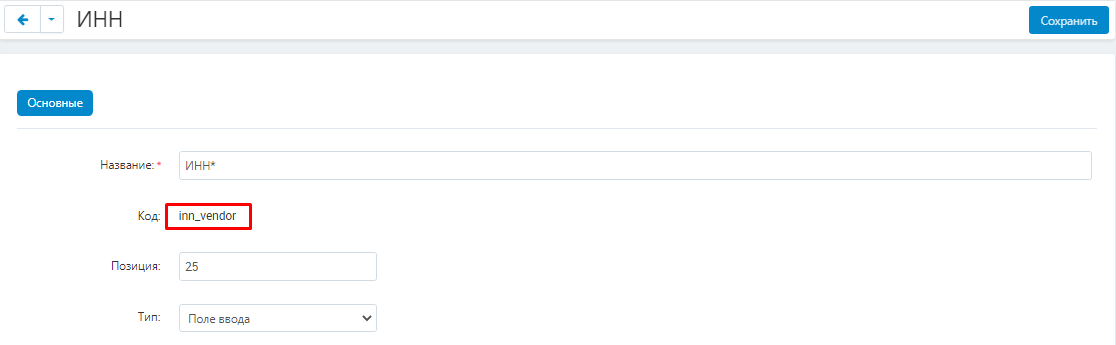
22. The second field of the "INN" profile should appear. This is a special field of the seller's TIN profile, which is required to generate a receipt. Check the correctness of creation by clicking on the name of the profile field.
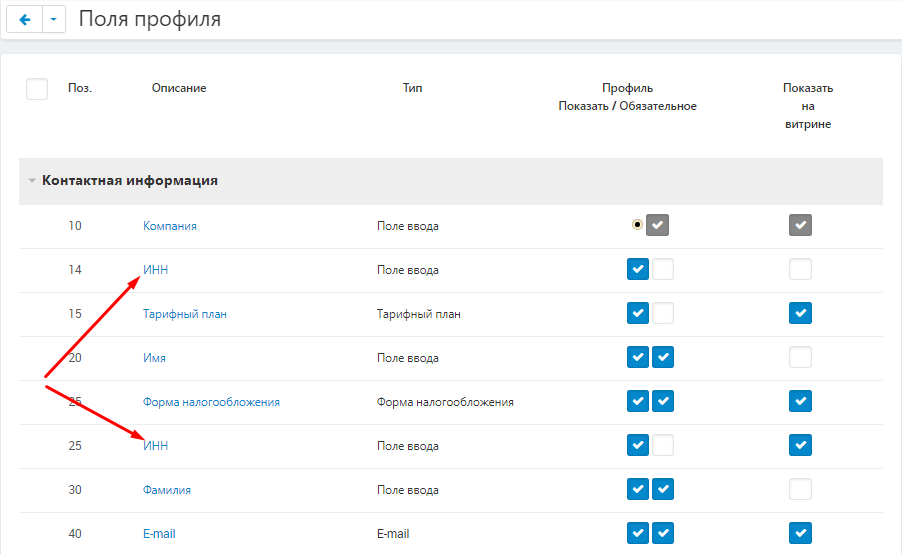
23. The code field must contain "inn_vendor". If necessary, mark it with a symbol (*,!, ^) And never delete it!
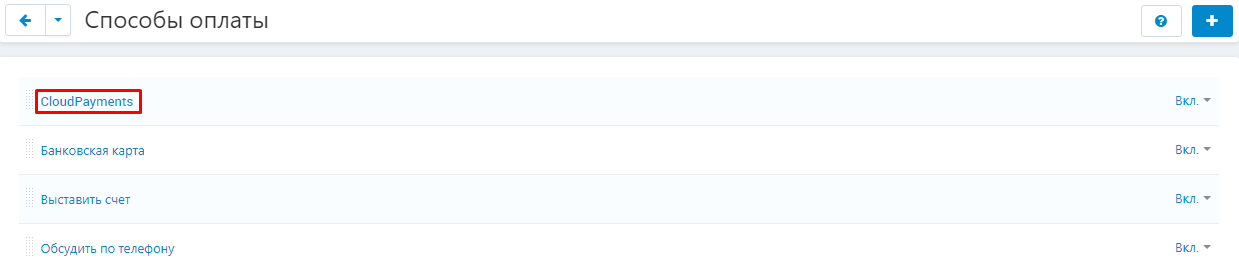
CREATING A PAYMENT METHOD
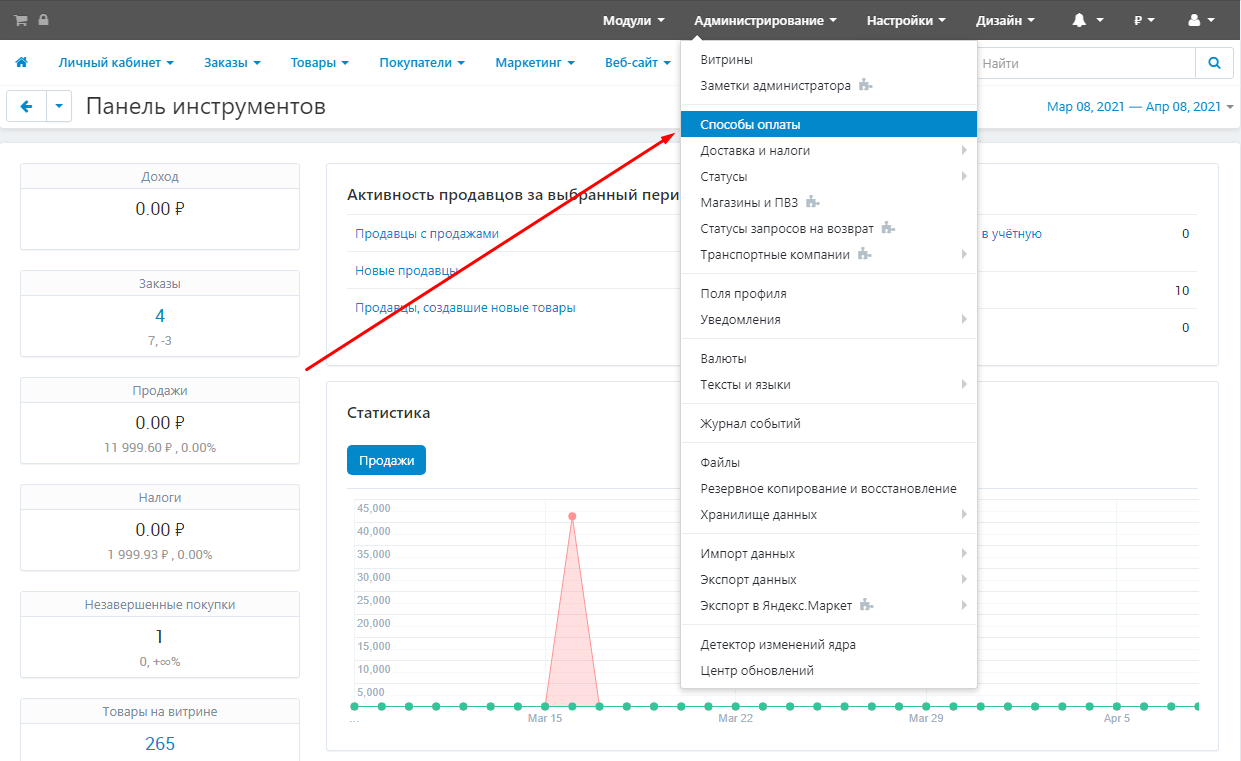
1. To use the functionality of the module, you need to create a new payment method. To do this, go to the "Administration" tab and select the "Payment Methods" section.
2. Click on the blue plus button in the upper right corner of the panel.

3. Select the "Basic" tab and enter the name of the payment method in the "Name" field.
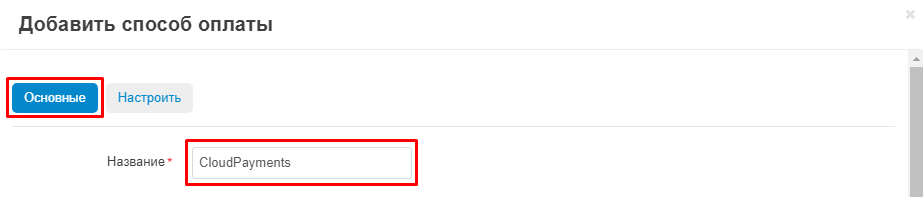
4. Expand the additional menu in the "Processor" item and select the "CloudPayments + MW" item.

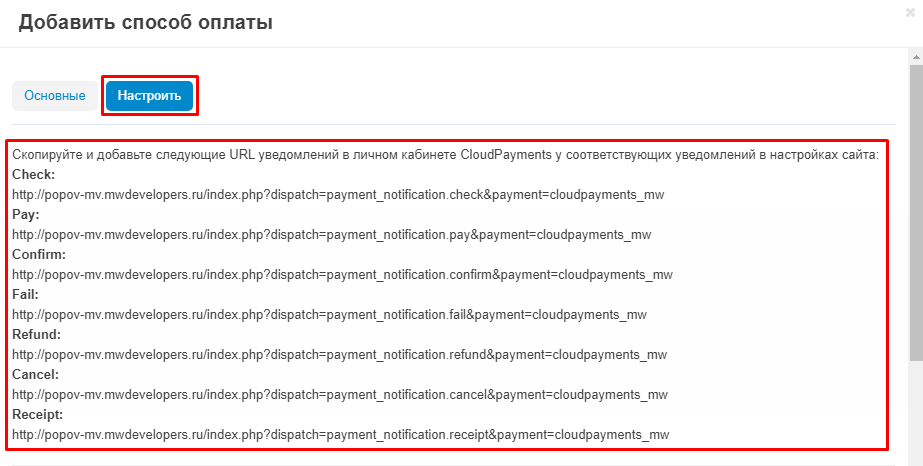
5. Go to the "Customize" tab. Copy and add the URL of notifications in your CloudPayments Personal Area from the corresponding notifications in the site settings.
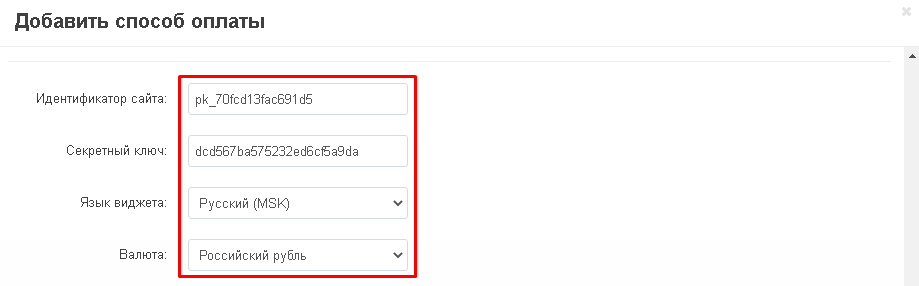
6. Scroll down to the "Add a Payment Method" section. Fill in the site ID and secret key. Change the widget language and currency if necessary.
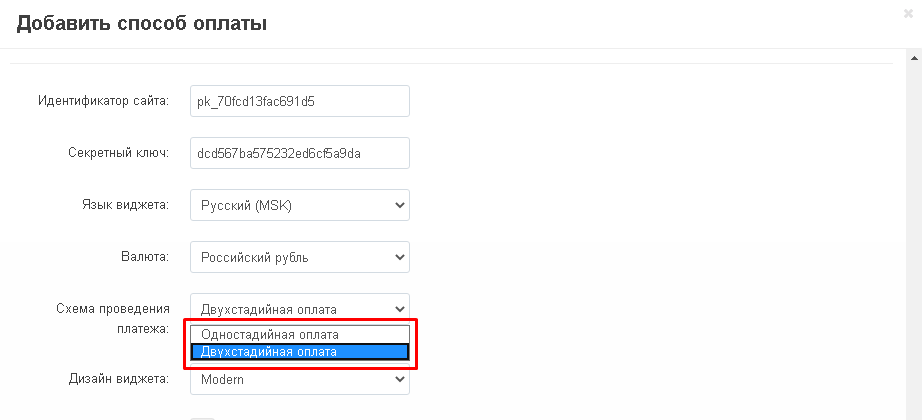
7. Select the option of the payment scheme: "One-step" or "Two-step".
8. Install the widget design. Payment widget - a pop-up form for entering the card details and the payer's e-mail address. The widget automatically detects the type of payment system: Visa, MasterCard, Maestro or "MIR", as well as the card issuing bank and shows the corresponding logos.
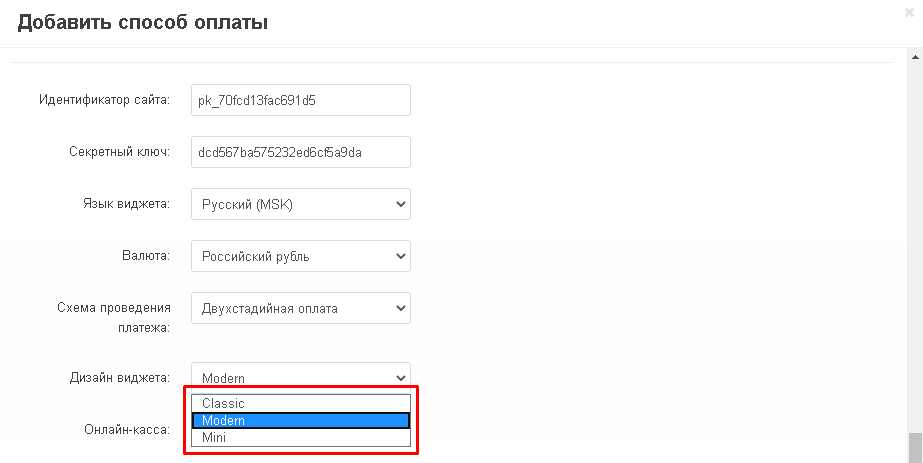
There are three widget options available: "Classic"
"Modern"
и "Mini".
9. Check the box to apply the online checkout.

10. Choose a taxation system.

11. Specify the method of payment and the subject of payment for this method of payment. Enter the TIN of the organization. If you do not enter the TIN of a specific seller, then it will be duplicated from the default settings.

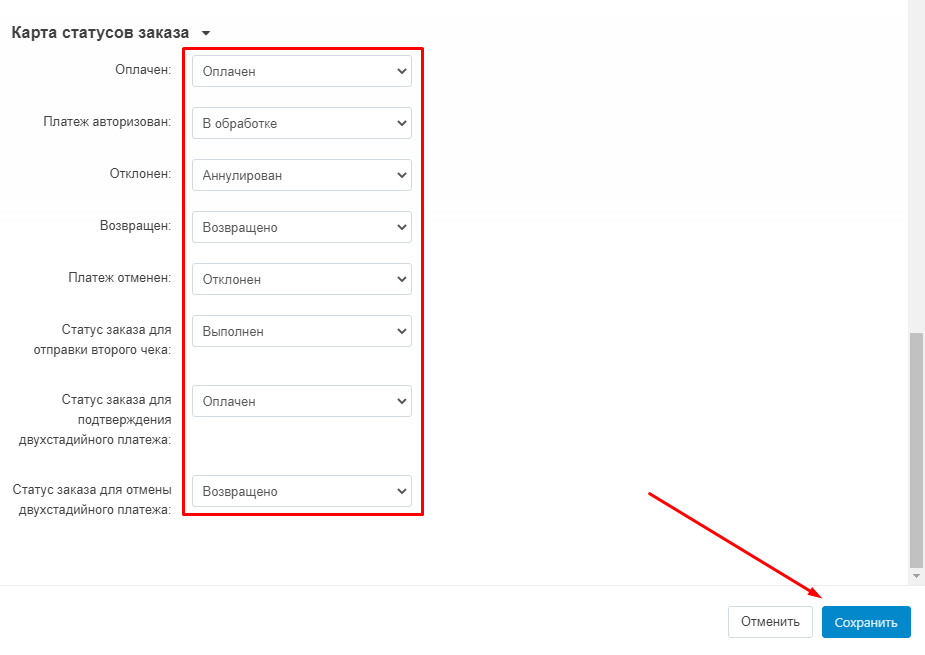
12. Correlate statuses for this payment method. When finished, click on the blue "Save" button in the lower right corner.
For example, the standard ratio of statuses for a two-step payment.
13. The new payment method will appear in the general list.
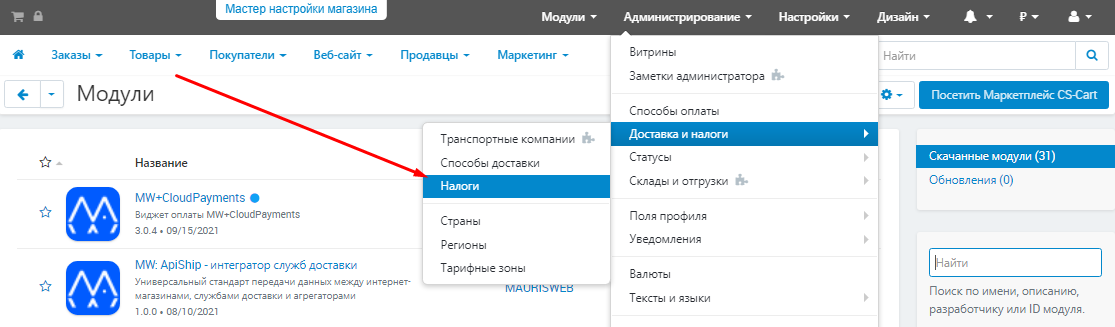
WORK WITH TAXES
1. All the necessary information about taxes can be found in the "Taxes" section. To do this, go to the "Administration" tab, the "Shipping and taxes" section and select "Taxes".
2. Here you can see the VAT rates that are already available. Or create new ones by clicking on the blue plus button at the top right of the panel.
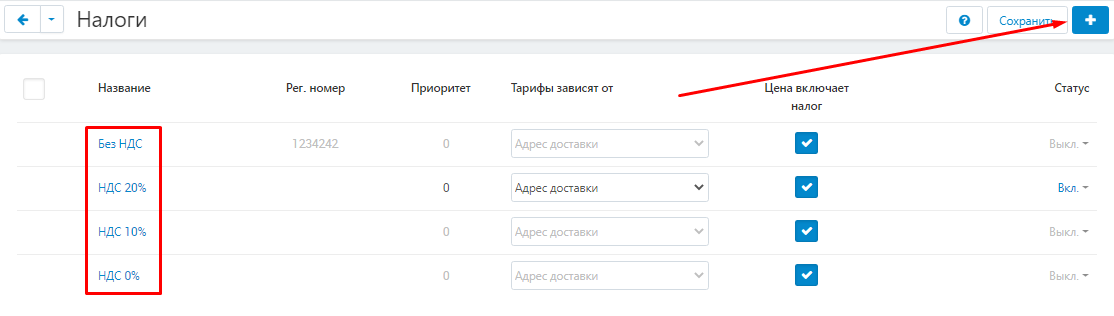
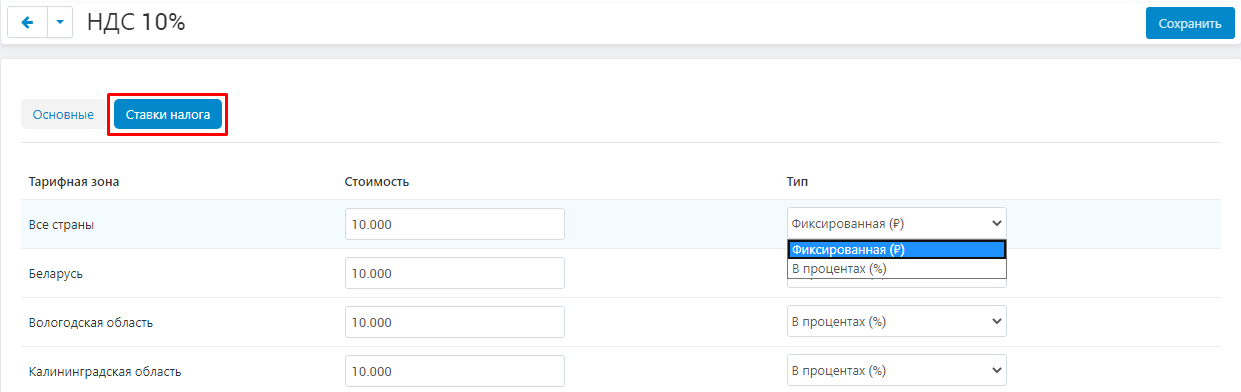
3. If there is a difference in taxation for countries or tariff zones, then go inside the desired VAT rate and select the "Tax rates" tab. Here, for each tariff zone, you can specify the cost and its type.
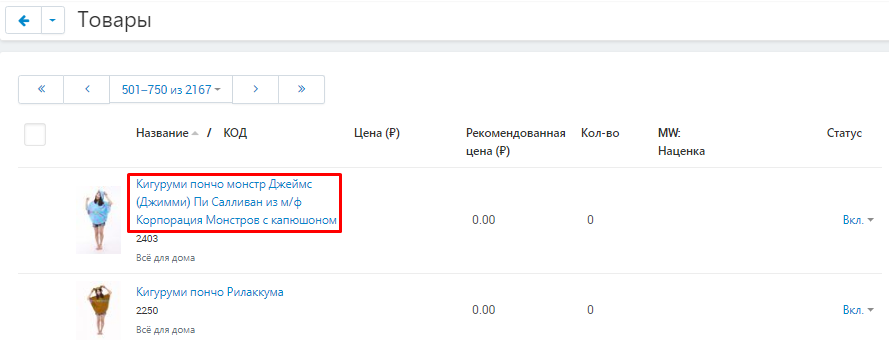
4. To add VAT to a product, go to the "Products" tab and select "Products".
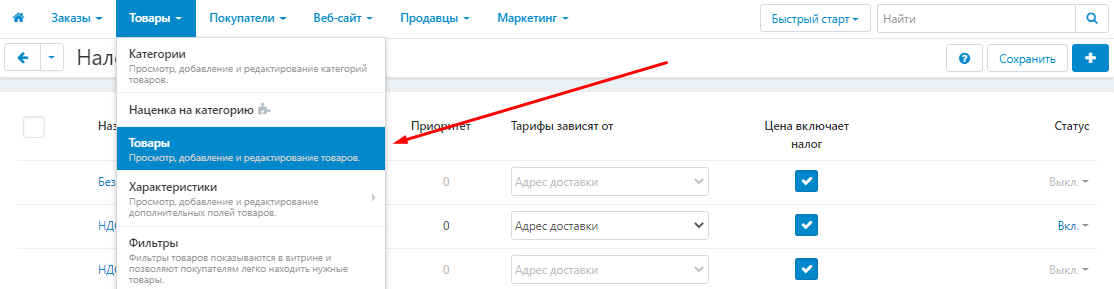
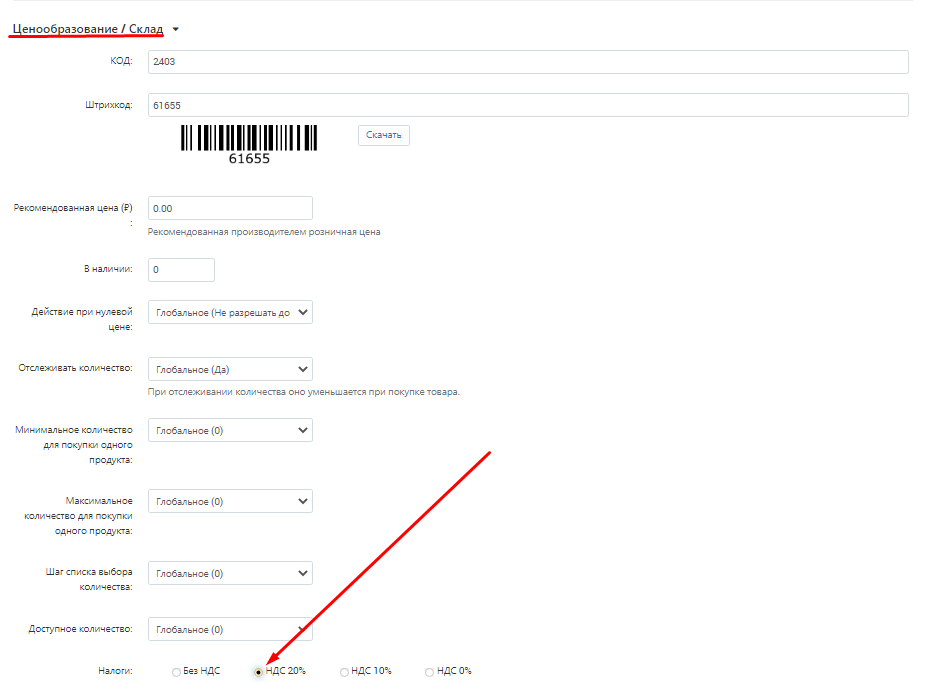
5. Select a product and click on its name highlighted in black or blue.
6. Go to the "Pricing / Warehouse" section and in the "Taxes" section, mark the required VAT.
SELLER-SPECIFIC SETTINGS
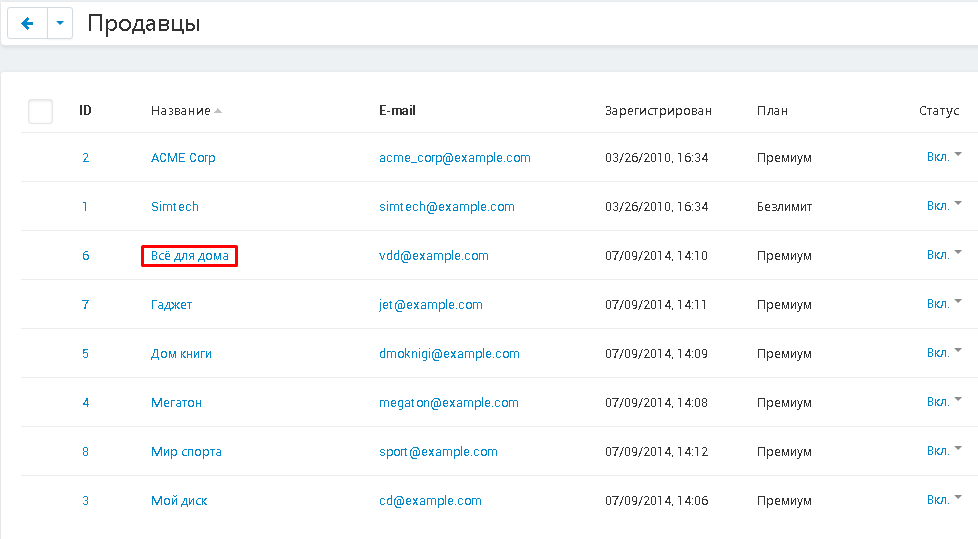
1. To configure settings for a specific seller, go to the "Sellers" tab and select the "Sellers" section.

2. In the list that appears, select the required seller and click on its name.
3. Go to the "Online checkout parameters" tab.

4. Go to the "Online checkout parameters" tab. In the item "Sign of the payment method", open the additional menu and select one of the options for how the payment will be made.
5. Expand the menu in the item "Sign of the subject of calculation" and select one of the options, in the form of which the payment will be accepted.
6. Save your changes by clicking on the blue "Save" button in the upper right corner of the panel.

ORDERING
1. Click on the button in the form of a grocery basket in the upper left corner to go to the storefront.

2. Add the product to your cart and click on the "Checkout" button.
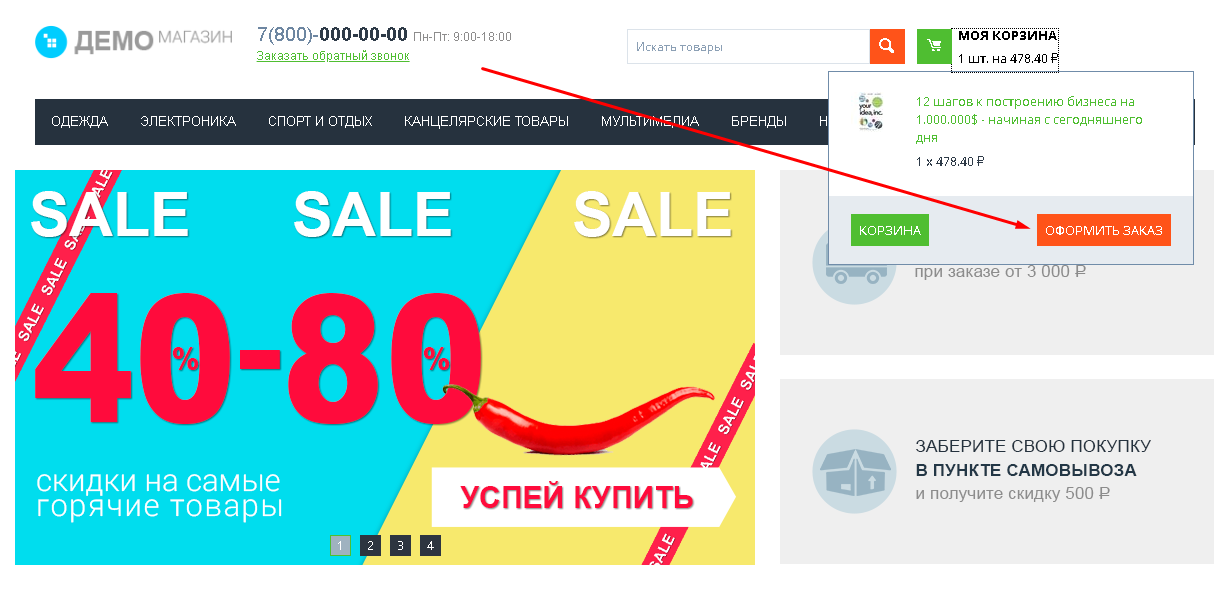
3. A new one, created using the module, will appear in the list of payment methods.
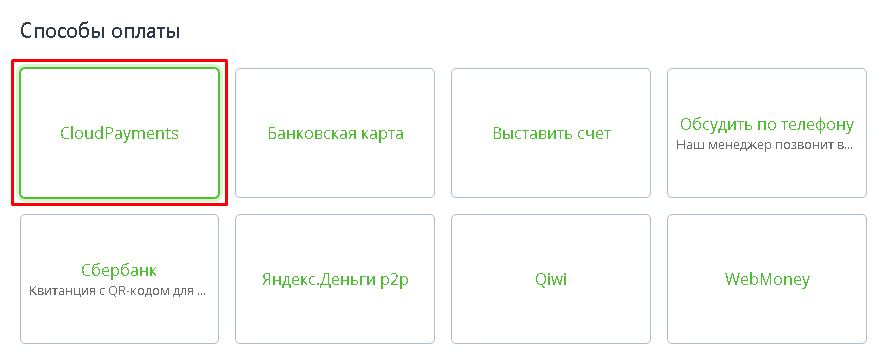
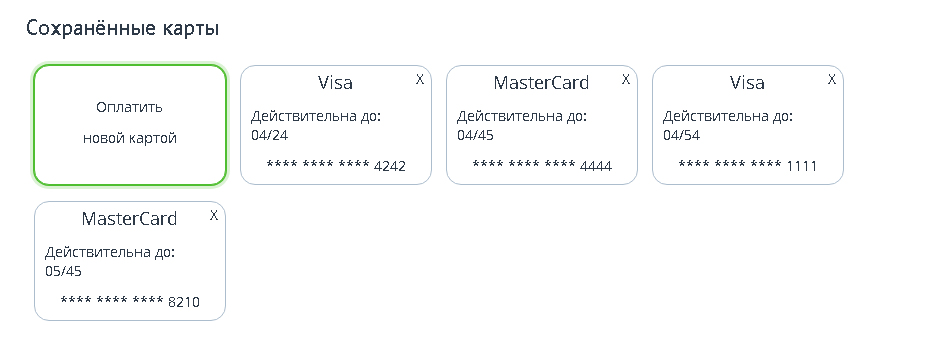
4. In case of repeated use of this payment method, it will display all bank cards for which payment has already been made. To use one of them, you need to click on the button with the data of this card.
To add a new card (or if there are no saved ones yet) click on the "Pay with a new card" button.
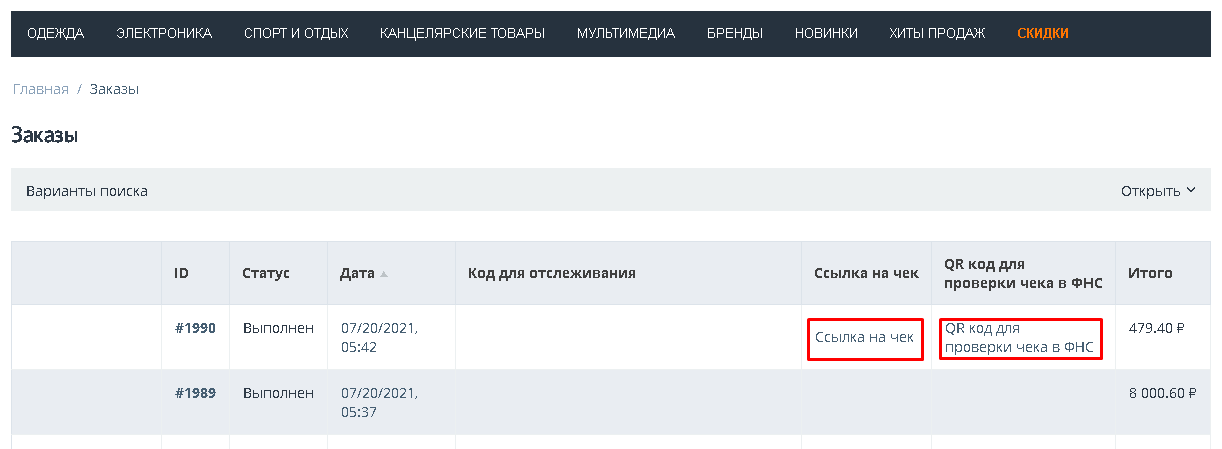
5. After completing the order, the buyer will have access to receive a receipt and a QR code. This will be reflected in all orders (after purchase, or in the profile).
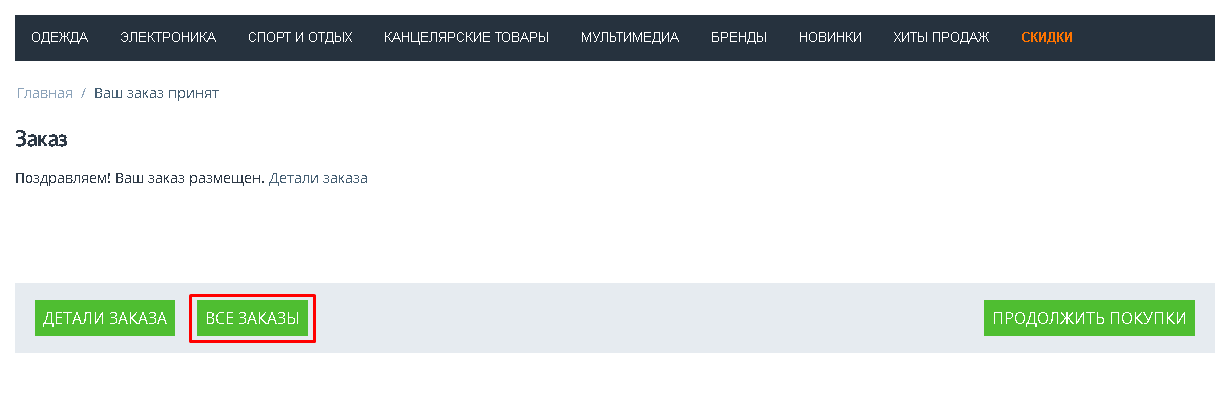
6. For orders paid through CloudPayments and having the "Completed" status, links to the receipt and QR code will be displayed.
EXAMPLE:

Relevance of the instruction - v.3.0.7