TILDA HTML CONSTRUCTOR MODULE FOR CS-CART
By synchronizing work with the Tilda constructor, the module makes it possible to easily and quickly make up pages. This is a new way to create websites where the process is like a game. Now everyone is a designer, if there is a passion for what they love.
Save with pleasure!
Creating professional content is usually a long and costly process. In large companies (such as Ozon, Wildberries, etc.), this is done by a staff of specialists who are very difficult to find, and their services have an appropriate cost. A long process of approvals, development of an adaptive template for different versions of devices, edits, etc. can stretch the creation of content for many months.
Using the Tilda HTML Constructor module greatly facilitates the entire process of creating pages, blocks/sections. You save on maintaining a specialized staff and, more importantly, you save time on creating unique content. After all, no one else knows what it should be like, except you!
At the same time, you can do the direct creation of pages, both yourself and any employee (manager, administrator, etc.) Completely focus on the content – everything else has already been thought out for you.
Learning to use Tilda is easy!
The Tilda Help Center contains many articles, text and video instructions, after studying which you will learn everything about the process of creating content. At each stage, you will be accompanied by hints, following which you will easily learn everything.
Use ready-made templates or a library that includes more than 550 blocks that can be combined using an intuitive interface. And the Zero Block layout will help you create new blocks from scratch, making their design unique. The blocks themselves are designed in such a way that the creation of an adaptive website is elementary, so you do not have to optimize the design for different devices.
Advantages of the module
The module completely transfers the content created in the Tilda constructor, forming pages and blocks for the marketplace. You can fill in the content, create your own banner or a unique product card.
You can publish the finished content in any section:
- Home page,
- Products,
- Categories,
- Shopping cart,
- Making an order,
- Authorization page,
- Profile,
- Gift certificates,
- Specifications,
- Seller's page, etc.
Features
- The set includes the module "Full width Blocks".
- The module works only if there is a "Business" tariff for Tilda.
Constructor as a theme
This functionality is not a replacement for a standard or non-standard theme for the platform, but only an addition. It can only be used as part of a content change.
The module is compatible with:
- with the standard Responsive theme;
- with the themes of our partners AlexBranding UniTheme2 and Youpi;
- with themes from most other developers.
Detailed step-by-step instructions for the module can be found atMaurisweb.ru/help - section"Help".
CONTACTS
Up-to-date information about changes in the functionality of the module, as well as compatibility with other modules, is published in our Telegram channel and in the group VKONTAKTE
Telegram t.me/maurisweb
VKONTAKTEvk.com/maurisweb
You can submit a request to the support service, ask questions to the managers about the work or completion of the module via messengers, the groupVKONTAKTE and mail.
- WhatsApp +7-923-364-90-07
- Telegram t.me/mauriswebru
- Telegram +7-923-364-90-07
- VKONTAKTEvk.com/maurisweb
- E-mail: info@maurisweb.ru
Detailed instructions for working with the module
The instruction is current at the time of publication. The module is regularly updated and improved. There may be minor differences in the control of the module.
Tilda HTML Constructor
Synchronizing work with the Tilda designer, the module makes it possible to quickly and easily layout pages. This is a new way of building websites, where the process is like a game. Now everyone is a designer if there is a passion for what they love.
SCOPE OF APPLICATION
The module is suitable for any stores and marketplaces that require a site with a beautiful, modern and understandable design.
EXAMPLE OF APPLICATION
- Homepage;
- Page "About the Company";
- Catalogs of goods and services;
- Section "Team", etc.
SPECIFICATIONS
- Imports content created with the Tilda constructor;
- Converts content to pages;
- Allows you to add pages to storefront layouts.
COMMUNICATION WITH OTHER MODULES
The kit includes the "Full Width Blocks" module.
For information on compatibility with other modules, see product features:
For CS-Cart - https://maurisweb.ru/programmy...
For Multi-Vendor - https://maurisweb.ru/programmy...
CONFIGURING THE MODULE
1. To install a module, go to the "Modules" tab, in the pop-up menu, select "Manage modules" and "MAURISWEB".

2. In the list that opens, select the module you are interested in and click on its name.

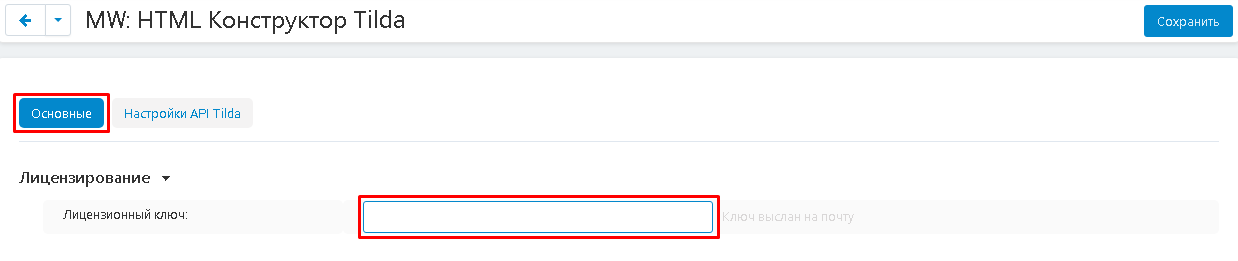
3. On the page that opens, select the "General" tab. If the license key is not set automatically and the module settings will be blocked, go to your account at www.maurisweb.ru, copy the license key and paste it into the appropriate item. The key has also been sent to your email.
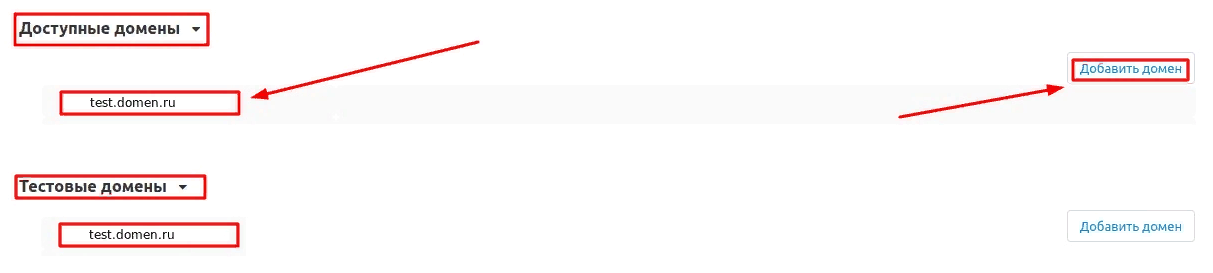
4. In the "Available domains" and "Test domains" sections, check the correctness of the specified domains. You can add additional domains by clicking on the white "Add Domain" button on the right side of the page. The total number of domains should not exceed three.
5. Go down below, select the "Basic settings" section and tick the box "Save data when removing the module" so as not to lose them when reinstalling the module.

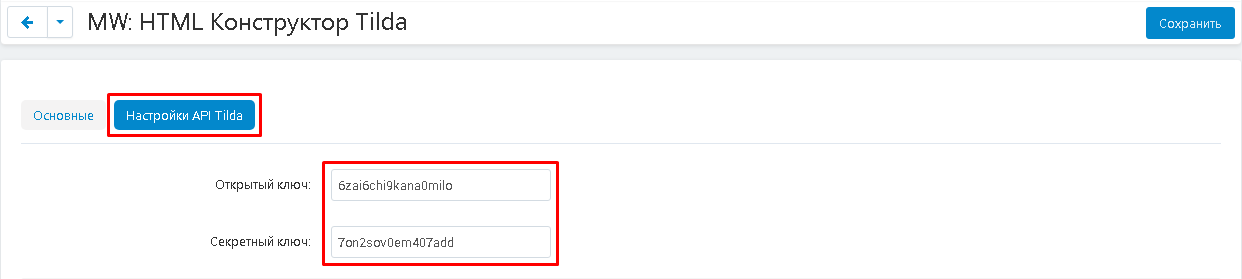
6. Go to the "Tilda API Settings" tab, enter the public and private keys obtained from the Tilda website.
7. To enable automatic CRON update, check the box.

8. To configure CRON to load and refresh pages, copy the command and add it to the scheduler.

9. Save the module settings. To do this, click on the blue "Save" button in the upper right corner of the panel.

WORK WITH CONTENT
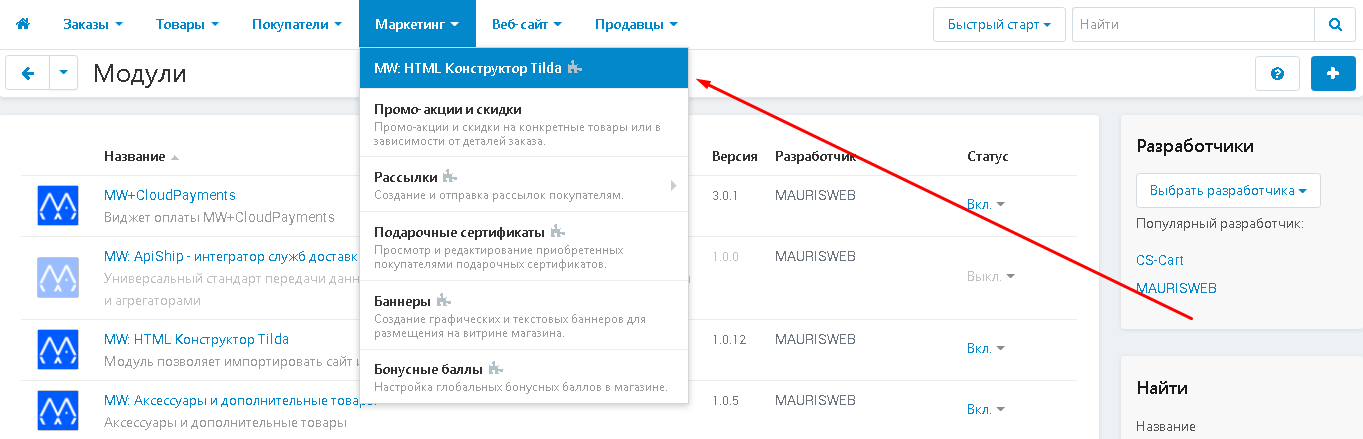
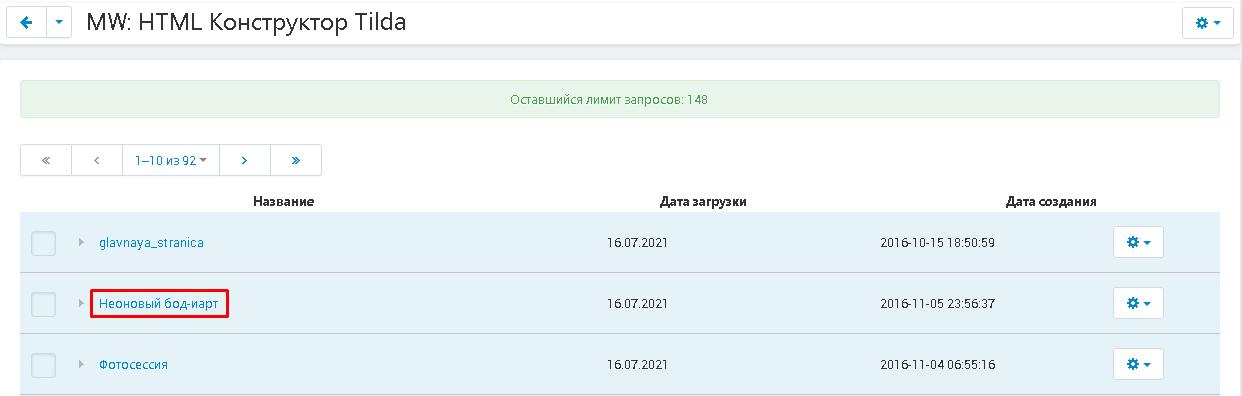
1. To get started, go to the "Marketing" tab and select "MW: Tilda HTML Constructor".
2.In the lower right corner of the panel, click on the gear-shaped button and select the "Load projects" function.

3. After the update, the available projects will open.
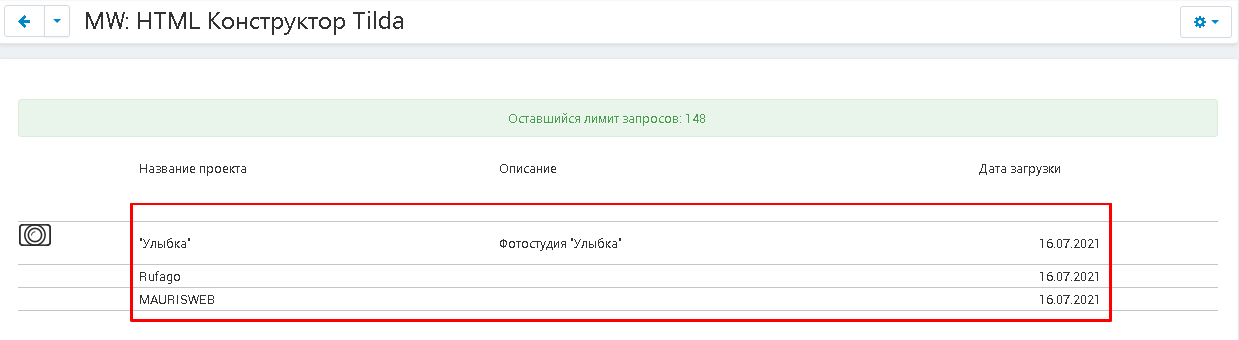
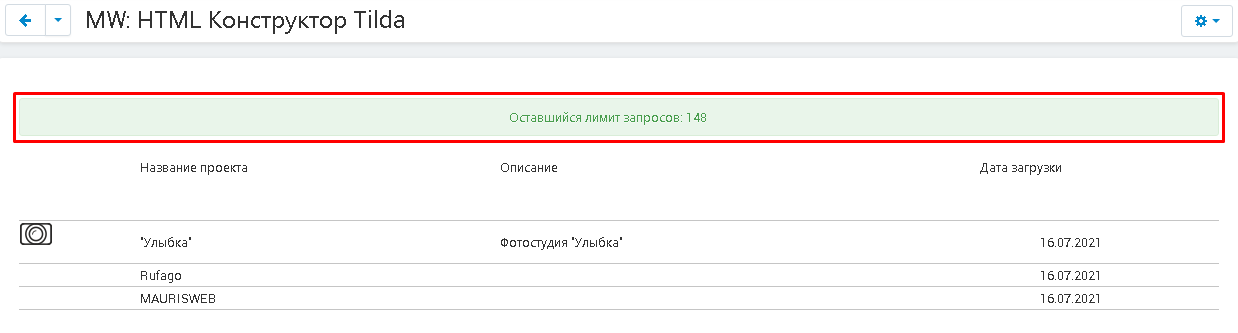
4. Above the list of projects, the available number of requests to the Tilda site will be displayed. After its end, access will be terminated for a certain time.
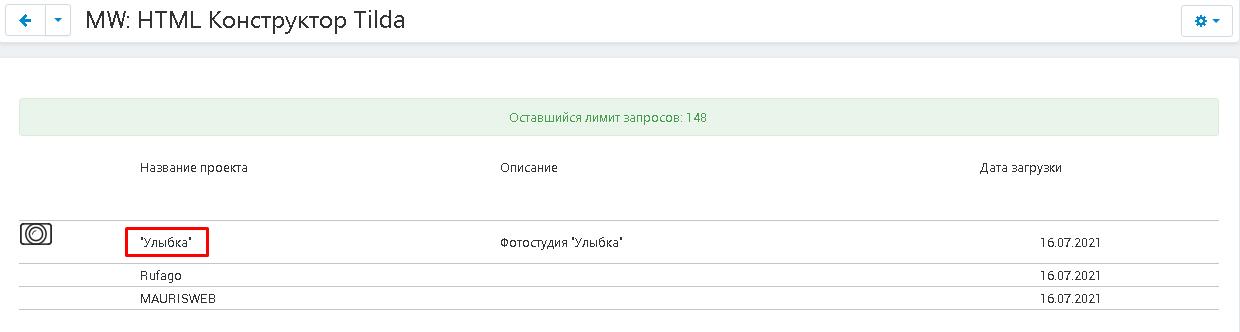
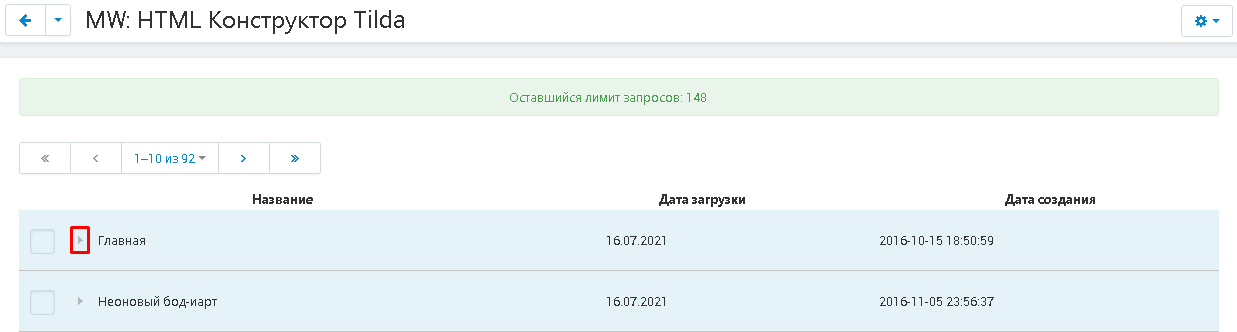
5. To open the required project, click on its name.
6. Initially, the page list will be empty. To load them, click on the gear in the right corner of the panel and select "Load Project".

7. After loading, a list of pages available for use will appear.
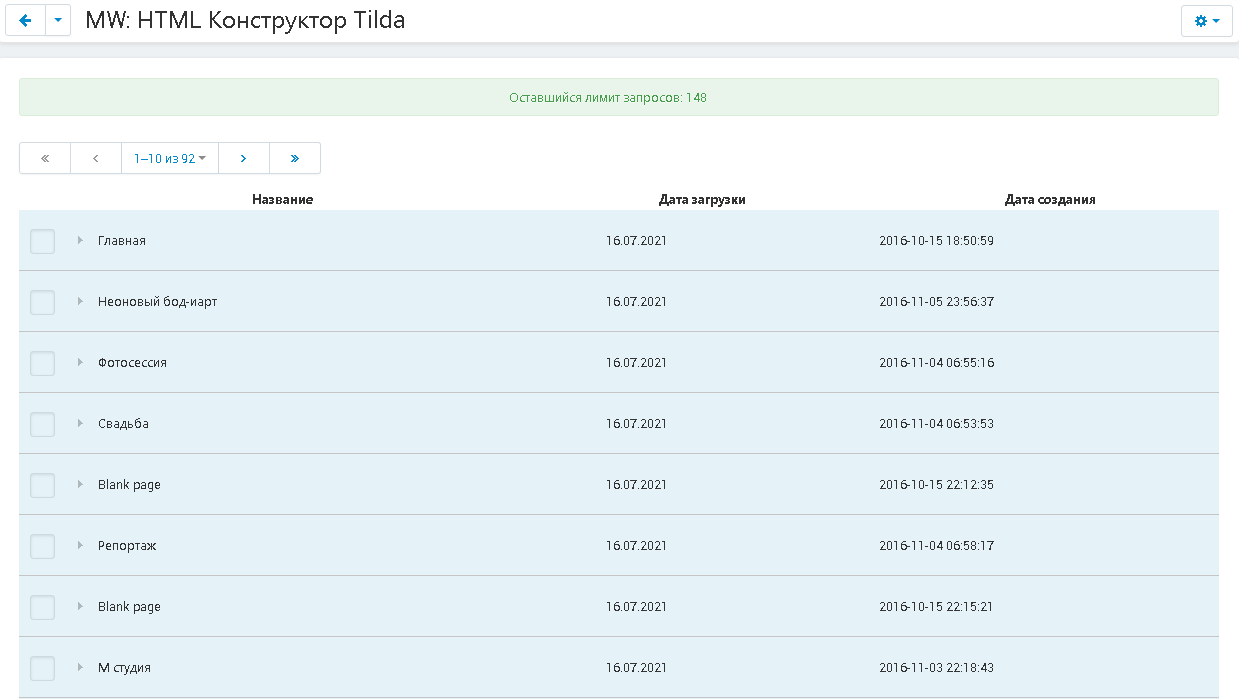
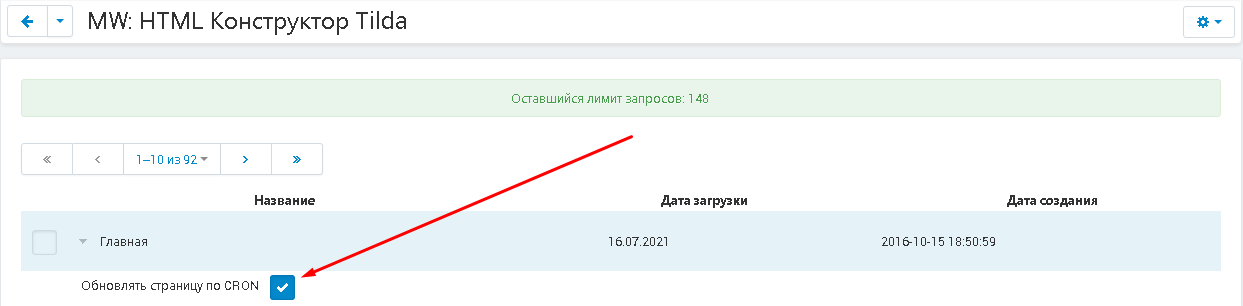
8. Click on the arrow next to the title to expand the details of the desired page.
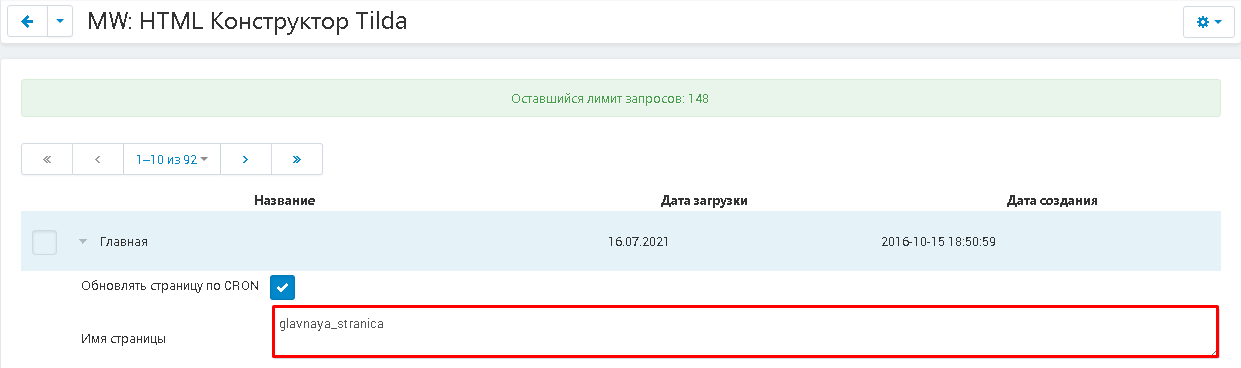
9. For the page to be automatically updated by CRON, leave a check mark in place and uncheck to disable this function.
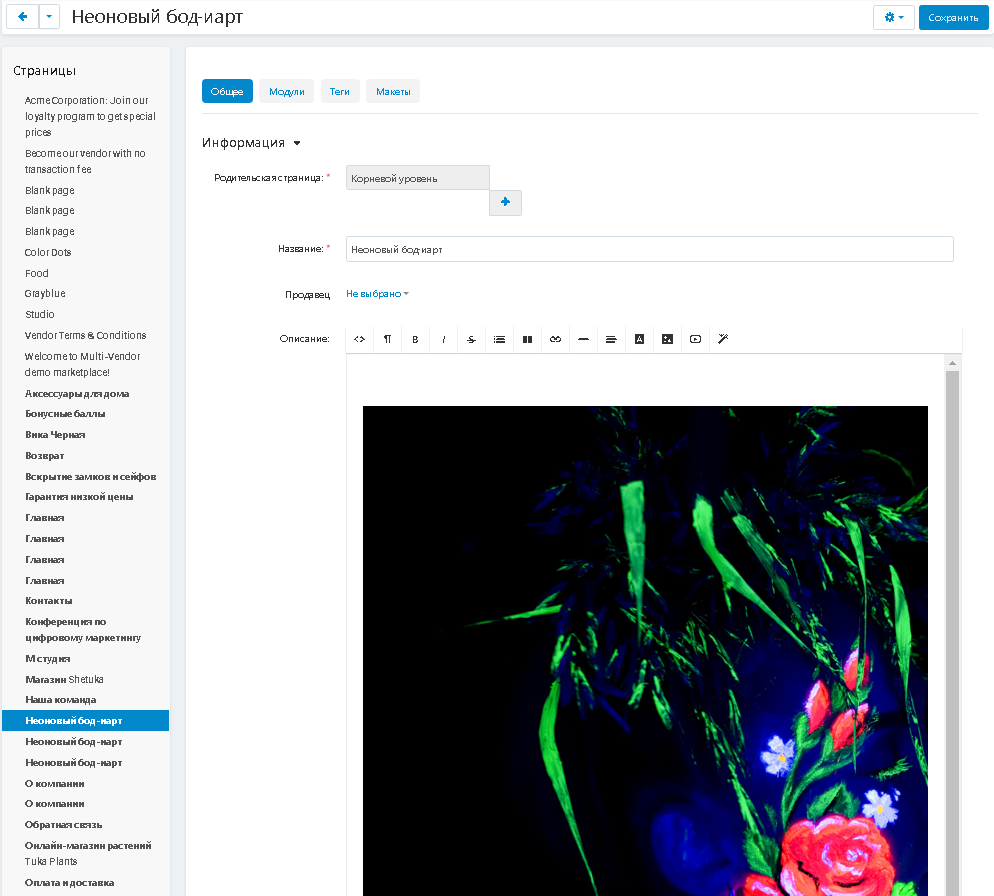
10. If you need to change the name of the page to display it in the general list of pages, then enter it in the "Page name" field.
11. If you wish, you can make changes to such content display items as "Page Title", "Description", "Meta Title", "Meta Description", "Meta Words".
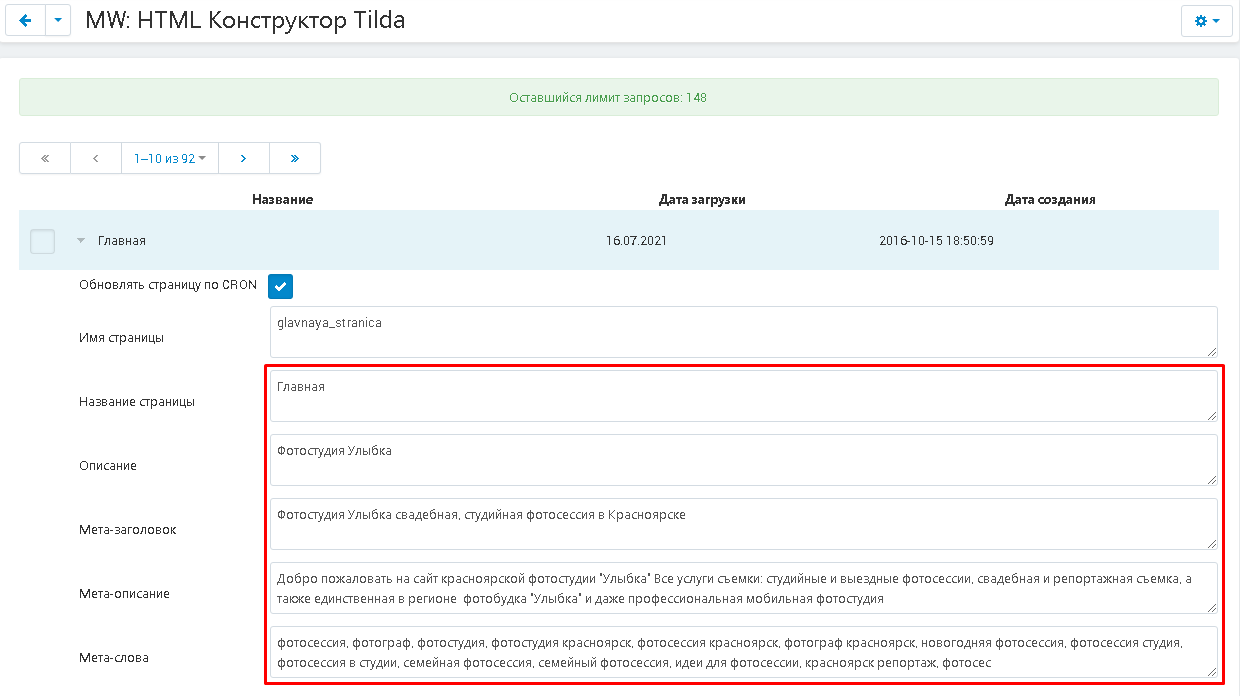
12. In the "Content" item, you can make changes to the code of the content itself.
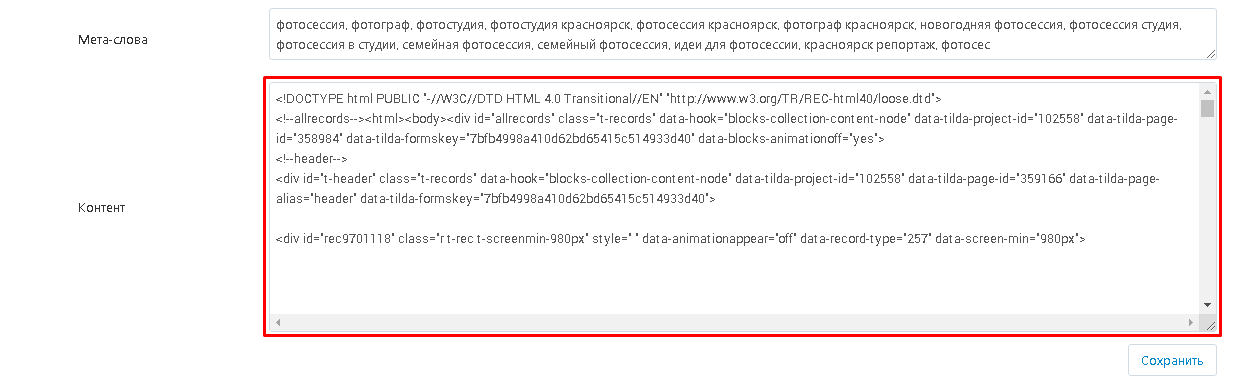
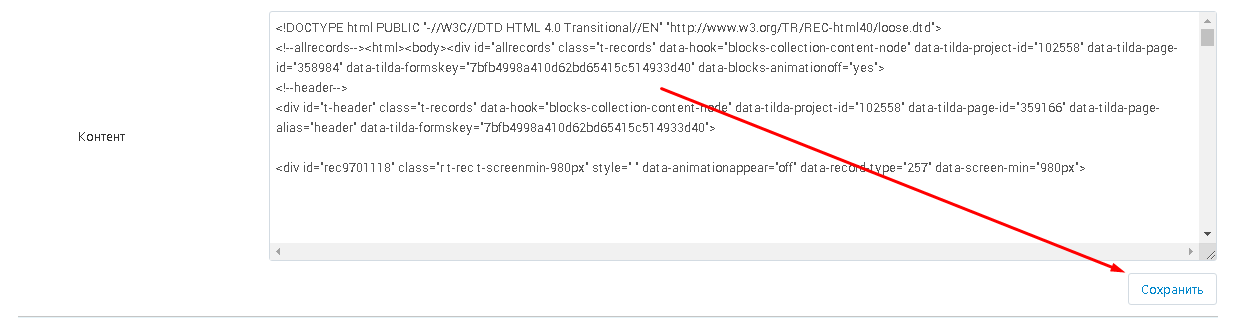
13. After making changes, click on the "Save" button immediately after the "Content" field.
14. To refresh the pages, click on the gear-shaped button and select the "Load project" function.

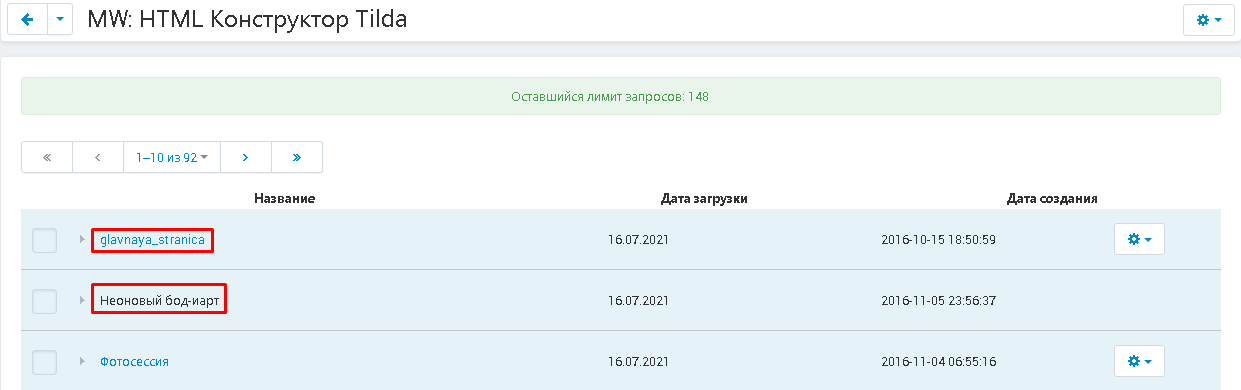
15. To convert the pages loaded from the project into content, select the necessary pages by ticking the checkboxes. Then click on the gear-shaped button and select the function "Create pages from selected".
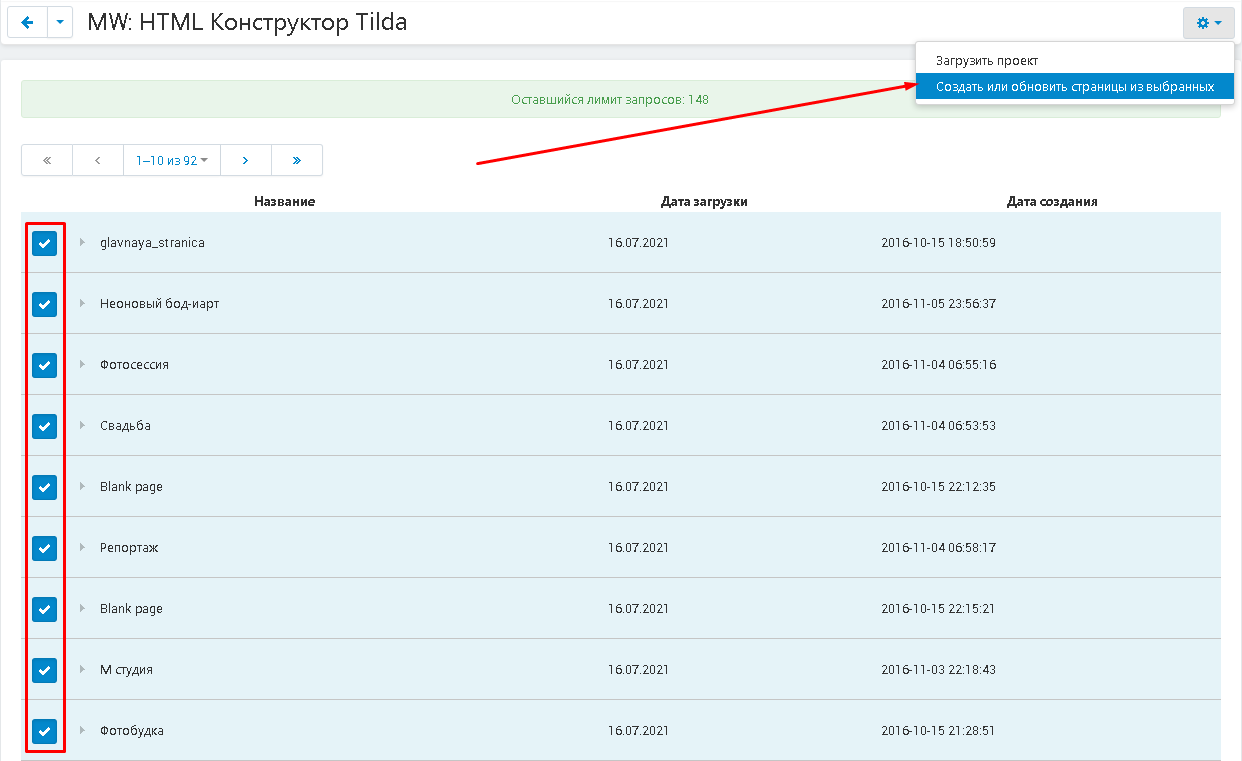
16. The pages will become active and change color to blue.
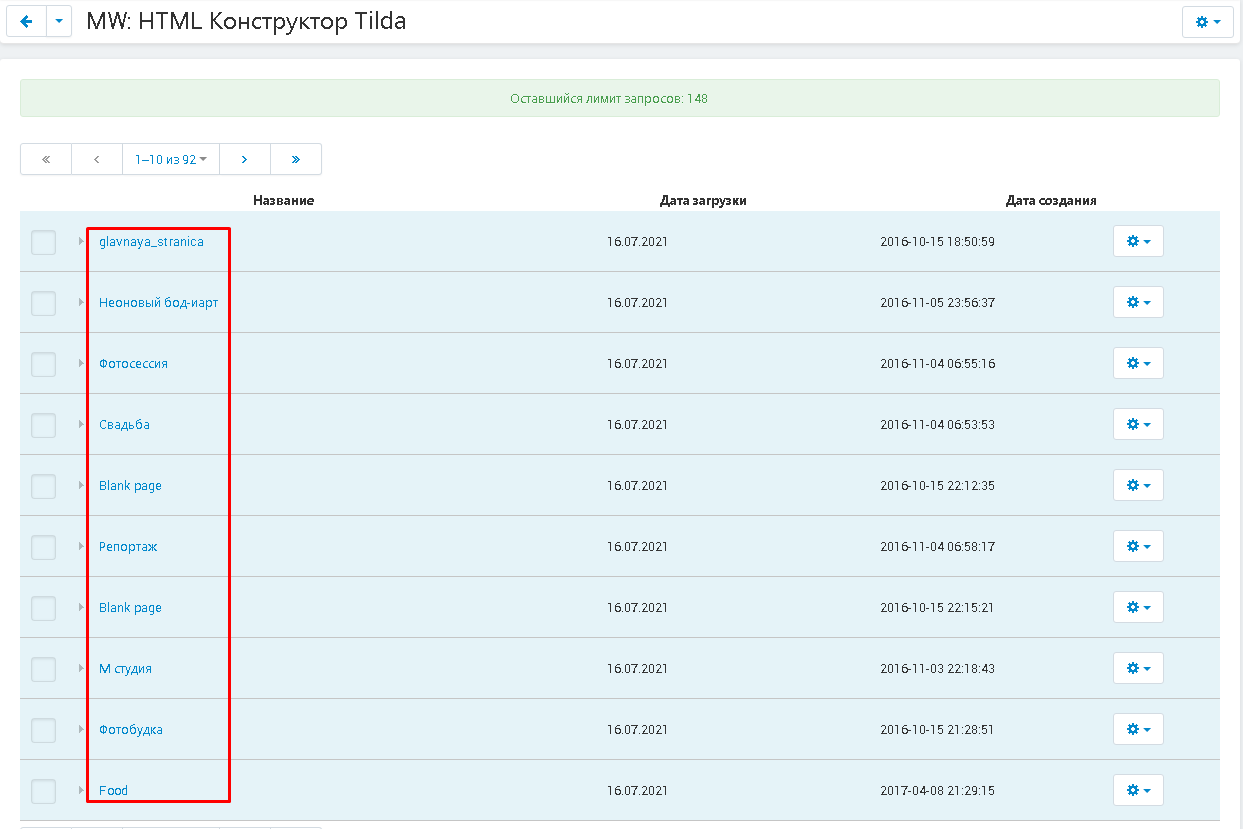
17. Click on the page title.
18. A page will open that you can edit.
19. To remove a link to a page, click on the gear-shaped button and select the "Unlink" function.
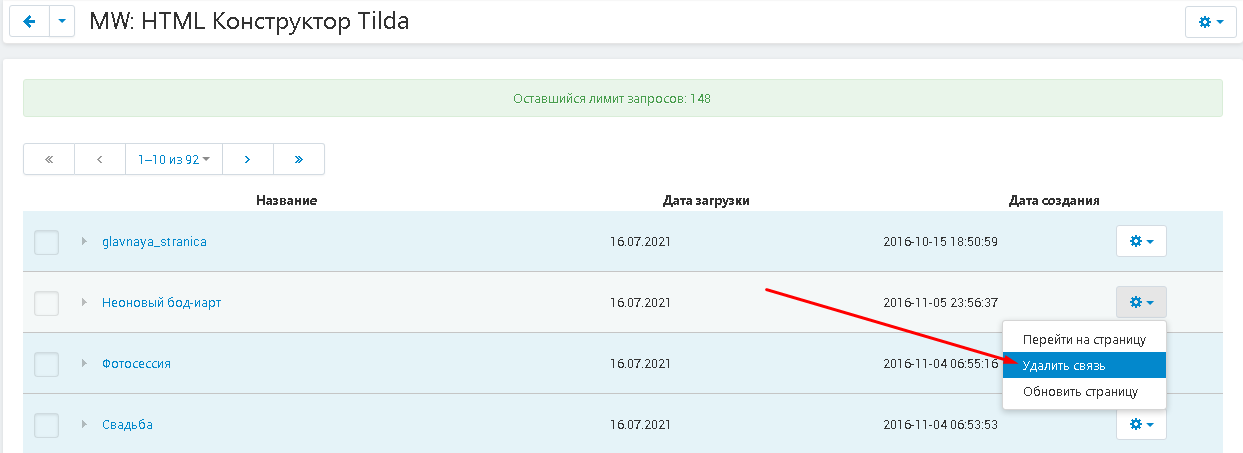
20. The page with the broken link will become inactive and black.
ADD CONTENT TO BLOCK
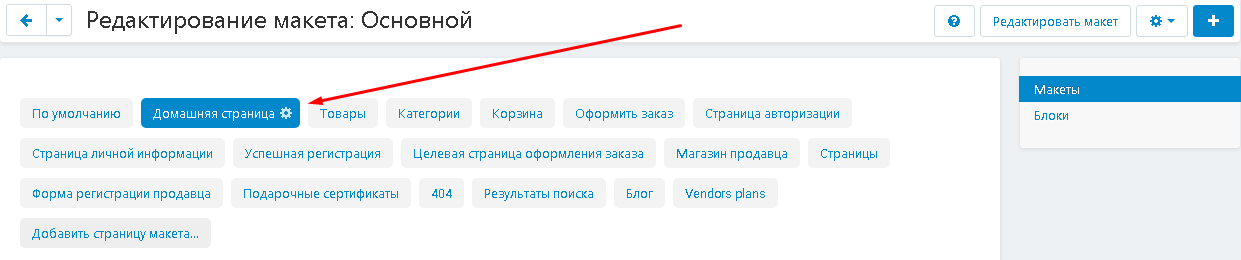
1. To insert the processed content into the storefront, go to the "Design" tab, select the "Layouts" and "Layouts" section.

2. Select the page where you want to add your content and go to the tab with its name.
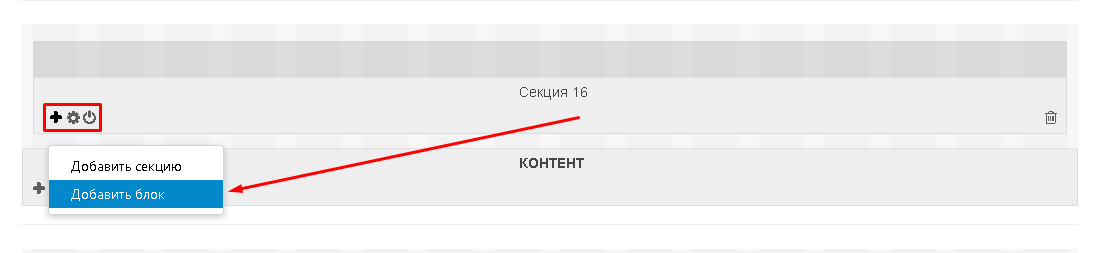
3. Before adding a block, create a section in which it will be located. To do this, drop down to the "Content" container. Move your cursor to the lower left corner. Three buttons for editing will appear. Click on the plus sign and select the "Add Section" function.

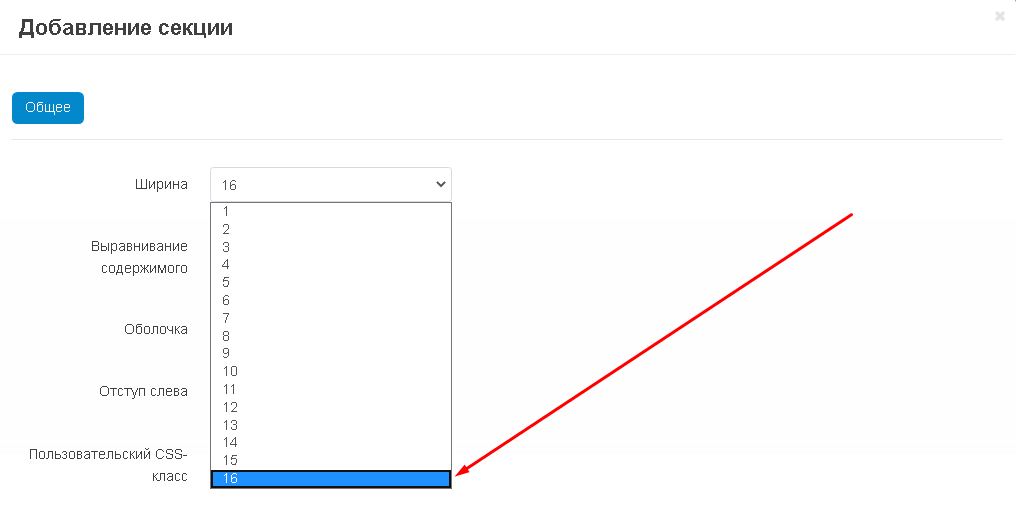
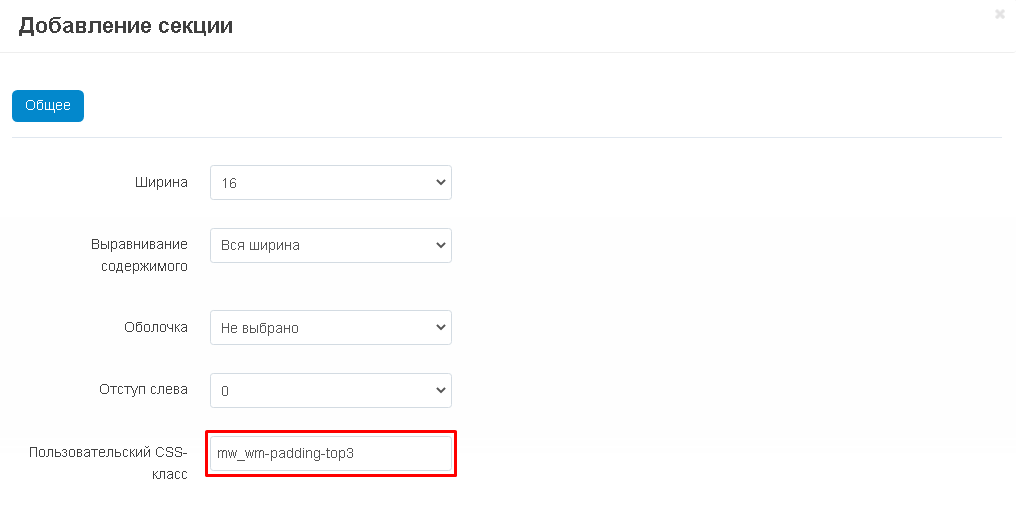
4. The section creation window will appear. Expand the additional menu in the "Width" item and select the value "16". This is the default width for the section being created.

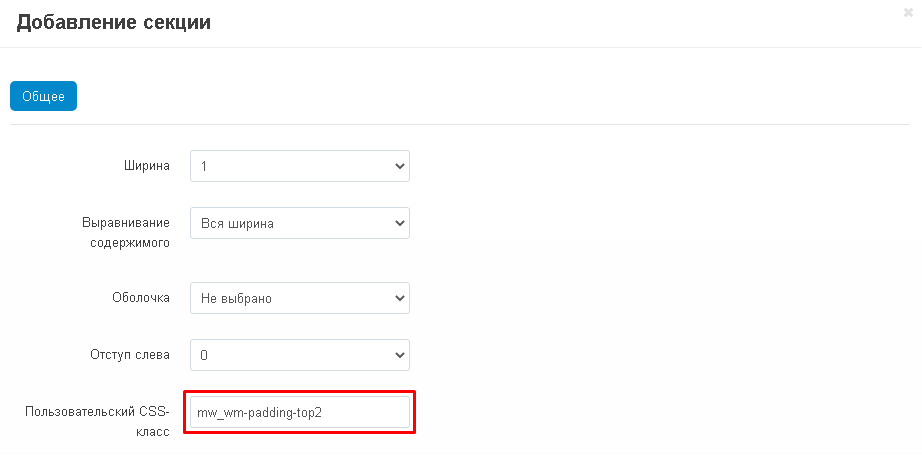
5. If you need to make indents between sections, then in the "Custom CSS class" field, insert the necessary classes without quotes separated by a space. In order to indent with the desired pixel value from 1 to 5. In the name of the below CSS classes, replace the number 1 with the desired one:
"mw_wm-padding-top1" - if you need to indent the top;
"mw_wm-padding-bottom1" - if you need to indent from the bottom;
"mw_wm-padding-left1" - if you need to indent to the left;
"mw_wm-padding-right1" - if you need to indent to the right.
6. Complete the section creation by clicking on the "Create" button in the lower right corner of the panel.

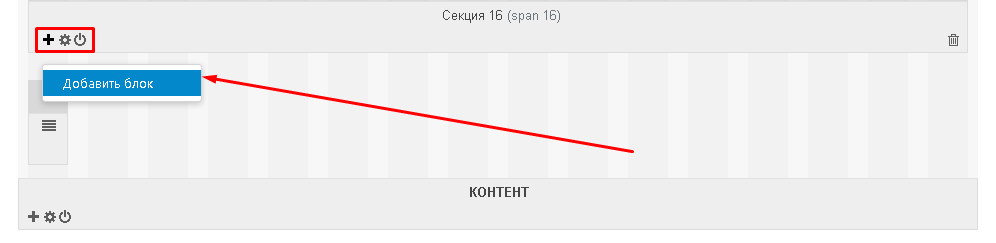
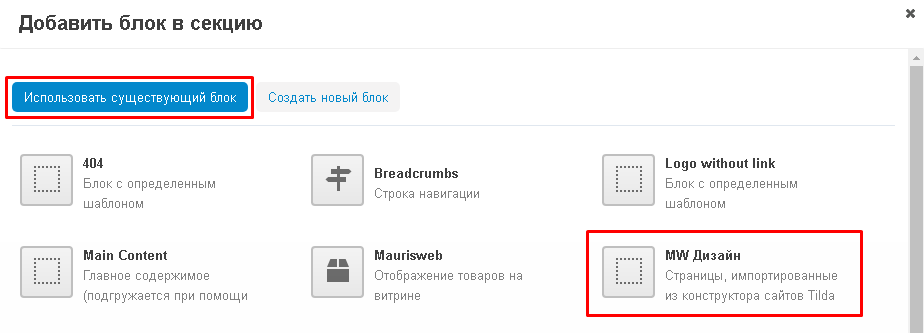
7. Now in the created section, click on the plus sign and select the "Add block" function.
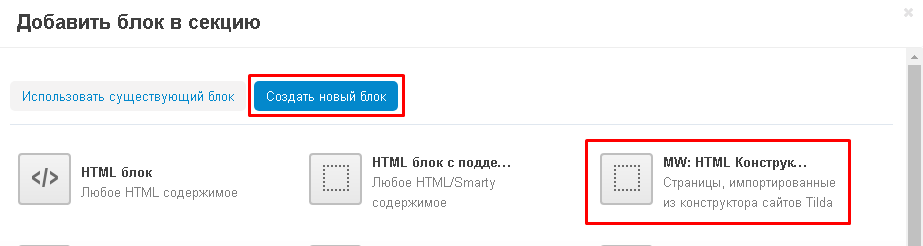
8. In the window that appears, go to the "Create a new block" tab and select the "MW: Tilda HTML Constructor" block.
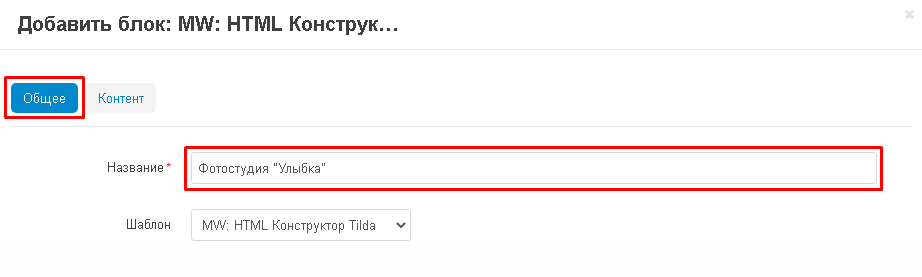
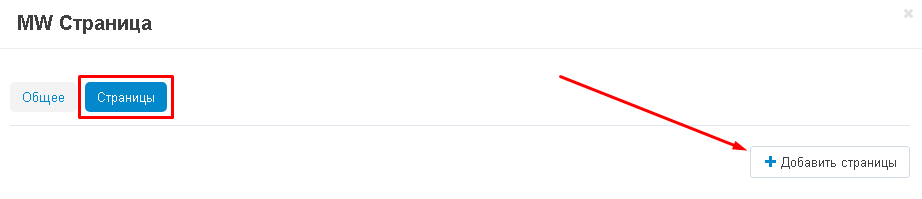
9. In the block creation window, select the "General" tab and enter the name in the "Name" item.
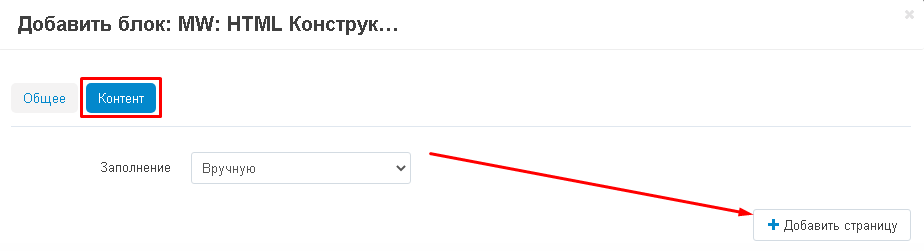
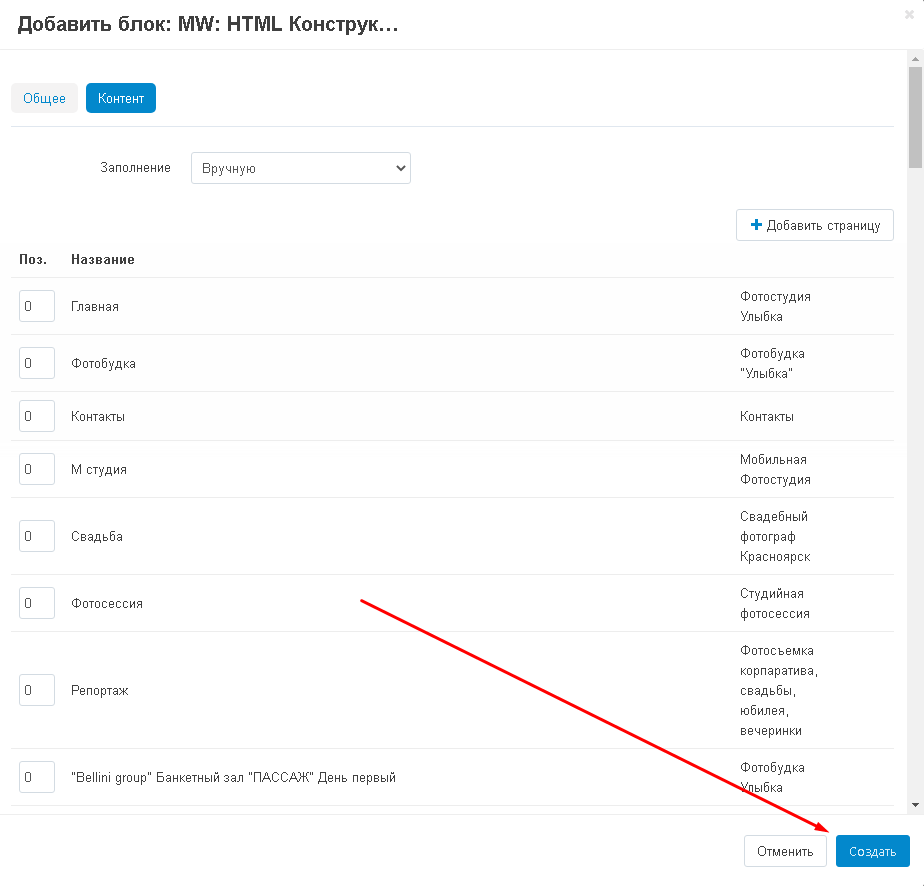
10. Go to the "Content" tab and click on the "Add page" button to select the pages for the block.
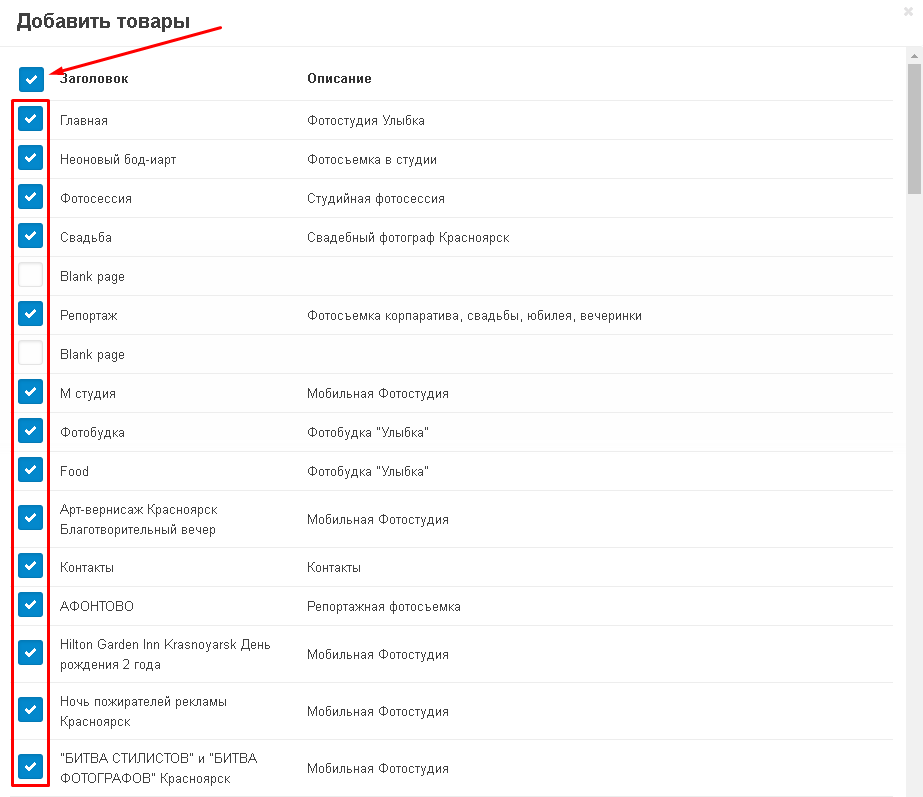
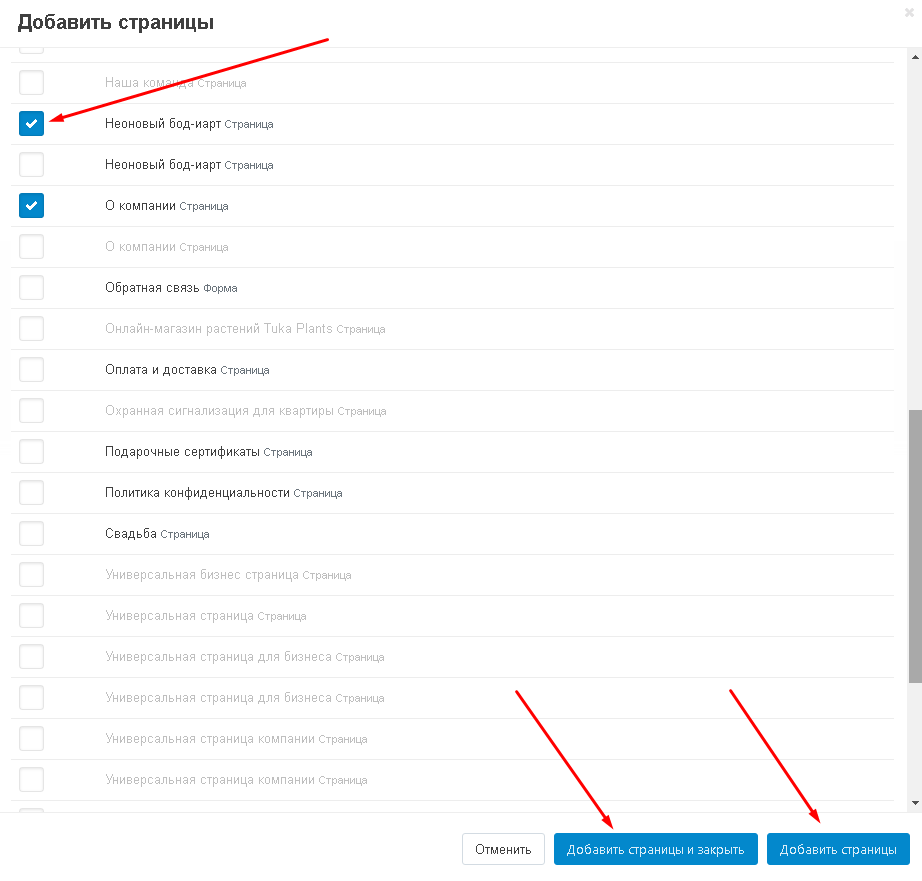
11. A list will appear with the pages loaded from the Tilda constructor. Select one or more by ticking them. Or check all by checking the box next to the title.
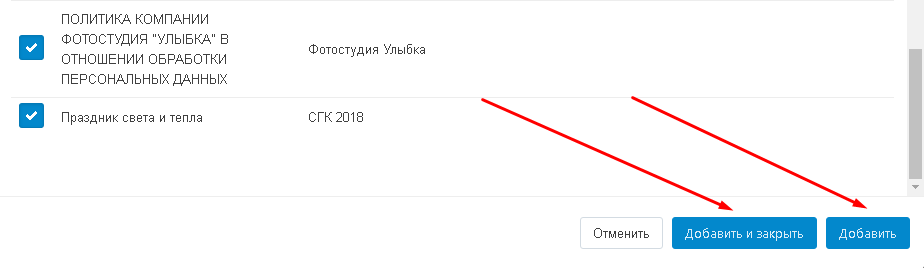
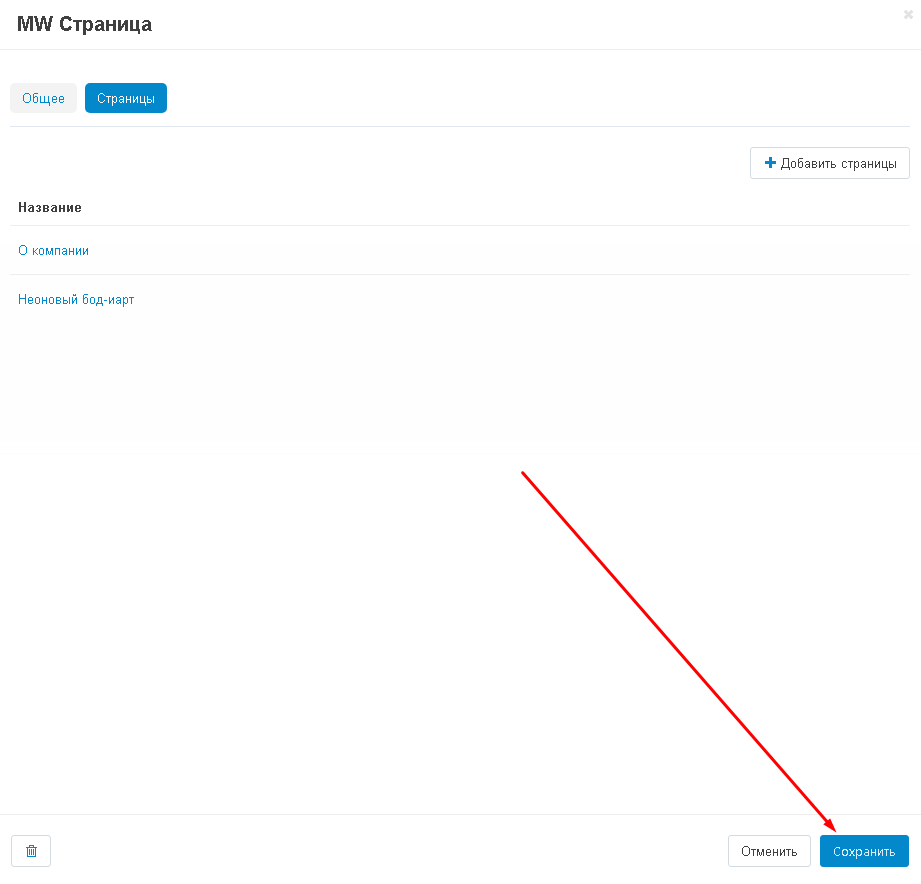
12. If you have added a block and want to return to the selection of pages, click on the blue "Add" button in the lower right corner of the window. If you are finished with the selection, click on the "Add and Close" button.
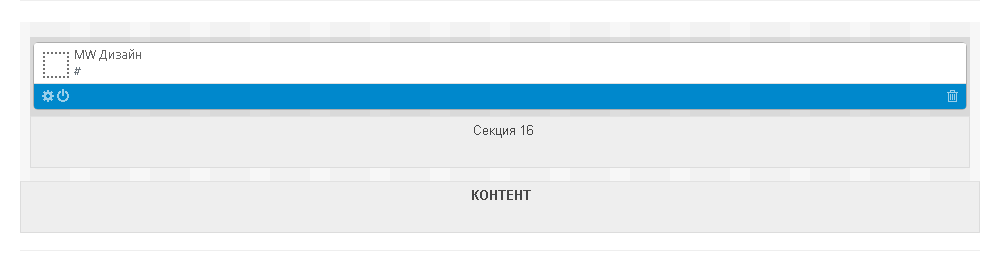
13. After you have added all the content you want, click on the blue "Create" button in the lower right corner.
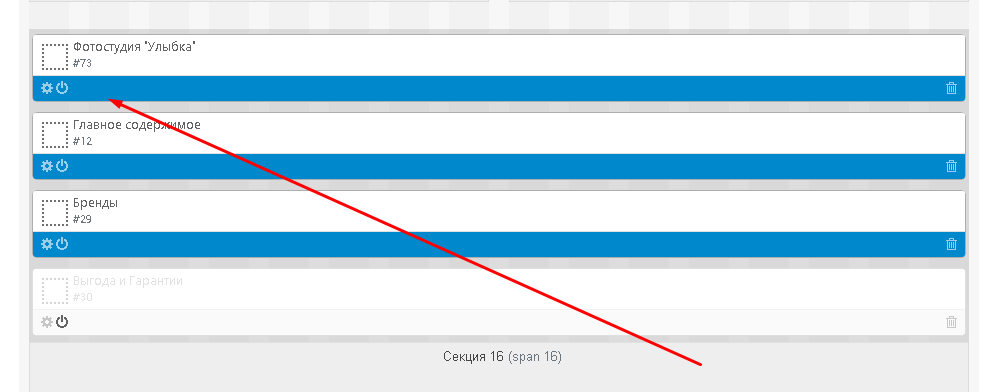
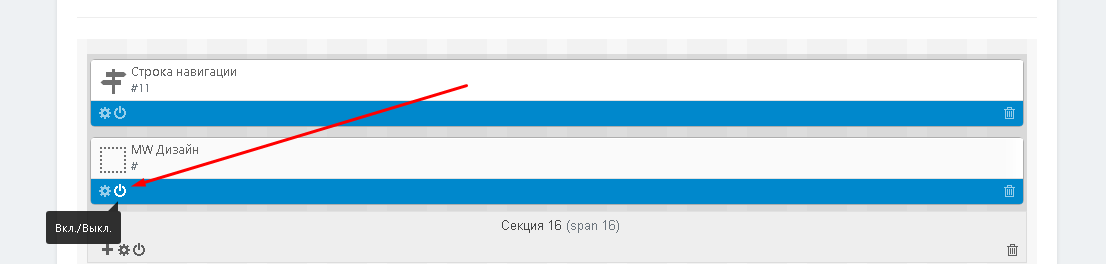
14. The created block will appear in the general list of section blocks. Using the buttons, you can edit or disable it.
VERIFICATION OF THE RESULT
1. Click on the gear-shaped button in the right corner of the panel and select the "Preview" function.
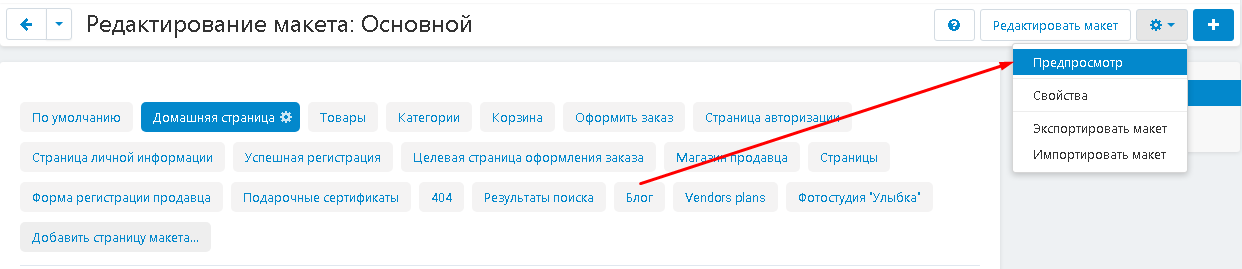
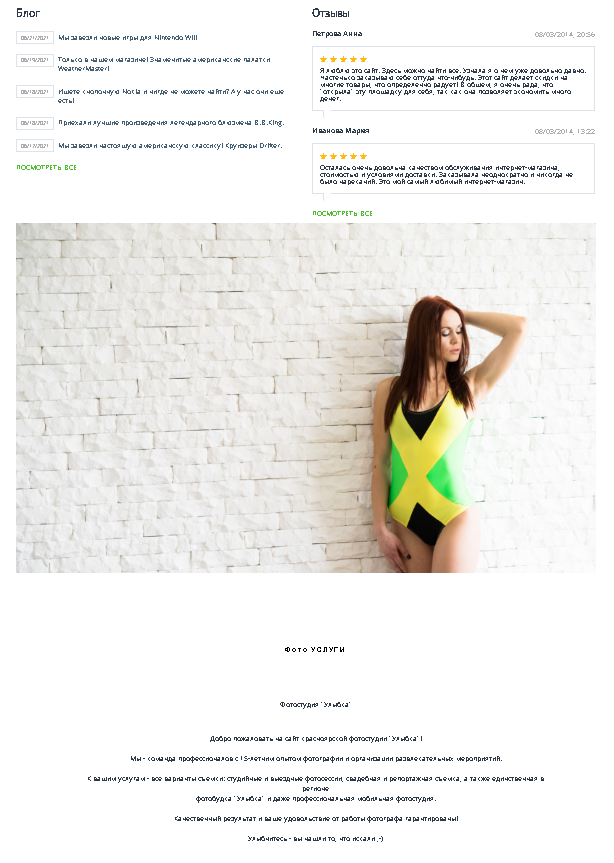
2. The content will appear in the part of the storefront where you added the block.
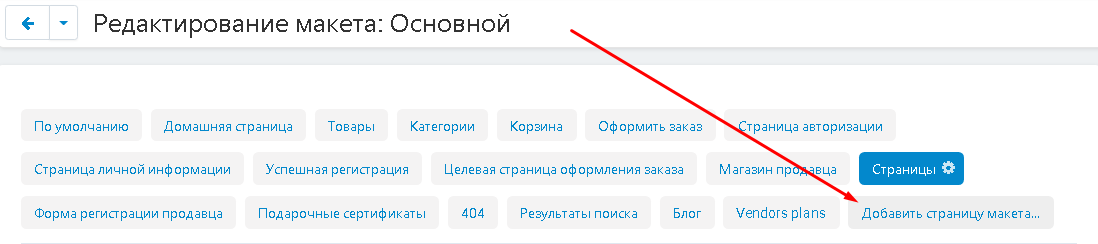
ADD CONTENT LIKE LAYOUT
1. To create a new page, select the "Add Layout Page" tab.
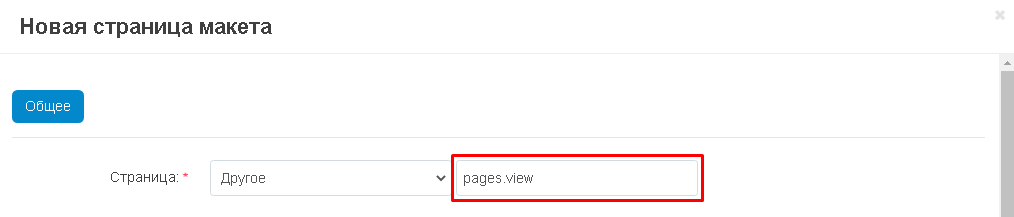
2. In the page creation window, in the second input field of the "Page" item, enter "pages.view" without quotation marks.
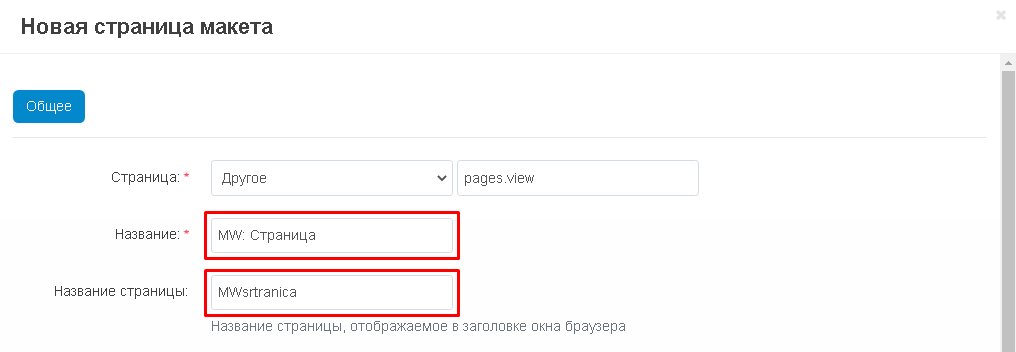
3. ВIn the "Name" field, enter the name of the item. Please note that the items "Title" and "Page title" are different fields. In the first case, this is the internal name of the page, in the second - what will be displayed in the browser window.
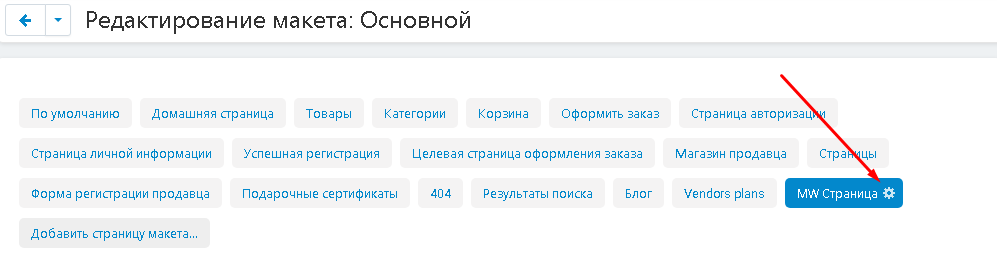
4. Complete the creation by clicking on the blue "Create" button in the lower right corner of the window.

5. Go to the page settings. To do this, click on the gear-shaped icon next to the tab name.
6. Go to the "Pages" tab and click on the "Add Pages" button.
7. Select the required pages by ticking them. To mark and continue the selection, click on the "Add pages" button in the lower right corner of the window, to complete the selection, click "Add pages and close".
8. After all pages have been added, click on the blue "Save" button in the lower right corner.
9. Now add a section. To do this, go down to the "Content" container and add a new section.

10. The section creation window will appear. Expand the additional menu in the "Width" item and select the value "16". This is the default width for the section being created.
11. If you need to make indents between sections, then in the "Custom CSS class" field, insert the necessary classes without quotes, separated by a space. In order to indent with the desired pixel value from 1 to 5. In the name of the below CSS classes, replace the number 1 with the desired one:
"mw_wm-padding-top1" - if you need to indent the top;
"mw_wm-padding-bottom1" - if you need to indent from the bottom;
"mw_wm-padding-left1" - if you need to indent to the left;
"mw_wm-padding-right1" - if you need to indent to the right.
12. Click on the blue "Create" button in the lower right corner of the window.

13. Now you can add a block to the created section, click on the plus sign and select "Add Block".
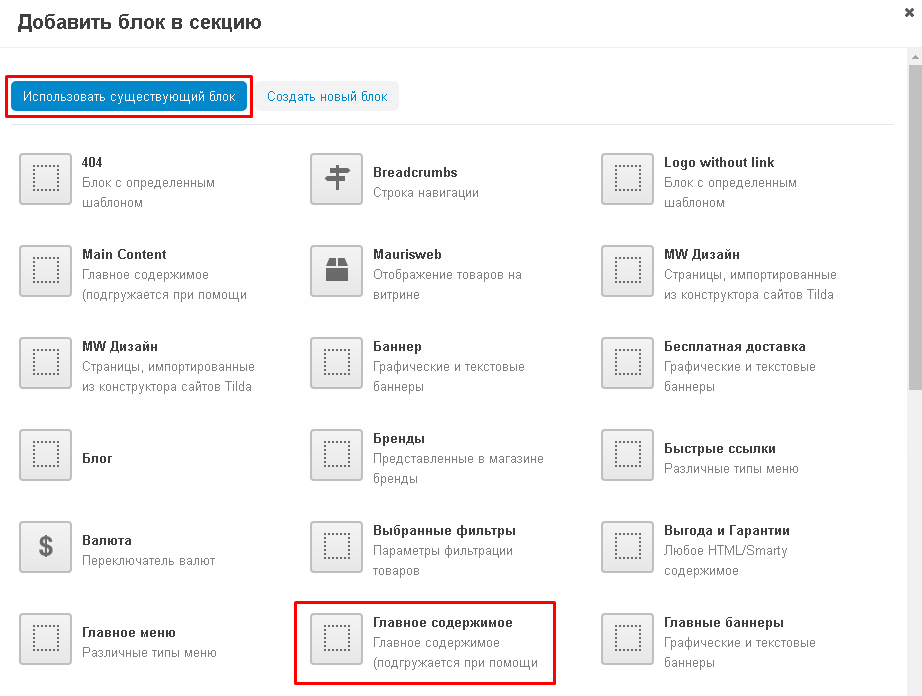
14. In the window that appears, go to the "Use an existing block" tab and select the "Main content" block.
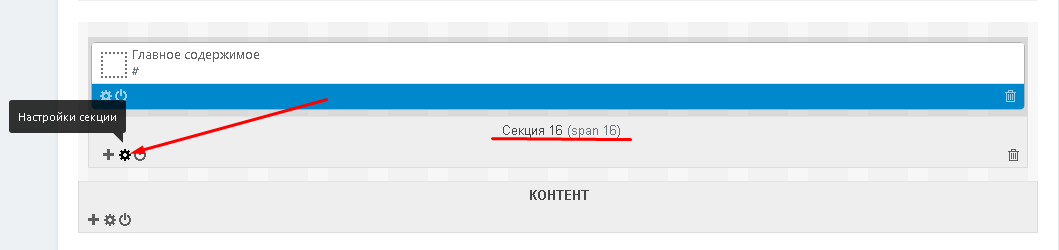
15. The new block will appear in the general layout. Using the buttons, it can be edited or turned off.

BLOCKS IN THE FULL WIDTH
The "Full Width Blocks" module comes with the kit and is used to stretch blocks to the full width of the screen. If you have the Alexbranding "UhiTheme2" or "YOUPI" modules installed, then you do not need to enable the module.
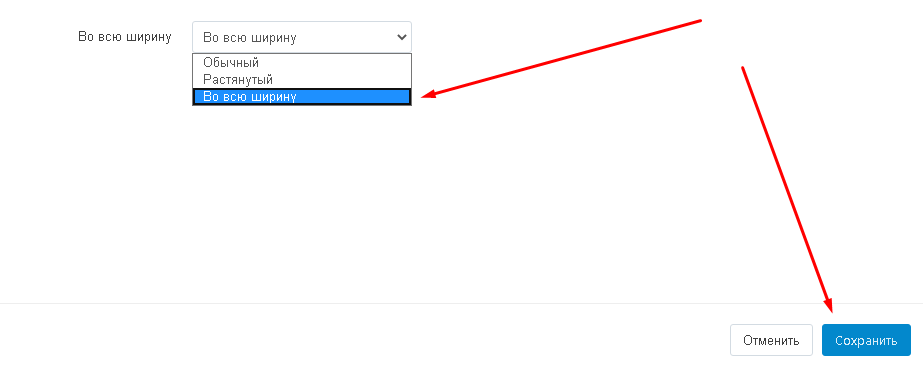
1. To stretch the blocks in full width, go to the settings of the required section.
2. Go to the item "Full Width", expand the additional menu and select the value "Full Width". Save your changes.
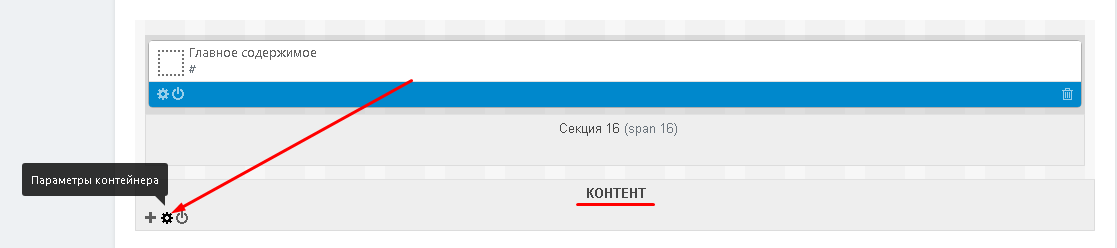
3. Go down to the "Content" container and go to the container settings.
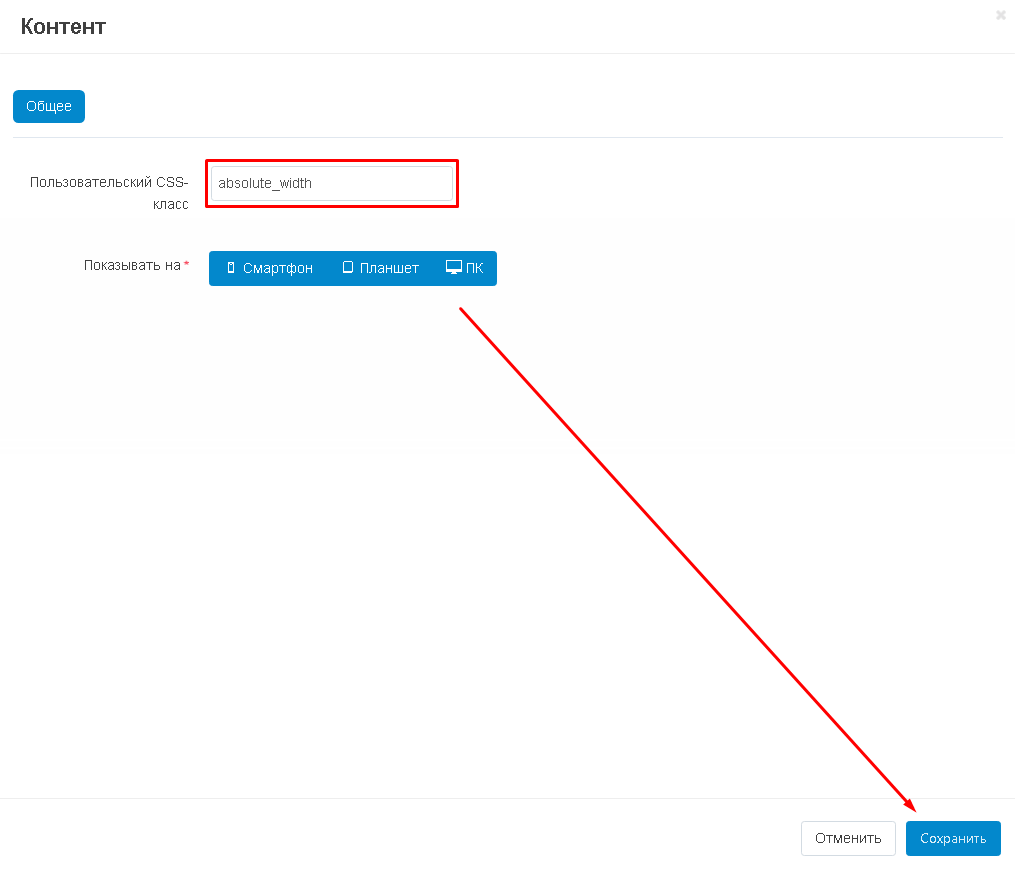
4. Under "Custom CSS Class", write "absolute_width" without quotes.
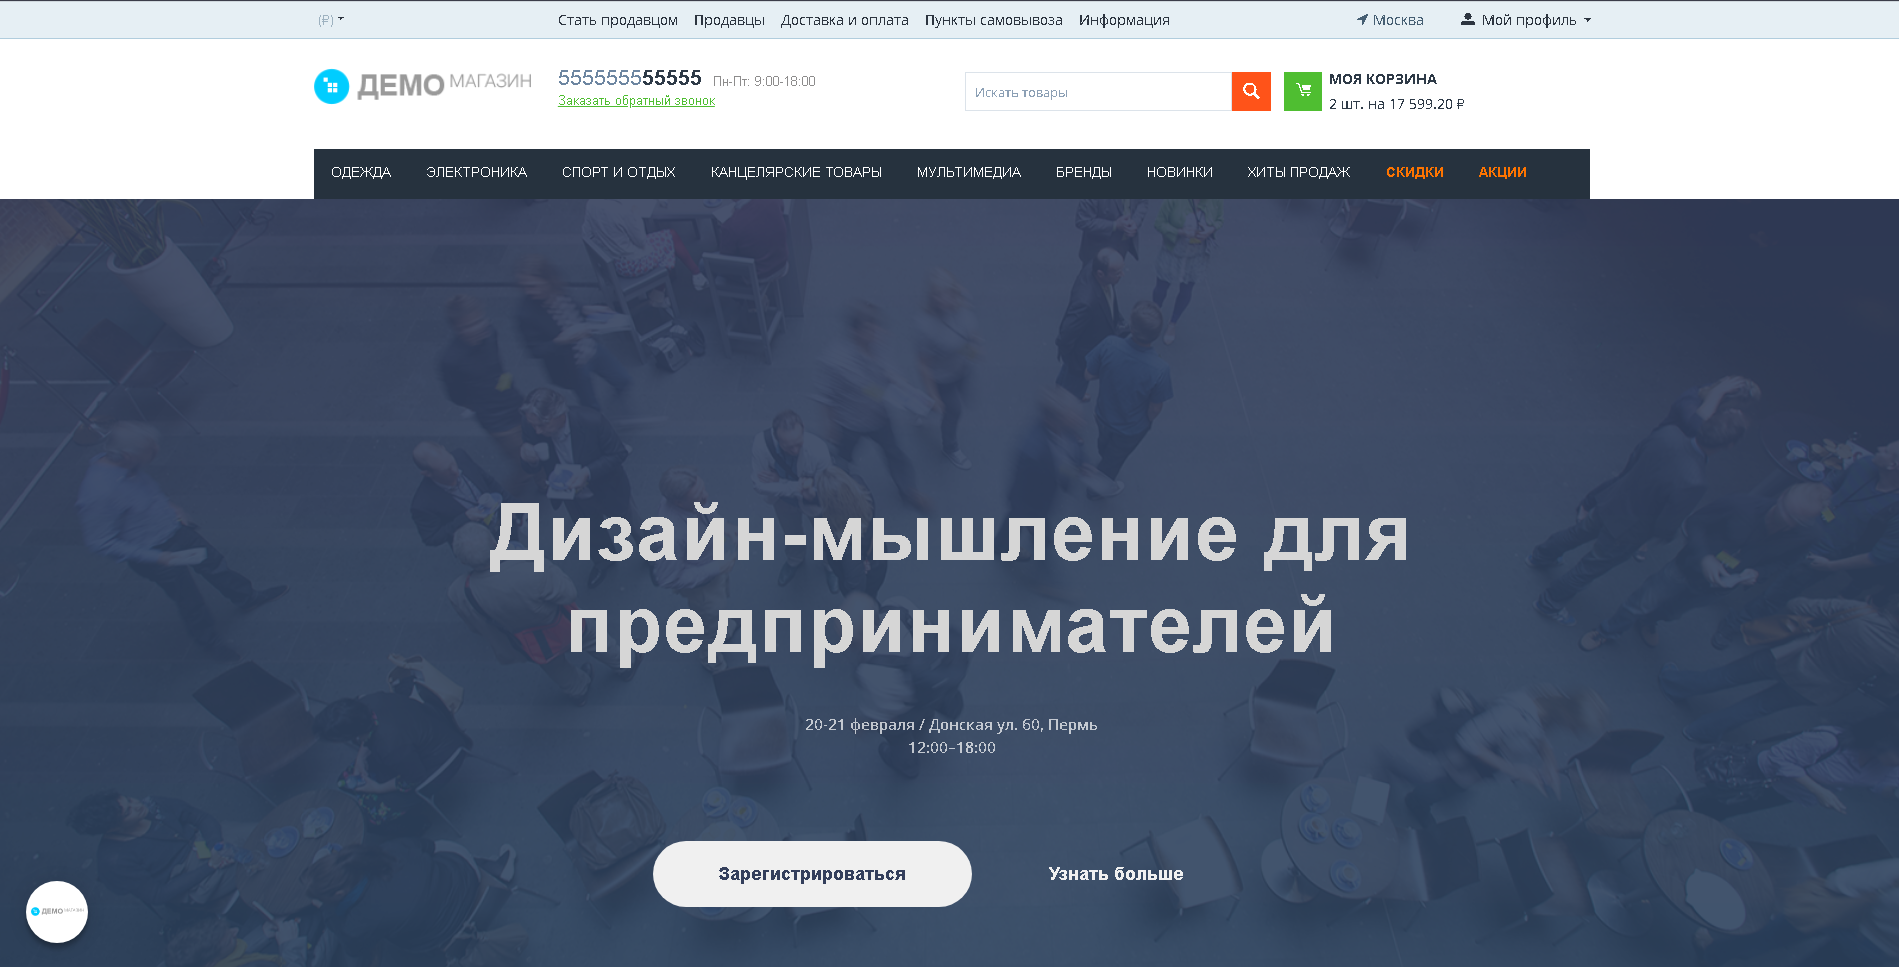
The content will be published on a separate page, stretched across the full width of the screen.
ADD CONTENT AS A CATEGORY
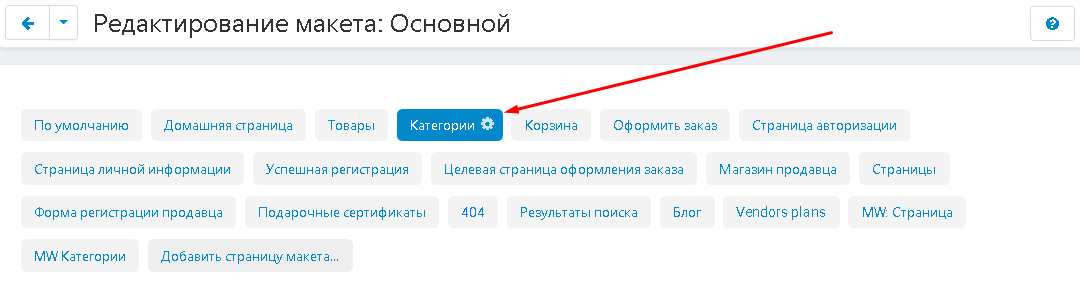
1. On the layout edit page, select the "Add Layout Page" tab.
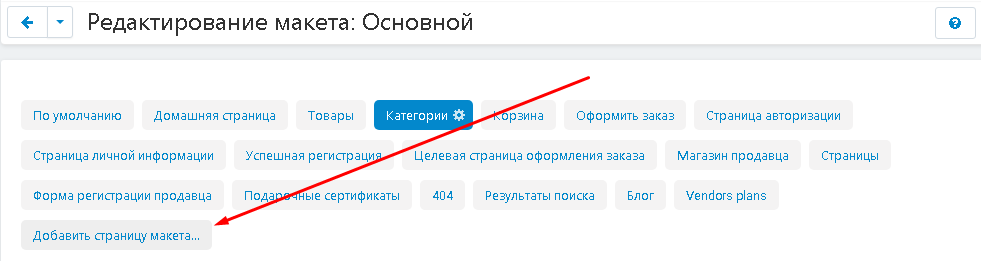
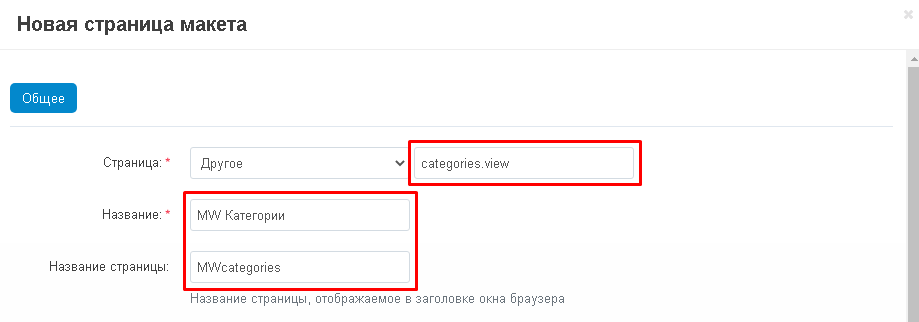
2. In the page creation window, in the second input field of the "Page" item, enter without quotes or "categories.view". In the "Name" field, enter the name of the item. Please note that the items "Title" and "Page title" are different fields. In the first case, this is the internal name of the page, in the second, it will be reflected in the browser window.
3. When finished, click the blue "New" button in the lower right corner of the window.

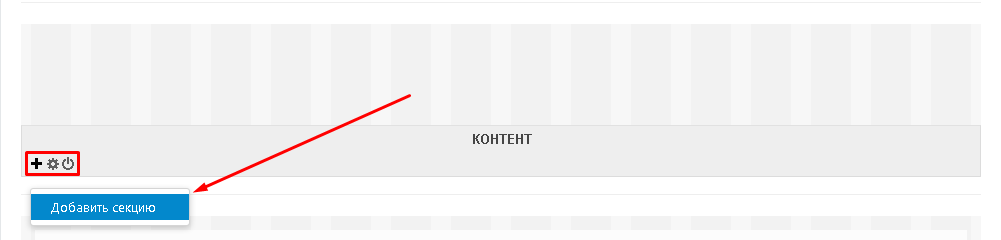
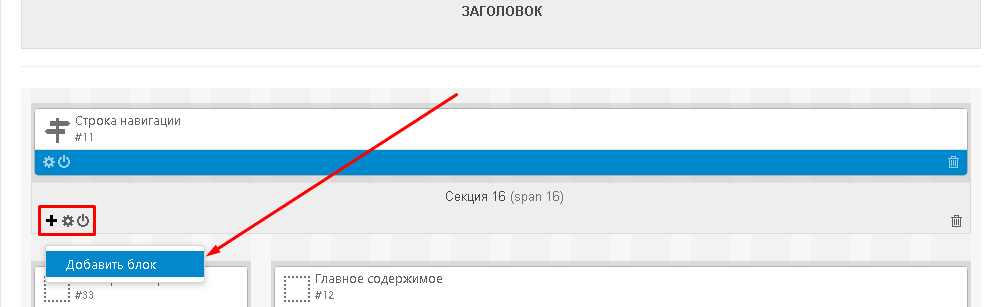
4. Scroll down to the "Content" section. Click on the plus button and select the "Add Section" function.
5. Move the cursor to the left corner of the created section, click the plus sign button and select the "Add block" function.
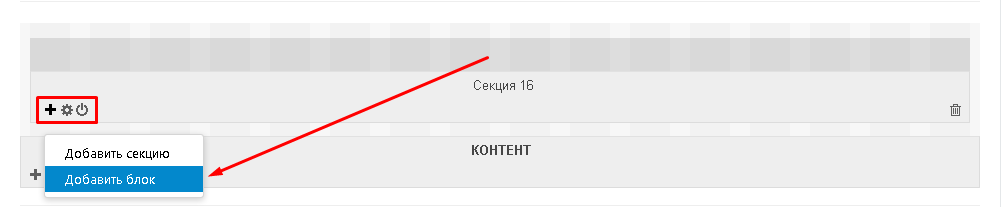
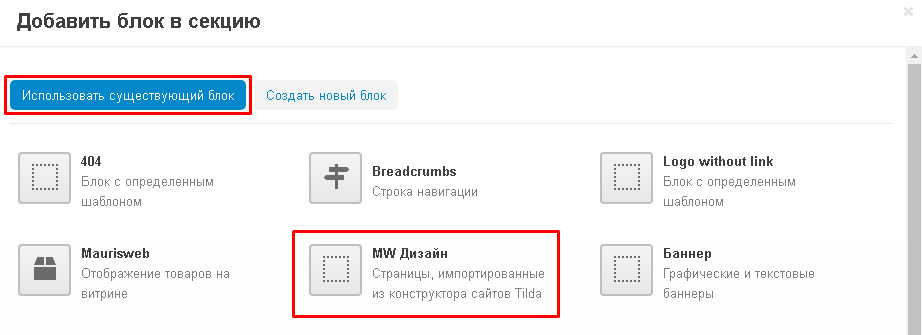
6. Create a new block or use an already created one, into which the pages from Tilda are imported.
7. The new block will appear in the general layout. Using the buttons, it can be edited or turned off.
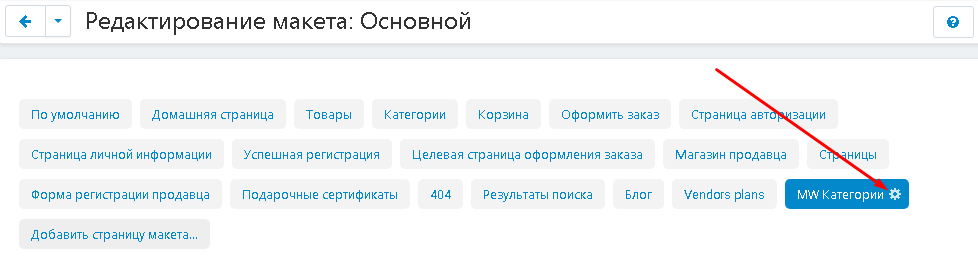
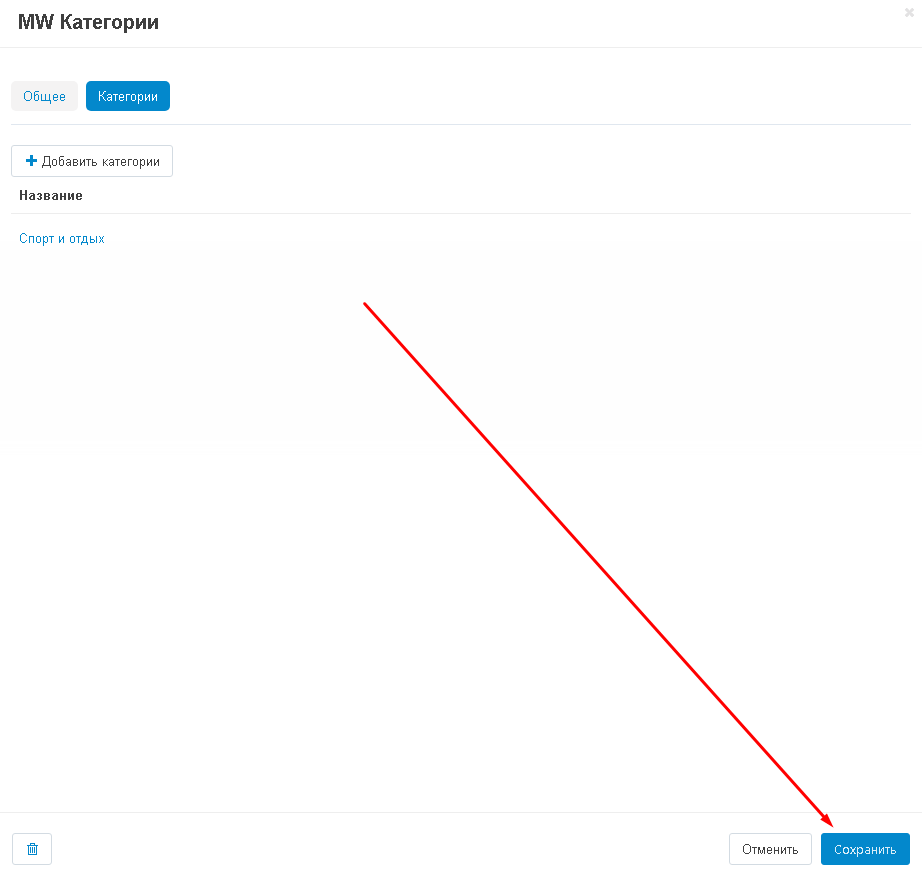
8. For correct display, a new page must be linked to a category. To do this, go to the tab settings by clicking on the gear next to the name.
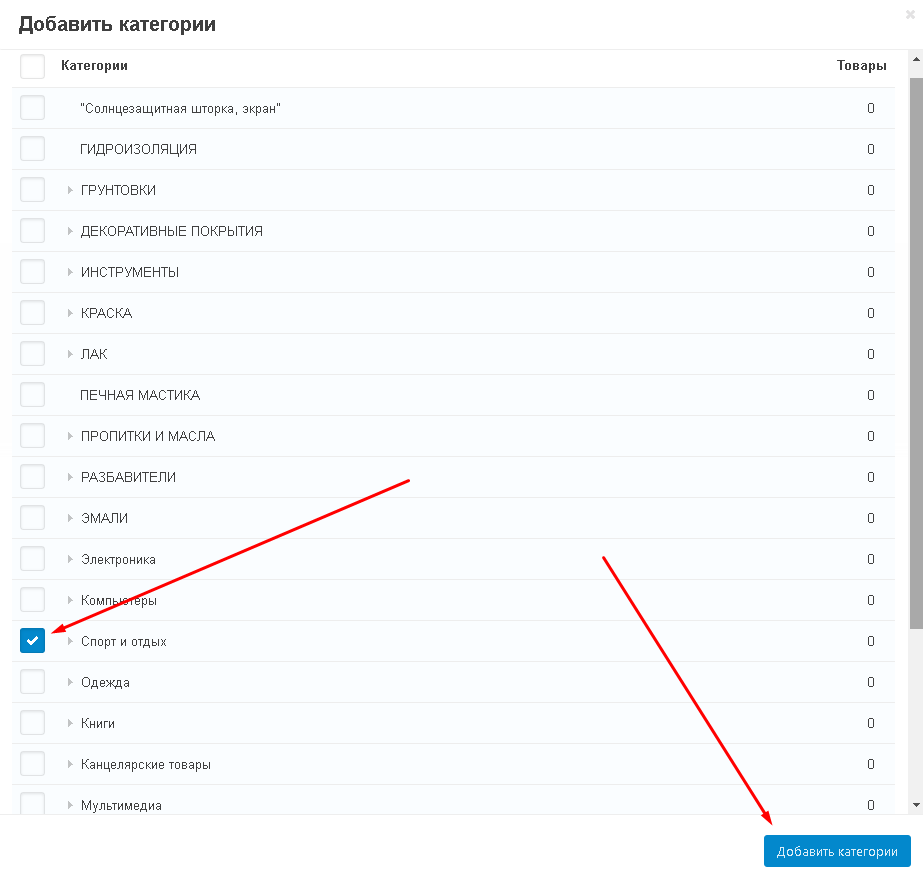
9. Go to the "Categories" tab and click on the "Add Categories" button.

10. Select one or more categories by ticking them and click on the blue "Add Categories" button in the lower right corner.
11. Save your changes.
The content will be displayed on the category page (see the Full Width Blocks section on how to stretch the page to full width).

CONTENT FOR INDIVIDUAL CATEGORY
You can also create custom content for a category.
1. Go to the "Categories" tab.
2. Select the section to which you want to add content, click on the plus button and select the "Add block" function.
3. Use an existing block with imported pages from the Tilda constructor or create a new one.
4. Turn off the unit by pressing the corresponding button.
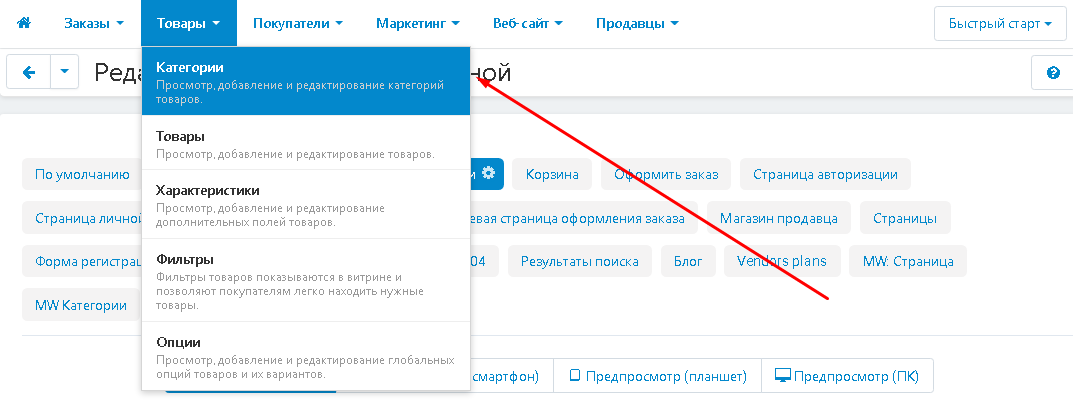
5. Go to the "Products" tab and select the "Categories" section.
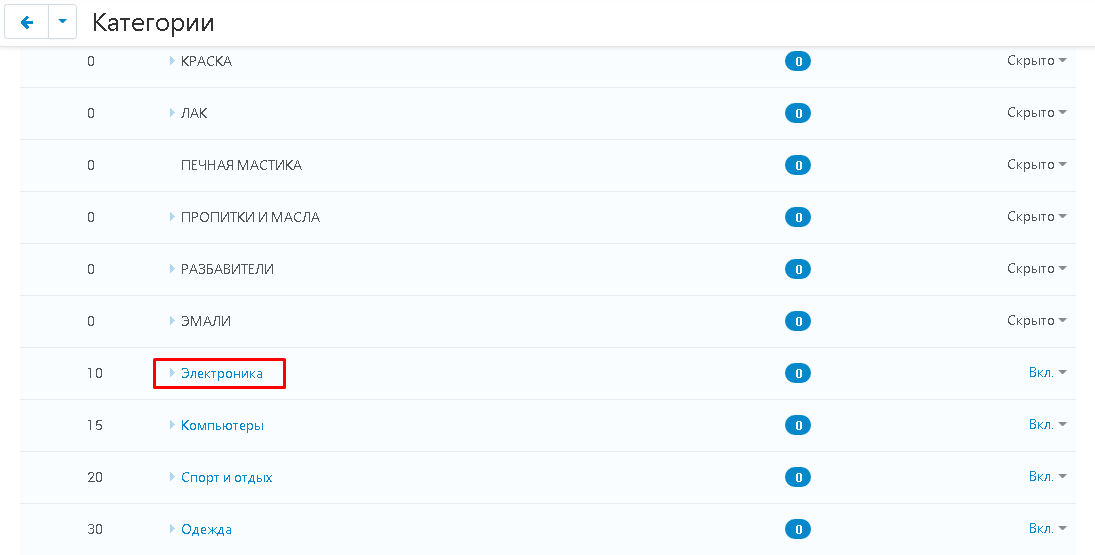
6. Select a category and click on its name to go inside.
7. Go to the "Layouts" tab.

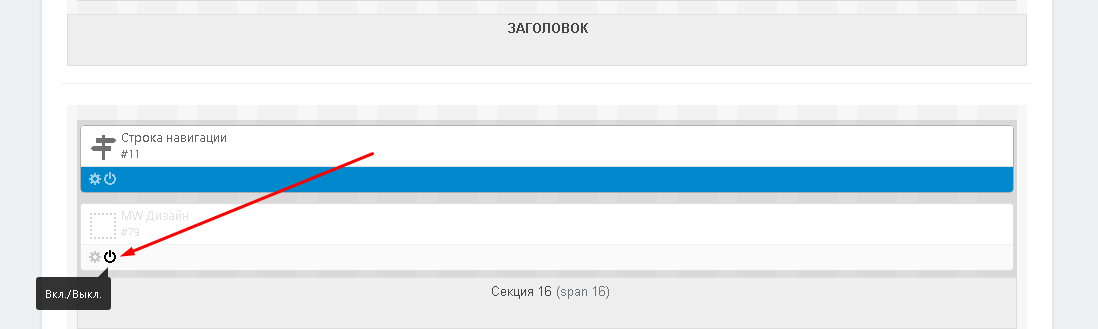
8. Scroll down to the section where the block was added and turn it on.
9. The content will be published on the category page.

10. At the same time, for other categories it will not be applied.
At the same time, for other categories it will not be applied.